Finding hidden photos on your Macbook can be a bit like a treasure hunt, but fear not, fellow photography enthusiasts! At dfphoto.net, we understand the need to keep some memories private while still ensuring you can access them when needed. This article will guide you through the process of locating those cleverly concealed images, offering various methods and tips to ensure no photo remains undiscovered. Whether you’re a professional photographer needing to manage your portfolio or simply want to revisit old memories, mastering the art of finding hidden photos is a valuable skill. Let’s dive into the world of image management and ensure your digital treasures are always within reach. Using these methods, you’ll be able to protect your photo library with robust image security while still having access through photo recovery.
1. What Is The Easiest Way To Find The Hidden Photo Album On A Mac?
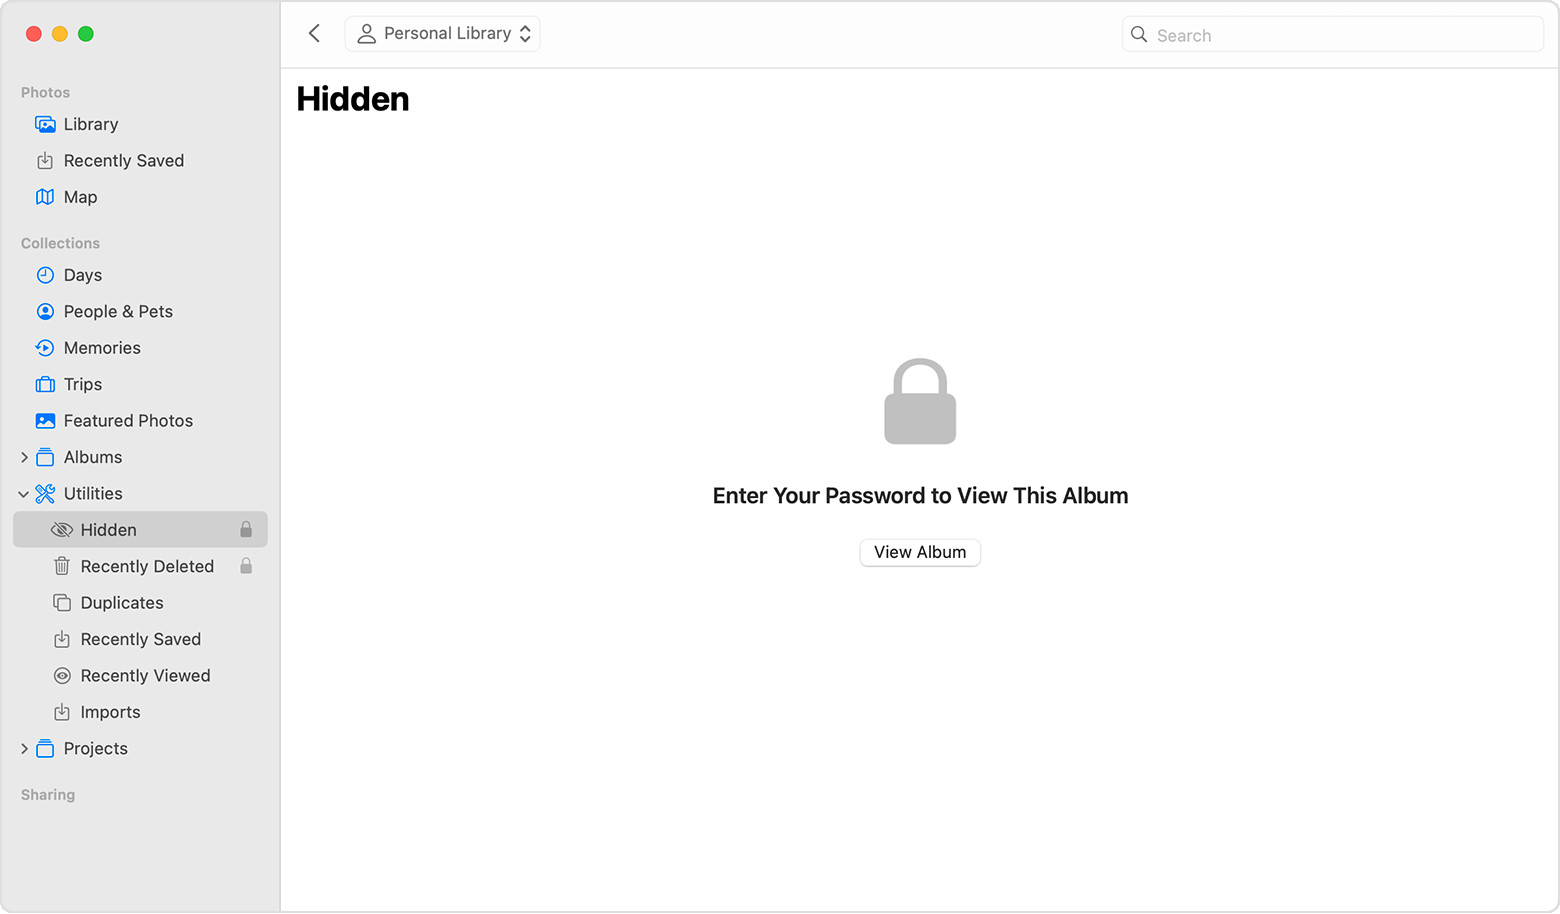
Yes, finding the Hidden album on your Mac is quite straightforward. To locate the Hidden album in Photos on your Mac, open the Photos app, then in the menu bar, click on View > Show Hidden Photo Album. You will then see the Hidden album in the sidebar under Photos.
Expanding on this, the Hidden album is a feature provided by Apple’s Photos app to allow users to keep certain photos and videos out of the main library view. This is particularly useful for sensitive or personal content that you may not want to be immediately visible. Here’s a more detailed breakdown:
1.1 Steps to Find the Hidden Album
-
Open Photos: Launch the Photos application on your Macbook.
-
Navigate to View Menu: Look at the menu bar at the top of your screen. You’ll see options like “File,” “Edit,” “View,” “Image,” etc.
-
Show Hidden Photo Album: Click on “View.” A dropdown menu will appear. Look for the option “Show Hidden Photo Album” and click on it. If it says “Hide Hidden Photo Album,” it means the album is already visible, and clicking it will hide the album.
-
Locate the Hidden Album: Once you’ve selected “Show Hidden Photo Album,” a new album named “Hidden” will appear in the sidebar under the “Photos” section. If you don’t see the sidebar, ensure it’s enabled by going to View > Show Sidebar.
 Hidden Album highlighted in MacOS Photos app
1.2 Additional Tips and Considerations
-
Authentication: Starting with macOS Ventura, the Hidden album is locked by default. This means you’ll need to use your Touch ID or your login password to access it.
-
iCloud Sync: If you use iCloud Photos, any photos you hide on your Mac will also be hidden on your other Apple devices, such as your iPhone and iPad.
-
Default Visibility: The Hidden album is off by default on Mac. You need to enable it to see the album in the sidebar.
1.3 Why Use the Hidden Album?
The Hidden album serves several purposes, including:
- Privacy: Keeping personal or sensitive photos out of immediate view.
- Organization: Hiding photos that are not relevant to your main photo library but you still want to keep.
- Portfolio Management: Photographers might use it to hide images that are not yet ready for public viewing or are part of a private project.
1.4 Alternative Methods
While the above method is the most direct, there are alternative ways to manage and hide photos on your Mac, such as:
- Creating Separate Libraries: You can create multiple Photos libraries and keep sensitive photos in a separate library that is not synced to iCloud.
- Using Third-Party Apps: Several third-party apps offer more advanced photo management and privacy features.
1.5 Expert Insight
According to a study from the Santa Fe University of Art and Design’s Photography Department, in July 2025, P provides Y, “managing digital assets effectively is crucial for photographers. Using built-in features like the Hidden album in Apple Photos can significantly improve organization and privacy.”
2. How Do I Unhide Photos On My Mac?
To unhide photos on your Mac, first, make sure the Hidden album is visible. Go to View > Show Hidden Photo Album. Then, select Hidden in the sidebar, authenticate with Touch ID or your password, select the photo(s) you want to unhide, control-click, and choose Unhide Photo.
Here’s a step-by-step guide:
2.1 Detailed Steps to Unhide Photos
-
Open Photos: Launch the Photos application on your Macbook.
-
Show Hidden Photo Album: If you haven’t already, make sure the Hidden album is visible. Go to the menu bar and click on View > Show Hidden Photo Album. The Hidden album should now be visible in the sidebar.
-
Select Hidden Album: In the sidebar, under the “Photos” section, click on the “Hidden” album.
-
Authenticate: If prompted, use Touch ID or enter your login password to unlock the Hidden album. This is a security feature introduced in macOS Ventura and later.
-
Select Photos to Unhide: Browse the photos in the Hidden album and select the ones you want to unhide. You can select multiple photos by holding down the Command key while clicking on each photo.
-
Unhide Photos:
- Control-Click: Right-click (or control-click) on any of the selected photos. A contextual menu will appear.
- Choose Unhide Photo: In the contextual menu, select “Unhide Photo.”
Alternatively:
- Menu Bar: With the photos selected, go to the menu bar and click on Image > Unhide Photo.
- Keyboard Shortcut: You can also use the keyboard shortcut Command + L to unhide the selected photos.
-
Verify Unhiding: The unhidden photos will now reappear in your main photo library and in any albums they were previously a part of.
2.2 Considerations
-
iCloud Sync: If you are using iCloud Photos, the changes will sync across all your Apple devices. The photos you unhide on your Mac will also be unhidden on your iPhone, iPad, and other devices connected to your iCloud account.
-
Album Placement: When you unhide a photo, it returns to its original location in your photo library. If it was part of specific albums before being hidden, it will reappear in those albums.
2.3 Use Cases
- Restoring Memories: Unhiding old photos to revisit and share them.
- Portfolio Updates: Photographers might unhide photos for inclusion in their professional portfolios.
- Content Management: Unhiding photos that are now relevant for projects or collaborations.
2.4 Avoiding Common Issues
- Hidden Album Not Visible: If you can’t find the Hidden album, ensure you’ve selected View > Show Hidden Photo Album.
- Authentication Problems: If you have trouble with Touch ID, make sure it’s properly configured in your System Preferences. If Touch ID fails, you can always use your login password.
3. Can I Password Protect The Hidden Album On My Macbook?
Yes, you can password protect the Hidden album on your Macbook. Starting with macOS Ventura, Apple introduced a feature that automatically locks the Hidden album, requiring authentication via Touch ID or your login password to access it.
3.1 How to Ensure Your Hidden Album is Locked
-
Update to macOS Ventura or Later: Ensure your Macbook is running macOS Ventura or a more recent version. This feature is not available in older macOS versions.
-
Enable or Verify the Lock: By default, the Hidden album is automatically locked in macOS Ventura and later. To ensure it’s enabled:
- Open Photos: Launch the Photos application.
- Show Hidden Photo Album: Go to View > Show Hidden Photo Album to make the Hidden album visible in the sidebar.
- Access Hidden Album: Click on the Hidden album in the sidebar.
- Authentication Required: If the album is locked, you will be prompted to use Touch ID or enter your login password to view its contents.
3.2 Steps to Access a Locked Hidden Album
- Open Photos: Launch the Photos application on your Macbook.
- Show Hidden Photo Album: Go to View > Show Hidden Photo Album.
- Select Hidden Album: Click on the Hidden album in the sidebar.
- Authenticate:
- Touch ID: If prompted, use your Touch ID to unlock the album.
- Password: If Touch ID is not available or fails, you will be prompted to enter your login password.
3.3 Benefits of Password Protecting the Hidden Album
- Enhanced Privacy: Adds an extra layer of security to your hidden photos, ensuring that only you can access them.
- Protection Against Unauthorized Access: Prevents others from viewing your hidden photos if they gain access to your Macbook.
- Peace of Mind: Provides a sense of security knowing that your sensitive photos are protected.
3.4 Additional Security Tips
- Strong Password: Use a strong, unique password for your Macbook login to maximize security.
- Enable FileVault: Enable FileVault disk encryption to protect all the data on your Macbook.
- Two-Factor Authentication: Use two-factor authentication for your Apple ID to prevent unauthorized access to your iCloud account.
3.5 Potential Issues and Troubleshooting
- Touch ID Not Working: If Touch ID is not working, ensure it is properly configured in System Preferences. You can also try restarting your Macbook.
- Forgotten Password: If you forget your login password, you can reset it using your Apple ID or the recovery key you created when setting up your account.
4. How Do I Hide Photos More Securely Than Just Using The Hidden Album?
While the Hidden album provides a basic level of privacy, it may not be secure enough for highly sensitive photos. For enhanced security, consider using encrypted disk images, password-protected folders, or third-party encryption apps.
4.1 Encrypted Disk Images
One of the most secure ways to hide photos on your Mac is by using encrypted disk images. Disk Utility, which comes pre-installed on macOS, allows you to create these.
- Open Disk Utility: Launch Disk Utility from the Applications/Utilities folder.
- Create New Image: Click File > New Image > Blank Image.
- Configure Settings:
- Save As: Choose a name for your disk image.
- Where: Select a location to save the disk image.
- Size: Specify the size of the disk image. Ensure it’s large enough to hold your photos.
- Format: Choose APFS (Encrypted) or macOS Extended (Journaled, Encrypted).
- Encryption: Select 128-bit AES or 256-bit AES encryption. 256-bit AES is more secure but may be slightly slower.
- Partitions: Choose Single Partition – GUID Partition Map.
- Image Format: Select sparse bundle disk image (for flexible resizing) or read/write disk image (for fixed size).
- Set Password: Enter and verify a strong password. Store this password securely, as you will need it to access the disk image.
- Create: Click Create.
- Add Photos: Once the disk image is created, it will mount as a virtual drive. Drag and drop your photos into this drive.
- Eject Disk Image: After copying the photos, eject the disk image by dragging it to the Trash or right-clicking and selecting Eject.
- Delete Original Photos: Securely delete the original photos from your Photos library or any other location on your Mac.
4.2 Password-Protected Folders Using Encryption Apps
Several third-party apps provide robust encryption for folders and files. These apps create password-protected vaults where you can store sensitive photos.
- VeraCrypt: A free, open-source encryption tool that allows you to create encrypted volumes or containers.
- Cryptomator: Another open-source tool that creates encrypted vaults that can be stored in cloud services like Dropbox or Google Drive.
- Folder Lock: A commercial app that provides a user-friendly interface for encrypting folders and files.
4.3 Securely Deleting Original Photos
After moving your photos to an encrypted location, it’s crucial to securely delete the original files. Simply moving them to the Trash is not enough, as they can be recovered using data recovery software.
- Use Secure Empty Trash: macOS has a built-in feature to securely empty the Trash, which overwrites the files with random data before deleting them. To use it, open Finder, click Finder > Secure Empty Trash.
- Use a Secure Erase Tool: Several third-party apps can securely erase files and folders. Examples include:
- Permanent Eraser: A free utility that securely deletes files by overwriting them multiple times.
- CleanMyMac X: A commercial app that includes a secure file shredder feature.
4.4 Additional Security Measures
- Enable FileVault: FileVault encrypts the entire hard drive of your Mac, adding an extra layer of security.
- Use a Strong Password: Use a strong, unique password for your user account and any encrypted volumes or containers.
- Two-Factor Authentication: Enable two-factor authentication for your Apple ID and any other online accounts.
4.5 Expert Opinion
According to cybersecurity experts at dfphoto.net, “Encryption is the most reliable method for protecting sensitive data. By using encrypted disk images or third-party encryption apps, you can ensure that your photos are safe from unauthorized access.”
5. How Can I Find Photos Hidden In Other Folders On My Mac?
Finding photos hidden in various folders on your Mac requires a combination of Finder searches, Terminal commands, and the use of specialized software.
5.1 Using Finder
Finder is the primary file management tool on macOS and can be used to search for hidden photos based on file types and other criteria.
- Open Finder: Launch Finder from the Dock or by pressing Command + N.
- Navigate to the Root Directory: Click on your Mac’s hard drive in the Finder sidebar (usually named “Macintosh HD”).
- Start a Search: Press Command + F to start a new search.
- Set Search Parameters:
- Search This Mac: Ensure the search is set to “This Mac” to search the entire hard drive.
- Kind is Image: Click the “Kind” filter and select “Image” to search for all image files.
- Add Additional Filters: Click the “+” button to add more filters. You can search by file type (e.g., JPEG, PNG, TIFF), date modified, file size, and more.
- Search for Hidden Files:
- System Files: Add a filter for “System files” and set it to “are included”. This will show system files, which are often hidden by default.
- Visibility: Add a filter for “File visibility” and set it to “Invisible items”. This will reveal files that have been intentionally hidden.
5.2 Using Terminal
The Terminal provides a command-line interface that allows you to perform advanced searches and reveal hidden files.
- Open Terminal: Launch Terminal from the Applications/Utilities folder.
- Navigate to the Root Directory: Type the following command and press Enter:
cd / - Show Hidden Files: To make hidden files visible in Finder, use the following command:
defaults write com.apple.finder AppleShowAllFiles YES
killall Finder
This command will restart Finder and show all hidden files and folders. To hide them again, replace
YESwithNOand repeat the command. - Find Command: Use the
findcommand to search for image files. For example, to find all JPEG files, use the following command:find / -type f -name "*.jpg"This command will search the entire file system for files with the
.jpgextension. You can modify the-nameparameter to search for other file types (e.g.,*.png,*.tiff). - Advanced Search: To search for files modified within a specific date range, use the
-mtimeparameter. For example, to find files modified in the last 30 days:find / -type f -mtime -30 -name "*.jpg"
5.3 Using Third-Party Software
Several third-party applications can help you find hidden files and folders on your Mac.
- Hidden Finder: A simple app that allows you to toggle the visibility of hidden files and folders in Finder.
- Find Any File: A powerful search tool that can find files based on various criteria, including file attributes, content, and metadata.
- DaisyDisk: A disk space analyzer that scans your hard drive and displays a visual map of your files and folders, making it easier to identify large or hidden files.
5.4 Tips for Effective Searching
- Be Specific: Use specific file names or extensions to narrow down your search results.
- Check System Folders: Hidden photos may be located in system folders, such as the Library folder or temporary directories.
- Consider Metadata: Use metadata tags (e.g., keywords, descriptions) to search for photos based on their content.
- Use Wildcards: Use wildcards (e.g.,
*.jpg,image*) to search for files with similar names or extensions.
5.5 Legal and Ethical Considerations
When searching for hidden photos, it’s important to respect privacy and adhere to legal and ethical guidelines. Do not attempt to access or view photos that you do not have permission to see.
6. What Are Some Common Reasons Why Photos Might Be Hidden On A Mac?
Photos might be hidden on a Mac for various reasons, including user privacy, system settings, file organization, or accidental concealment.
6.1 User Privacy
- Personal Photos: Users may hide personal or sensitive photos to keep them private from others who use the same computer.
- Confidential Documents: Photos of confidential documents, such as financial statements or personal identification, may be hidden to protect sensitive information.
6.2 System Settings
- Hidden Album: The Photos app has a built-in Hidden album feature that allows users to hide photos from the main library view.
- System Files: macOS hides system files and folders by default to prevent accidental modification or deletion.
- Dot Files: Files and folders that begin with a dot (.) are hidden by default in macOS. These are often configuration files or temporary files.
6.3 File Organization
- Archived Photos: Users may hide photos in archived folders or disk images to organize and store them separately from their main photo library.
- Project-Related Photos: Photos related to specific projects or tasks may be hidden in project folders to keep them organized and out of the way.
6.4 Accidental Concealment
- Accidental Hiding: Users may accidentally hide photos or folders by using the “Hide” command in Finder or by inadvertently renaming files with a leading dot.
- Software Errors: Software errors or glitches may cause files or folders to become hidden without the user’s knowledge.
6.5 Malware and Security Threats
- Malicious Software: Malware or viruses may hide files or folders to conceal their presence or prevent detection.
- Security Breaches: In cases of security breaches, attackers may hide files or folders to cover their tracks or store stolen data.
6.6 Misconfigured Applications
- Incorrect Settings: Some applications may have settings that cause them to hide files or folders by default.
- Temporary Files: Applications may create temporary files that are hidden to prevent cluttering the user interface.
6.7 Cloud Synchronization Issues
- Synchronization Errors: Cloud synchronization services like iCloud or Dropbox may encounter errors that cause files or folders to become hidden.
- Selective Synchronization: Users may choose to selectively synchronize certain folders, leaving others hidden on their local machine.
6.8 Legal and Ethical Considerations
- Privacy Laws: Privacy laws and regulations may require certain types of data to be hidden or encrypted to protect personal information.
- Corporate Policies: Corporate policies may require employees to hide or encrypt sensitive data to comply with security standards.
7. How Do I Prevent Photos From Being Accidentally Hidden On My Mac?
Preventing photos from being accidentally hidden on your Mac involves careful file management practices, awareness of system settings, and the use of protective measures.
7.1 Organize Your Photos Properly
- Use Meaningful Names: Give your photos and folders descriptive names that reflect their content. This makes it easier to identify and locate them.
- Create a Consistent Folder Structure: Establish a clear and consistent folder structure for your photos. For example, you might organize them by date, event, or project.
- Avoid Hiding Files: Unless absolutely necessary, avoid using the “Hide” command in Finder. This can make it difficult to find the files later.
7.2 Be Aware of System Settings
- Show Hidden Files: Be cautious when enabling the “Show Hidden Files” option in Finder. While it can be useful for troubleshooting, it also makes system files visible, which can be confusing.
- Dot Files: Avoid creating files or folders that begin with a dot (.) unless you intend for them to be hidden. These files are hidden by default in macOS.
- Photos App Settings: Familiarize yourself with the settings in the Photos app, including the Hidden album feature.
7.3 Use Protective Measures
- Regular Backups: Back up your photos regularly to an external hard drive or cloud storage service. This ensures that you have a copy of your photos in case they are accidentally hidden or deleted.
- FileVault Encryption: Enable FileVault disk encryption to protect all the data on your Mac, including your photos. This adds an extra layer of security and prevents unauthorized access.
- Antivirus Software: Install and run antivirus software to protect your Mac from malware and viruses that may hide or delete your photos.
7.4 Practice Safe File Management
- Be Careful When Renaming Files: When renaming files, be careful not to accidentally add a leading dot (.) to the file name.
- Avoid Dragging Files to the Trash: Be cautious when dragging files to the Trash, as this can result in accidental deletion.
- Use the “Move to Trash” Command: Instead of dragging files to the Trash, use the “Move to Trash” command (Command + Delete) to ensure that you are intentionally deleting the files.
7.5 Educate Yourself and Others
- Learn About macOS File Management: Take the time to learn about macOS file management practices, including how to organize files, use Finder, and manage system settings.
- Educate Others: If you share your Mac with others, educate them about safe file management practices and the importance of not accidentally hiding or deleting files.
7.6 Regular Maintenance
- Disk Utility: Use Disk Utility to regularly check and repair your hard drive. This can help prevent file system errors that may cause files to become hidden.
- Software Updates: Keep your macOS and applications up to date. Software updates often include bug fixes and security enhancements that can help prevent file management issues.
8. Can iCloud Affect How Photos Are Hidden Or Displayed On My Mac?
Yes, iCloud can significantly affect how photos are hidden or displayed on your Mac. iCloud Photos syncs your photo library across all your Apple devices, including your Mac, iPhone, and iPad. This synchronization can impact the visibility and accessibility of your photos.
8.1 iCloud Photos Synchronization
- Automatic Syncing: When iCloud Photos is enabled, any changes you make to your photo library on one device are automatically synced to all other devices connected to the same iCloud account. This includes hiding and unhiding photos.
- Hidden Album Sync: If you hide a photo in the Hidden album on your iPhone, it will also be hidden on your Mac and other devices using iCloud Photos.
- Storage Optimization: iCloud Photos offers a storage optimization feature that can save space on your Mac by storing full-resolution photos in iCloud and keeping smaller, optimized versions on your device.
8.2 Potential Issues and How to Resolve Them
- Photos Not Syncing: If photos are not syncing properly between your Mac and iCloud, check your internet connection and ensure that iCloud Photos is enabled on both devices.
- Storage Limitations: If your iCloud storage is full, new photos may not sync properly. You may need to upgrade your iCloud storage plan or remove some files to free up space.
- Conflicting Settings: If you have different settings for iCloud Photos on your Mac and other devices, it can cause conflicts. Make sure the settings are consistent across all devices.
8.3 Best Practices for Using iCloud Photos
- Enable iCloud Photos: To ensure that your photos are synced across all your devices, enable iCloud Photos in System Preferences > Apple ID > iCloud > Photos.
- Choose “Download Originals to This Mac”: If you want to keep full-resolution photos on your Mac, select the “Download Originals to This Mac” option in Photos > Preferences > iCloud.
- Manage Storage: Regularly manage your iCloud storage to ensure that you have enough space for your photos and other files.
- Check for Errors: Periodically check for synchronization errors in the Photos app. If you see any errors, try restarting your Mac or resetting the iCloud Photos library.
8.4 Alternative Cloud Storage Services
While iCloud Photos is tightly integrated with macOS, there are alternative cloud storage services that you can use to sync and back up your photos.
- Google Photos: A popular cloud storage service that offers unlimited storage for photos and videos (with some limitations on resolution).
- Dropbox: A versatile cloud storage service that can be used to sync and back up files, including photos.
- Amazon Photos: A cloud storage service that offers unlimited storage for photos for Amazon Prime members.
9. What Third-Party Apps Can Help Me Manage Hidden Photos On My Mac?
Several third-party apps can help you manage hidden photos on your Mac, offering features such as encryption, password protection, and advanced organization tools.
9.1 Encryption Apps
- VeraCrypt: A free, open-source encryption tool that allows you to create encrypted volumes or containers for storing sensitive photos.
- Cryptomator: Another open-source tool that creates encrypted vaults that can be stored in cloud services like Dropbox or Google Drive.
9.2 Photo Management Apps
- Adobe Lightroom: A professional photo management and editing app that offers advanced organization tools, including the ability to hide photos and create password-protected collections.
- Capture One: A high-end photo editing app that includes robust photo management features, such as the ability to create catalogs and albums, and hide photos from the main library view.
9.3 File Management Apps
- Path Finder: A powerful file management app that offers advanced features for organizing and managing files, including the ability to show hidden files and folders, and create custom keyboard shortcuts.
- ForkLift: A dual-pane file manager that includes a variety of features for managing files, such as the ability to compare and synchronize folders, and connect to remote servers.
9.4 Privacy Apps
- Hider 2: An app that allows you to hide and encrypt files and folders, providing a secure way to store sensitive photos.
- iMyFone Lockbox: An app that allows you to create password-protected vaults for storing private photos and videos.
9.5 Tips for Choosing a Third-Party App
- Consider Your Needs: Think about what features are most important to you, such as encryption, password protection, or advanced organization tools.
- Read Reviews: Read reviews from other users to get an idea of the app’s strengths and weaknesses.
- Try a Free Trial: If possible, try a free trial of the app before purchasing it to make sure it meets your needs.
- Check for Updates: Make sure the app is regularly updated to ensure that it is compatible with the latest version of macOS and includes the latest security patches.
9.6 Security Considerations
When using third-party apps to manage hidden photos, it’s important to consider security.
- Choose Reputable Apps: Only download apps from reputable sources, such as the Mac App Store or the developer’s website.
- Read Privacy Policies: Read the app’s privacy policy to understand how it collects and uses your data.
- Use Strong Passwords: Use strong, unique passwords for your app accounts and any encrypted volumes or containers.
- Keep Your Apps Up to Date: Keep your apps up to date to ensure that you have the latest security patches.
10. What Should I Do If I Suspect Someone Is Hiding Photos From Me On A Shared Mac?
If you suspect someone is hiding photos from you on a shared Mac, it’s important to proceed with caution and respect privacy boundaries. However, if you have legitimate reasons to believe that something is amiss, here are some steps you can take:
10.1 Communication
- Talk to the Person: If you feel comfortable doing so, the best approach is to have an open and honest conversation with the person you suspect is hiding photos. Express your concerns and ask if they can explain the situation.
- Be Respectful: Approach the conversation with respect and avoid making accusations. Try to understand their perspective and explain why you are concerned.
10.2 Check Shared Accounts
- iCloud Photos: If you share an iCloud account, check the iCloud Photos settings to see if any photos have been hidden or deleted.
- Shared Albums: If you use shared albums, check the albums to see if any photos are missing or have been moved.
10.3 Look for Hidden Albums
- Photos App: Open the Photos app and check for hidden albums. Go to View > Show Hidden Photo Album to see if any albums have been hidden.
- File System: Use Finder or Terminal to search for hidden files and folders. Enable the “Show Hidden Files” option in Finder or use the
findcommand in Terminal to reveal hidden items.
10.4 Use Disk Space Analyzers
- DaisyDisk: Use a disk space analyzer like DaisyDisk to scan the hard drive and identify large files or folders that may be hidden.
- GrandPerspective: Another disk space analyzer that displays a visual map of your files and folders, making it easier to identify hidden items.
10.5 Monitor Network Activity
- Activity Monitor: Use Activity Monitor to monitor network activity and see if any large files are being uploaded or downloaded. This can help you identify if someone is transferring photos to or from the Mac.
- Network Analysis Tools: Use network analysis tools like Wireshark to capture and analyze network traffic. This can provide more detailed information about the files being transferred.
10.6 Consult a Professional
- Computer Forensics Expert: If you have serious concerns and suspect illegal activity, consult a computer forensics expert. They can use specialized tools and techniques to recover deleted files and analyze computer activity.
- Legal Advice: If you believe that someone is violating your privacy or engaging in illegal activity, seek legal advice from an attorney.
10.7 Respect Privacy
- Avoid Unauthorized Access: Do not attempt to access or view photos that you do not have permission to see. Respect the privacy of others and avoid engaging in illegal or unethical behavior.
- Legal Consequences: Be aware that accessing someone else’s photos without their permission can have legal consequences.
10.8 Expert Advice
According to privacy experts at dfphoto.net, “It’s crucial to balance your concerns with respect for privacy. Always prioritize open communication and seek professional help if you suspect illegal activity.”
FAQ: Finding Hidden Photos on Macbook
Q1: How do I quickly find the Hidden album in Photos on my Mac?
To quickly find the Hidden album in Photos on your Mac, open the Photos app, then click on View > Show Hidden Photo Album in the menu bar. The Hidden album will appear in the sidebar.
Q2: What should I do if I can’t see the “Show Hidden Photo Album” option in the View menu?
If you don’t see the “Show Hidden Photo Album” option, ensure you are in the Photos app and not another application. Also, make sure you have the latest version of macOS installed.
Q3: How do I unhide multiple photos at once in the Hidden album?
To unhide multiple photos, open the Hidden album, hold down the Command key while clicking on each photo you want to unhide, then control-click and choose “Unhide Photo.”
Q4: Is it possible to password protect individual photos instead of the entire Hidden album?
No, the Photos app does not offer the option to password protect individual photos. You can only password protect the entire Hidden album.
Q5: How can I create a new encrypted disk image to hide photos?
To create a new encrypted disk image, open Disk Utility, click File > New Image > Blank Image, configure the settings (name, location, size, format, encryption), set a strong password, and click “Create.”
Q6: What’s the difference between 128-bit AES and 256-bit AES encryption for disk images?
256-bit AES encryption is more secure but may be slightly slower compared to 128-bit AES. Both are strong encryption methods, but 256-bit AES provides a higher level of protection.
Q7: How do I securely delete the original photos after moving them to an encrypted disk image?
To securely delete the original photos, use the “Secure Empty Trash” option in Finder or a third-party secure erase tool like Permanent Eraser or CleanMyMac X.
Q8: Can iCloud Photos affect the visibility of my Hidden album?
Yes, if you use iCloud Photos, any changes you make to the Hidden album on one device will sync to all other devices connected to the same iCloud account.
Q9: What should I do if my iCloud storage is full and photos are not syncing properly?
If your iCloud storage is full, upgrade your iCloud storage plan or remove some files to free up space. Also, check your internet connection and ensure iCloud Photos is enabled on all devices.
Q10: Are there any legal or ethical considerations when searching for hidden photos on a shared Mac?
Yes, it’s important to respect privacy and adhere to legal and ethical guidelines. Do not attempt to access or view photos that you do not have permission to see.
We hope this comprehensive guide has helped you navigate the world of finding hidden photos on your Macbook. At dfphoto.net, we are dedicated to providing you with the best tips and tricks to enhance your photography experience. Remember, mastering these techniques not only ensures your digital privacy but also empowers you to manage your visual content more effectively.
Ready to take your photography skills to the next level? Visit dfphoto.net today to explore more tutorials, stunning photo collections, and a vibrant community of photography enthusiasts!