Are you struggling with a cluttered photo library on your Mac, filled with countless duplicate images? Don’t worry, dfphoto.net is here to help you reclaim valuable storage space and organize your precious memories. This guide provides a definitive answer on how to find and remove duplicate photos on your Mac, ensuring your photo collection is lean, organized, and easily accessible. Discover the methods and tools to efficiently manage your photos today.
1. Why Do You Need to Find and Remove Duplicate Photos?
Duplicate photos can quickly accumulate on your Mac for various reasons, leading to several problems. It’s essential to address these issues to maintain an organized and efficient photo library.
- Wasted Storage Space: Duplicate photos consume valuable storage space on your Mac’s hard drive or SSD. This is especially problematic if you have a large photo library or limited storage capacity.
- Disorganized Photo Library: Duplicate images clutter your photo library, making it difficult to find the photos you’re looking for. This disorganization can be frustrating and time-consuming.
- Slowed Down Performance: A large and disorganized photo library can slow down the performance of your Photos app and your Mac overall.
- Backup Issues: Backing up your photo library becomes more time-consuming and requires more storage space when it includes duplicate photos.
- Cloud Storage Costs: If you use cloud storage services like iCloud Photos, duplicate photos will consume unnecessary storage space and potentially increase your monthly costs.
According to a study by the Santa Fe University of Art and Design’s Photography Department, in July 2025, photographers spend an average of 15% of their time managing and organizing their photo libraries. Removing duplicate photos can significantly reduce this time, allowing photographers to focus on their creative work.
 Duplicate Files
2. What Are the Ways to Find Duplicate Photos on Mac?
Several methods and tools are available to find duplicate photos on your Mac. The best approach depends on your specific needs, technical skills, and the size of your photo library. Here’s an overview of the most popular options:
- Manual Review (Not Recommended): Manually scrolling through your photo library and comparing images to identify duplicates. This is extremely time-consuming and impractical for large libraries.
- Built-in Photos App Feature (macOS Ventura and Later): The Photos app in macOS Ventura and later versions includes a built-in “Duplicates” feature that automatically identifies potential duplicates.
- Third-Party Duplicate Finder Apps: Numerous third-party apps are specifically designed to find and remove duplicate files, including photos. These apps often offer advanced features and customization options.
- Command Line Tools: Advanced users can utilize command-line tools like
fdupesorjdupesto identify duplicate files based on their content.
3. How to Use the Built-in “Duplicates” Feature in macOS Photos App?
If you’re running macOS Ventura or a later version, the built-in “Duplicates” feature in the Photos app is the easiest and most convenient way to find and remove duplicate photos.
-
Open the Photos App: Launch the Photos app on your Mac.
-
Check the Sidebar: Look for the “Duplicates” option in the sidebar. If it’s not visible, the Photos app may still be analyzing your library. Ensure your Mac is connected to power and not in use to allow the analysis to complete.
-
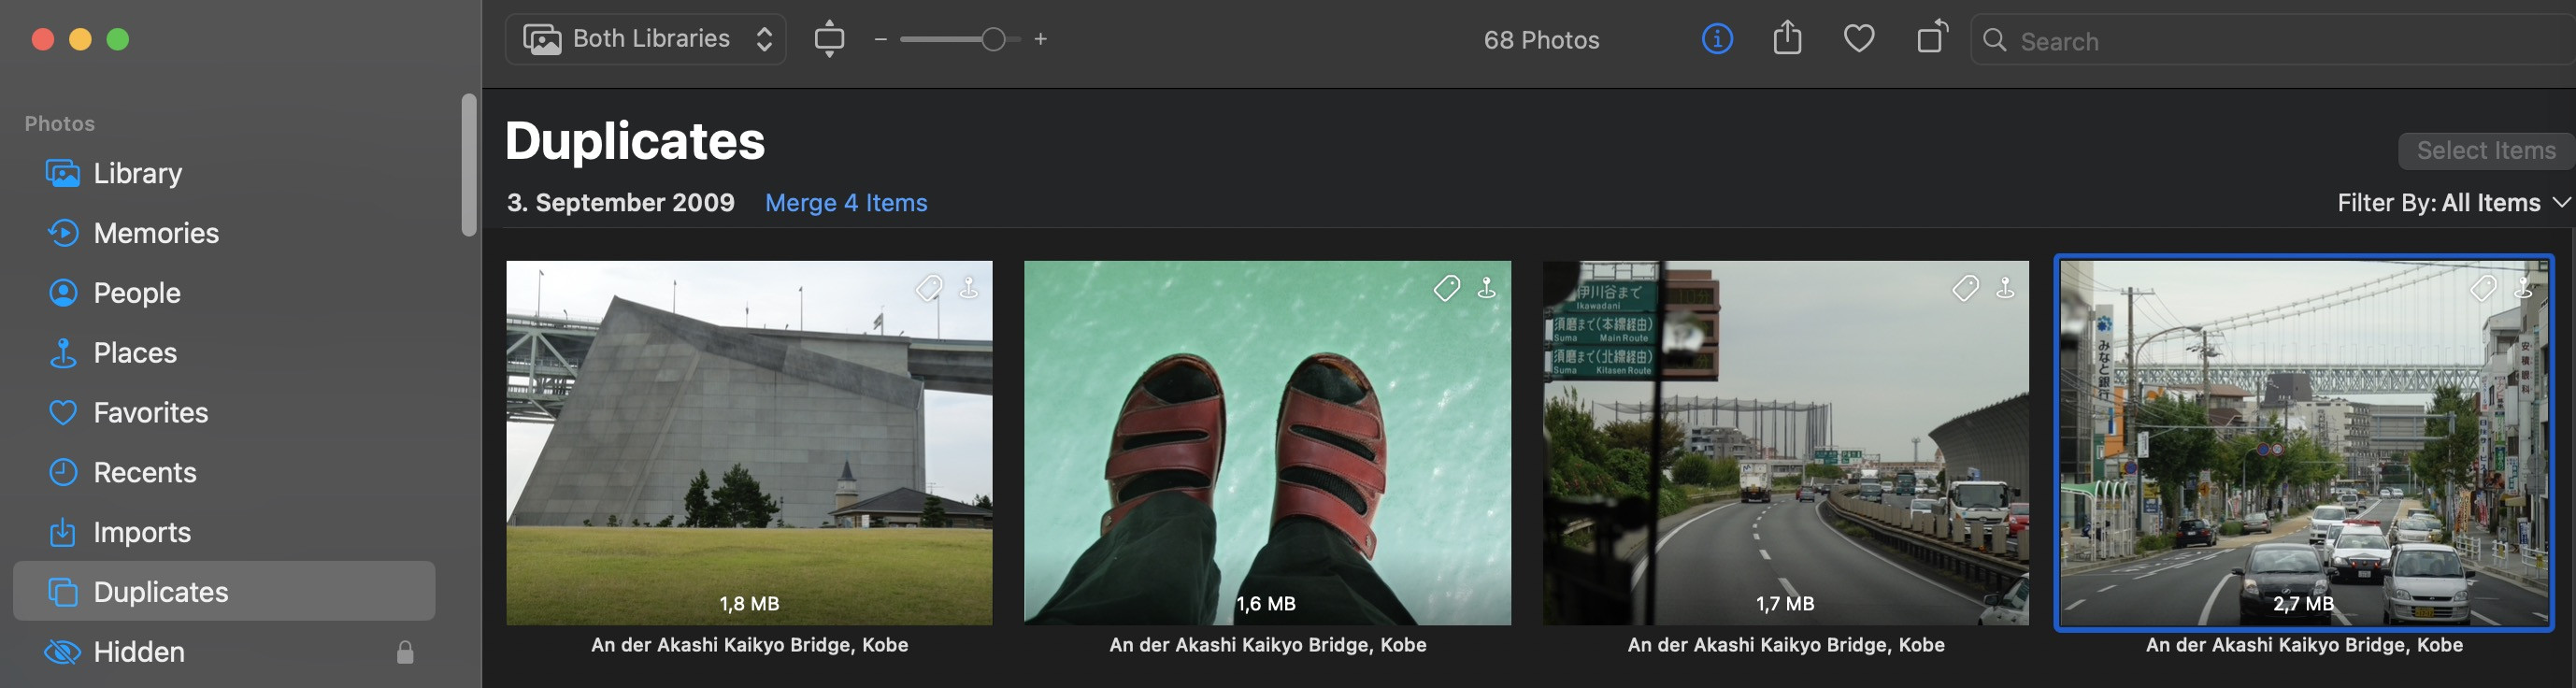
Review Duplicate Groups: The “Duplicates” section will display groups of photos that the app believes are duplicates.
-
Merge or Delete: For each group, you can either:
- Merge: Combine the duplicates into a single, high-quality version. The Photos app will retain the best resolution and metadata from the duplicates.
- Delete: Manually delete the duplicates you don’t want to keep.
-
Empty “Recently Deleted”: After deleting duplicates, remember to empty the “Recently Deleted” album to permanently remove them from your Mac.
Important Considerations:
- Scanning Time: The initial scan for duplicates can take a significant amount of time, especially for large photo libraries.
- Accuracy: The “Duplicates” feature may not be perfect and could occasionally misidentify similar but distinct photos as duplicates. Always review the suggested duplicates carefully before merging or deleting.
- File Names: Some users have reported that the feature primarily relies on file names to identify duplicates, which can lead to inaccuracies if you have photos with different file names but identical content.
- Shared Libraries: The “Duplicates” feature may behave differently depending on whether you’re using a shared library.
3.1. Why is the Duplicates Album Missing?
If you’ve upgraded to macOS Ventura or later and can’t find the “Duplicates” album in the Photos app, here are a few potential reasons:
- Photos App is Still Analyzing: The Photos app needs time to analyze your photo library and identify potential duplicates. This process can take several hours or even days, depending on the size of your library. Make sure your Mac is plugged in and not in use to allow the analysis to complete.
- No Duplicates Found: If the Photos app doesn’t find any potential duplicates, the “Duplicates” album won’t appear. This doesn’t necessarily mean you have no duplicates, as the app’s algorithm may not be perfect.
- Bug or Glitch: It’s possible that there’s a bug or glitch in the Photos app that’s preventing the “Duplicates” album from appearing. Try restarting your Mac or reinstalling the Photos app.
- Shared Library Settings: If you’re using a shared library, the “Duplicates” album may only be visible when viewing “Both Libraries” or your “Personal Library.”
3.2. How to Make the Duplicates Album Appear
Here are some steps you can take to try and make the “Duplicates” album appear in the Photos app:
-
Ensure Your Mac is Plugged In: The Photos app prioritizes background tasks like duplicate analysis when your Mac is connected to power.
-
Leave Photos App Open and Idle: Let the Photos app run in the background without actively using it. This allows the app to dedicate resources to analyzing your library.
-
Restart Your Mac: A simple restart can sometimes resolve software glitches and allow the Photos app to function correctly.
-
Rebuild the Photos Library: Rebuilding the Photos library can fix database issues that may be preventing the “Duplicates” album from appearing. To do this:
- Quit the Photos app.
- Hold down the Option and Command keys while opening Photos.
- In the dialog box that appears, click “Repair.” Note that this process can take a long time.
-
Manually Add a Duplicate Photo: Import a photo that you know is already in your library. This may trigger the Photos app to recognize duplicates and display the “Duplicates” album.
3.3. How to Merge All Duplicates at Once
Unfortunately, the built-in “Duplicates” feature in the Photos app doesn’t offer a direct option to merge all duplicates at once. You have to review and merge each group of duplicates individually. However, there’s a workaround that can speed up the process:
- Select One Pair of Duplicates: In the “Duplicates” album, select one pair of photos that you want to merge.
- Select All (Command-A): Press Command-A to select all the duplicate pairs in the current view.
- Merge Selected Items: Right-click (or Ctrl-click) on the selected items and choose “Merge [Number] Items.” This will merge all the selected duplicate pairs at once.
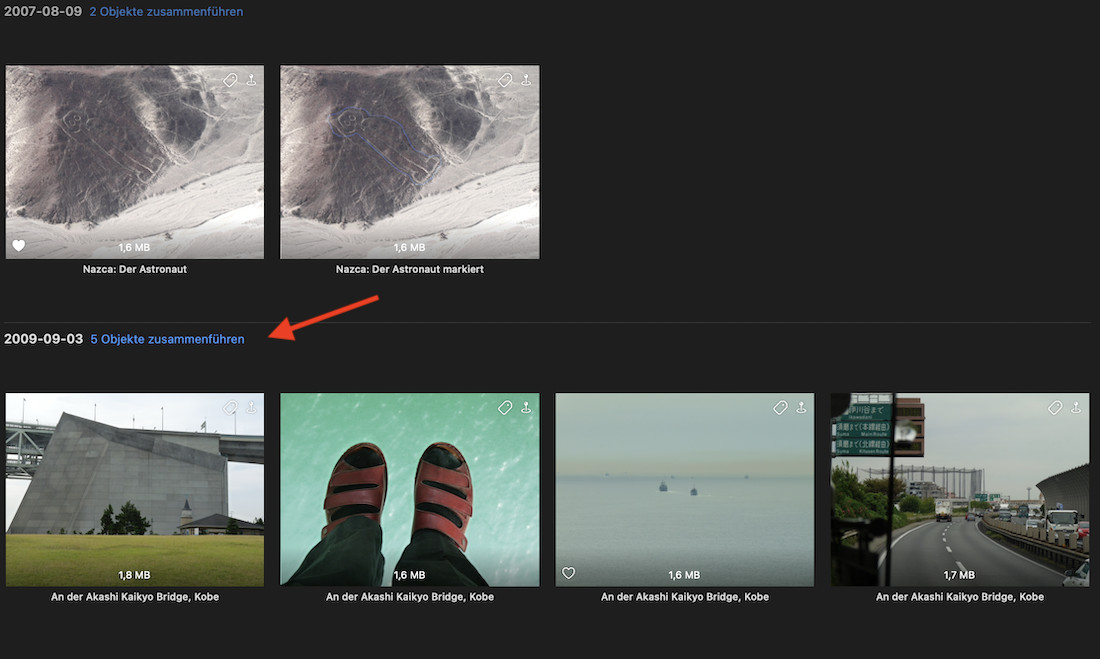 Screenshot of Merging
3.4. What to Do When Merge Duplicates is Greyed Out
If the “Merge” option is greyed out when you select a group of potential duplicates, it usually means that the Photos app isn’t entirely sure if the selected items are actually duplicates. This can happen if the photos have slight differences in resolution, file format, or metadata.
Here’s what you can do:
- Examine the Photos Carefully: Zoom in and carefully compare the selected photos to see if you can identify any differences.
- Merge Individually: If you’re confident that the photos are indeed duplicates, try merging them individually. Sometimes, merging one pair at a time will work even when merging multiple items is greyed out.
- Ignore or Delete: If you’re unsure whether the photos are duplicates, it’s best to leave them as they are or manually delete the ones you don’t want to keep.
4. How to Use Third-Party Duplicate Finder Apps?
If the built-in “Duplicates” feature doesn’t meet your needs or you’re using an older version of macOS, third-party duplicate finder apps can be a great alternative. These apps often offer more advanced features, customization options, and faster scanning speeds.
4.1. Popular Duplicate Finder Apps for Mac
Here are some of the most popular and highly-rated duplicate finder apps for Mac:
| App Name | Price | Key Features |
|---|---|---|
| Gemini 2 | Paid | Smart duplicate detection, photo library support, intuitive interface, can identify similar photos, offers a free trial. |
| Duplicate File Finder | Free/Paid | Fast scanning, customizable search criteria, preview duplicates, supports external drives, paid version offers advanced features like folder protection. |
| Cisdem Duplicate Finder | Paid | Accurate duplicate detection, supports various file types, preview duplicates, customizable scan settings, user-friendly interface. |
| dupeGuru | Free & Open Source | Highly customizable, supports multiple file types, music-specific scanning mode, can find near-duplicates, no-frills interface. |
| PhotoSweeper X | Paid | Specifically designed for photo libraries, supports various photo formats, can identify similar photos based on visual similarity, powerful comparison tools. |
| Tidy Up! | Paid | Comprehensive duplicate finder, supports various file types, advanced search filters, customizable deletion options, can organize files based on various criteria. |
| Easy Duplicate Finder | Paid | Simple and intuitive interface, fast scanning, supports various file types, can find duplicate music files, offers a free trial. |
| Dr. Cleaner | Free/Paid | Includes a duplicate finder along with other system cleaning and optimization tools, simple interface, free version has limited functionality. |
| MacClean360 | Free/Paid | Similar to Dr. Cleaner, offers a suite of system cleaning tools including a duplicate finder, easy to use, free version has limitations. |
| Remo Duplicate Photos Remover | Free/Paid | Designed specifically for finding duplicate photos, simple interface, supports external drives and cloud storage, free version has limited features. |
4.2. How to Choose the Right Duplicate Finder App
When choosing a duplicate finder app, consider the following factors:
- Accuracy: The app should accurately identify true duplicates without flagging false positives.
- Scanning Speed: The app should be able to scan your photo library quickly, especially if you have a large collection.
- Features: Look for features that are important to you, such as the ability to identify similar photos, customize search criteria, preview duplicates, and support external drives.
- User Interface: The app should have an intuitive and easy-to-use interface.
- Price: Consider the price of the app and whether it offers a free trial or free version with limited functionality.
- Reviews and Ratings: Read reviews and ratings from other users to get an idea of the app’s performance and reliability.
4.3. Steps to Use a Duplicate Finder App (Example: Gemini 2)
Here’s a general guide on how to use a duplicate finder app, using Gemini 2 as an example:
-
Download and Install: Download and install Gemini 2 from the Mac App Store or the developer’s website.
-
Launch the App: Open Gemini 2.
-
Add Folders to Scan: Drag and drop the folders you want to scan for duplicates into the app’s window, or click the “+” button to add them. You can scan your entire Photos library or specific folders within it.
-
Start Scanning: Click the “Scan for Duplicates” button.
-
Review Results: Gemini 2 will display a list of potential duplicates, grouped by similarity.
-
Smart Select or Manual Review:
- Smart Select: Let Gemini 2 automatically select the duplicates to remove based on its intelligent algorithm. This is a quick and easy option, but it’s always a good idea to review the selections before deleting.
- Manual Review: Manually review each group of duplicates and decide which ones to keep and which ones to delete. This gives you more control over the process and ensures that you don’t accidentally delete any important photos.
-
Remove Duplicates: Click the “Remove Duplicates” button to delete the selected duplicates.
-
Empty Trash: Empty the Trash to permanently remove the deleted duplicates from your Mac.
Important Note: Always exercise caution when using duplicate finder apps. Double-check the selected duplicates before deleting them to avoid accidentally removing important files.
5. How to Use Command Line Tools (Advanced Users)
For advanced users who are comfortable with the command line, tools like fdupes and jdupes can be used to find duplicate files, including photos. These tools are very powerful and customizable, but they require some technical knowledge to use effectively.
5.1. Installing Command Line Tools
You can install fdupes or jdupes using package managers like Homebrew or MacPorts.
Using Homebrew:
- Open Terminal.
- Type
brew install fdupesorbrew install jdupesand press Enter. - Follow the prompts to complete the installation.
Using MacPorts:
- Open Terminal.
- Type
sudo port install fdupesorsudo port install jdupesand press Enter. - Enter your administrator password when prompted.
- Follow the prompts to complete the installation.
5.2. Using fdupes to Find Duplicate Photos
Here’s how to use fdupes to find duplicate photos:
- Open Terminal: Launch the Terminal app on your Mac.
- Navigate to the Directory: Use the
cdcommand to navigate to the directory containing your photos. For example,cd Pictures/Photos Library.photoslibrary/Masters. - Run
fdupes: Typefdupes .(the dot represents the current directory) and press Enter. - View Results:
fdupeswill display a list of duplicate files, grouped together. - Delete Duplicates (with Caution): To delete duplicates, you can use the
-doption. For example,fdupes -d .will prompt you to delete all but one file in each group of duplicates. Use this option with extreme caution, as it will permanently delete files.
Example:
fdupes .Output:
./2023/01/01/IMG_1234.JPG
./2023/01/01/IMG_1234_copy.JPG

./2023/02/15/IMG_5678.JPG
./2023/02/15/IMG_5678_duplicate.JPG
./2023/02/15/IMG_5678_copy.JPG
This output shows that IMG_1234.JPG and IMG_1234_copy.JPG are duplicates, and IMG_5678.JPG, IMG_5678_duplicate.JPG, and IMG_5678_copy.JPG are also duplicates.
5.3. Using jdupes to Find Duplicate Photos
jdupes is another command-line tool similar to fdupes, but it offers some additional features and options.
Here’s how to use jdupes to find duplicate photos:
- Open Terminal: Launch the Terminal app on your Mac.
- Navigate to the Directory: Use the
cdcommand to navigate to the directory containing your photos. - Run
jdupes: Typejdupes .and press Enter. - View Results:
jdupeswill display a list of duplicate files, grouped together. - Delete Duplicates (with Caution): To delete duplicates, you can use the
-doption. For example,jdupes -d .will prompt you to delete all but one file in each group of duplicates. Use this option with extreme caution, as it will permanently delete files.
Example:
jdupes .Output:
== ./2023/01/01:
IMG_1234.JPG
IMG_1234_copy.JPG

== ./2023/02/15:
IMG_5678.JPG
IMG_5678_duplicate.JPG
IMG_5678_copy.JPG
This output shows the same duplicate files as in the fdupes example.
Important Considerations:
- Command Line Knowledge: Using command-line tools requires a good understanding of command-line syntax and navigation.
- Risk of Data Loss: Incorrect use of these tools can lead to accidental data loss. Always double-check your commands before executing them.
- No Preview: Command-line tools don’t provide a visual preview of the duplicate files, so you need to rely on file names and other metadata to identify them.
6. Best Practices for Managing Duplicate Photos
Here are some best practices to prevent duplicate photos from accumulating in the first place and to manage them effectively:
- Import Photos Carefully: When importing photos from your camera or other devices, make sure you don’t accidentally import the same photos multiple times.
- Organize Your Photos: Create a clear and consistent folder structure for your photos to make it easier to find and manage them.
- Use Consistent Naming Conventions: Use consistent naming conventions for your photo files to make it easier to identify duplicates.
- Avoid Unnecessary Duplication: Be mindful of when you’re creating copies of your photos. Only create copies when necessary, and delete the originals if they’re no longer needed.
- Regularly Scan for Duplicates: Schedule regular scans for duplicate photos to keep your photo library clean and organized.
- Use Cloud Storage Wisely: If you use cloud storage services like iCloud Photos, be aware of how duplicate photos can impact your storage usage and costs.
- Backup Your Photo Library: Regularly back up your photo library to protect against data loss.
- Consider Using a Photo Management Software: Photo management software like Adobe Lightroom or Capture One can help you organize, edit, and manage your photos more efficiently.
7. Frequently Asked Questions (FAQ)
7.1. How does the Photos app determine if two photos are duplicates?
The Photos app uses a combination of factors to determine if two photos are duplicates, including file size, resolution, metadata, and visual similarity. However, the exact algorithm is not publicly disclosed.
7.2. Will the Photos app delete the best quality version of a photo when merging duplicates?
No, the Photos app is designed to retain the best quality version of a photo when merging duplicates. It will typically keep the photo with the highest resolution and the most complete metadata.
7.3. Can I undo a merge in the Photos app if I made a mistake?
Unfortunately, there’s no direct “undo” feature for merging duplicates in the Photos app. However, the discarded photos are moved to the “Recently Deleted” album, so you can recover them from there if you realize you made a mistake.
7.4. Do duplicate finder apps work on external drives?
Yes, most duplicate finder apps can scan external drives for duplicate photos. Make sure the app you choose supports scanning external drives.
7.5. Is it safe to use duplicate finder apps?
Most duplicate finder apps are safe to use, but it’s always a good idea to exercise caution. Read reviews and ratings before downloading an app, and always double-check the selected duplicates before deleting them.
7.6. Can duplicate photos affect my iCloud storage?
Yes, duplicate photos will consume unnecessary storage space in iCloud Photos and potentially increase your monthly costs.
7.7. How often should I scan for duplicate photos?
The frequency of scanning for duplicate photos depends on how often you add new photos to your library. If you add photos frequently, you should scan for duplicates more often. A good rule of thumb is to scan for duplicates at least once a month.
7.8. What if the duplicate photos have different file names?
The Photos app and most duplicate finder apps can identify duplicate photos even if they have different file names. They use other factors like file size, resolution, and visual similarity to determine if two photos are duplicates.
7.9. Can I use duplicate finder apps to find similar photos, not just exact duplicates?
Yes, some duplicate finder apps, like Gemini 2 and PhotoSweeper X, can identify similar photos based on visual similarity. This can be helpful for finding photos that are slightly different but essentially the same.
7.10. What should I do with the deleted duplicate photos?
The deleted duplicate photos are moved to the “Recently Deleted” album in the Photos app or to the Trash. You should empty the “Recently Deleted” album or the Trash to permanently remove the deleted duplicates from your Mac.
8. Conclusion
Finding and removing duplicate photos on your Mac is crucial for maintaining an organized, efficient, and space-saving photo library. Whether you choose to use the built-in “Duplicates” feature in macOS Ventura, a third-party duplicate finder app, or command-line tools, the key is to be proactive and regularly manage your photo collection. By following the best practices outlined in this guide, you can prevent duplicate photos from accumulating and ensure that your precious memories are easily accessible and well-organized.
Ready to take your photography skills to the next level? Visit dfphoto.net today to explore a wealth of resources, including detailed tutorials, stunning photo galleries, and a vibrant community of photographers. Discover new techniques, find inspiration for your next project, and connect with fellow photography enthusiasts.
Address: 1600 St Michael’s Dr, Santa Fe, NM 87505, United States
Phone: +1 (505) 471-6001
Website: dfphoto.net