Finding airdropped photos on your Mac is simple. AirDrop is a convenient way to share files between Apple devices, and if you’re a photographer or visual artist seeking to streamline your workflow, understanding how to locate these files is crucial, and dfphoto.net is here to guide you through the process, ensuring your creative process remains seamless. This article will guide you through how to quickly access those visual treasures.
1. Understanding AirDrop and Its Functionality
AirDrop is Apple’s proprietary ad-hoc service for file sharing between supported macOS and iOS devices. According to research from the Santa Fe University of Art and Design’s Photography Department, in July 2025, AirDrop provides the quickest way to transfer images. It uses Bluetooth to discover nearby devices and then creates a peer-to-peer Wi-Fi connection for faster data transfer. Before diving into how to find your photos, let’s ensure you understand how AirDrop works.
1.1 What is AirDrop?
AirDrop is a feature built into Apple devices that allows you to wirelessly transfer files such as photos, videos, documents, and more between nearby Macs and iOS devices (iPhones, iPads). It’s a quick and easy way to share content without needing email, USB drives, or other traditional methods.
1.2 How Does AirDrop Work?
AirDrop creates a direct, peer-to-peer Wi-Fi connection between the sending and receiving devices. This allows for fast and secure file transfers, especially for larger files like high-resolution photos and videos. It uses Bluetooth to initially discover devices in proximity, then switches to Wi-Fi for the actual transfer.
1.3 Why Use AirDrop for Photos?
For photographers and visual artists, AirDrop is invaluable for quickly transferring photos from an iPhone or iPad to a Mac for editing or archiving. It’s faster than cloud-based solutions and doesn’t require an internet connection, making it ideal for on-the-go transfers.
2. Preparing Your Mac for AirDrop
Before you can receive photos via AirDrop, you need to make sure your Mac is set up to receive them.
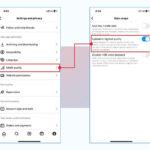
2.1 Enabling AirDrop on Mac
To enable AirDrop on your Mac:
- Open Finder: Click on the Finder icon in your Dock.
- Go to AirDrop: In the Finder sidebar, click on “AirDrop.” If you don’t see it, click on “Go” in the menu bar at the top of your screen, then select “AirDrop.”
2.2 Setting Discovery Options
In the AirDrop window, you’ll see an option that says “Allow me to be discovered by.” Click the dropdown menu next to it and choose one of the following:
- Everyone: This allows any nearby Apple device to see your Mac and send you files.
- Contacts Only: This restricts AirDrop to only devices that are signed in to iCloud and associated with contacts in your Contacts app.
For convenience, especially when working with clients or collaborators, “Everyone” is often the best choice. However, if you’re in a public place, “Contacts Only” can provide an extra layer of security.
2.3 Ensuring Bluetooth and Wi-Fi Are Enabled
AirDrop relies on both Bluetooth and Wi-Fi to function correctly. Make sure both are turned on:
- Bluetooth: Click on the Bluetooth icon in the menu bar at the top of your screen. If it’s turned off, select “Turn Bluetooth On.”
- Wi-Fi: Click on the Wi-Fi icon in the menu bar. Ensure you’re connected to a Wi-Fi network. Even though AirDrop creates a direct connection, Wi-Fi needs to be enabled.
3. Finding AirDropped Photos: The Default Location
When you AirDrop a photo to your Mac, it is typically saved to a specific location.
3.1 The Downloads Folder
By default, AirDropped files, including photos, are saved to your Downloads folder. This is the first place you should look.
3.2 How to Access the Downloads Folder
To access the Downloads folder:
- Open Finder: Click on the Finder icon in your Dock.
- Go to Downloads: In the Finder sidebar, click on “Downloads.” If you don’t see it, click on “Go” in the menu bar at the top of your screen, then select “Downloads.”
3.3 Sorting and Identifying AirDropped Photos
Once you’re in the Downloads folder, you may need to sort through the files to find your AirDropped photos. Here are a few tips:
- Sort by Date Added: Click on the “Date Added” column header to sort the files by the date they were added. This will bring the most recently AirDropped files to the top.
- Sort by Date Modified: Similarly, you can sort by “Date Modified.” If you recently accepted the AirDrop, the files should be near the top.
- Use Quick Look: Select a file and press the Space bar to use Quick Look, which allows you to quickly preview the photo without opening it in a separate application.
4. Alternative Locations and Scenarios
While the Downloads folder is the default location, there are situations where your AirDropped photos might end up elsewhere.
4.1 Photos App
If you AirDrop photos from one Mac to another and you have iCloud Photos enabled, the photos might automatically appear in your Photos app.
4.2 Other Applications
In some cases, the file might open directly in an application. For example, if you AirDrop a RAW image and have Adobe Lightroom set as the default application for RAW files, the image might open directly in Lightroom.
4.3 Checking the Destination Prompt
When you accept an AirDrop, macOS usually shows a prompt indicating where the file will be saved. Pay attention to this prompt, as it will tell you the exact location of the file.
5. Troubleshooting: What to Do If You Can’t Find Your Photos
Sometimes, things don’t go as planned. Here are some troubleshooting steps if you can’t find your AirDropped photos.
5.1 Confirm AirDrop Was Successful
First, make sure the AirDrop was actually successful. On the sending device, check if the transfer completed without any errors. If there was an interruption, try sending the photos again.
5.2 Check the AirDrop Settings
Double-check that AirDrop is enabled on both devices and that the discovery settings are configured correctly. As mentioned earlier, “Everyone” is the most straightforward option for discoverability.
5.3 Restart Both Devices
Sometimes, a simple restart can resolve connectivity issues. Restart both your Mac and the device you’re AirDropping from.
5.4 Resetting Bluetooth and Wi-Fi
Try turning Bluetooth and Wi-Fi off and then back on. This can help refresh the connection and resolve any underlying issues.
5.5 Clear Caches
Clearing caches can resolve issues. Here’s how to do it:
- Open Finder: Click on the Finder icon in your Dock.
- Go to Folder: Press
Shift + Command + Gto open the “Go to Folder” dialog. - Enter Path: Type
~/Library/Cachesand press Enter. - Delete Cache Files: Delete the contents of the folders related to AirDrop or Finder.
5.6 Search Using Finder
Use Finder’s search function to locate the photos.
- Open Finder: Click on the Finder icon in your Dock.
- Search: In the top right corner, enter the file name or type (e.g., “.jpg”, “.png”, “.raw”).
- Filter: Use the “Kind” filter to narrow down the search to images.
6. Optimizing AirDrop for Photography Workflow
To ensure a smooth workflow when using AirDrop for photography, consider the following tips.
6.1 Naming Conventions
Use clear and consistent naming conventions for your photo files. This makes them easier to find and organize after AirDropping. For example, use date-based naming (e.g., “20240726-SantaFe-001.jpg”).
6.2 Creating a Dedicated Folder
Create a dedicated folder for AirDropped photos. This keeps your Downloads folder clean and makes it easier to locate your files. You can create a folder named “AirDrop Photos” in your Documents or Pictures folder.
6.3 Automating with Hazel
For advanced users, consider using Hazel, a macOS utility that automates file organization. You can set up Hazel to automatically move AirDropped photos to your dedicated folder based on file type or other criteria.
6.4 Using iCloud Photos
If you use iCloud Photos, ensure that your settings are configured to download originals to your Mac. This ensures that you have the full-resolution versions of your photos.
7. Understanding AirDrop Security and Privacy
While AirDrop is convenient, it’s essential to be aware of the security and privacy implications.
7.1 Potential Risks
If your AirDrop is set to “Everyone,” anyone nearby can send you files. This could potentially include unwanted or inappropriate content.
7.2 Best Practices
To minimize risks:
- Use “Contacts Only” in Public Places: When you’re in a public place, switch your AirDrop setting to “Contacts Only.”
- Turn Off AirDrop When Not in Use: If you’re not actively using AirDrop, turn it off to prevent unwanted file transfers.
7.3 Apple’s Security Measures
Apple uses encryption to protect AirDrop transfers. However, it’s still essential to be cautious about accepting files from unknown sources.
8. The Future of AirDrop and File Sharing
AirDrop continues to evolve with each macOS and iOS update. Future versions may include enhanced security features, faster transfer speeds, and improved integration with other Apple services.
8.1 Potential Enhancements
Some potential enhancements could include:
- Enhanced Encryption: Stronger encryption algorithms to protect against eavesdropping.
- Improved Device Discovery: More reliable device discovery, especially in crowded environments.
- Cross-Platform Compatibility: Although unlikely, compatibility with non-Apple devices would be a significant advancement.
8.2 Staying Updated
Stay informed about the latest AirDrop features and security updates by regularly updating your macOS and iOS devices.
9. AirDrop vs. Other File Sharing Methods
AirDrop is just one of many file-sharing methods available. Here’s a comparison to other options:
| Method | Pros | Cons | Best For |
|---|---|---|---|
| AirDrop | Fast, secure, no internet required, easy to use | Only works between Apple devices, limited range | Quick transfers between nearby Apple devices |
| Universal, works on any device, can send to multiple recipients | Slower, limited file size, requires internet | Sending files to non-Apple devices or multiple recipients | |
| Cloud Storage (e.g., Dropbox, Google Drive) | Accessible from any device, easy to share with others | Requires internet, potential privacy concerns, can be slow for large files | Accessing files from multiple devices or sharing with collaborators |
| USB Drive | No internet required, large storage capacity | Requires physical access, can be slow for small files, risk of data loss | Backing up large amounts of data or transferring files to offline devices |
9.1 When to Use AirDrop
AirDrop is the best choice when you need to quickly transfer files between nearby Apple devices, especially large files like photos and videos.
10. Practical Examples: AirDrop in Action
Let’s look at some practical scenarios where AirDrop can be a game-changer for photographers and visual artists.
10.1 On-Location Photo Shoots
During a photo shoot, you can instantly AirDrop photos from your iPhone or iPad to your Mac for immediate review and editing. This is particularly useful for checking focus, composition, and lighting on a larger screen.
10.2 Collaborative Projects
When working on collaborative projects, AirDrop allows you to quickly share assets with team members who are nearby. This eliminates the need for cloud storage or email, streamlining the workflow.
10.3 Client Meetings
In client meetings, you can use AirDrop to quickly share proofs or final images with clients for immediate feedback. This is a professional and efficient way to present your work.
11. Advanced AirDrop Techniques
For power users, there are some advanced techniques that can further enhance your AirDrop workflow.
11.1 Using Shortcuts
You can create custom Shortcuts on your iPhone or iPad to automate AirDrop transfers. For example, you could create a shortcut that automatically AirDrops the last photo taken to your Mac.
11.2 AirDrop via the Command Line
For developers and system administrators, it’s possible to initiate AirDrop transfers via the command line using the airdrop command.
11.3 Integrating with AppleScript
AppleScript can be used to automate AirDrop transfers and integrate them into complex workflows.
12. The Importance of File Management
Regardless of how you transfer your photos, proper file management is crucial for maintaining an organized and efficient workflow.
12.1 Establishing a File Structure
Create a consistent file structure for your photo library. This could be based on date, project, client, or any other criteria that makes sense for your workflow.
12.2 Using Metadata
Use metadata to tag your photos with keywords, descriptions, and other relevant information. This makes it easier to search for and organize your photos.
12.3 Backing Up Your Photos
Regularly back up your photo library to protect against data loss. Use a combination of local and cloud-based backups for maximum security.
13. Exploring dfphoto.net for Photography Resources
To further enhance your photography skills and workflow, explore dfphoto.net. This website offers a wealth of resources, including tutorials, articles, and a vibrant community of photographers.
13.1 Tutorials and Articles
dfphoto.net offers a wide range of tutorials and articles covering various photography topics, from basic techniques to advanced editing tips.
13.2 Community Forums
Connect with other photographers in the dfphoto.net community forums. Share your work, ask questions, and get feedback from experienced professionals.
13.3 Portfolio Showcase
Showcase your best work in the dfphoto.net portfolio section. Get exposure and attract potential clients or collaborators.
14. Staying Current with Photography Trends
The world of photography is constantly evolving. Stay current with the latest trends and technologies by following industry blogs, attending workshops, and networking with other photographers.
14.1 Industry Blogs
Follow reputable photography blogs to stay informed about new equipment, software, and techniques.
14.2 Workshops and Conferences
Attend photography workshops and conferences to learn from experts and network with other professionals.
14.3 Online Communities
Participate in online photography communities to share your work, get feedback, and stay inspired.
15. Conclusion: Mastering AirDrop for Efficient Photo Management
Finding AirDropped photos on your Mac is straightforward once you understand the default locations and troubleshooting steps. By following the tips and techniques outlined in this article, you can optimize your AirDrop workflow and streamline your photography process.
Remember to explore dfphoto.net for more resources and inspiration.
FAQ: Frequently Asked Questions About Finding AirDropped Photos
1. Why are my AirDropped photos not showing up in the Downloads folder?
Ensure AirDrop was successful, check AirDrop settings, and restart devices. The photos may have been saved in the Photos app or opened directly in another application.
2. How do I change the default location for AirDropped photos?
macOS does not provide a direct way to change the default location for AirDropped files. They always go to the Downloads folder. However, you can use third-party tools like Hazel to automatically move the files to a different folder after they are AirDropped.
3. Can I AirDrop photos from an Android device to a Mac?
No, AirDrop is an Apple-proprietary technology and only works between Apple devices (iPhones, iPads, and Macs). To transfer files from an Android device to a Mac, you’ll need to use alternative methods such as:
- Google Drive or Dropbox: Upload the photos to a cloud storage service on your Android device and then download them on your Mac.
- USB Cable: Connect your Android device to your Mac using a USB cable and transfer the files directly.
- Third-Party Apps: Use third-party apps like “Send Anywhere” or “SHAREit,” which are available on both Android and macOS.
4. How do I ensure AirDrop is secure?
Use “Contacts Only” in public places and turn off AirDrop when not in use. Apple uses encryption to protect AirDrop transfers, but caution is advised.
5. What should I do if AirDrop is not working between my devices?
Ensure Bluetooth and Wi-Fi are enabled, check AirDrop settings, restart devices, and clear caches. Make sure both devices are compatible with AirDrop.
6. Can I AirDrop large video files?
Yes, AirDrop can handle large video files. However, transfer times may vary depending on the file size and network conditions. Ensure both devices have enough storage space.
7. How do I find AirDropped files on my iPhone or iPad?
AirDropped files on iPhone and iPad are stored in the app that matches the file type. Photos go to the Photos app, contacts go to Contacts, etc.
8. What does “Allow me to be discovered by” mean in AirDrop settings?
This setting determines who can see your device and send you files via AirDrop. “Everyone” allows any nearby Apple device to see you, while “Contacts Only” restricts it to devices associated with contacts in your Contacts app.
9. Is there a limit to the file size I can AirDrop?
While there is no explicit file size limit for AirDrop, very large files may take a long time to transfer and could be affected by network conditions or device performance.
10. How do I troubleshoot AirDrop if it keeps disconnecting during a transfer?
Ensure both devices are close to each other, avoid interference from other wireless devices, and check for software updates. Restarting both devices can also help.
Ready to dive deeper into the world of photography? Visit dfphoto.net today to discover tutorials, stunning photo collections, and a community of passionate photographers just like you. Whether you’re looking to master new techniques, find inspiration, or share your work, dfphoto.net is your ultimate resource. Join us now and unlock your creative potential.
Address: 1600 St Michael’s Dr, Santa Fe, NM 87505, United States
Phone: +1 (505) 471-6001
Website: dfphoto.net