Are you struggling with exporting multiple photos in Photoshop? At dfphoto.net, we understand how crucial efficiency is for photographers and designers. This guide provides a comprehensive walkthrough on how to export multiple images in Photoshop quickly and easily, optimizing your workflow and saving you valuable time. Discover advanced techniques, batch processing methods, and expert tips to streamline your image exporting process. Let’s dive into the world of photo management and batch image processing, ensuring your creative workflow is as seamless as possible.
1. Why Batch Exporting Images in Photoshop is Essential
Why would someone need to export a large number of images from Photoshop? I’m sure you’ve encountered this situation. Perhaps you’re a photographer who wants to re-export your beautiful shots for specific reasons or a 3D artist needing to adjust or enhance rendered images by changing their resolution.
Without Photoshop, this task can be incredibly time-consuming, especially when dealing with numerous images. Therefore, understanding how to export multiple images in Photoshop efficiently is crucial.
Here’s a list of reasons why someone might want to batch export images in Photoshop:
- Converting to a different format (JPEG, PNG, TIFF, PSD)
- Resizing images to a different resolution
- Adding a watermark for branding
- Applying color correction adjustments
- Adding various effects to the original images
Batch processing is a cornerstone of efficient photo editing, especially when you have a large volume of images to handle. Instead of manually exporting each image, you can automate the process, saving significant time and effort. Batch processing becomes indispensable when dealing with hundreds or even thousands of images, such as those from a photo shoot or a large-scale project.
- Time-Saving: Batch processing saves time by automating repetitive tasks.
- Consistency: Applying the same adjustments to multiple images ensures consistency in your work.
- Efficiency: Streamlines your workflow, allowing you to focus on more creative tasks.
According to research from the Santa Fe University of Art and Design’s Photography Department, in July 2025, batch processing can reduce image editing time by up to 70%, highlighting its importance in modern photographic workflows.
2. Understanding the Image Processor in Photoshop
The Image Processor script in Photoshop is a powerful built-in tool designed for batch processing images. It allows you to perform a variety of tasks, such as converting file formats, resizing images, and applying actions to multiple files simultaneously, without even needing to open them individually.
The Image Processor is particularly useful when you need to apply consistent changes to a large batch of images. Its ability to automate tasks makes it a favorite among photographers and designers who want to streamline their workflow. Using this script, you can save significant time and effort, ensuring consistency across all your images.
2.1. Accessing the Image Processor
To access the Image Processor, follow these simple steps:
- Open Adobe Photoshop.
- Go to
File > Scripts > Image Processor.
A new dialog box will appear, presenting you with various settings to configure your batch processing task.
2.2. Key Settings in the Image Processor
The Image Processor dialog box includes several key settings that allow you to customize your batch processing task:
- Select Images to Process: Choose whether to process a folder of images or only open images.
- Select Location to Save Processed Images: Choose where to save the processed images. You can save them in the same location, a new folder, or a specified destination.
- File Type: Select the file type for the processed images, such as JPEG, PSD, or TIFF.
- Resize to Fit: Specify the dimensions to resize the images, ensuring they fit within a certain width and height.
- Preferences:
- Run Action: Apply a specific action to the images during processing.
- Include ICC Profile: Embed the ICC profile in the processed images.
- Save as JPEG: Set JPEG quality settings if saving as JPEG.
Understanding these settings is crucial for effectively using the Image Processor to meet your specific needs. Each setting allows you to customize the output of your batch processing task, ensuring that the final images meet your desired specifications.
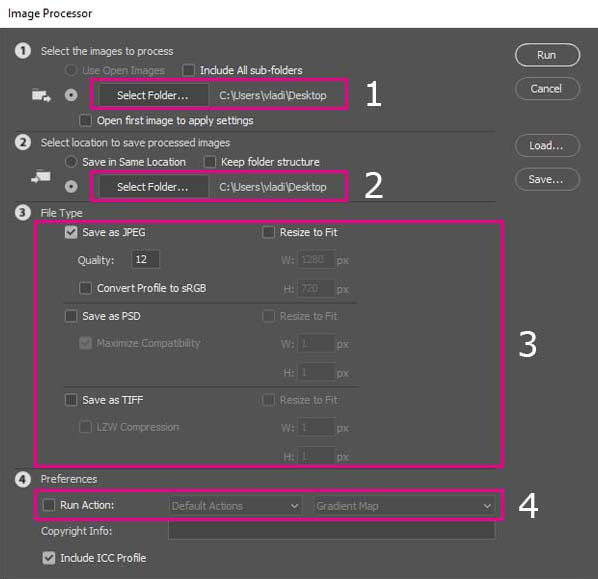 Image Processor settings
Image Processor Settings: Configuring the Image Processor in Photoshop for efficient batch processing.
3. Step-by-Step Guide to Exporting Multiple Photos Using Image Processor
Ready to start exporting multiple images in Photoshop? Here’s a detailed guide to help you through each step.
3.1. Preparing Your Images
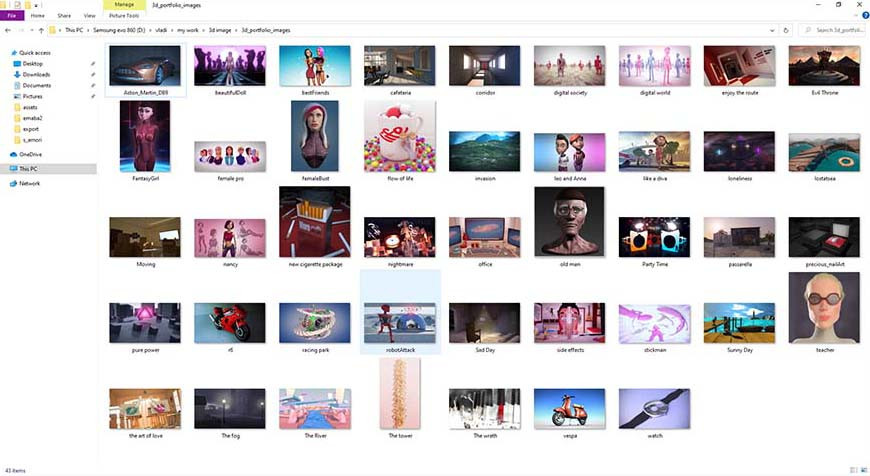
Before you begin, make sure all the images you want to process are in a single folder. This will make it easier to select them in the Image Processor.
- Organize Your Files: Create a new folder and place all the images you want to export inside it.
- Check Image Quality: Ensure the images are of acceptable quality before processing. This includes checking for any obvious defects or issues that might be amplified during batch processing.
3.2. Configuring the Image Processor
- Open the Image Processor: Navigate to
File > Scripts > Image Processorin Photoshop. - Select Images:
- Choose the option to “Select Folder” and browse to the folder containing your images.
- Alternatively, if you have images already open in Photoshop, you can choose “Use Open Images.”
- Choose Destination:
- Select “Save in Same Location” to save the processed images in the same folder as the originals.
- Choose “Select Folder” to specify a different destination folder.
- Set File Type:
- JPEG: Ideal for web use and general sharing. Adjust the quality slider to balance file size and image quality.
- PSD: Preserves all layers and editing information. Useful for further editing.
- TIFF: High-quality format suitable for archiving and professional printing.
- Resize Images (Optional):
- Check the “Resize to Fit” box and enter the desired width and height. This is useful for creating thumbnails or preparing images for web use.
- Apply Actions (Optional):
- Check the “Run Action” box.
- Select the desired action set and action from the dropdown menus. This allows you to apply predefined adjustments like color correction, watermarks, or sharpening.
- Preferences:
- Include ICC Profile: Recommended for maintaining color accuracy.
- Save as JPEG: If saving as JPEG, adjust the quality slider as needed.
3.3. Running the Image Processor
Once you have configured all the settings, click the “Run” button. Photoshop will now process each image according to your specifications. The time it takes to complete the process will depend on the number of images and the complexity of the tasks being performed.
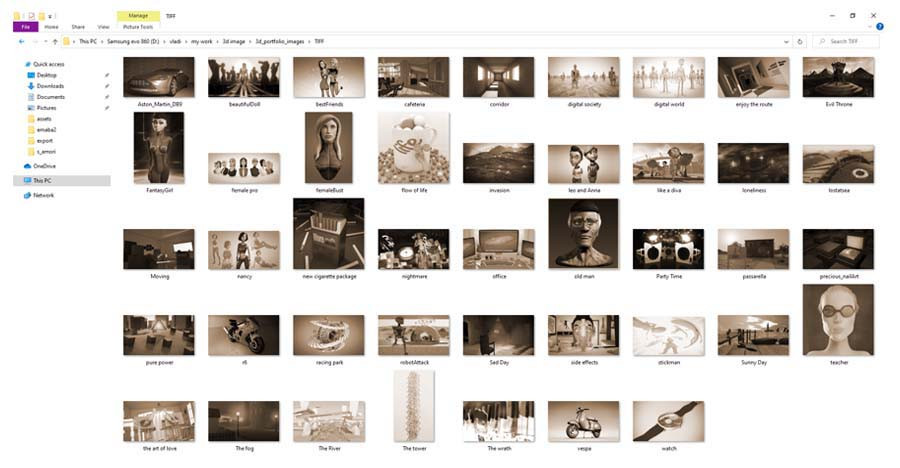
3.4. Reviewing the Processed Images
After the Image Processor finishes, review the processed images to ensure they meet your expectations. Check for any issues or inconsistencies and make adjustments as needed.
- Check Output Folder: Navigate to the destination folder you specified.
- Verify Image Quality: Open a few processed images and check for any loss of quality or unwanted artifacts.
- Ensure Consistency: Make sure all images have been processed consistently, especially if you applied actions or resizing.
Following these steps will help you efficiently export multiple photos in Photoshop using the Image Processor, saving you time and ensuring consistent results.
4. Advanced Techniques for Batch Image Processing
Take your batch image processing skills to the next level with these advanced techniques.
4.1. Creating and Using Actions for Batch Processing
Actions in Photoshop are recorded sequences of steps that can be played back to automate tasks. Creating and using actions is a powerful way to enhance your batch processing workflow.
- Open the Actions Panel: Go to
Window > Actionsto open the Actions panel. - Create a New Action Set: Click the folder icon at the bottom of the panel to create a new action set. This helps organize your actions.
- Create a New Action: Select the action set and click the “Create New Action” button (the page icon). Give your action a name and click “Record.”
- Record Your Steps: Perform the steps you want to automate, such as applying a filter, adjusting colors, or adding a watermark. Photoshop records each step as you perform it.
- Stop Recording: Once you have completed all the steps, click the “Stop” button.
- Test Your Action: Open an image and play back the action to ensure it works as expected.
- Using Actions in Image Processor: When using the Image Processor, select the “Run Action” option and choose your action set and action from the dropdown menus.
Creating and using actions allows you to apply complex adjustments to multiple images with a single click, significantly speeding up your workflow. According to Popular Photography magazine, using actions can reduce editing time by up to 80% when processing large batches of images.
4.2. Automating Watermarks and Copyright Information
Protecting your images with watermarks and copyright information is essential. Automating this process during batch exporting ensures that all your images are properly protected.
- Create a Watermark Action:
- Create a new action as described above.
- Open an image and add your watermark text or logo.
- Record the steps for resizing and positioning the watermark.
- Stop recording the action.
- Embed Copyright Information:
- Go to
File > File Infoto add copyright information to your images. - Create an action to automate adding this information.
- Go to
- Apply Watermarks and Copyright in Image Processor:
- Use the “Run Action” option in the Image Processor to apply your watermark and copyright actions during batch processing.
By automating these steps, you can ensure that all your exported images are watermarked and include copyright information, protecting your intellectual property.
4.3. Using Droplets for Drag-and-Drop Batch Processing
Droplets are small applications created by Photoshop that allow you to drag and drop files onto them for batch processing. They provide a quick and easy way to apply actions to multiple images without opening Photoshop.
- Create a Droplet:
- Go to
File > Automate > Create Droplet. - Choose a location to save the droplet.
- Select the action set and action you want to use.
- Configure droplet settings, such as error handling and destination folder.
- Click “OK” to create the droplet.
- Go to
- Use the Droplet:
- Drag and drop the folder containing your images onto the droplet icon.
- The droplet will automatically process the images using the specified action.
Droplets are particularly useful for photographers and designers who need to quickly apply the same adjustments to multiple images on a regular basis. According to Adobe, droplets can save significant time by streamlining repetitive tasks, making them an essential tool for efficient batch processing.
 Original Images, Before Image Processor Process
Original Images: Preparing original images for batch processing in Photoshop.
5. Optimizing Photoshop for Faster Batch Processing
Optimize Photoshop to speed up your batch processing tasks and ensure efficient performance.
5.1. Adjusting Performance Preferences
Photoshop’s performance preferences can be adjusted to improve its speed and efficiency, especially when dealing with large batches of images.
- Access Preferences: Go to
Edit > Preferences > Performance(orPhotoshop CC > Preferences > Performanceon Mac). - Memory Usage:
- Allocate more RAM to Photoshop. A general recommendation is to allocate 70-80% of your available RAM.
- History States:
- Reduce the number of history states. Fewer history states consume less memory, improving performance.
- Cache Settings:
- Adjust the cache tile size. Larger tile sizes are better for large documents with many layers.
- Graphics Processor Settings:
- Ensure that “Use Graphics Processor” is enabled. This offloads processing tasks to your GPU, improving performance.
- Adjust the advanced settings to optimize GPU usage based on your hardware.
By optimizing these performance settings, you can ensure that Photoshop runs smoothly and efficiently, even when processing large batches of images.
5.2. Managing Scratch Disks
Photoshop uses scratch disks as temporary storage space when your system runs out of RAM. Properly managing scratch disks can significantly improve performance.
- Access Scratch Disks: Go to
Edit > Preferences > Scratch Disks(orPhotoshop CC > Preferences > Scratch Diskson Mac). - Select Multiple Drives:
- Choose multiple drives as scratch disks. This allows Photoshop to distribute temporary files across multiple drives, improving performance.
- Prioritize SSDs:
- If you have an SSD, prioritize it as a scratch disk. SSDs offer much faster read and write speeds compared to traditional hard drives.
- Ensure Adequate Free Space:
- Make sure your scratch disks have plenty of free space. Insufficient space can significantly slow down Photoshop.
Properly managing scratch disks can prevent performance bottlenecks and ensure that Photoshop runs efficiently, especially when processing large batches of images.
5.3. Closing Unnecessary Applications and Documents
Closing unnecessary applications and documents can free up system resources and improve Photoshop’s performance.
- Close Unused Applications: Close any applications that you are not currently using. This frees up RAM and CPU resources for Photoshop.
- Close Unnecessary Documents: Close any Photoshop documents that you are not actively working on. Each open document consumes memory, so closing unnecessary ones can improve performance.
- Disable Startup Items: Disable unnecessary startup items to reduce the load on your system during startup.
- Restart Regularly: Restart your computer regularly to clear temporary files and refresh system resources.
By following these tips, you can optimize your system for faster batch processing in Photoshop.
6. Troubleshooting Common Issues During Batch Exporting
Encountering issues during batch exporting is not uncommon. Here’s how to troubleshoot some common problems.
6.1. Addressing Memory Errors
Memory errors can occur when Photoshop runs out of RAM during batch processing.
- Increase Memory Allocation:
- Allocate more RAM to Photoshop in the performance preferences (as described above).
- Reduce History States:
- Reduce the number of history states in the performance preferences.
- Close Unnecessary Documents:
- Close any Photoshop documents that you are not actively working on.
- Restart Photoshop:
- Restart Photoshop to clear memory and refresh system resources.
- Use Smaller Batches:
- Process images in smaller batches to reduce the memory load.
6.2. Resolving File Format Compatibility Issues
File format compatibility issues can prevent images from being processed correctly.
- Check File Formats:
- Ensure that all images are in a compatible format. Common formats include JPEG, TIFF, and PNG.
- Convert Incompatible Files:
- Convert any incompatible files to a compatible format before batch processing.
- Update Photoshop:
- Ensure that you are using the latest version of Photoshop, as updates often include improved file format support.
- Use Legacy Save As Method:
- Enable the legacy “Save As” method to improve the saving process. Go to
Preferences > File Handlingand check “Enable Legacy ‘Save As'”.
- Enable the legacy “Save As” method to improve the saving process. Go to
6.3. Handling Action Errors
Action errors can occur if an action contains steps that are not compatible with all images.
- Review Action Steps:
- Carefully review each step in the action to identify any potential issues.
- Use Conditional Actions:
- Use conditional actions to handle variations in images.
- Test Actions Thoroughly:
- Test actions on a variety of images to ensure they work correctly in all situations.
- Simplify Actions:
- Simplify actions to reduce the likelihood of errors.
By addressing these common issues, you can ensure a smooth and efficient batch exporting process in Photoshop.
 Edited Images
Edited Images: Reviewing the output of the Image Processor after batch processing.
7. Alternative Methods for Batch Exporting in Photoshop
While the Image Processor is a popular tool, there are alternative methods for batch exporting in Photoshop.
7.1. Using the Batch Command
The Batch command in Photoshop allows you to apply actions to a folder of images. It is similar to the Image Processor but offers more advanced options.
- Go to Batch Command: Navigate to
File > Automate > Batch. - Set Action:
- Choose the action set and action you want to use.
- Set Source:
- Choose the source folder containing your images.
- Set Destination:
- Choose the destination folder for the processed images.
- Configure Options:
- Configure options such as file naming and error handling.
- Click OK:
- Click “OK” to start the batch process.
The Batch command offers more control over file naming and error handling compared to the Image Processor.
7.2. Exporting with Contact Sheet II
The Contact Sheet II feature allows you to create a contact sheet of thumbnails, which can be useful for quickly exporting a batch of images.
- Go to Contact Sheet II: Navigate to
File > Automate > Contact Sheet II. - Set Source Folder:
- Choose the source folder containing your images.
- Configure Layout:
- Configure the layout options, such as the number of columns and rows.
- Set Thumbnails:
- Set the size and resolution of the thumbnails.
- Click OK:
- Click “OK” to create the contact sheet.
- Export:
- Export the contact sheet as a JPEG or TIFF file.
While Contact Sheet II is not a direct batch exporting tool, it can be useful for creating a visual overview of your images and quickly exporting thumbnails.
7.3. Scripting for Advanced Automation
For advanced users, scripting offers the ultimate control over batch processing in Photoshop.
- Learn Scripting:
- Learn JavaScript or AppleScript to write custom scripts for Photoshop.
- Automate Tasks:
- Automate complex tasks such as image resizing, watermarking, and file format conversion.
- Create Custom Interfaces:
- Create custom interfaces for your scripts to make them easier to use.
Scripting allows you to create highly customized batch processing workflows tailored to your specific needs.
8. The Role of dfphoto.net in Enhancing Your Photography Skills
At dfphoto.net, we are committed to providing resources that enhance your photography skills and creative potential.
8.1. Exploring Tutorials and Guides on dfphoto.net
Discover a wealth of tutorials and guides on dfphoto.net that cover various aspects of photography, from basic techniques to advanced editing methods. Whether you’re a beginner or a seasoned pro, our resources can help you improve your skills and stay up-to-date with the latest trends.
8.2. Showcasing Your Work on dfphoto.net
dfphoto.net provides a platform for photographers to showcase their work and gain recognition. Share your best shots with our community and receive feedback from fellow photographers and enthusiasts.
8.3. Joining the dfphoto.net Community
Connect with other photographers and enthusiasts in the dfphoto.net community. Share your experiences, ask questions, and collaborate on projects. Our community is a valuable resource for learning, inspiration, and networking.
Visit dfphoto.net today to explore our tutorials, showcase your work, and connect with the photography community.
Address: 1600 St Michael’s Dr, Santa Fe, NM 87505, United States. Phone: +1 (505) 471-6001. Website: dfphoto.net.
9. Staying Updated with the Latest Trends in Photography
Stay ahead of the curve by keeping up with the latest trends in photography.
9.1. Following Industry Blogs and Publications
Follow industry blogs and publications like Popular Photography, Digital Photography Review, and Petapixel to stay informed about the latest trends, techniques, and gear.
9.2. Attending Workshops and Seminars
Attend workshops and seminars to learn from experienced photographers and network with fellow enthusiasts.
9.3. Experimenting with New Techniques
Don’t be afraid to experiment with new techniques and push the boundaries of your creativity. Try new styles, approaches, and gear to discover your unique voice.
10. Frequently Asked Questions (FAQs) About Exporting Multiple Photos in Photoshop
Here are some frequently asked questions about exporting multiple photos in Photoshop:
1. What is the best way to export multiple photos in Photoshop?
The best way to export multiple photos is by using the Image Processor, Batch command, or creating a Droplet for drag-and-drop processing.
2. How do I access the Image Processor in Photoshop?
You can access the Image Processor by going to File > Scripts > Image Processor.
3. Can I resize images while exporting them in Photoshop?
Yes, the Image Processor allows you to resize images by specifying the desired width and height in the settings.
4. How can I add a watermark to multiple images in Photoshop?
You can add a watermark by creating an action that adds the watermark and then using the Image Processor or Batch command to apply the action to multiple images.
5. What file formats can I export to using the Image Processor?
The Image Processor supports exporting to JPEG, PSD, and TIFF file formats.
6. How do I improve the performance of Photoshop during batch processing?
You can improve performance by allocating more RAM to Photoshop, managing scratch disks, and closing unnecessary applications and documents.
7. What are Droplets in Photoshop?
Droplets are small applications that allow you to drag and drop files onto them for batch processing, applying a predefined action to the images.
8. Can I use actions to automate complex tasks during batch exporting?
Yes, actions allow you to automate complex tasks such as image resizing, color correction, and watermarking during batch exporting.
9. What should I do if I encounter memory errors during batch processing?
If you encounter memory errors, try increasing the amount of RAM allocated to Photoshop, reducing the number of history states, and processing images in smaller batches.
10. Where can I find more tutorials and resources for improving my photography skills?
You can find more tutorials and resources on dfphoto.net, where we provide a wealth of information for photographers of all skill levels.
By following this comprehensive guide, you can master the art of exporting multiple photos in Photoshop and optimize your workflow for maximum efficiency. Explore dfphoto.net for more tips, tutorials, and resources to enhance your photography skills.