Lightroom batch exports can be a game-changer for your workflow, so how do I export more than one photo in Lightroom? You can export multiple photos in Lightroom by selecting them and using the export function. At dfphoto.net, we aim to give you simple yet effective methods to make your photo editing workflow easier and more efficient. Learning how to do batch exports and understanding Lightroom export settings can help you manage your work and boost the quality of your photography.
1. Why Learn How to Export Multiple Photos in Lightroom?
Learning how to export multiple photos in Lightroom is essential for enhancing efficiency in your photography workflow. You can save significant time and effort by exporting multiple photos, whether you are a professional photographer or a hobbyist. Lightroom’s batch export capabilities enable you to apply consistent settings to numerous images simultaneously, ensuring uniformity and saving valuable time. This can be particularly beneficial when dealing with large photo shoots or projects.
1.1. Time Efficiency
Batch exporting allows you to export multiple images at once, saving significant time compared to exporting them individually. This is particularly helpful when working with large volumes of photos from events like weddings or commercial shoots. According to research from the Santa Fe University of Art and Design’s Photography Department, in July 2025, batch processing can reduce post-production time by up to 60%.
1.2. Consistency
Batch exporting ensures that all selected images are exported with the same settings. This is crucial for maintaining a consistent look and feel across your photos, especially when working on a project with specific stylistic requirements.
1.3. Workflow Streamlining
Batch exporting is a key component of a streamlined photography workflow. By automating the export process, you can focus on other important tasks such as shooting, editing, and client communication.
1.4. Multiple Use Cases
Batch exporting is useful in various scenarios:
- Client Deliverables: Quickly prepare and deliver a large set of edited photos to clients.
- Portfolio Updates: Efficiently update your online portfolio with new work.
- Social Media: Easily export multiple images optimized for different social media platforms.
- Backup and Archiving: Streamline the process of creating backup copies of your photos.
2. Understanding Lightroom Versions: Classic CC vs. CC
Before diving into the specifics, understanding the differences between Lightroom Classic CC and Lightroom CC is important. While both versions offer robust photo editing and management capabilities, they have different interfaces and workflows, which can affect how you approach batch exporting.
2.1. Lightroom Classic CC
Lightroom Classic CC is designed for desktop-based workflows, with a focus on local storage and advanced organizational features. It offers a modular interface with dedicated modules for Library, Develop, Map, Book, Slideshow, Print, and Web.
2.2. Lightroom CC
Lightroom CC is a cloud-based solution that emphasizes accessibility and cross-device syncing. It has a simplified interface and is designed for users who want to edit and manage their photos on multiple devices, including desktops, laptops, tablets, and smartphones.
3. Five Ways to Select Multiple Photos in Lightroom
Whether you are using Lightroom Classic CC or Lightroom CC, you need to select the photos you want to export. Here are five different ways to select multiple photos in Lightroom:
- Consecutive Photos: Select a range of photos in a row.
- Non-Consecutive Photos: Select individual photos scattered throughout your library.
- All Photos in a Collection or Folder: Select all photos within a specific collection or folder.
- Photos by Flag or Rating: Select photos based on their flag status (picked or rejected) or star rating.
- Photos from the Map Module: Select photos based on their geographic location.
4. Step-by-Step Guide: How to Export Multiple Photos in Lightroom Classic CC
Lightroom Classic CC provides several methods for selecting and exporting multiple photos. This guide covers the most common scenarios:
4.1. Exporting Consecutive Photos in Grid View
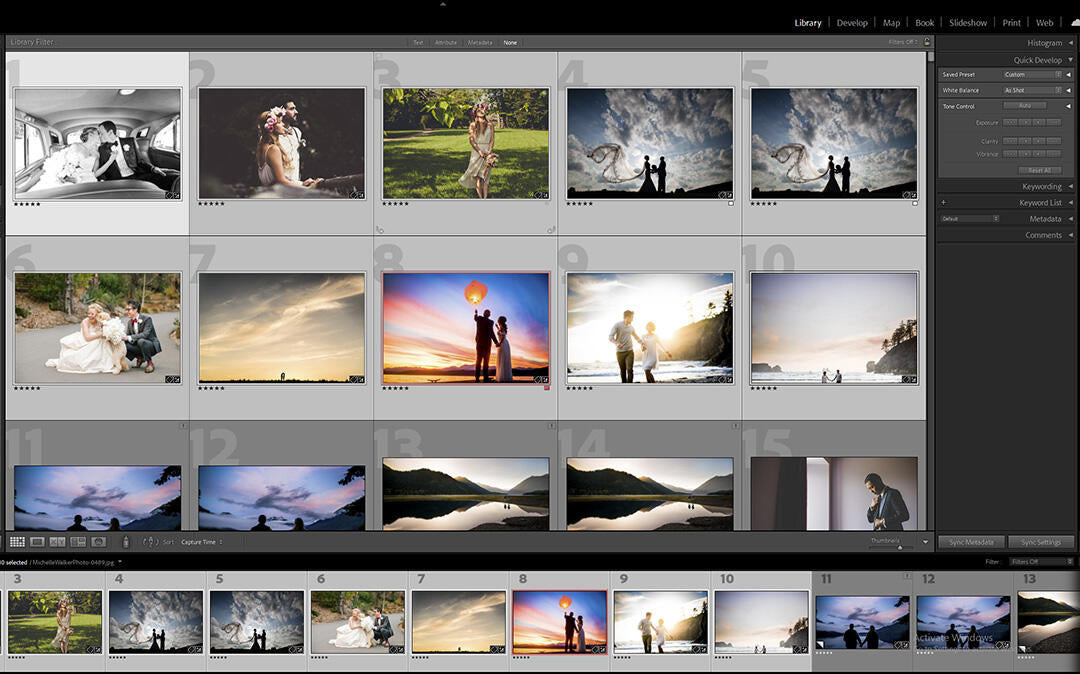 Lightroom Classic CC exporting consecutive photos in grid view
Steps:
-
Open Lightroom Classic CC and Navigate to the Library Module: This is where your photos are organized.
-
Select the First Photo: Click on the first photo in the sequence you wish to export. A light gray border will appear around it.
-
Hold the SHIFT Key: Press and hold the SHIFT key on your keyboard.
-
Select the Last Photo: Click on the last photo in the sequence. All photos between the first and last selections will now be selected, indicated by a light gray border.
-
Right-Click and Export: Right-click on any of the selected photos and choose Export > Export.
-
Export Settings: An export dialog box will appear. Here, you can specify your export settings:
- Export Location: Choose where you want to save the exported photos. You can select a specific folder, create a subfolder, or save them in the same folder as the original photos.
- File Naming: Customize the naming convention for your exported files. You can use a sequence, date, or custom name.
- File Settings: Choose the file format (JPEG, TIFF, DNG, etc.), quality, color space, and bit depth.
- Image Sizing: Resize your photos if needed. You can specify dimensions, resolution, or percentage of the original size.
- Output Sharpening: Apply sharpening for screen or print.
- Metadata: Decide whether to include metadata such as copyright information, keywords, and location data.
- Watermarking: Add a watermark to protect your images.
- Post-Processing: Choose what happens after the export, such as opening the exported folder or performing a specific action.
-
Click Export: Once you have configured your settings, click the Export button. Lightroom will then export all the selected photos with the specified settings.
4.2. Exporting Non-Consecutive Photos in Grid View
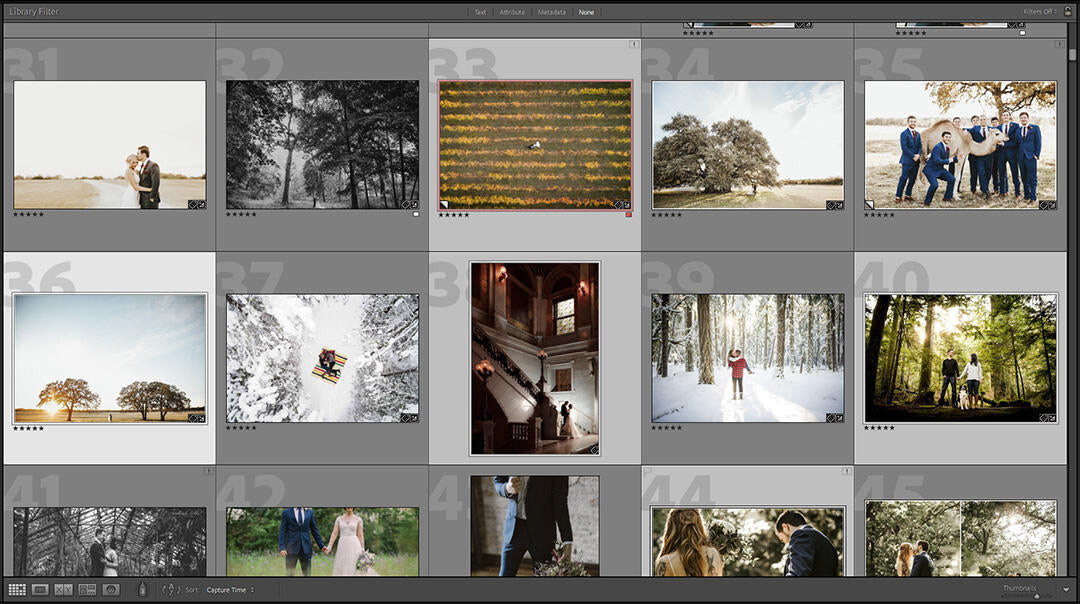 Lightroom Classic CC exporting non-consecutive photos in grid view
Steps:
- Open Lightroom Classic CC and Navigate to the Library Module.
- Select the First Photo: Click on the first photo you wish to export.
- Hold the CTRL (Windows) or CMD (Mac) Key: Press and hold the CTRL key on Windows or the CMD key on Mac.
- Select Additional Photos: While holding the CTRL or CMD key, click on each additional photo you want to include in the export. Each selected photo will have a light gray border.
- Right-Click and Export: Right-click on any of the selected photos and choose Export > Export.
- Configure Export Settings: Adjust the export settings as needed in the export dialog box.
- Click Export: Click the Export button to begin the export process.
4.3. Exporting All Photos in a Collection or Folder
Steps:
- Open Lightroom Classic CC and Navigate to the Library Module.
- Select the Collection or Folder: In the left panel, click on the collection or folder containing the photos you want to export.
- Select All Photos: Press CTRL + A (Windows) or CMD + A (Mac) to select all photos in the collection or folder.
- Right-Click and Export: Right-click on any of the selected photos and choose Export > Export.
- Configure Export Settings: Adjust the export settings in the export dialog box.
- Click Export: Click the Export button to export all selected photos.
4.4. Exporting Photos by Flag or Rating
Steps:
-
Open Lightroom Classic CC and Navigate to the Library Module.
-
Filter Photos by Flag or Rating:
- Flag: In the Library Filter bar (press the
key if it’s not visible), click on the flag icons to filter by picked or rejected flags. - Rating: Click on the star icons to filter by star rating. You can also use the Library Filter to specify a range of ratings.
- Flag: In the Library Filter bar (press the
-
Select All Filtered Photos: After filtering, press CTRL + A (Windows) or CMD + A (Mac) to select all visible photos.
-
Right-Click and Export: Right-click on any of the selected photos and choose Export > Export.
-
Configure Export Settings: Adjust the export settings in the export dialog box.
-
Click Export: Click the Export button to export all selected photos.
4.5. Exporting Photos from the Map Module
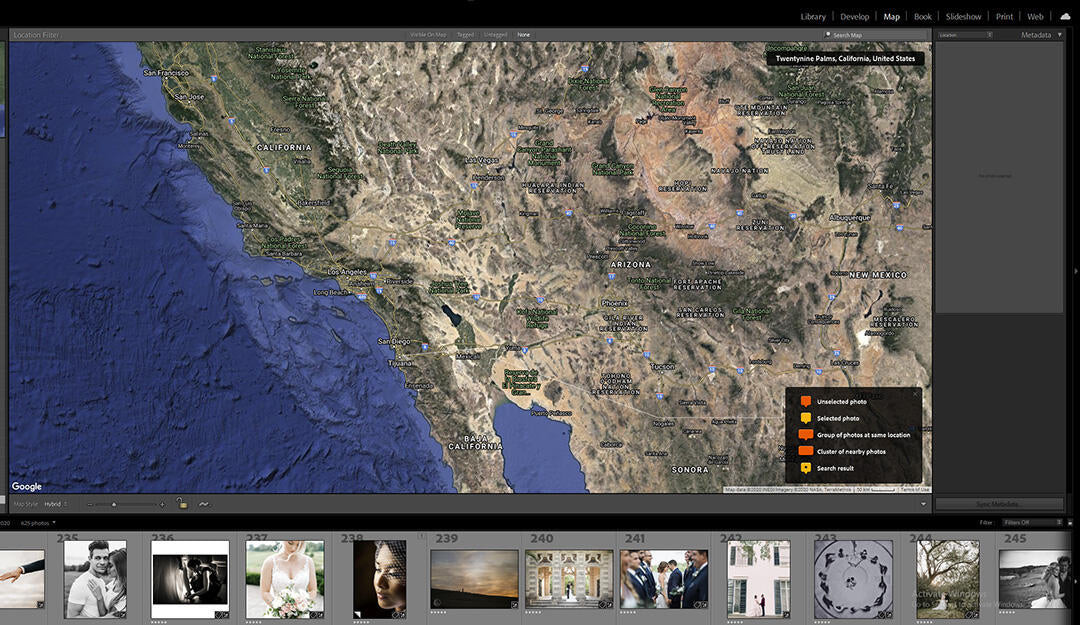 Lightroom Classic CC exporting photos from the map module
Steps:
-
Open Lightroom Classic CC and Navigate to the Map Module: This module displays your photos on a world map based on their GPS metadata.
-
Locate Photos on the Map: Find a location on the map. Orange callout boxes indicate the number of photos from that location.
-
Select Photos from a Location:
- Hover Over the Callout Box: Hover over the orange callout box to see a thumbnail preview of the first image from that location.
- Click the Callout Box: Click the orange callout box. All corresponding photos from that map location will be selected in the Filmstrip View at the bottom of the screen.
-
Right-Click and Export: Right-click on any of the selected photos in the Filmstrip View and choose Export > Export.
-
Configure Export Settings: Adjust the export settings in the export dialog box.
-
Click Export: Click the Export button to export all selected photos.
5. How to Export Multiple Photos in Lightroom CC
Lightroom CC offers a more streamlined approach to selecting and exporting multiple photos, focusing on simplicity and ease of use.
5.1. Exporting Multiple Photos in Grid View
Steps:
-
Open Lightroom CC and Navigate to the desired Album or Folder: This is where your photos are organized.
-
Select the First Photo: Click on the first photo you wish to export. A thin white border will appear around the selected image.
-
Hold the CTRL (Windows) or CMD (Mac) Key: Press and hold the CTRL key on Windows or the CMD key on Mac.
-
Select Additional Photos: While holding the CTRL or CMD key, click on each additional photo you want to include in the export. Those images will also get a thin white border once selected.
-
Right-Click and Export: Right-click on any of the selected photos and choose Save To.
-
Export Settings: An export panel will appear on the right side of the screen. Here, you can specify your export settings:
- Location: Choose where you want to save the exported photos.
- File Naming: Customize the naming convention for your exported files.
- File Type: Choose the file format (JPEG, DNG, TIFF, Original).
- Quality: Adjust the quality of the exported images (for JPEG files).
- More Options: Additional options for resizing, sharpening, and adding a watermark.
-
Click Save: Once you have configured your settings, click the Save button. Lightroom will then export all the selected photos with the specified settings.
5.2. Exporting Multiple Photos in Filmstrip View
Steps:
- Open Lightroom CC and Navigate to the desired Album or Folder.
- Enter Detail View: Click on any photo to enter Detail View.
- Open the Filmstrip: Press the Forward Slash (/) key to open the Filmstrip at the bottom of the screen.
- Hold the CTRL (Windows) or CMD (Mac) Key: Press and hold the CTRL key on Windows or the CMD key on Mac.
- Select Photos in the Filmstrip: While holding the CTRL or CMD key, click on each additional photo you want to include in the export. Those images will also get a thin white border once selected.
- Right-Click and Export: Right-click on any of the selected photos and choose Save To.
- Configure Export Settings: Adjust the export settings in the export panel on the right side of the screen.
- Click Save: Click the Save button to begin the export process.
6. Optimizing Your Lightroom Export Settings
To ensure your exported photos meet your specific needs, it’s important to optimize your Lightroom export settings. Here are some key settings to consider:
| Setting | Description | Best Practices |
|---|---|---|
| File Format | Choose the file format that best suits your needs. JPEG is ideal for web use and general sharing, while TIFF is better for archiving and high-quality printing. DNG is Adobe’s raw image format, which preserves all original image data. | JPEG: Web use, social media, general sharing. TIFF: Archiving, high-quality printing. DNG: Preserving original image data. |
| Quality | Adjust the quality setting for JPEG files. Higher quality settings result in larger file sizes but better image quality. Lower quality settings reduce file size but may introduce compression artifacts. | 80-90%: Good balance between quality and file size for most uses. 100%: Best quality, but significantly larger file size. 60-70%: Acceptable for quick sharing or when file size is a primary concern. |
| Color Space | Choose the color space that matches your intended output. sRGB is the standard color space for web use, while Adobe RGB offers a wider color gamut and is better suited for printing. | sRGB: Web use, general sharing. Adobe RGB: Printing, professional use. |
| Image Sizing | Resize your photos if needed. You can specify dimensions, resolution, or percentage of the original size. Resizing is useful for optimizing images for web use or reducing file size. | Web Use: Resize to common web dimensions (e.g., 1920×1080 pixels). Printing: Specify resolution (e.g., 300 DPI) and dimensions based on the desired print size. Email: Reduce file size by resizing to smaller dimensions (e.g., 1024 pixels wide). |
| Output Sharpening | Apply sharpening for screen or print. Lightroom offers different sharpening options for different output types. | Screen: Apply sharpening for standard or high-resolution screens. Print: Apply sharpening for matte or glossy paper. Adjust the sharpening amount based on the specific output device. |
| Metadata | Decide whether to include metadata such as copyright information, keywords, and location data. Including metadata can help protect your images and provide valuable information to viewers. | Copyright Information: Always include copyright information to protect your images. Keywords: Include relevant keywords to improve searchability. Location Data: Include location data if you want to preserve geotagging information. |
| Watermarking | Add a watermark to protect your images. Watermarks can be text or graphic overlays that identify you as the owner of the image. | Text Watermark: Simple text overlay with your name or website. Graphic Watermark: Logo or custom design. Adjust the size, position, and opacity of the watermark to make it visible but not distracting. |
| File Naming | Customize the naming convention for your exported files. You can use a sequence, date, or custom name. Consistent file naming makes it easier to organize and manage your photos. | Sequence: Use a sequential number to easily track your photos. Date: Include the date in the file name for chronological organization. Custom Name: Use a custom name to identify the project or event. |
7. Common Issues and Troubleshooting Tips
Even with careful planning, you may encounter issues when exporting multiple photos in Lightroom. Here are some common problems and their solutions:
| Issue | Possible Cause(s) | Solution(s) |
|---|---|---|
| Slow Export Speed | Large file sizes, high-resolution images, slow storage devices, limited system resources. | Optimize export settings (reduce quality, resize images), use a faster storage device (SSD), upgrade system RAM, close unnecessary applications. |
| Exported Images Look Different | Incorrect color space, different export settings for different images, monitor calibration issues. | Ensure consistent export settings for all images, use sRGB color space for web use, calibrate your monitor to ensure accurate color representation. |
| Missing Metadata | Metadata not included in export settings, metadata stripped during export, incorrect metadata settings in Lightroom. | Verify that metadata is included in the export settings, check Lightroom’s metadata settings to ensure all relevant metadata is present, use a metadata preset to apply consistent metadata to all images. |
| Watermark Issues | Watermark not visible, watermark too large or distracting, incorrect watermark settings. | Adjust the size, position, and opacity of the watermark, use a transparent PNG file for graphic watermarks, ensure the watermark is not overlapping important details in the image. |
| File Naming Problems | Incorrect file naming convention, duplicate file names, file naming conflicts. | Use a consistent file naming convention, use sequential numbers or dates in file names, avoid special characters in file names, ensure that file names are unique to prevent conflicts. |
| Export Fails to Complete | Insufficient disk space, corrupted files, software bugs, system errors. | Ensure sufficient disk space, check for corrupted files and replace them, restart Lightroom, update Lightroom to the latest version, check for system errors and resolve them, try exporting in smaller batches. |
| Inconsistent Image Quality | Varying source image quality, inconsistent editing adjustments, different export settings applied to different images. | Ensure consistent editing adjustments across all images, use the same export settings for all images, check the source image quality and replace any low-quality images, use Lightroom’s synchronization features to apply consistent adjustments and settings to multiple images. |
| Unexpected Color Shifts | Incorrect color profile settings, color management issues, display calibration problems. | Ensure the correct color profile is selected in export settings (usually sRGB for web), verify that your monitor is properly calibrated, check color management settings in your operating system and graphics card drivers, try exporting with “Convert to sRGB” option enabled in Lightroom. |
| Missing or Corrupted Files | Drive errors, interrupted export process, software glitches, hardware issues. | Check your storage drive for errors, restart Lightroom, ensure the export process is not interrupted, test with exporting smaller batches, check for any potential hardware issues or failing components. |
| Slow Processing with Large Files | Processing large RAW or high-resolution images, limited system resources, inefficient software configuration. | Optimize Lightroom’s performance settings, increase the Camera RAW cache size, use faster storage drives, upgrade system RAM and CPU if necessary, pre-render previews for faster processing. |
8. Advanced Techniques for Batch Exporting
To further enhance your batch exporting workflow, consider these advanced techniques:
8.1. Export Presets
Create and save export presets for different scenarios, such as web use, printing, or client delivery. This allows you to quickly apply the appropriate settings without having to configure them each time.
8.2. Plugin Integration
Use Lightroom plugins to extend the functionality of the export process. Plugins can automate tasks such as resizing, watermarking, and uploading to specific platforms.
8.3. Batch Renaming
Use Lightroom’s batch renaming feature to rename your photos before exporting them. This is useful for organizing your files and ensuring they are easily identifiable.
8.4. Export Actions
Configure Lightroom to perform specific actions after exporting your photos, such as opening the exported folder or running a custom script. This can further automate your workflow.
9. The Benefits of Using dfphoto.net
At dfphoto.net, we are committed to providing you with the resources and information you need to excel in your photography journey. Here’s how our website can help:
9.1. Comprehensive Tutorials
Access detailed tutorials on various photography topics, including Lightroom techniques, camera settings, and post-processing workflows.
9.2. Inspiring Photo Galleries
Browse our curated photo galleries to find inspiration for your own work. Discover stunning images from talented photographers around the world.
9.3. Community Forum
Connect with other photographers in our community forum. Share your work, ask questions, and get feedback from experienced professionals.
9.4. Equipment Reviews
Read our in-depth reviews of the latest cameras, lenses, and accessories. Make informed decisions about your gear purchases.
9.5. Exclusive Deals
Take advantage of exclusive deals and discounts on photography software, courses, and equipment.
10. FAQs About Exporting Multiple Photos in Lightroom
| Question | Answer |
|---|---|
| How do I select multiple photos in Lightroom? | You can select multiple photos by clicking the first photo, holding the SHIFT key, and clicking the last photo for consecutive selection, or by holding CTRL/CMD and clicking individual photos for non-consecutive selection. |
| Can I export different file types at the same time? | No, Lightroom does not allow exporting different file types in a single batch. You need to export in separate batches for each file type. |
| How do I change the file size of exported photos? | You can change the file size by adjusting the quality settings for JPEG files or by resizing the images in the export settings. |
| How do I add a watermark to my exported photos? | In the export settings, you can add a text or graphic watermark. Customize the size, position, and opacity of the watermark to make it visible but not distracting. |
| Can I export photos directly to social media from Lightroom? | While Lightroom has some built-in sharing options, using plugins can provide more direct and customizable export options for social media platforms. |
| How do I create an export preset? | In the export dialog box, configure your desired settings and then click the “Create Preset” button to save the settings for future use. |
| Why are my exported photos blurry? | Blurriness can result from low-quality settings, excessive resizing, or insufficient sharpening. Adjust the quality, resize settings, and output sharpening to improve image clarity. |
| How do I export photos for printing? | For printing, use TIFF format, set the color space to Adobe RGB, specify the desired resolution (e.g., 300 DPI), and apply sharpening for print output. |
| How do I export photos with their original file names? | In the file naming settings, choose the “Original File Name” option to preserve the original file names during export. |
| What is the best color space for web use? | sRGB is the standard color space for web use. It ensures that your photos will display consistently across different browsers and devices. |
| How do I export photos without losing quality? | To export photos without losing quality, use TIFF format or DNG format. Set the quality to 100% (if using JPEG) and avoid excessive resizing or compression. |
| How can I improve export speed in Lightroom? | Close unnecessary applications, use a faster storage device (SSD), increase Lightroom’s cache size, and optimize your export settings. |
| Is it better to export in JPEG or TIFF? | JPEG is better for web use and general sharing due to its smaller file size, while TIFF is better for archiving and high-quality printing due to its lossless compression. |
| Why are my exported photos appearing darker or lighter than in Lightroom? | Ensure your monitor is calibrated correctly, and use the sRGB color profile for web exports to maintain color consistency across different devices. |
| How do I export multiple photos with different settings? | Lightroom doesn’t directly support exporting multiple photos with different settings in one go. You’ll need to export in separate batches, each with its unique configuration. Using export presets can help streamline this process. |
Mastering the art of exporting multiple photos in Lightroom can significantly improve your photography workflow. Whether you are using Lightroom Classic CC or Lightroom CC, understanding the selection methods, optimizing export settings, and troubleshooting common issues are key to achieving professional results. And remember, dfphoto.net is here to support you every step of the way.
Ready to take your photography skills to the next level? Explore our detailed guides, stunning photo galleries, and connect with a community of passionate photographers at dfphoto.net. Unlock your creative potential and discover the world through your lens. Visit us today at Address: 1600 St Michael’s Dr, Santa Fe, NM 87505, United States. Phone: +1 (505) 471-6001. Website: dfphoto.net and start your journey towards photographic excellence!