Live Photos on iPhones are a fantastic way to capture moments with a bit of motion and sound. Sometimes, you might want to share these lively memories as GIFs, especially for platforms that don’t support Live Photos. However, users often find themselves puzzled when trying to export GIFs from their iOS Photos, particularly when the “Export GIF” option appears to be missing or greyed out.
This guide will walk you through the straightforward steps to successfully export GIFs from your iOS photos to files, ensuring you can share your animated memories easily. We’ll clarify why you might be encountering issues and provide a foolproof method to get your GIFs exported efficiently.
Understanding Live Photos and GIFs
Before diving into the “how-to,” let’s briefly understand the difference between Live Photos and GIFs. A Live Photo is essentially a short video clip captured by your iPhone when you take a photo in Live mode. It contains motion and sound, bringing your still images to life within the Apple ecosystem.
On the other hand, a GIF (Graphics Interchange Format) is a widely compatible image format that supports animation. GIFs are excellent for sharing short, looping videos or animations across various platforms and devices, including social media and websites that might not natively support Live Photos.
The goal here is to convert the “live” motion part of your Live Photo into a looping GIF file that you can easily share.
Step-by-Step Guide: Exporting GIFs from iOS Photos
The key to successfully exporting GIFs from iOS Photos lies in a simple adjustment within the Photos app itself, specifically on your iPhone. Here’s how to do it:
Step 1: Convert Your Live Photo to Loop or Bounce on your iPhone
This is the crucial step that often gets missed. The direct “Export GIF” option might seem elusive because Live Photos, in their original form, are not directly recognized as animated content for GIF conversion within the export menu on Mac Photos. You need to tell your iPhone that you want to emphasize the motion aspect of the Live Photo.
-
Open the Photos App: Launch the Photos app on your iPhone and navigate to the Live Photo you wish to export as a GIF.
-
Swipe Up or Tap “Live”: Once you’ve selected your Live Photo, swipe up on the image or look for the “Live” dropdown menu at the top left corner.
-
Choose “Loop” or “Bounce”: You’ll see three options: “Live,” “Loop,” and “Bounce.” Select either “Loop” or “Bounce.”
- Loop: Plays your Live Photo animation continuously in a loop.
- Bounce: Plays the animation forward and then reverses it, creating a back-and-forth bouncing effect.
By applying either “Loop” or “Bounce” effect, you are essentially processing your Live Photo into a recognized animated format that can then be exported as a GIF.
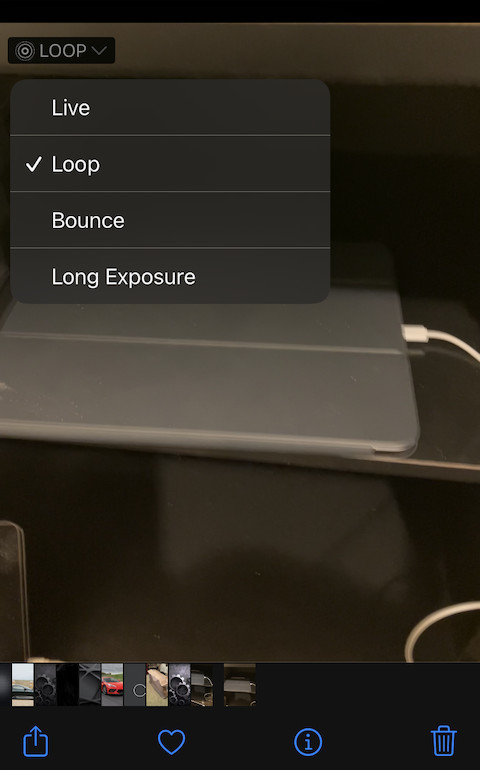 iPhone Photos app showing Live Photo effects Loop and Bounce, required for GIF export.
Step 2: Export as GIF on your Mac (or iPhone)
Once you’ve converted your Live Photo to “Loop” or “Bounce” on your iPhone, the “Export GIF” option should become available when you access the photo on your Mac or even directly on your iPhone.
On your Mac:
-
Open Photos App on Mac: Ensure your iPhone Photos are synced with your Mac Photos app via iCloud. Open the Photos app on your Mac and find the Live Photo you modified.
-
Select Export: Select the Live Photo. Then, in the menu bar, click “File” then “Export” and then “Export GIF…” or simply click the “Export” button in the toolbar.
-
Choose Export Location: A dialog box will appear, allowing you to choose where to save your GIF file and rename it if you wish. Select your desired location and click “Export.”
On your iPhone (Alternative Method):
While the original thread focuses on Mac export, you can also achieve GIF export directly on your iPhone using the “Files” app after applying the “Loop” or “Bounce” effect.
-
Open the Photos App: Open the Photos app and select your modified Live Photo (with “Loop” or “Bounce” effect).
-
Tap the Share Button: Tap the Share button (the square with an upward arrow) at the bottom left corner.
-
Scroll Down and Choose “Save to Files”: Scroll down the share sheet options and tap “Save to Files.”
-
Choose Location and Save: Select where you want to save the file within your Files app (e.g., iCloud Drive, On My iPhone). Tap “Save.”
-
Access GIF in Files App: Navigate to the location you saved the file in the Files app. You might see it initially as a Live Photo file. However, when you share it from the Files app to certain platforms or apps that support GIF recognition, it will be treated and function as a GIF. For more explicit GIF conversion and control, consider using third-party apps (mentioned later).
Troubleshooting: Why is “Export GIF” Greyed Out?
If you are still encountering a greyed-out “Export GIF” option on your Mac, even after syncing your Live Photo, it’s likely because the Live Photo has not been converted to “Loop” or “Bounce.”
-
Verify “Loop” or “Bounce” is Applied: Double-check on your iPhone that you have indeed applied the “Loop” or “Bounce” effect to the Live Photo. This is the most common reason for the “Export GIF” option to be unavailable.
-
Software Updates: Ensure both your iPhone and Mac are running the latest compatible versions of iOS and macOS. Software bugs can sometimes cause unexpected issues.
-
Restart Apps/Devices: Sometimes, simply restarting the Photos app on both your iPhone and Mac, or even restarting your devices, can resolve temporary glitches.
Alternative Methods for GIF Export
While the built-in Photos app provides a basic way to export GIFs, you might want more control over the GIF creation process, such as adjusting frame rates, resolution, or adding effects. In such cases, numerous third-party apps are available on the App Store that offer advanced GIF conversion features from Live Photos. Search for apps using keywords like “Live Photo to GIF,” “GIF maker,” or “video to GIF” to explore these options.
Conclusion
Exporting GIFs from iOS Photos to files is a quite simple process once you understand the necessary step of converting your Live Photo to “Loop” or “Bounce” on your iPhone first. By following this guide, you should be able to easily create and share GIFs from your lively memories. Experiment with the “Loop” and “Bounce” effects to see which one best suits your desired GIF animation. Now, go ahead and bring your Live Photos to life as shareable GIFs!