Running out of storage on your iPhone? Duplicate photos are often silent culprits consuming precious space. If you’re wondering how to efficiently clear out those unnecessary copies and reclaim storage, you’ve come to the right place. This guide will walk you through the simple steps to erase duplicate photos on your iPhone and also cover other essential photo deletion methods to keep your photo library organized and optimized.
Why Do Duplicate Photos Clutter Your iPhone?
Before diving into the solution, let’s understand why duplicate photos accumulate on your iPhone in the first place. Several common scenarios lead to this issue:
- Accidental Multiple Imports: Importing photos from your computer or other devices multiple times can easily create duplicates.
- Cloud Syncing Issues: Glitches or interruptions during iCloud Photo syncing can sometimes result in repeated uploads of the same images.
- Saving Multiple Versions: Editing a photo and saving it repeatedly, instead of saving over the original, generates duplicate files.
- App-Related Duplicates: Certain apps might automatically save photos, leading to copies already present in your photo library.
- Backups and Restores: Restoring your iPhone from a backup might sometimes reintroduce photos you thought you had already deleted or create copies of existing ones.
Regardless of the cause, dealing with duplicate photos is crucial for efficient iPhone storage management. Thankfully, Apple has introduced a built-in feature to simplify this process.
How to Delete Duplicate Photos on iPhone (iOS 16 and Later)
Apple’s iOS 16 and later versions have made it incredibly easy to identify and remove duplicate photos directly within the Photos app. Here’s how to use the built-in Duplicates album:
Utilizing the Duplicates Album
-
Open the Photos App: Locate and tap the Photos app icon on your iPhone’s home screen.
-
Navigate to the Albums Tab: At the bottom of the Photos app, tap on the “Albums” tab.
-
Scroll Down to Utilities and Find Duplicates: Scroll down the Albums screen until you find the “Utilities” section. Within this section, you should see a “Duplicates” album. Tap on “Duplicates”.
 iPhone showing the Duplicates album option under Utilities in the Photos app
 -
Review Duplicate Sets: The Duplicates album will display sets of photos that the system has identified as duplicates. You can tap on each set to preview the photos and compare them.
-
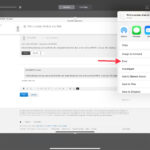
Merge Duplicates: For each set of duplicates, tap the “Merge” button located above the photo thumbnails.
-
Confirm Merge: A confirmation prompt will appear, displaying the number of items to be merged. Tap “Merge [Number] Items” to proceed.
 iPhone showing the Merge option to combine duplicate photos
Understanding the Merge Process
When you merge duplicate photos, your iPhone intelligently retains the version with the highest image quality and relevant metadata. The other duplicate photos are then moved to the “Recently Deleted” album. This ensures you keep the best version while freeing up space.
Important Note: The Duplicates album feature requires iOS 16, iPadOS 16.1, or later. The duplicate detection process runs automatically in the background and may take some time to complete, especially if you have a large photo library. Be patient if the Duplicates album doesn’t appear immediately after updating to iOS 16.
Other Methods to Delete Photos on Your iPhone
While the Duplicates album efficiently handles redundant photos, you might also need to delete photos for other reasons, such as clearing out unwanted or blurry images. Here are general methods for deleting photos on your iPhone:
Deleting a Single Photo
- Open Photos: Launch the Photos app.
- Select a Photo: Tap on the specific photo you want to delete to view it in full screen.
- Tap the Trash Icon: Look for the Trash Can icon at the bottom right corner of the screen. Tap this icon.
- Confirm Deletion: Tap “Delete Photo” in the confirmation pop-up that appears from the bottom of the screen. The photo will be moved to the Recently Deleted album.
Deleting Multiple Photos
- Open Photos: Open the Photos app.
- Tap Select: In any album view (like Recents or Albums), tap the “Select” button located in the top right corner of the screen.
- Select Photos: Tap on each photo you wish to delete. A checkmark will appear on the selected photos. You can also swipe your finger across multiple photos to select a range quickly.
- Tap the Trash Icon: Once you’ve selected all the photos you want to delete, tap the Trash Can icon at the bottom right.
- Confirm Deletion: Tap “Delete [Number] Photos” to confirm. The selected photos will be moved to the Recently Deleted album.
Deleting Photos Permanently from Recently Deleted
Photos you delete are initially moved to the “Recently Deleted” album and remain there for 30 days. This gives you a safety net to recover accidentally deleted photos. After 30 days, they are automatically and permanently deleted. If you want to permanently delete photos sooner and free up space immediately:
- Go to Albums and Recently Deleted: In the Photos app, tap the “Albums” tab and scroll down to “Recently Deleted” under Utilities.
- Unlock Recently Deleted (if required): In iOS 16.1 or later, you might need to use Face ID or Touch ID to unlock the Recently Deleted album for privacy. Tap “View Album” and authenticate.
- Select Photos to Permanently Delete: Tap “Select” in the top right corner. Then, select the specific photos you want to permanently erase. Or, if you want to delete everything in Recently Deleted, you can skip selection.
- Tap Delete: Tap the “Delete” button at the bottom left. For individual photos, it’s the “More” button (three dots in a circle) then “Delete”. To delete all, there might be a “Delete All” option in the bottom left or right corner depending on your iOS version.
- Confirm Permanent Deletion: Confirm your action by tapping “Delete Photo” or “Delete [Number] Photos” in the confirmation prompt. Be aware that photos deleted from Recently Deleted are unrecoverable.
Recovering Deleted Photos
Accidentally deleted a photo? Don’t worry! As long as it’s within 30 days of deletion, you can recover it from the “Recently Deleted” album:
- Go to Albums and Recently Deleted: Navigate to the “Recently Deleted” album as described in the permanent deletion steps.
- Unlock Recently Deleted (if required): Authenticate with Face ID or Touch ID if prompted.
- Select Photos to Recover: Tap “Select”, then choose the photos you want to restore. To recover everything, you may have a “Recover All” option.
- Tap Recover: Tap “Recover” at the bottom right. For individual photos, it’s the “More” button then “Recover”.
- Confirm Recovery: Tap “Recover Photo” or “Recover [Number] Photos” to confirm. The recovered photos will be restored to their original albums in your main photo library.
Tips to Prevent Duplicate Photos in the Future
While knowing how to delete duplicates is helpful, preventing them in the first place saves time and effort. Here are some best practices:
- Import Photos Carefully: When importing photos from external sources, ensure you only import them once. Double-check before initiating the import process again.
- Manage iCloud Photo Settings: Review your iCloud Photo settings to ensure they are configured correctly and syncing smoothly. Avoid making changes that might trigger re-uploads.
- Edit Mindfully: When editing photos, try to use non-destructive editing features whenever possible, or save changes over the original photo rather than creating new copies.
- Be Aware of App Settings: Check the settings of apps that automatically save photos to your library and adjust them if necessary to prevent unnecessary duplication.
- Regular Photo Library Maintenance: Periodically review your photo library and delete unwanted photos, including duplicates, to keep things organized and prevent storage clutter.
Conclusion
Managing photos on your iPhone, including removing duplicate photos, is essential for maintaining storage space and keeping your photo library organized. With iOS 16 and later, Apple has provided a convenient built-in tool to tackle duplicate photos effectively. By combining this feature with general photo deletion and recovery methods, and by adopting preventative habits, you can ensure a clean, efficient, and enjoyable photo experience on your iPhone. Take control of your photo library today and free up valuable storage!