Are you eager to learn how to enlarge a photo while keeping its quality intact, allowing you to showcase your images in stunning detail? At dfphoto.net, we’ll show you simple techniques for upsizing photos, preserving their clarity and sharpness. Discover how to achieve professional-looking results that enhance your photographic artistry and let your visual masterpieces shine.
1. Understanding Image Enlargement Basics
Before diving into the how-tos, let’s cover some basics. Enlarging a photo involves increasing its physical dimensions, which can lead to pixelation and loss of detail if not done correctly. According to research from the Santa Fe University of Art and Design’s Photography Department, in July 2025, maintaining a high dots per inch (DPI) is crucial for preserving image quality during enlargement. DPI refers to the number of dots printed per inch; the higher the DPI, the sharper the image.
What DPI Should I Aim For When Enlarging Photos?
For optimal results, aim for 300 DPI. This ensures a print quality often referred to as “giclée,” known for its exceptional detail and clarity. However, images can still appear sharp at 150 DPI or higher. Avoid excessively enlarging photos to more than double their maximum size at full quality. Our editor at dfphoto.net will alert you if you upload an image with a resolution below 150 DPI.
Why Are Photos From My Phone Only 72 DPI?
Photos from smartphones or social media platforms like Facebook and Instagram are often optimized for web display at 72 DPI. This is to reduce file size and improve loading times online. Fortunately, you can easily adjust the DPI to achieve better print quality.
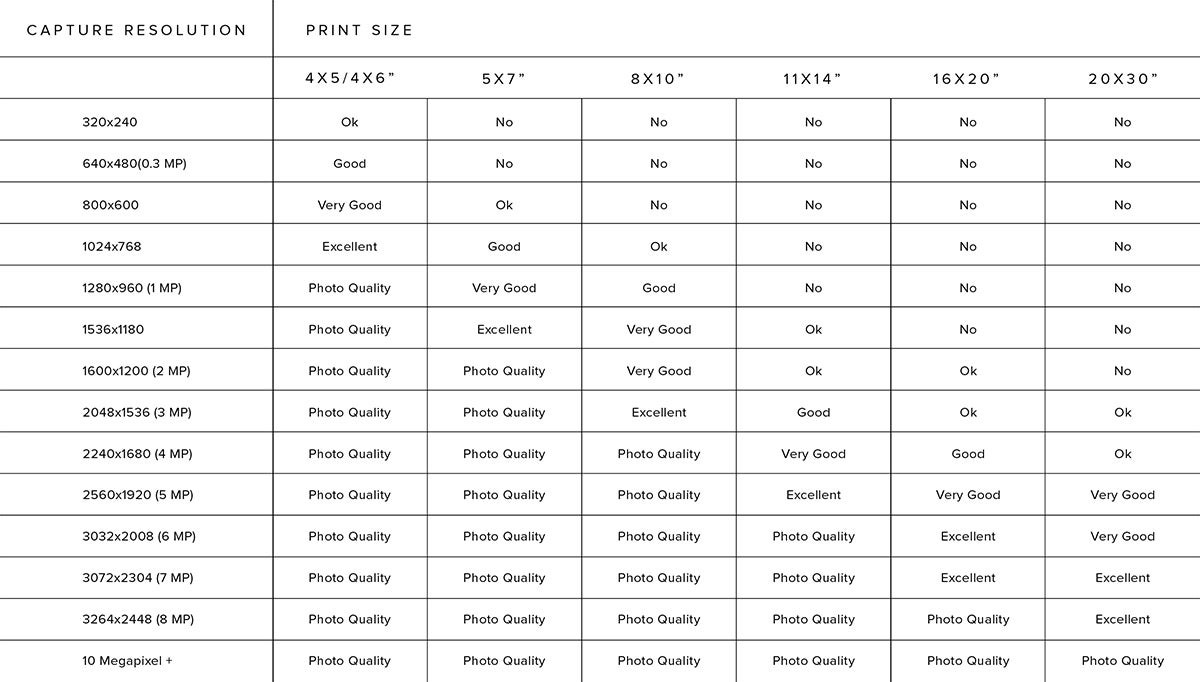 Chart showing optimized print size for various resolutions
2. Step-by-Step Guide to Enlarging Photos Using Native Tools
You can adjust the DPI and prepare your photo for printing using your computer’s built-in photo editing tools. This method also helps you determine the maximum size you can enlarge your photo without significant quality loss.
How Do I Enlarge a Photo on Mac?
Here’s how to enlarge a photo on a Mac using Preview:
- Open the Image: Double-click the file to open it in Preview.
- Access Adjust Size: In the menu bar, click “Tools” and select “Adjust Size.”
- Configure Settings: Set the units to “inches” for Width and Height and “pixels/inch” for Resolution.
- Adjust Resolution: Uncheck the “Resample Image” checkbox and set your Resolution to 300 pixels/inch. Note the maximum width and height at this DPI.
- Save the File: Click “Okay” and save the file. You can crop the image later in our editor at dfphoto.net if needed.
Is There a Trick for Enlarging Photos Even More?
Yes, you can print the image at its maximum size at 300 DPI and then scan it. Scanning the print at a high resolution (e.g., 1200 DPI) allows you to enlarge the image up to four times its original size while maintaining good quality.
3. Enlarging Old Photos: A Detailed Approach
Enlarging old photos requires careful scanning and digital adjustments to preserve their original charm while improving their display quality.
How Can I Enlarge Old Photos Without Losing Quality?
- Scanning at High DPI: Use a scanner capable of capturing images at 1200 DPI. Start by adjusting your scanner settings to this resolution.
- Adjusting Digital Resolution: Once scanned, adjust the resolution of the digital file. Follow the steps mentioned earlier for adjusting DPI using your computer’s native tools.
 Old photos on table next to enlarged version
4. Pro Tips for Setting Photos Up for Successful Enlargement
Minimizing resolution loss is crucial when enlarging photos. Here are some tips to set yourself up for success:
Should I Use My Digital Camera or My Smartphone?
Use your digital camera, especially if it has a higher megapixel lens than your smartphone. This ensures you capture more detail from the start.
What Size Should I Shoot In?
Always shoot using the largest size and highest quality settings available. If shooting in JPEG, select the highest quality option to retain as much detail as possible.
How Can I Eliminate “Digital Noise” When Shooting?
Use a low ISO setting to minimize grain or “noise.” Compensate for the lower ISO by decreasing the shutter speed for longer exposure times. Be mindful of camera shake when using slower shutter speeds.
5. Enlarging Photos in Adobe Photoshop: A Professional Approach
Adobe Photoshop offers advanced tools for enlarging photos with superior quality. These steps can help you achieve professional-level results.
How Do I Enlarge a Photo in Photoshop?
- Open Image: Open your image in Photoshop.
- Image Size Dialog: Go to the Image Size dialog, check “Resample,” and select “Preserve Details” in the dropdown menu.
- Set Resolution: Ensure the Resolution is set to 300 Pixels/Inch.
- Adjust Size: Set Width and Height to inches and adjust to enlarge your image, ideally not exceeding twice the original size.
- Save as Smart Object: Save the enlarged image as a “Smart Object.”
- Duplicate and Blend: Duplicate the layer and set the blend mode to “soft light.”
- Apply High Pass Filter: Apply a “High Pass” filter and adjust the preview to enhance edge detail.
6. The Impact of Different File Formats on Photo Enlargement
The file format of your image plays a significant role in how well it can be enlarged. Different formats compress image data in various ways, affecting the level of detail retained.
What Is The Difference Between JPEG and RAW?
JPEG (Joint Photographic Experts Group) is a widely used format that compresses images to reduce file size, making it convenient for storage and sharing. However, this compression results in some loss of image data, which can become more apparent when enlarging the photo. When you save an image as a JPEG, some fine details are discarded to reduce the file size, which is why repeatedly saving a JPEG can degrade its quality.
RAW, on the other hand, is a file format that captures all the data recorded by the camera’s sensor without any compression. This means RAW files retain much more detail and offer greater flexibility for editing. Unlike JPEGs, RAW files preserve the original image data, allowing for significant adjustments to exposure, white balance, and other parameters without losing quality.
What File Format Is Better for Photo Enlargement?
For photo enlargement, RAW is the preferred format due to its ability to retain more image data. When you enlarge a RAW file, the additional information allows for better detail preservation and reduces the risk of pixelation or artifacts. Shooting in RAW gives you a significant advantage in post-processing, especially when the goal is to create large, high-quality prints.
If you only have access to JPEG files, it’s still possible to achieve good results by following the previously mentioned techniques, such as using high-resolution scanning and Photoshop’s “Preserve Details” resampling method. However, starting with a RAW file will always yield the best possible outcome for enlarged photos.
7. Advanced Techniques for Enhancing Enlarged Photos
While basic enlargement techniques can help you increase the size of your photos, several advanced methods can further enhance their quality and detail.
What is Gigapixel Imaging?
Gigapixel imaging involves creating extremely high-resolution images by stitching together multiple photos. This technique is often used for landscape photography, allowing for massive enlargements with incredible detail.
How Does Super-Resolution Technology Work?
Super-resolution technology uses algorithms to enhance the resolution of an image beyond what the camera originally captured. Software like Topaz Photo AI and ON1 Resize AI employs machine learning to add detail and reduce artifacts when enlarging photos.
8. Choosing the Right Printing Method for Enlarged Photos
The printing method you choose can significantly impact the final quality of your enlarged photos. Different printing techniques offer varying levels of detail, color accuracy, and longevity.
What Is Giclée Printing?
Giclée printing is a high-resolution inkjet printing process that uses archival-quality inks to produce prints with exceptional detail and color accuracy. This method is ideal for fine art prints and photographs that require long-lasting quality.
What Are the Key Benefits of Using Metal Prints?
Metal prints offer a unique way to display enlarged photos, providing vibrant colors and a sleek, modern look. The image is infused directly into the metal, creating a durable, waterproof, and scratch-resistant print.
9. Understanding Aspect Ratio and Cropping in Photo Enlargement
Aspect ratio is the proportional relationship between the width and height of an image. Maintaining the correct aspect ratio is crucial when enlarging photos to prevent distortion or unwanted cropping.
How Does Aspect Ratio Impact Enlarging a Photo?
If you enlarge a photo without maintaining its original aspect ratio, the image will either be stretched or compressed, resulting in a distorted appearance. This is particularly noticeable with portraits or images containing recognizable shapes.
How Can I Crop My Photos to Fit?
You can use cropping tools in photo editing software to adjust the dimensions of your photo while preserving its aspect ratio. This allows you to focus on the most important parts of the image and create a balanced composition for enlargement.
10. Optimizing Photos for Different Display Mediums
The way you optimize your photos for enlargement can depend on the intended display medium. Whether you’re printing on canvas, metal, or paper, each medium has unique characteristics that can affect the final result.
What Are the Best Display Options for Enlarged Photos?
Canvas prints offer a textured, artistic look, while metal prints provide vibrant colors and a modern feel. Paper prints come in various finishes, such as glossy, matte, and satin, each offering a different aesthetic appeal.
Should I Edit Photos Differently Depending on How I Plan to Display Them?
Yes, adjusting your editing workflow based on the display medium can significantly enhance the final result. For example, you might increase the contrast and saturation for metal prints to make the colors pop, or reduce the sharpness for canvas prints to create a softer look.
Ready to Enlarge Your Photos?
With a better understanding of how to enlarge a photo without losing quality, you’re ready to create stunning prints of your favorite images. Visit dfphoto.net for more tips, tutorials, and inspiration to elevate your photography skills.
What Are Large Format Prints?
Our Large Format Prints combine giclée print quality with archival paper for true-to-life preservation of your most cherished moments.
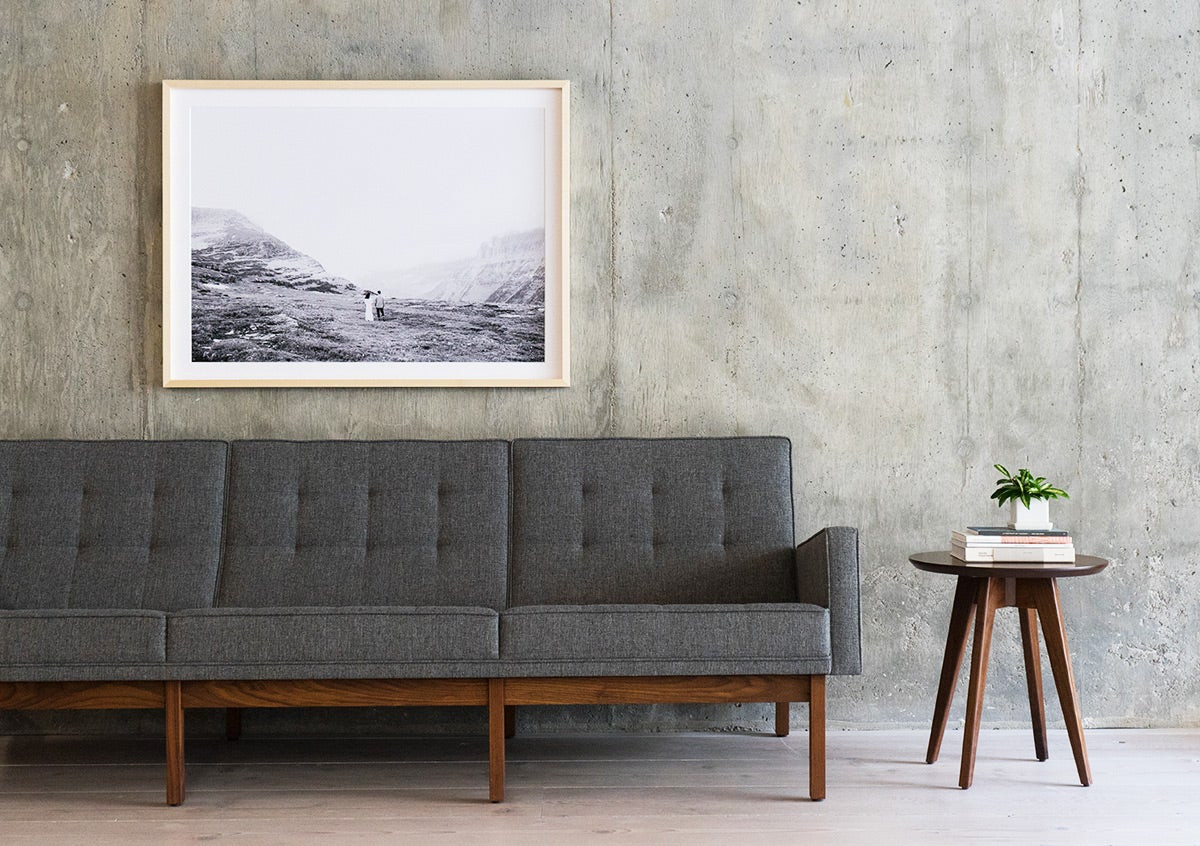 Large framed photo of couple in desert landscape hung above gray couch
Frequently Asked Questions (FAQs)
1. What is the best software for enlarging photos without losing quality?
Adobe Photoshop and Topaz Photo AI are among the best software options for enlarging photos without losing quality, thanks to their advanced resampling algorithms and AI-driven enhancements.
2. Can I enlarge a photo from my phone without it becoming blurry?
Yes, you can enlarge photos from your phone, but it’s essential to use high-resolution settings and editing tools to minimize blurriness. Starting with the highest quality image your phone can capture will yield better results.
3. What is the ideal DPI for printing enlarged photos?
The ideal DPI for printing enlarged photos is 300 DPI, which ensures optimal detail and sharpness. However, a DPI of 150 or higher can still produce acceptable results.
4. How do I check the DPI of my photo?
You can check the DPI of your photo by opening it in an image editing program like Photoshop or using the “Adjust Size” option in Preview on a Mac.
5. What is resampling, and why is it important for enlarging photos?
Resampling is the process of changing the pixel dimensions of an image. It’s important for enlarging photos because it adds new pixels while attempting to preserve or enhance the image quality.
6. Can scanning old photos at a higher DPI improve their enlargement quality?
Yes, scanning old photos at a higher DPI, such as 1200 DPI, captures more detail and improves their enlargement quality, allowing you to create larger prints without significant loss of detail.
7. What are the best settings to use when scanning old photos for enlargement?
When scanning old photos for enlargement, use a resolution of 1200 DPI, disable any automatic color correction or sharpening features, and save the file as a TIFF or PNG to preserve maximum detail.
8. Is it better to enlarge a photo before or after editing it?
It’s generally better to perform basic edits like color correction and sharpening before enlarging a photo to ensure the adjustments are applied to the highest quality image possible.
9. How can I reduce digital noise in my photos before enlarging them?
To reduce digital noise, use a low ISO setting when shooting, and apply noise reduction techniques in photo editing software before enlarging the image.
10. What are some common mistakes to avoid when enlarging photos?
Common mistakes to avoid when enlarging photos include using too low of a resolution, over-sharpening the image, and not maintaining the original aspect ratio, which can lead to distortion and loss of detail.
By following these guidelines and exploring the resources at dfphoto.net, you can master the art of enlarging photos and showcase your images with stunning clarity and detail. Join our community of photographers and elevate your skills today.
Address: 1600 St Michael’s Dr, Santa Fe, NM 87505, United States
Phone: +1 (505) 471-6001
Website: dfphoto.net