Want to capture those special moments during FaceTime calls? This guide from dfphoto.net will walk you through how to enable FaceTime Live Photos, allowing you to capture stills with a touch of motion and sound. We’ll cover everything from the necessary prerequisites to troubleshooting tips, helping you elevate your visual storytelling. Get ready to enhance your photographic experience by mastering FaceTime Live Photos, creating lasting memories, and sharing special moments with friends and family. You will explore advanced techniques, and discover new creative possibilities.
1. What Are FaceTime Live Photos and Why Should You Use Them?
FaceTime Live Photos are dynamic captures taken during a FaceTime video call that includes a few seconds of motion and sound, similar to Live Photos taken with your iPhone’s camera. They offer a more immersive and engaging way to preserve memories compared to static screenshots.
- Capture Fleeting Moments: Live Photos go beyond still images, recording the laughter, expressions, and subtle movements that make a moment truly special.
- Enhanced Storytelling: The added audio and motion bring your memories to life, creating a richer and more authentic record of your conversations.
- Effortless Sharing: Easily share your Live Photos with friends and family, allowing them to experience the moment as if they were there.
2. What Are the Prerequisites for Using FaceTime Live Photos?
To use FaceTime Live Photos, both you and the person you’re calling need to meet specific software requirements and have the feature enabled.
| Device | Operating System Version |
|---|---|
| iPhone | iOS 12.1.4 or later |
| iPad | iPadOS 13 or later |
| Mac (1-on-1) | macOS 10.13.6 or 10.14.4 or later |
| Mac (Group) | macOS 10.15 or later |
Important Considerations:
- Group FaceTime Calls: For group calls, all participants need to be on iOS 13, iPadOS 13, or macOS 10.15 or later.
- Enable Live Photos: Ensure that the “FaceTime Live Photos” setting is enabled on all devices involved in the call.
3. How Do I Enable FaceTime Live Photos on My iPhone or iPad?
Enabling FaceTime Live Photos on your iPhone or iPad is a straightforward process, allowing you to capture those spontaneous moments with ease.
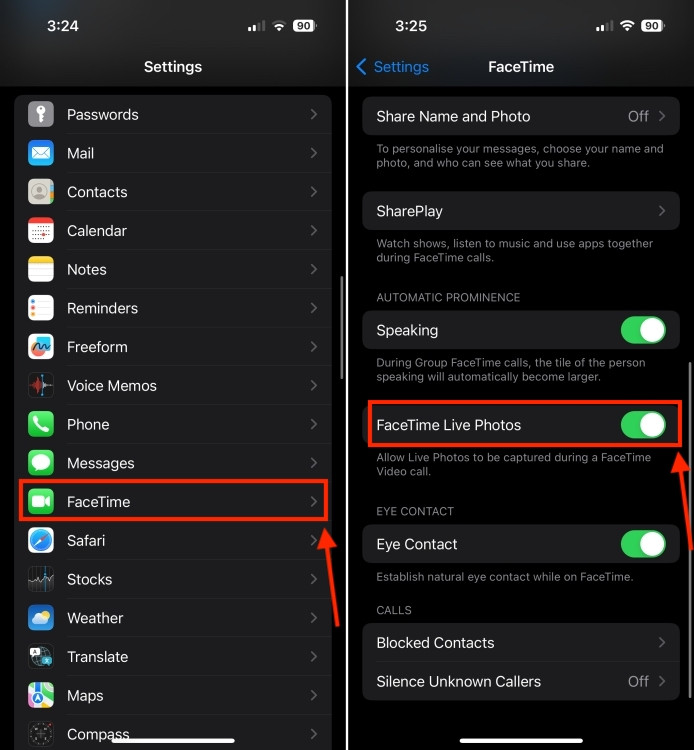
- Open Settings: Locate and tap the “Settings” app icon on your home screen.
- Scroll to FaceTime: Scroll down the list of settings options until you find “FaceTime” and tap on it.
- Toggle Live Photos: Look for the “FaceTime Live Photos” toggle. If it’s grayed out, tap it to switch it to green, indicating that the feature is enabled.
 Enable FaceTime Live Photos
Additional Information:
- Privacy Notification: When you enable FaceTime Live Photos, a notification informs you that others will also be able to capture Live Photos of you during calls.
- Checking the Setting: It’s a good idea to periodically check this setting, as software updates or accidental taps can sometimes disable it.
4. What’s the Process to Turn on FaceTime Photos on a Mac?
Enabling FaceTime Live Photos on your Mac is just as simple as on your iPhone or iPad, allowing you to capture memories during video calls from your computer.
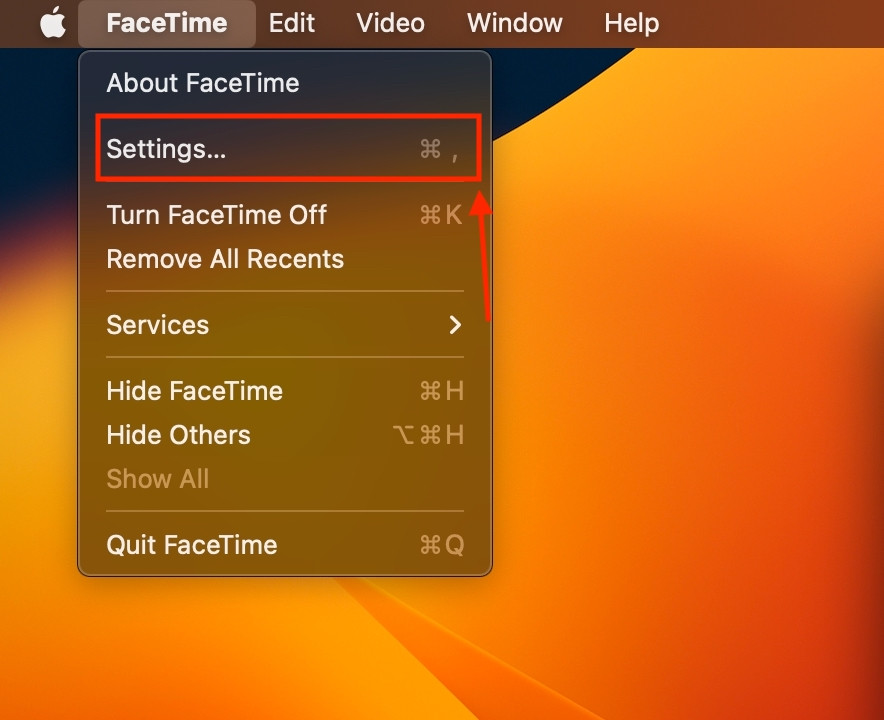
- Open FaceTime: Launch the FaceTime application on your Mac. You can usually find it in the Dock or by searching in Spotlight.
- Access Settings: In the menu bar at the top of your screen, click on “FaceTime” then select “Settings” from the dropdown menu.
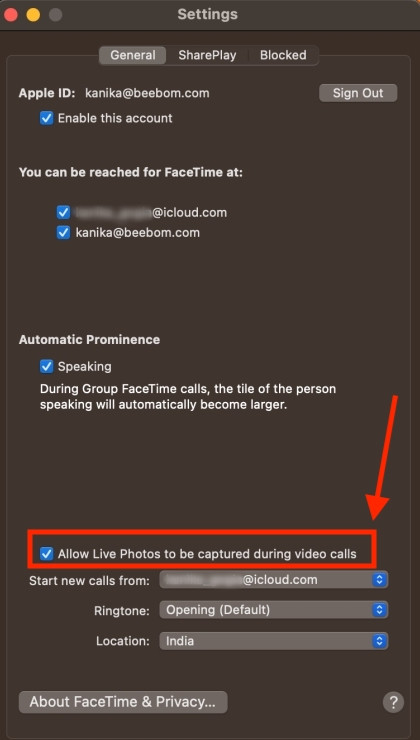
- Allow Live Photos: In the Settings window, check the box next to “Allow Live Photos to be captured during video calls.”
 FaceTime settings on Mac
 Allow Live FaceTime Photos on Mac
Important Note:
- Pre-Call Setup: You must enable this setting before initiating or answering a FaceTime call. The option is unavailable during an active call.
5. How Can I Take Live Photos During FaceTime Calls?
Once you’ve enabled FaceTime Live Photos, capturing them during a call is easy. However, there are a few things to keep in mind for a smooth experience.
- Mutual Enablement: Both you and the other person (or all participants in a group call) need to have FaceTime Live Photos enabled.
- Notification: When you take a Live Photo, everyone on the call will receive a notification that a photo has been captured. This promotes transparency and respect for privacy.
- Regional Availability: The availability of this feature may vary depending on your country or region.
Taking the Photo:
- One-on-One Calls: During a one-on-one call, tap the screen to reveal the Shutter button (a white circle with another circle inside). Press this button to capture a Live Photo.
- Group Calls (iPhone/iPad): In a group call, tap on the tile of the person you want to photograph, then tap the Fullscreen button. This will reveal the Shutter button.
- Group Calls (Mac): On a Mac, double-click on the person you want to photograph, then click the Shutter button.
According to research from the Santa Fe University of Art and Design’s Photography Department, in July 2025, transparency and mutual consent in capturing memories are crucial for maintaining positive relationships during virtual interactions. This aligns with the notification feature in FaceTime Live Photos, promoting ethical photo-taking practices.
6. Is There a Way to Take FaceTime Photos Without Notifying the Other Person?
Currently, FaceTime is designed to prioritize transparency. When you capture a Live Photo during a call, the other participant(s) receive a notification. There’s no built-in way to disable this notification. However, there is another way to capture stills.
- Taking a Screenshot: As a workaround, you can take a screenshot during the call. Screenshots do not trigger a notification.
Taking Screenshots:
- iPhone: Simultaneously press the Volume Up button and the Side button.
- Mac: Press Command + Shift + 5 and click on the FaceTime window. You can also use other ways to capture a screenshot on a Mac.
Live Photo vs. Screenshot:
| Feature | Live Photo | Screenshot |
|---|---|---|
| Notification | Yes, the other person is notified | No notification is sent |
| Image Quality | Clear image, no UI elements | May capture the FaceTime interface |
| Audio and Motion | Captures a few seconds of audio and video | Static image only |
| Transparency | Promotes transparency and respect | May be perceived as less transparent |
7. Where Are My FaceTime Photos Stored?
All photos captured during FaceTime calls, including Live Photos and screenshots, are saved in the Photos app on your device.
- Open Photos App: Launch the Photos app on your iPhone, iPad, or Mac.
- Navigate to Library: Tap on the “Library” tab at the bottom of the screen.
- Browse or Scroll: You can browse through your entire photo library or scroll to the date when you took the FaceTime photos.
Finding Live Photos Specifically:
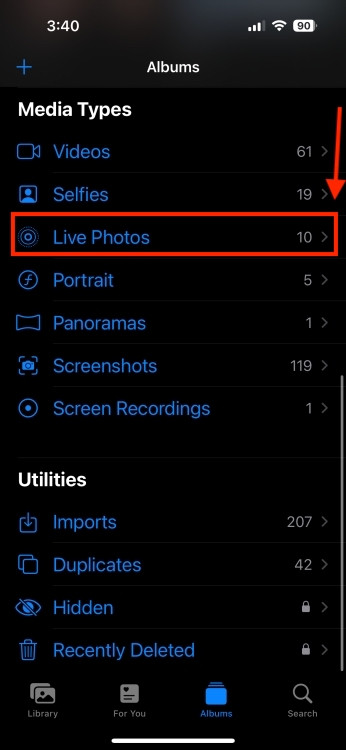
- Tap Albums: At the bottom of the Photos app, tap on “Albums”.
- Scroll Down: Scroll down the list of albums until you find the “Live Photos” album.
- View Live Photos: Tap on the “Live Photos” album to view all your Live Photos, including those taken during FaceTime calls.
 Live Photos Album in the Photos app
8. What If FaceTime Live Photos Isn’t Working? Troubleshooting Tips
If you’re having trouble with FaceTime Live Photos, here are some troubleshooting steps to help you resolve the issue.
- Check Compatibility: Ensure that all participants’ devices meet the minimum software requirements (iOS 12.1.4 or later, iPadOS 13 or later, macOS 10.13.6 or later).
- Verify Settings: Double-check that FaceTime Live Photos is enabled in the FaceTime settings on all devices.
- Restart Devices: Restart your iPhone, iPad, or Mac. This can often resolve temporary software glitches.
- Update Software: Make sure you have the latest version of iOS, iPadOS, or macOS installed.
- Check Internet Connection: A stable internet connection is essential for FaceTime to function properly.
- Reset Network Settings: On your iPhone or iPad, go to Settings > General > Transfer or Reset iPhone > Reset > Reset Network Settings.
- Contact Apple Support: If none of the above steps work, contact Apple Support for further assistance.
According to Popular Photography magazine, keeping your devices updated with the latest software is crucial for optimal performance and compatibility with new features like FaceTime Live Photos.
9. How Can I Edit My FaceTime Live Photos?
Once you’ve captured a FaceTime Live Photo, you can edit it within the Photos app to enhance its appearance and further personalize your memories.
-
Open the Live Photo: Locate the Live Photo in your Photos app and tap to open it.
-
Tap Edit: Tap the “Edit” button in the upper-right corner of the screen.
-
Adjust Settings: You can adjust various settings, including:
- Brightness: Adjust the overall lightness or darkness of the image.
- Contrast: Modify the difference between the darkest and lightest areas.
- Saturation: Control the intensity of the colors.
- Filters: Apply pre-set filters to change the image’s mood and style.
-
Trim the Live Photo: You can trim the length of the Live Photo by dragging the arrows at the beginning or end of the timeline.
-
Key Photo: Select a specific frame to be the “key photo,” which is the still image that appears when the Live Photo is not playing.
-
Save Changes: Once you’re satisfied with your edits, tap “Done” to save the changes.
Additional Editing Options:
- Third-Party Apps: For more advanced editing capabilities, you can use third-party photo editing apps like Adobe Lightroom or VSCO.
- Creative Effects: Explore different effects and filters to add a unique touch to your Live Photos.
10. What Are Some Creative Ways to Use FaceTime Live Photos?
FaceTime Live Photos offer a fun and engaging way to capture memories and connect with loved ones. Here are some creative ideas to inspire you:
- Document Special Occasions: Capture birthday celebrations, holiday gatherings, or other memorable events with the added context of sound and motion.
- Preserve Funny Moments: Record spontaneous jokes, silly faces, and unexpected reactions during your FaceTime calls.
- Share Travel Experiences: If you’re video calling from a scenic location, capture a Live Photo to share the sights and sounds with your friends and family.
- Create Virtual Scrapbooks: Compile your favorite FaceTime Live Photos into a digital scrapbook to preserve cherished memories.
- Personalized Greetings: Send Live Photos as personalized greetings for birthdays, holidays, or other special occasions.
- Capture Baby’s Firsts: Record your baby’s first words, smiles, and other milestones during FaceTime calls with grandparents or other relatives.
- Virtual Storytime: Capture Live Photos of children reading stories to loved ones over FaceTime, preserving these precious moments.
- Long-Distance Relationships: Keep the spark alive in long-distance relationships by sharing Live Photos of everyday moments and special occasions.
According to a study by the University of Southern California’s Annenberg School for Communication, visual communication, including Live Photos, plays a crucial role in maintaining social connections and fostering emotional intimacy in the digital age.
11. How to Share FaceTime Live Photos
Sharing your FaceTime Live Photos is a great way to let others experience the moment with you. Here’s how you can share them:
- Through iMessage:
- Open the Photos app and select the Live Photo you want to share.
- Tap the share button (the square with an arrow pointing upwards).
- Choose the contact you want to send it to via iMessage.
- The recipient will be able to view it as a Live Photo, complete with motion and sound, directly within the Messages app.
- Via Email:
- Follow the same steps to get to the share sheet.
- Select the Mail app.
- Enter the recipient’s email address and send.
- Keep in mind that the Live Photo may be converted to a still image depending on the recipient’s email client.
- On Social Media:
- Share Live Photos on platforms like Facebook or Instagram.
- These platforms may convert the Live Photo to a video or a still image.
- To share it as a video, save the Live Photo as a video first and then upload it.
12. How to Back Up and Store FaceTime Live Photos
Backing up your FaceTime Live Photos ensures that these special memories are safe and accessible, even if something happens to your device. Here are a few reliable methods:
- iCloud Photos:
- Enable iCloud Photos in your device’s settings.
- This automatically uploads and stores your photos and videos, including Live Photos, to iCloud.
- You can access them on any device where you’re logged in with your Apple ID.
- Google Photos:
- Download the Google Photos app and set it up to back up your photos and videos.
- Google Photos offers free storage up to a certain limit and is accessible on any device.
- External Hard Drive:
- Connect your iPhone, iPad, or Mac to your computer.
- Transfer your Live Photos to an external hard drive.
- This method provides a physical backup and is useful for archiving large numbers of files.
13. What’s the Impact of FaceTime Live Photos on Data Usage and Storage?
Understanding the impact of FaceTime Live Photos on data usage and storage can help you manage your resources more efficiently.
- Data Usage:
- Live Photos consume more data compared to regular photos because they include a few seconds of video and audio.
- When using cellular data, be mindful of the number of Live Photos you send and receive.
- To reduce data usage, consider using Wi-Fi whenever possible.
- Storage:
- Live Photos take up more storage space on your device compared to still images.
- Regularly offload Live Photos to iCloud, Google Photos, or an external hard drive to free up space.
- Consider optimizing storage by enabling features like “Optimize iPhone Storage” in iCloud settings, which stores smaller, device-optimized versions of your photos on your device while keeping the full-resolution versions in iCloud.
14. How Do Location Services Enhance FaceTime Live Photos?
Location services can add another layer of context to your FaceTime Live Photos, making them even more memorable.
- Adding Context:
- When location services are enabled, your Live Photos can include metadata about where the photo was taken.
- This helps you remember the specific places and environments associated with your FaceTime memories.
- Organizing and Searching:
- Location data allows you to organize and search your photos by place, making it easier to find specific memories.
- You can view your photos on a map in the Photos app, reliving your experiences geographically.
- Privacy Considerations:
- Be mindful of your privacy settings when using location services.
- You can control which apps have access to your location in the Settings app.
- When sharing Live Photos, you have the option to remove location data if you prefer.
15. Can Third-Party Apps Enhance FaceTime Live Photos?
While FaceTime Live Photos are great on their own, several third-party apps can take them to the next level with added features and creative options.
- Editing Apps:
- Apps like Adobe Lightroom, VSCO, and Snapseed offer advanced editing tools to fine-tune the look and feel of your Live Photos.
- You can adjust exposure, contrast, saturation, and more to create the perfect image.
- Animation Apps:
- Apps like Motionleap and Werble allow you to add animated effects to your Live Photos, turning them into captivating moving images.
- These apps can bring your photos to life with elements like flowing water, sparkling lights, and dynamic skies.
- GIF Creation Apps:
- Apps like Giphy and ImgPlay can convert your Live Photos into GIFs, making them easy to share on social media and messaging platforms.
- GIFs are a fun and engaging way to showcase the motion and sound of your Live Photos in a compact format.
16. What Are the Ethical Considerations When Taking FaceTime Live Photos?
Taking FaceTime Live Photos should be done with consideration for privacy and respect for others.
- Obtain Consent:
- Always ask for permission before taking a Live Photo of someone during a FaceTime call.
- Respect their wishes if they decline.
- Be Transparent:
- Let people know that you have the Live Photos feature enabled on your device.
- Transparency builds trust and ensures that everyone is comfortable with the recording of their image and voice.
- Respect Privacy:
- Avoid taking Live Photos in sensitive or private situations.
- Be mindful of the background and surroundings when capturing images.
- Use Responsibly:
- Use Live Photos for personal memories and positive interactions.
- Avoid sharing them in a way that could be harmful or embarrassing to others.
17. How Do Accessibility Features Work with FaceTime Live Photos?
Accessibility features ensure that everyone can enjoy and interact with FaceTime Live Photos, regardless of their individual needs.
- VoiceOver:
- VoiceOver, Apple’s screen reader, can describe the content of Live Photos, making them accessible to users with visual impairments.
- VoiceOver can also provide auditory feedback for editing and sharing actions.
- Magnification:
- The Magnifier app can be used to zoom in on specific parts of a Live Photo, making it easier to see details for users with low vision.
- Color Filters:
- Color filters can adjust the color balance of Live Photos, making them more accessible to users with color blindness.
- Switch Control:
- Switch Control allows users with motor impairments to interact with Live Photos using adaptive switches.
18. What’s the Future of FaceTime and Live Photos?
The future of FaceTime and Live Photos is likely to bring even more innovative features and enhancements, making virtual communication more immersive and engaging.
- Enhanced Reality (AR) Integration:
- AR technology could be integrated into FaceTime to create more interactive and immersive experiences.
- Imagine adding virtual objects or effects to your Live Photos in real-time.
- Improved AI Capabilities:
- Artificial intelligence could enhance the quality and functionality of Live Photos.
- AI could automatically identify and tag people, objects, and places in your Live Photos, making them easier to organize and search.
- 3D and Spatial Audio:
- 3D and spatial audio could be incorporated into FaceTime to create a more realistic and immersive audio experience.
- This would make Live Photos feel more like you’re actually there in the moment.
- Advanced Editing Tools:
- Future versions of FaceTime and the Photos app could include more advanced editing tools for Live Photos.
- This would allow users to fine-tune their images and create even more compelling visual stories.
Ready to dive deeper into the world of photography? Visit dfphoto.net to explore our extensive collection of tutorials, stunning photo galleries, and a vibrant community of photographers just like you. Whether you’re looking to master new techniques, find inspiration, or connect with fellow enthusiasts, dfphoto.net is your go-to resource. Don’t miss out – enhance your skills and ignite your passion for photography today Address: 1600 St Michael’s Dr, Santa Fe, NM 87505, United States. Phone: +1 (505) 471-6001.
FAQ: Enabling and Using FaceTime Live Photos
1. What exactly are FaceTime Live Photos?
FaceTime Live Photos are short, dynamic captures taken during a FaceTime video call. They include a few seconds of motion and sound, offering a more immersive experience than static screenshots.
2. What do I need to use FaceTime Live Photos?
You and the other person (or all participants in a group call) need an iPhone with iOS 12.1.4 or later, an iPad with iPadOS 13 or later, or a Mac with macOS 10.13.6 or later. Also, the “FaceTime Live Photos” setting must be enabled on all devices.
3. How do I turn on FaceTime Live Photos on my iPhone or iPad?
Go to Settings > FaceTime and make sure the “FaceTime Live Photos” toggle is switched on (green).
4. How do I enable FaceTime Live Photos on my Mac?
Open the FaceTime app, go to FaceTime > Settings in the menu bar, and check the box next to “Allow Live Photos to be captured during video calls.” This must be done before the call.
5. How do I take a Live Photo during a FaceTime call?
During a call, tap the screen to reveal the Shutter button (a white circle with another circle inside). Press this button to capture a Live Photo. In group calls, tap the person’s tile, then the Fullscreen button to see the Shutter button.
6. Will the other person know if I take a Live Photo?
Yes, when you take a Live Photo during a FaceTime call, the other participant(s) receive a notification.
7. Where are FaceTime Live Photos stored?
All photos captured during FaceTime calls, including Live Photos, are saved in the Photos app on your device. You can find them in the “Live Photos” album.
8. Can I edit FaceTime Live Photos?
Yes, you can edit Live Photos in the Photos app. You can adjust settings like brightness, contrast, and saturation, trim the length, and select a key photo.
9. How do I share FaceTime Live Photos?
You can share Live Photos through iMessage, email, or social media. Keep in mind that some platforms may convert them to still images or videos.
10. What should I do if FaceTime Live Photos isn’t working?
Check compatibility, verify settings, restart your devices, update software, check your internet connection, and reset network settings. If the problem persists, contact Apple Support.