Are you looking to free up some storage space on your iPhone by permanently deleting those unwanted photos? At dfphoto.net, we provide a step-by-step guide on exactly how to empty trash photos on your iPhone, ensuring they are completely removed. Learn how to permanently remove photos from your Apple devices, manage iCloud storage, and optimize your photo library with these photo management tips.
1. Why Emptying Trash Photos on Your iPhone is Important
Why is it crucial to empty the trash photos or the Recently Deleted album on your iPhone? Regularly clearing out these photos isn’t just about decluttering your digital life; it’s a vital step in maintaining your device’s performance and protecting your privacy.
1.1. Freeing Up Valuable Storage Space
One of the most immediate benefits of emptying your trash photos is the liberation of storage space. Photos and videos, especially high-resolution ones, consume a significant amount of memory. By permanently deleting unwanted images, you create room for new photos, apps, and other important data. This is especially beneficial if you have a device with limited storage capacity.
1.2. Enhancing Device Performance
A full storage can lead to a sluggish iPhone performance. When your device is struggling to manage a large volume of data, it can slow down app loading times, cause delays in system processes, and even affect battery life. Regularly emptying trash photos helps prevent these issues by keeping your storage optimized.
1.3. Protecting Your Privacy
Beyond storage and performance, privacy is a critical consideration. Photos often contain sensitive personal information. Even if you’ve deleted them from your main gallery, they remain in the Recently Deleted album for 30 days. Emptying this album ensures that these potentially private images are permanently removed, reducing the risk of unauthorized access if your device is compromised.
1.4. Managing iCloud Storage Effectively
For users who utilize iCloud Photos, emptying trash photos on your iPhone also impacts your iCloud storage. When you delete a photo from your iPhone, it’s moved to the Recently Deleted album, but it still counts towards your iCloud storage limit. Permanently deleting these photos frees up space in your iCloud account, allowing you to store more backups, documents, and other important files.
1.5. Preventing Accidental Recoveries
The Recently Deleted album provides a safety net, allowing you to recover photos you might have accidentally deleted. However, this also means that anyone with access to your device can recover these images. Emptying the album ensures that the photos are unrecoverable, providing an additional layer of security for your personal data.
1.6. Streamlining Photo Management
Regularly emptying trash photos is a good habit to incorporate into your photo management routine. It encourages you to periodically review your photos, delete what you don’t need, and keep your photo library organized. This can save you time and effort in the long run, making it easier to find and share the photos you actually want.
1.7. Reducing Clutter and Digital Stress
Finally, there’s a psychological benefit to emptying your trash photos. A cluttered photo library can be overwhelming and contribute to digital stress. By regularly clearing out unwanted images, you create a sense of order and control, making your digital life more manageable and enjoyable.
2. Step-by-Step Guide: How to Empty Trash Photos on Your iPhone
So, you’re ready to reclaim some storage and boost your iPhone’s performance? Here’s a comprehensive guide to empty trash photos on your iPhone:
2.1. Step 1: Delete Photos from Your Main Photo Library
The first step in the process is to remove the unwanted photos from your main photo library. This is done through the Photos app.
2.1.1. Opening the Photos App
Locate the Photos app icon on your iPhone’s home screen. It’s the icon with a colorful flower. Tap it to open your photo library.
2.1.2. Navigating to Your Photos
Once the app is open, you’ll typically land in the “Library” tab, where your photos are organized by date. You can also navigate to specific albums using the “Albums” tab at the bottom of the screen.
2.1.3. Selecting Photos for Deletion
To select photos for deletion, tap the “Select” button in the upper-right corner of the screen. This allows you to choose multiple photos at once. Simply tap on each photo you wish to delete. A blue checkmark will appear on each selected image.
2.1.4. Initiating the Deletion Process
Once you’ve selected all the unwanted photos, tap the trash can icon at the bottom-right corner of the screen. A pop-up message will appear, asking you to confirm the deletion. Tap “Delete [Number] Photos” to proceed.
2.1.5. Understanding the Initial Deletion Outcome
It’s important to note that deleting photos from your main library doesn’t permanently erase them. Instead, they are moved to the “Recently Deleted” album, where they will remain for 30 days before being permanently deleted. This provides a window of opportunity to recover photos you might have accidentally deleted.
2.2. Step 2: Accessing the “Recently Deleted” Album
Now that you’ve deleted the photos from your main library, the next step is to access the “Recently Deleted” album. This is where the deleted photos are temporarily stored.
2.2.1. Navigating to the Albums Tab
Open the Photos app and tap the “Albums” tab at the bottom of the screen. This will take you to a screen that displays all your photo albums, including the “Recently Deleted” album.
2.2.2. Locating the “Recently Deleted” Album
Scroll down the list of albums until you find the “Recently Deleted” album. It’s usually located near the bottom of the list, under the “Utilities” section. The album icon features a trash can symbol.
2.2.3. Opening the “Recently Deleted” Album
Tap on the “Recently Deleted” album to open it. Here, you’ll see all the photos and videos you’ve deleted in the past 30 days. Each item will display the number of days remaining before it’s permanently deleted.
2.3. Step 3: Permanently Deleting Photos from the “Recently Deleted” Album
This is the crucial step in the process, where you permanently erase the photos from your iPhone.
2.3.1. Selecting Photos for Permanent Deletion
Once inside the “Recently Deleted” album, tap the “Select” button in the upper-right corner of the screen. This allows you to choose the photos you want to permanently delete. Tap on each photo to select it.
2.3.2. Choosing the “Delete” Option
After selecting the photos, tap the “Delete” button at the bottom-left corner of the screen. A pop-up message will appear, asking you to confirm that you want to permanently delete the selected photos.
2.3.3. Confirming Permanent Deletion
Tap “Delete [Number] Photos” to confirm. This action will permanently remove the photos from your iPhone, and they cannot be recovered.
2.3.4. Using the “Delete All” Option
If you want to empty the entire “Recently Deleted” album, you can use the “Delete All” option. This will permanently delete all the photos and videos in the album with a single tap. To do this, tap the “Delete” button at the bottom-left corner of the screen, and then choose “Delete All” from the pop-up menu.
2.4. Step 4: Verifying Storage Space
After emptying the “Recently Deleted” album, it’s a good idea to check your iPhone’s storage space to ensure that the deleted photos have indeed been removed.
2.4.1. Accessing the iPhone Storage Settings
Open the Settings app on your iPhone. This is the app with the gear icon. Scroll down and tap “General,” then tap “iPhone Storage.”
2.4.2. Reviewing Storage Usage
The “iPhone Storage” screen provides a detailed overview of how your device’s storage is being used. It displays a color-coded bar graph showing the amount of storage occupied by different categories, such as “Photos,” “Apps,” “Media,” and “Other.”
2.4.3. Confirming Storage Space Has Been Freed Up
Check the amount of storage used by the “Photos” category. If you’ve successfully emptied the “Recently Deleted” album, you should see a decrease in the storage space used by photos. This confirms that the deleted photos have been permanently removed from your device.
2.5. Step 5: Managing iCloud Photos
If you’re using iCloud Photos, it’s important to understand how deleting photos on your iPhone affects your iCloud storage.
2.5.1. Understanding iCloud Photos Syncing
iCloud Photos automatically syncs your photo library across all your Apple devices, including your iPhone, iPad, and Mac. This means that any changes you make to your photo library on one device will be reflected on all your other devices.
2.5.2. Impact of Deleting Photos on iCloud
When you delete photos from your iPhone and empty the “Recently Deleted” album, the photos are also permanently deleted from iCloud. This frees up storage space in your iCloud account, but it also means that the photos are no longer accessible on any of your other devices.
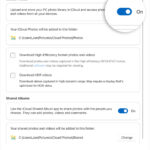
2.5.3. Checking iCloud Storage
To check your iCloud storage, open the Settings app on your iPhone. Tap your name at the top of the screen, then tap “iCloud.” This will show you a breakdown of how your iCloud storage is being used.
2.5.4. Managing iCloud Storage
If you’re running low on iCloud storage, you can manage it by deleting unnecessary files, such as old backups, documents, and photos. You can also upgrade to a larger iCloud storage plan if needed.
2.6. Step 6: Tips for Regular Photo Cleanup
To keep your iPhone’s storage optimized and your photo library organized, it’s a good idea to establish a regular photo cleanup routine.
2.6.1. Setting a Reminder
Set a reminder on your iPhone to review and clean up your photos on a regular basis. This could be once a week, once a month, or whatever interval works best for you.
2.6.2. Creating Albums for Organization
Use albums to organize your photos into categories, such as “Vacations,” “Family,” “Events,” and “Projects.” This makes it easier to find and manage your photos.
2.6.3. Deleting Duplicates and Blurry Photos
Take the time to identify and delete duplicate photos, blurry photos, and other unwanted images. These can take up valuable storage space and clutter your photo library.
2.6.4. Backing Up Important Photos
Before deleting any photos, make sure you’ve backed up any important images that you want to keep. You can use iCloud, your computer, or an external hard drive for backups.
2.6.5. Utilizing Third-Party Photo Management Apps
Consider using third-party photo management apps to help you organize and clean up your photo library. These apps often offer advanced features, such as duplicate detection, facial recognition, and automatic organization.
By following these steps, you can efficiently empty trash photos on your iPhone, free up storage space, and keep your photo library organized and clutter-free.
3. Advanced Tips for Managing iPhone Photo Storage
Want to become a true master of iPhone photo storage? Here’s some advanced tips for effectively managing your iPhone photo storage:
3.1. Utilizing iCloud Photo Library Effectively
iCloud Photo Library is a powerful tool, but it requires smart management to avoid storage issues.
3.1.1. Understanding “Optimize iPhone Storage”
In iCloud settings, you’ll find an option called “Optimize iPhone Storage.” When enabled, your iPhone stores smaller, optimized versions of your photos on the device while keeping the original, high-resolution versions in iCloud. This can save a significant amount of space on your iPhone, especially if you have a large photo library.
3.1.2. Balancing Quality and Storage
While optimizing storage is great, be aware that you’re trading off some image quality on your device. When you view a photo, your iPhone will download the full-resolution version from iCloud as needed. If you frequently access your photos and want the best possible quality, you might prefer to keep full-resolution originals on your device.
3.1.3. Regularly Reviewing iCloud Storage
Keep an eye on your iCloud storage usage. You can do this in the Settings app under your Apple ID. If you’re nearing your storage limit, consider deleting unnecessary files, such as old backups or large videos, or upgrading to a larger storage plan.
3.2. Using Third-Party Cloud Storage Solutions
While iCloud is convenient for Apple users, several other cloud storage services offer competitive features and pricing.
3.2.1. Exploring Options Like Google Photos and Dropbox
Google Photos and Dropbox are popular alternatives to iCloud. They offer automatic photo syncing, organization tools, and the ability to share photos with others. Google Photos also provides unlimited storage for “high quality” photos, which are slightly compressed but still look great for most purposes.
3.2.2. Assessing Storage Limits and Pricing
Compare the storage limits and pricing of different cloud storage services to find the best fit for your needs. Some services offer free storage tiers, while others require a paid subscription for larger storage capacities.
3.2.3. Integrating with iPhone
Most cloud storage services offer iOS apps that integrate seamlessly with your iPhone. You can set up automatic photo uploads, view your photos in the app, and share them with others directly from your iPhone.
3.3. Employing Lossless Compression Techniques
Lossless compression can reduce the file size of your photos without sacrificing image quality.
3.3.1. Understanding HEIF Format
iPhones use the HEIF (High Efficiency Image File Format) by default, which offers better compression than JPEG while maintaining similar image quality. Make sure your iPhone is set to capture photos in HEIF format in Settings > Camera > Formats.
3.3.2. Converting to HEIF
If you have older JPEG photos on your iPhone, you can convert them to HEIF to save space. There are several apps available on the App Store that can perform this conversion.
3.3.3. Using Third-Party Compression Apps
Some third-party apps offer advanced lossless compression techniques that can further reduce the file size of your photos without affecting quality. These apps often use sophisticated algorithms to identify and remove redundant data in the image files.
3.4. Leveraging External Storage Devices
For users with extensive photo libraries, external storage devices can be a lifesaver.
3.4.1. Connecting External Hard Drives
You can connect an external hard drive to your iPhone using a Lightning-to-USB adapter. This allows you to transfer photos and videos from your iPhone to the external drive, freeing up space on your device.
3.4.2. Using Wireless Storage Devices
Wireless storage devices, such as portable Wi-Fi hard drives, offer a convenient way to back up and access your photos without the need for cables. These devices create their own Wi-Fi network, allowing you to connect your iPhone and transfer files wirelessly.
3.4.3. Choosing the Right Device for Your Needs
Consider your storage needs, budget, and portability requirements when choosing an external storage device. Portable SSDs offer fast transfer speeds and are more durable than traditional hard drives, but they are also more expensive.
3.5. Automating Photo Management Tasks
Automation can save you time and effort in managing your iPhone photos.
3.5.1. Setting Up Automatic Backups
Configure automatic backups to iCloud, Google Photos, or another cloud storage service to ensure that your photos are always safe and secure.
3.5.2. Using IFTTT or Similar Services
IFTTT (If This Then That) is a web service that allows you to create automated workflows between different apps and services. You can use IFTTT to automatically organize your photos into albums, back them up to a specific location, or share them on social media.
3.5.3. Exploring iOS Shortcuts
The iOS Shortcuts app allows you to create custom automation workflows on your iPhone. You can use Shortcuts to automate tasks such as resizing photos, converting them to different formats, or sharing them with specific contacts.
By implementing these advanced tips, you can take control of your iPhone photo storage and ensure that your device always has enough space for the photos and videos that matter most.
4. Troubleshooting Common Issues When Emptying Trash Photos
Encountering problems while trying to empty trash photos on your iPhone? Here’s how to troubleshoot common issues.
4.1. Photos Not Deleting from “Recently Deleted”
Sometimes, photos may not delete from the “Recently Deleted” album as expected. This can be frustrating, but there are several possible causes and solutions.
4.1.1. Checking iCloud Syncing Status
Ensure that iCloud Photos is properly synced. If your iPhone is not connected to the internet or if iCloud syncing is paused, the deletion may not be reflected in the “Recently Deleted” album. Go to Settings > Photos and make sure “iCloud Photos” is turned on and that your device is connected to Wi-Fi.
4.1.2. Restarting Your iPhone
A simple restart can often resolve minor software glitches. Turn off your iPhone, wait a few seconds, and then turn it back on. This can help refresh the Photos app and allow the deletion to proceed.
4.1.3. Force Quitting the Photos App
If restarting your iPhone doesn’t work, try force quitting the Photos app. To do this, swipe up from the bottom of the screen (or double-press the Home button on older iPhones) to bring up the app switcher. Then, swipe up on the Photos app preview to close it. Reopen the app and try deleting the photos again.
4.1.4. Checking Storage Space
Ensure that you have sufficient storage space on your iPhone and in your iCloud account. If your storage is nearly full, the deletion process may be interrupted. Free up some space by deleting other unnecessary files or upgrading your iCloud storage plan.
4.1.5. Resetting Network Settings
In some cases, network connectivity issues can prevent photos from being deleted. Try resetting your iPhone’s network settings by going to Settings > General > Reset > Reset Network Settings. Note that this will also reset your Wi-Fi passwords, so you’ll need to re-enter them.
4.2. “Recently Deleted” Album is Empty But Storage is Still Full
If you’ve emptied the “Recently Deleted” album but your iPhone’s storage is still showing as full, there are a few potential explanations.
4.2.1. Hidden Albums or Files
Sometimes, hidden albums or files can take up storage space without being visible in the Photos app. Check for any hidden albums by going to the Albums tab in the Photos app and scrolling down to the “Utilities” section. Tap “Hidden” to view any hidden albums.
4.2.2. System Data and Cache
Your iPhone’s system data and cache can also consume a significant amount of storage space. This data is used to store temporary files and settings for apps and the operating system. To clear some of this data, try clearing the cache for individual apps or performing a soft reset of your iPhone.
4.2.3. “Other” Storage Category
The “Other” category in iPhone storage can include a variety of files, such as system files, caches, logs, and app data. This category can sometimes grow unexpectedly large. To reduce the size of the “Other” category, try clearing your browsing history, deleting old messages, and removing unused apps.
4.2.4. Restarting Your iPhone
As mentioned earlier, restarting your iPhone can often resolve minor software glitches and free up storage space.
4.3. Photos Reappearing After Deletion
In rare cases, photos may reappear in your photo library after you’ve deleted them. This can be caused by iCloud syncing issues or software bugs.
4.3.1. Disabling and Re-enabling iCloud Photos
Try disabling and re-enabling iCloud Photos in Settings > Photos. This can help refresh the connection between your iPhone and iCloud and resolve syncing issues.
4.3.2. Updating to the Latest iOS Version
Make sure your iPhone is running the latest version of iOS. Software updates often include bug fixes and performance improvements that can address issues with photo deletion.
4.3.3. Contacting Apple Support
If you’ve tried all of the above steps and your photos are still reappearing after deletion, contact Apple Support for further assistance. They may be able to diagnose the issue and provide a solution.
4.4. Unable to Access “Recently Deleted” Album
If you’re unable to access the “Recently Deleted” album, there may be a problem with your Photos app or your iCloud account.
4.4.1. Ensuring iCloud Photos is Enabled
The “Recently Deleted” album is only available if iCloud Photos is enabled. Go to Settings > Photos and make sure “iCloud Photos” is turned on.
4.4.2. Checking Your Apple ID Account
Ensure that you’re signed in to your Apple ID account on your iPhone. Go to Settings > [Your Name] and verify that your Apple ID is correct.
4.4.3. Updating Your iPhone Software
As with other issues, updating to the latest version of iOS can often resolve problems with the Photos app and iCloud connectivity.
4.4.4. Restoring Your iPhone
If all else fails, you may need to restore your iPhone to its factory settings. This will erase all data on your device, so make sure you have a backup before proceeding.
By following these troubleshooting steps, you can resolve common issues when emptying trash photos on your iPhone and ensure that your photos are properly deleted.
5. How to Back Up Your Photos Before Deleting
Before you embark on a photo-deletion spree, it’s crucial to back up your precious memories. Here are several reliable methods to ensure your photos are safe before you hit that delete button.
5.1. Using iCloud
iCloud is Apple’s native cloud storage service, tightly integrated with your iPhone, and provides a seamless way to back up your photos.
5.1.1. Enabling iCloud Photos
To use iCloud for photo backups, go to Settings > [Your Name] > iCloud > Photos and toggle “iCloud Photos” on. This will automatically upload your photos to iCloud whenever your iPhone is connected to Wi-Fi.
5.1.2. Understanding Storage Limits
Apple provides 5GB of free iCloud storage, which may be insufficient for large photo libraries. You can upgrade to a larger storage plan if needed.
5.1.3. Checking Backup Status
To check the status of your iCloud backups, go to Settings > [Your Name] > iCloud > Photos. You’ll see information about when your photos were last synced and how much storage you’re using.
5.1.4. Downloading Originals
If you’re using “Optimize iPhone Storage,” your iPhone may store smaller, optimized versions of your photos. To download the full-resolution originals to your computer, go to iCloud.com, sign in with your Apple ID, and download the photos you want to back up.
5.2. Using Google Photos
Google Photos is a popular cloud storage service that offers unlimited storage for “high quality” photos and videos.
5.2.1. Downloading and Installing the App
Download and install the Google Photos app from the App Store. Sign in with your Google account.
5.2.2. Setting Up Automatic Backups
In the Google Photos app, go to Settings > Backup & Sync and turn on “Backup & Sync.” Choose whether to back up in “High quality” (unlimited storage) or “Original quality” (uses your Google Drive storage).
5.2.3. Managing Storage
Google Photos provides 15GB of free storage across Google Drive, Gmail, and Google Photos. If you need more storage, you can upgrade to a Google One plan.
5.2.4. Downloading Originals
To download your photos from Google Photos, go to photos.google.com, sign in with your Google account, and download the photos you want to back up.
5.3. Using a Computer
Backing up your photos to a computer provides a local copy of your files, ensuring they’re safe even if something happens to your cloud storage.
5.3.1. Connecting Your iPhone
Connect your iPhone to your computer using a Lightning cable.
5.3.2. Trusting the Computer
When prompted on your iPhone, tap “Trust This Computer.”
5.3.3. Importing Photos
On a Mac, the Photos app will automatically open and prompt you to import your photos. On a Windows PC, you can use the Windows Photos app or File Explorer to import your photos.
5.3.4. Creating a Backup Folder
Create a dedicated folder on your computer to store your iPhone photo backups.
5.4. Using an External Hard Drive
An external hard drive provides a convenient way to back up your photos without relying on cloud storage or a computer.
5.4.1. Connecting the Hard Drive
Connect the external hard drive to your computer.
5.4.2. Transferring Photos
Transfer your photos from your iPhone to the external hard drive using one of the methods described above (iCloud, Google Photos, or computer).
5.4.3. Creating a Backup Schedule
Establish a regular backup schedule to ensure your photos are always safe.
5.5. Using Third-Party Backup Apps
Several third-party apps offer advanced backup features, such as automatic backups, encryption, and versioning.
5.5.1. Exploring App Store Options
Browse the App Store for backup apps that meet your needs. Some popular options include iMazing, AnyTrans, and Dr.Fone.
5.5.2. Setting Up Automatic Backups
Configure the app to automatically back up your photos to a location of your choice.
5.5.3. Testing Restorations
Periodically test your backups to ensure that they’re working properly and that you can restore your photos if needed.
By following these backup methods, you can rest assured that your photos are safe and secure before you delete them from your iPhone.
6. The Impact of Emptying Trash Photos on iCloud and Other Devices
What happens to your photos in the cloud and on other devices when you empty the trash on your iPhone?
6.1. iCloud Photo Library
iCloud Photo Library is Apple’s cloud-based photo storage service, which automatically syncs your photos across all your Apple devices.
6.1.1. Synchronization Process
When you delete a photo on your iPhone and empty the “Recently Deleted” album, the photo is also permanently deleted from iCloud and all your other devices that are signed in to the same Apple ID and have iCloud Photos enabled.
6.1.2. Immediate Deletion
The deletion is usually immediate, but it may take a few minutes for the changes to propagate to all your devices.
6.1.3. Storage Updates
Your iCloud storage will be updated to reflect the deleted photos.
6.2. Shared Albums
Shared Albums allow you to share photos and videos with specific people, even if they don’t use Apple devices.
6.2.1. Removal from Shared Albums
When you delete a photo from your iPhone that is also in a Shared Album, the photo is removed from the Shared Album as well.
6.2.2. Notifications
Other members of the Shared Album may receive a notification that the photo has been removed.
6.2.3. Limited Recovery
If you accidentally delete a photo from a Shared Album, you may be able to recover it from the “Recently Deleted” album on your iPhone, but only if it hasn’t been permanently deleted yet.
6.3. My Photo Stream
My Photo Stream was an older Apple service that automatically uploaded your most recent photos to iCloud and pushed them to your other devices.
6.3.1. Discontinued Service
My Photo Stream has been discontinued by Apple, so it’s no longer relevant for most users.
6.3.2. Migration to iCloud Photos
If you were using My Photo Stream, Apple recommends migrating to iCloud Photos to continue syncing your photos across your devices.
6.4. Other Apple Devices
When you delete a photo on your iPhone, the changes are reflected on all your other Apple devices that are signed in to the same Apple ID and have iCloud Photos enabled.
6.4.1. iPhones, iPads, and Macs
This includes iPhones, iPads, and Macs.
6.4.2. Immediate Synchronization
The synchronization is usually immediate, but it may take a few minutes for the changes to propagate to all your devices.
6.4.3. Storage Updates
The storage on your other devices will be updated to reflect the deleted photos.
6.5. Non-Apple Devices
If you’re using a non-Apple device, such as an Android phone or a Windows PC, the impact of deleting photos on your iPhone will depend on whether you’re using a cloud storage service that syncs your photos across devices.
6.5.1. Google Photos
If you’re using Google Photos, the deletion will be reflected on your non-Apple devices as well.
6.5.2. Dropbox
If you’re using Dropbox, the deletion will be reflected on your non-Apple devices as well.
6.5.3. Other Cloud Services
The impact will vary depending on the specific cloud service you’re using.
By understanding the impact of emptying trash photos on iCloud and other devices, you can avoid unexpected data loss and ensure that your photos are managed consistently across all your devices.
7. The Importance of Regularly Managing Your iPhone Photo Library
Why should you make managing your iPhone photo library a regular habit? Here’s why it’s a beneficial practice:
7.1. Optimizing Storage Space
One of the most significant benefits of regularly managing your iPhone photo library is optimizing storage space. As mentioned earlier, photos and videos can consume a significant amount of storage on your device. By regularly deleting unwanted images, you can free up space for new photos, apps, and other important data.
7.2. Improving Device Performance
A full storage can lead to a sluggish iPhone performance. When your device is struggling to manage a large volume of data, it can slow down app loading times, cause delays in system processes, and even affect battery life. Regularly managing your photo library helps prevent these issues by keeping your storage optimized.
7.3. Enhancing Organization
A well-organized photo library is easier to navigate and enjoy. By regularly sorting, categorizing, and deleting photos, you can create a more streamlined and efficient photo collection. This makes it easier to find specific photos, share them with others, and relive your memories.
7.4. Protecting Privacy
Photos often contain sensitive personal information. Regularly managing your photo library ensures that any potentially private images are permanently removed, reducing the risk of unauthorized access if your device is compromised.
7.5. Saving Time
While it may seem time-consuming to manage your photo library regularly, it can actually save you time in the long run. By staying on top of your photos, you can avoid the overwhelming task of sorting through thousands of images at once.
7.6. Reducing Digital Stress
A cluttered photo library can be overwhelming and contribute to digital stress. By regularly managing your photos, you create a sense of order and control, making your digital life more manageable and enjoyable.
7.7. Preserving Memories
While it may seem counterintuitive, regularly managing your photo library can actually help you preserve your memories more effectively. By curating your collection and deleting unwanted images, you can focus on the photos that truly matter.
7.8. Discovering Hidden Gems
As you sort through your photos, you may rediscover hidden gems that you had forgotten about. This can be a fun and rewarding experience, allowing you to relive cherished memories and appreciate the beauty of your photos.
By incorporating regular photo management into your routine, you can enjoy all these benefits and make the most of your iPhone’s photo capabilities.
8. The Role of dfphoto.net in Helping You Master iPhone Photography
How does dfphoto.net help you enhance your iPhone photography skills and manage your photos effectively?
8.1. Comprehensive Photography Tutorials
dfphoto.net offers a wealth of comprehensive photography tutorials that cover a wide range of topics, from basic camera settings to advanced shooting techniques.
8.1.1. Mastering iPhone Camera Settings
Learn how to use your iPhone’s camera settings to capture stunning photos. Explore topics such as exposure, focus, white balance, and HDR.
8.1.2. Composition Techniques
Discover the art of composition and learn how to create visually appealing photos using techniques such as the rule of thirds, leading lines, and symmetry.
8.1.3. Lighting Tips
Master the art of lighting and learn how to use natural and artificial light to create beautiful photos.
8.2. Inspiring Photo Galleries
dfphoto.net features inspiring photo galleries showcasing the work of talented photographers from around the world.
8.2.1. Discovering New Styles
Explore different photographic styles and genres and find inspiration for your own work.
8.2.2. Learning from the Pros
Study the techniques and approaches of professional photographers and learn how to improve your own skills.
8.2.3. Getting Inspired
Find inspiration for your next photo project and discover new ways to express your creativity.
8.3. Gear Reviews and Recommendations
dfphoto.net provides in-depth reviews and recommendations for photography gear, including cameras, lenses, and accessories.
8.3.1. Finding the Right Equipment
Learn how to choose the right equipment for your needs and budget.
8.3.2. Staying Up-to-Date
Stay up-to-date on the latest photography gear and technology.
8.3.3. Making Informed Decisions
Make informed decisions about your gear purchases and avoid wasting money on unnecessary equipment.
8.4. Community Forums
dfphoto.net hosts a vibrant community forum where photographers of all skill levels can connect, share their work, and learn from each other.
8.4.1. Connecting with Fellow Photographers
Connect with fellow photographers from around the world and share your passion for photography.
8.4.2. Sharing Your Work
Share your photos and receive feedback from other photographers.
8.4.3. Learning from Others
Learn from the experiences and insights of other photographers.
8.5. Photo Editing Tutorials
dfphoto.net offers tutorials on photo editing software, such as Adobe Photoshop and Lightroom.
8.5.1. Mastering Editing Techniques
Learn how to use photo editing software to enhance your photos and create stunning visual effects.