Embroidery on photos, also known as photo embroidery, enhances visual art with textures and patterns, turning ordinary snapshots into extraordinary keepsakes; dfphoto.net is here to guide you. This detailed guide provides expert tips and innovative techniques to help both novice and experienced crafters create stunning embroidered photos, focusing on thread work, print durability, and design inspiration. Dive into the world of combining photography with stitching to unlock a new dimension of artistic expression!
1. What Is Photo Embroidery And Why Should You Try It?
Photo embroidery enhances images by adding stitched designs to printed photographs. Embroidery is a craft that involves decorating fabric or other materials with needle and thread to create decorative designs. Photo embroidery combines this traditional art with photography, bringing texture, color, and a personal touch to printed images.
1.1 Why Photo Embroidery?
- Personalization: It transforms ordinary photos into unique, personalized pieces of art.
- Creative Outlet: It offers a new way to express creativity and artistic skills.
- Sentimentality: Embroidered photos make heartfelt gifts and cherished mementos.
- Enhancement: It adds depth and dimension to flat photographs, making them more visually appealing.
- Accessibility: Suitable for all skill levels, from beginners to advanced crafters.
Photo embroidery allows you to reimagine your memories through a blend of visual and tactile artistry.
1.2 What Are The Essential Materials Required For Photo Embroidery?
To start photo embroidery, gather these supplies:
- Photos: Matte or luster finish prints work best.
- Embroidery Floss: Choose colors that complement your photo.
- Embroidery Needle: A sharp needle makes clean holes.
- Awl or Needle Tool: To pre-punch holes in your photo.
- Cardboard or Foam Board: To protect your work surface.
- Tape: To secure the photo to the backing.
- Scissors: For cutting threads.
- Embroidery Hoop (Optional): For added stability.
- Templates or Stencils (Optional): For design guidance.
- Thimble (Optional): To protect your finger when punching holes.
Having these materials ready will help you start your photo embroidery project smoothly.
1.3 What Photo Types Work Best?
Not all photos are created equal when it comes to embroidery. Here’s how to select the best ones:
- Finish: Matte or luster finishes are ideal. According to research from the Santa Fe University of Art and Design’s Photography Department, in July 2025, matte finishes reduce glare and provide a better surface for stitching.
- Paper Quality: High-quality photo paper is more durable and less likely to tear.
- Color vs. Black and White: Both work well, but consider how your thread colors will interact with the photo’s tones.
- Image Complexity: Simpler images with clear subjects are easier to embroider.
- Size: Choose a size that’s comfortable to handle and frame.
Selecting the right photo is crucial for a successful embroidery project.
1.4 Where Can You Find Inspiration For Your Designs?
Finding the right design inspiration can make your photo embroidery stand out. Consider these sources:
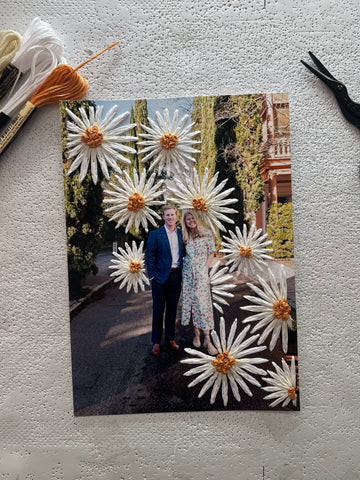
- Nature: Floral patterns, landscapes, and animal motifs.
- Geometric Shapes: Modern, abstract designs that add a contemporary touch.
- Personal Interests: Incorporate hobbies, favorite quotes, or significant dates.
- Cultural Motifs: Use traditional patterns or symbols that resonate with you.
- Online Resources: Explore Pinterest, Instagram, and dfphoto.net for ideas and templates.
Inspiration is all around you, waiting to be transformed into stitched art on your photos.
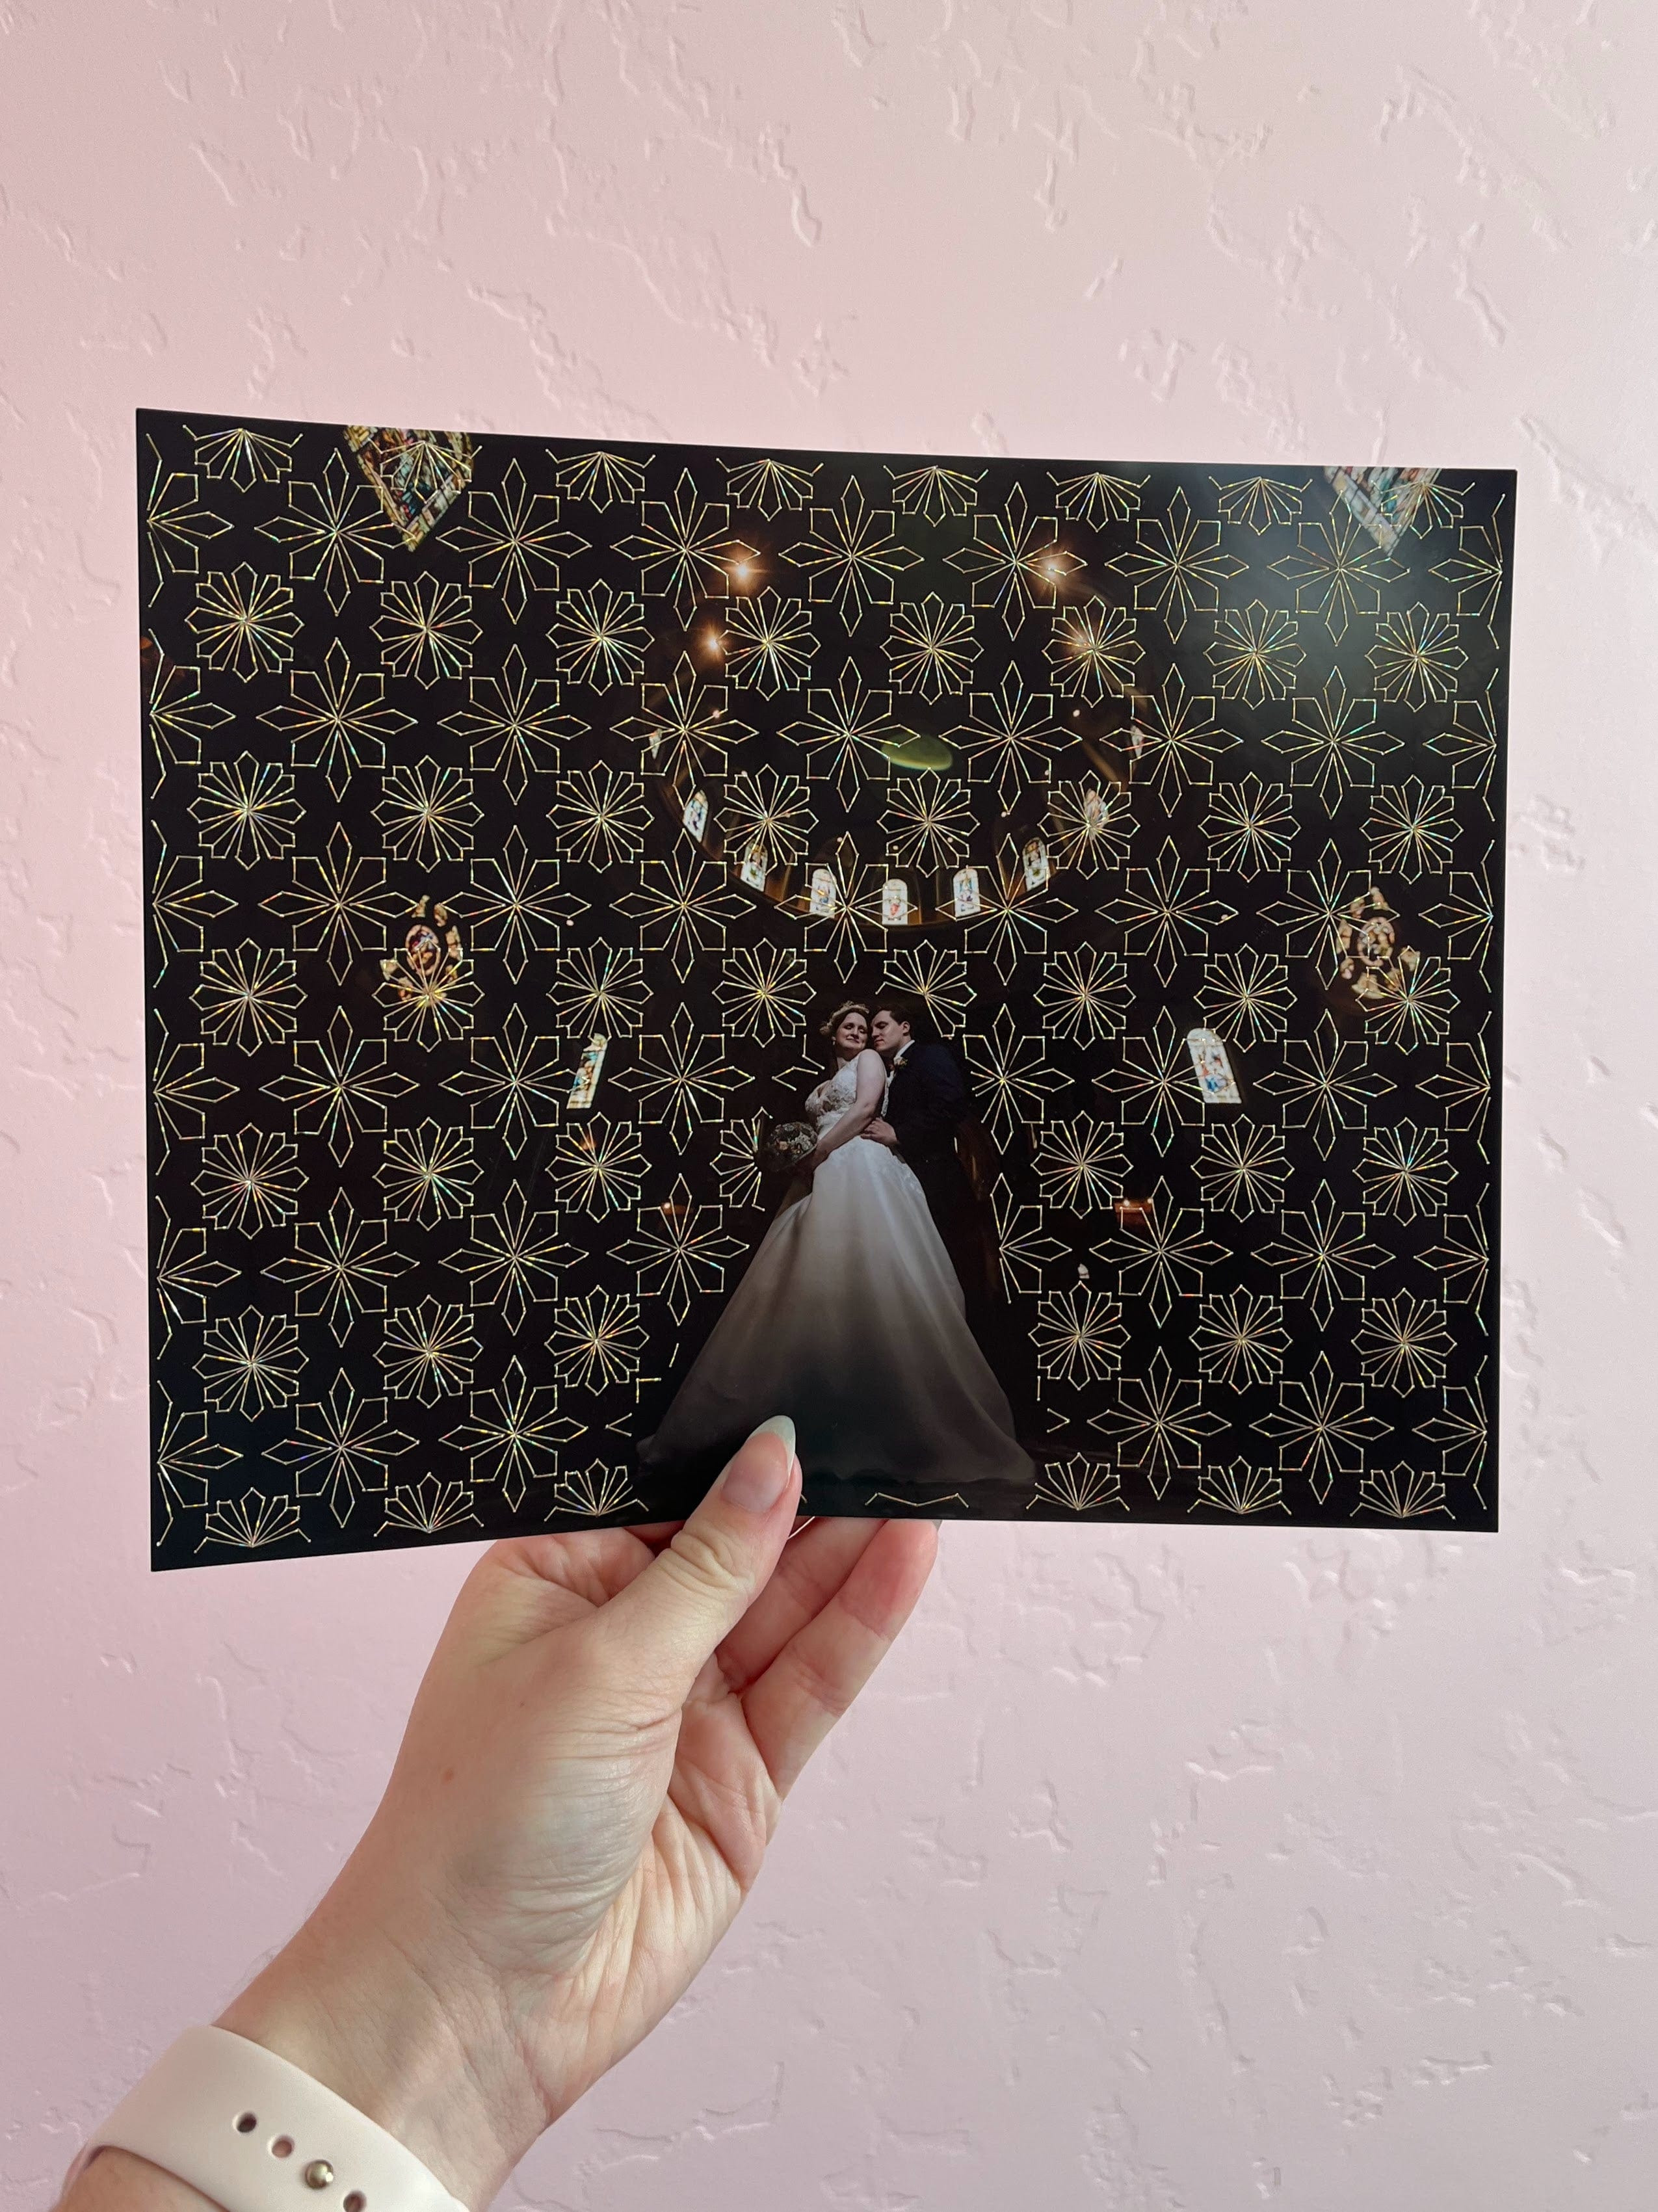
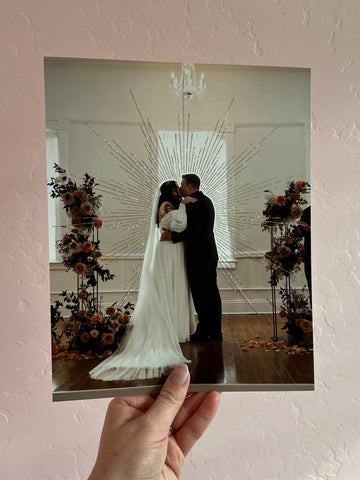 Photo embroidery featuring geometric shapes on a portrait
2. Step-by-Step Guide To Embroidering A Photo
Photo embroidery involves several steps that require patience and precision. Follow this guide to achieve the best results:
2.1 How Do You Prepare Your Photo For Embroidery?
Preparing your photo correctly is essential for a smooth embroidery process:
- Choose Your Photo: Opt for a matte or luster finish print.
- Secure the Photo: Tape the photo to a piece of cardboard or foam board.
- Plan Your Design: Sketch your design lightly onto the photo or use a template.
- Pre-Punch Holes: Use an awl or needle to create holes along your design lines.
- Space Holes Evenly: Consistent spacing makes stitching easier and neater.
Proper preparation ensures that your photo is ready for the needle and thread.
2.2 What Are The Basic Embroidery Stitches For Photos?
Knowing a few basic embroidery stitches can open up a world of design possibilities:
- Straight Stitch: Simple and versatile for lines and details.
- Back Stitch: Creates a solid line, perfect for outlines.
- Satin Stitch: Fills areas with smooth, dense coverage.
- French Knot: Adds texture and dimension with small, knotted dots.
- Running Stitch: Quick and easy for dashed lines and subtle accents.
- Cross Stitch: Forms X shapes, ideal for filling spaces and creating patterns.
Mastering these stitches will give you the foundation to create intricate designs.
2.3 How To Transfer Designs Onto Photos?
Transferring your design onto the photo accurately is crucial:
- Tracing Method: Use tracing paper to copy your design, then transfer it to the photo with a pencil.
- Stenciling: Place a stencil over your photo and lightly mark the design with a pencil.
- Freehand Drawing: If you’re confident, draw your design directly onto the photo.
- Digital Templates: Print a template and tape it to your photo as a guide.
Choose the method that best suits your comfort level and design complexity.
2.4 How Do You Choose The Right Embroidery Floss?
Selecting the right embroidery floss can enhance your photo embroidery:
- Material: Cotton floss is popular for its softness and wide color range.
- Color: Choose colors that complement or contrast with your photo.
- Strand Count: Use fewer strands for delicate details, more for bold lines.
- Finish: Consider metallic or variegated floss for added interest.
- Brand: DMC and Anchor are reliable brands known for quality and colorfastness.
Experiment with different floss types to find what works best for your style.
2.5 How To Handle Common Mistakes?
Even experienced embroiderers make mistakes. Here’s how to handle them:
- Tangled Thread: Use short lengths of thread to minimize tangling.
- Uneven Stitches: Practice your stitches on scrap paper before working on the photo.
- Holes Too Close Together: Space your holes evenly to prevent tearing.
- Incorrect Color Choice: Test your floss colors on a corner of the photo before committing.
- Loose Ends: Secure loose ends with small knots or by weaving them under stitches.
Don’t be afraid to experiment and learn from your mistakes.
3. Advanced Techniques For Photo Embroidery
Once you’re comfortable with the basics, explore these advanced techniques to elevate your photo embroidery:
3.1 What Is Thread Painting And How To Use It?
Thread painting involves using different colors and densities of stitches to create painterly effects:
- Layering Colors: Blend colors by overlapping stitches to create smooth transitions.
- Varying Stitch Lengths: Use different stitch lengths to add texture and dimension.
- Directional Stitching: Stitch in the direction of the subject’s contours to enhance its shape.
- Using Shading: Employ darker shades to create shadows and highlights.
- Practice: Experiment with different techniques on scrap fabric before applying them to your photo.
Thread painting can transform your embroidery into a work of art.
3.2 How To Incorporate Mixed Media?
Adding mixed media elements can add depth and visual interest:
- Beads and Sequins: Sew on beads and sequins for sparkle and texture.
- Ribbons and Lace: Incorporate ribbons and lace for a delicate, vintage look.
- Watercolor or Ink: Add watercolor or ink washes to enhance the photo’s background.
- Paper Embellishments: Glue on paper cutouts or origami for added dimension.
- Fabric Scraps: Attach fabric scraps to create collages and unique textures.
Mixed media can make your photo embroidery truly unique.
3.3 What Are The Tips For Working With Metallic Threads?
Metallic threads can add shimmer and elegance, but they can be tricky to work with:
- Use Short Lengths: Metallic threads tend to tangle, so use shorter lengths.
- Use Thread Conditioner: Apply thread conditioner to reduce friction and breakage.
- Choose the Right Needle: Use a needle with a larger eye to accommodate the thicker thread.
- Stitch Slowly: Work slowly and carefully to avoid snagging and breaking.
- Secure Ends Well: Metallic threads can unravel easily, so secure the ends tightly.
With practice, you can master the art of working with metallic threads.
3.4 How To Create 3D Effects?
Creating 3D effects can make your embroidery pop:
- Stumpwork: Create raised elements by stitching over wire or padding.
- Layered Stitches: Layer stitches on top of each other to build up height.
- Detached Elements: Stitch separate elements and attach them to the photo.
- Using Beads: Add beads and sequins to create raised textures.
- Padding: Use felt or batting under your stitches to create a cushioned effect.
3D embroidery adds a tactile dimension to your photo art.
3.5 How To Personalize Your Embroidered Photos?
Personalization is what makes your photo embroidery special:
- Monograms: Add initials or names for a personal touch.
- Dates: Include significant dates, such as birthdays or anniversaries.
- Quotes: Embroider meaningful quotes or phrases.
- Symbols: Incorporate symbols that represent personal interests or beliefs.
- Custom Designs: Create your own designs based on your experiences and memories.
Personalized details make your embroidered photos meaningful and unique.
 Close-up of metallic thread embroidery
4. Displaying And Preserving Your Embroidered Photos
Once your photo embroidery is complete, it’s important to display and preserve it properly:
4.1 How To Choose The Right Frame?
The right frame can enhance and protect your embroidered photo:
- Consider the Style: Choose a frame that complements the style of your embroidery.
- Use a Mat: A mat adds space between the photo and the glass, preventing damage to the stitches.
- Opt for UV-Protective Glass: UV glass protects the photo from fading and discoloration.
- Choose the Right Size: Ensure the frame is the correct size for your photo.
- Consider Depth: A deeper frame may be necessary for photos with 3D elements.
The frame is the final touch that showcases your work.
4.2 How To Protect Your Embroidery From Damage?
Protecting your embroidery is crucial for its longevity:
- Avoid Direct Sunlight: Exposure to sunlight can cause fading.
- Keep Away From Moisture: Moisture can damage the photo and the threads.
- Handle With Clean Hands: Oils and dirt can stain the embroidery.
- Store Properly: Store your embroidered photos in a cool, dry place.
- Clean Gently: If necessary, clean the embroidery with a soft brush or a slightly damp cloth.
Proper care ensures that your embroidered photos remain beautiful for years to come.
4.3 What Are The Best Ways To Display Your Embroidered Photos?
Displaying your embroidered photos creatively can enhance their impact:
- Gallery Wall: Create a gallery wall with a collection of embroidered photos.
- Display Easel: Use a display easel to showcase a single, special piece.
- Shadow Box: Frame your embroidered photo in a shadow box to add depth.
- Hanging Display: Hang your embroidered photo with decorative clips or twine.
- Themed Displays: Create themed displays for different seasons or occasions.
Show off your creativity by displaying your embroidered photos in unique and eye-catching ways.
4.4 How To Store Your Embroidered Photos?
Proper storage prevents damage and preserves your embroidered photos:
- Acid-Free Materials: Use acid-free paper or boxes to prevent discoloration.
- Flat Storage: Store photos flat to avoid bending or creasing.
- Cool, Dry Place: Choose a cool, dry location away from sunlight and moisture.
- Protective Sleeves: Use archival-quality sleeves to protect individual photos.
- Labeling: Label your storage containers to easily identify the contents.
Storing your embroidered photos properly ensures their long-term preservation.
4.5 Where To Find Inspiration For Displaying Your Embroidered Photos?
Finding inspiration for displaying your embroidered photos can help you create stunning presentations:
- Home Decor Magazines: Look to home decor magazines for ideas on gallery walls and display arrangements.
- Online Galleries: Explore online galleries and blogs for inspiration from other artists.
- Museums and Art Shows: Visit museums and art shows to see how professionals display artwork.
- Social Media: Check out Pinterest and Instagram for creative display ideas.
- Interior Design Blogs: Follow interior design blogs for tips on incorporating art into your home decor.
Let your creativity guide you in finding the perfect way to display your embroidered photos.
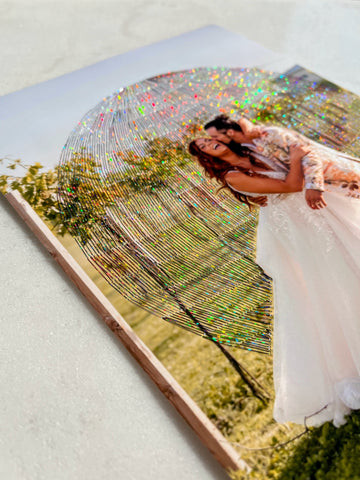 Photo embroidery framed and displayed on a wall
5. Troubleshooting Common Issues In Photo Embroidery
Even with careful planning, you may encounter issues during the photo embroidery process. Here’s how to troubleshoot them:
5.1 What To Do If Your Photo Tears?
Tearing is a common issue, but it can be managed:
- Reinforce the Back: Apply a piece of fabric or tape to the back of the tear.
- Use Smaller Needles: Switch to a smaller, sharper needle to reduce stress on the photo.
- Space Holes Further Apart: Increase the distance between holes to prevent further tearing.
- Patch the Area: Use a small piece of photo paper to patch the tear and stitch over it.
- Adjust Your Technique: Use a lighter touch and avoid pulling the thread too tightly.
Addressing tears promptly can save your project.
5.2 How To Prevent Thread Tangling?
Thread tangling can be frustrating, but there are ways to minimize it:
- Use Short Lengths: Cut shorter lengths of thread to reduce tangling.
- Use Thread Conditioner: Apply thread conditioner to smooth the thread.
- Drop the Needle: Let the needle hang freely to untwist the thread periodically.
- Store Thread Properly: Keep your floss organized to prevent tangling.
- Use the Right Needle: A needle with a larger eye can help reduce friction.
Preventing thread tangling makes the embroidery process much smoother.
5.3 What If Your Stitches Look Uneven?
Uneven stitches can detract from the overall look, but they can be corrected:
- Practice: Practice your stitches on scrap fabric to improve consistency.
- Use a Guide: Draw guidelines on your photo to help maintain even spacing.
- Adjust Tension: Ensure your thread tension is consistent.
- Redo Stitches: Don’t be afraid to remove and redo stitches that look uneven.
- Step Back: Take breaks to assess your work and make adjustments as needed.
Consistency comes with practice and attention to detail.
5.4 How To Remove Stitches Without Damaging The Photo?
Removing stitches carefully is essential:
- Use a Seam Ripper: A seam ripper is ideal for carefully cutting and removing stitches.
- Go Slowly: Work slowly and deliberately to avoid tearing the photo.
- Use Tweezers: Use tweezers to gently pull out the loose threads.
- Reinforce the Area: If the photo is damaged, reinforce the area before restitching.
- Avoid Sharp Tools: Avoid using sharp scissors or knives that can damage the photo.
Gentle and precise removal of stitches can minimize damage.
5.5 What To Do If The Colors Don’t Match Your Vision?
Color matching is crucial for achieving your desired look:
- Test Colors: Test your floss colors on a corner of the photo before committing.
- Use a Color Wheel: Consult a color wheel to choose complementary colors.
- Adjust Lighting: View your photo and floss under different lighting conditions.
- Take Photos: Take photos of your color combinations to assess their appearance.
- Trust Your Instincts: Choose colors that resonate with you and enhance your vision.
Experimentation and careful selection can help you achieve the perfect color palette.
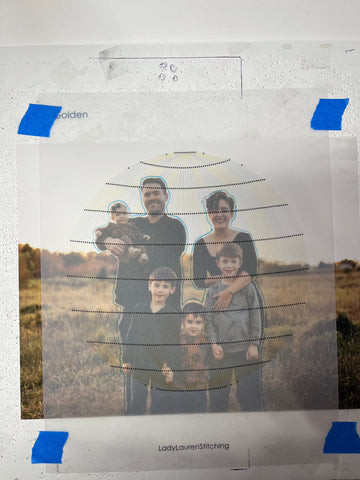 Photo embroidery in progress with a close-up on stitching
6. Exploring Different Themes And Styles In Photo Embroidery
Photo embroidery offers endless possibilities for exploring different themes and styles. Here are some ideas to inspire you:
6.1 What Are Popular Themes For Photo Embroidery?
Popular themes can provide a starting point for your creativity:
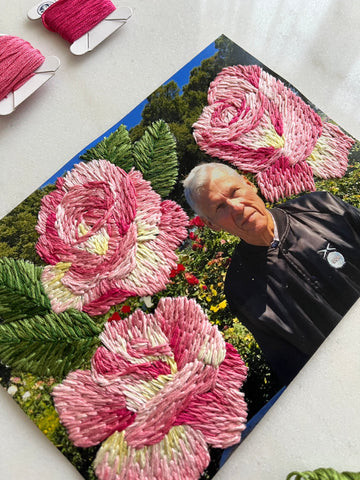
- Floral: Embroidered flowers and leaves add a touch of nature.
- Geometric: Geometric patterns create a modern, abstract look.
- Portraits: Highlight faces and features with delicate stitching.
- Landscapes: Capture the beauty of nature with embroidered landscapes.
- Animals: Add whimsical details with embroidered animals.
Choosing a theme can guide your design process.
6.2 How To Create A Vintage Look?
A vintage look can add charm and nostalgia to your photo embroidery:
- Use Sepia Tones: Choose floss in sepia and muted tones.
- Incorporate Lace: Add lace and vintage-style embellishments.
- Use Antique Photos: Embroider on vintage or antique photos.
- Distress the Photo: Gently distress the photo for a weathered look.
- Use Calligraphy: Add handwritten calligraphy with embroidered letters.
Vintage elements can evoke a sense of history and timelessness.
6.3 What Are Modern Embroidery Styles?
Modern embroidery styles offer a fresh and contemporary approach:
- Minimalist: Use simple stitches and clean lines for a minimalist look.
- Abstract: Create abstract designs with bold colors and unconventional patterns.
- Geometric: Incorporate geometric shapes and patterns for a modern edge.
- Negative Space: Use negative space to create striking visual effects.
- Pop Art: Draw inspiration from pop art with bright colors and bold designs.
Modern styles can bring a fresh and innovative perspective to your photo embroidery.
6.4 How To Blend Different Styles?
Blending different styles can create unique and innovative designs:
- Combine Vintage and Modern: Mix vintage elements with modern techniques.
- Incorporate Cultural Motifs: Blend traditional patterns with contemporary designs.
- Use Unexpected Materials: Combine embroidery with unconventional materials like metal or plastic.
- Experiment with Textures: Mix smooth and textured stitches for added interest.
- Break the Rules: Don’t be afraid to break the rules and experiment with your own unique style.
Blending styles can lead to unexpected and beautiful results.
6.5 Where To Find Inspiration For Different Styles And Themes?
Finding inspiration for different styles and themes can broaden your creative horizons:
- Art Galleries: Visit art galleries and museums to see a wide range of styles and themes.
- Design Blogs: Follow design blogs for inspiration on modern and innovative designs.
- Craft Fairs: Attend craft fairs to discover unique and handmade creations.
- Social Media: Explore Pinterest and Instagram for endless inspiration.
- Nature: Draw inspiration from the colors, shapes, and patterns of nature.
Inspiration is all around you, waiting to be discovered and incorporated into your photo embroidery.
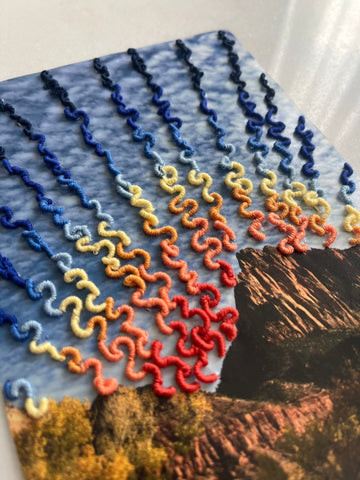
 Embroidery thread in various colors
7. Photo Embroidery For Special Occasions And Gifts
Photo embroidery is a thoughtful and personalized way to celebrate special occasions and create memorable gifts:
7.1 How To Create Embroidered Wedding Photos?
Embroidered wedding photos make cherished keepsakes:
- Use Elegant Stitches: Choose delicate and elegant stitches like satin stitch and French knots.
- Incorporate Wedding Themes: Add wedding-themed embellishments like flowers, hearts, and rings.
- Use Metallic Threads: Incorporate metallic threads for a touch of sparkle.
- Add the Wedding Date: Embroider the wedding date for a personal touch.
- Frame Beautifully: Frame the embroidered photo in a beautiful and elegant frame.
Embroidered wedding photos capture the love and joy of the special day.
7.2 What Are Ideas For Embroidered Baby Photos?
Embroidered baby photos make adorable and heartfelt gifts:
- Use Soft Colors: Choose soft and soothing colors for baby photos.
- Add Baby-Themed Embellishments: Incorporate baby-themed embellishments like animals, stars, and moons.
- Use Simple Stitches: Choose simple and easy stitches for a sweet and innocent look.
- Add the Baby’s Name: Embroider the baby’s name for a personal touch.
- Create a Mobile: Create a baby mobile with embroidered photo elements.
Embroidered baby photos celebrate the precious moments of new life.
7.3 How To Make Embroidered Holiday Cards?
Embroidered holiday cards add a personal touch to your greetings:
- Use Festive Colors: Choose festive colors like red, green, and gold.
- Incorporate Holiday Themes: Add holiday-themed embellishments like snowflakes, trees, and ornaments.
- Use Simple Stitches: Choose simple and easy stitches for a quick and easy project.
- Add Holiday Greetings: Embroider holiday greetings like “Merry Christmas” or “Happy Holidays.”
- Create a Collage: Create a holiday collage with embroidered photo elements.
Embroidered holiday cards spread joy and warmth during the holiday season.
7.4 What Are Personalized Gift Ideas?
Personalized photo embroidery gifts show you care:
- Monogrammed Photos: Add monograms for a personal touch.
- Embroidered Quotes: Embroider meaningful quotes or phrases.
- Themed Gifts: Create gifts based on personal interests or hobbies.
- Memory Keepsakes: Embroider photos that capture special memories.
- Family Portraits: Create embroidered family portraits.
Personalized gifts are always appreciated and cherished.
7.5 Where To Find Inspiration For Occasion-Based Embroidery?
Finding inspiration for occasion-based embroidery can help you create meaningful and personalized gifts:
- Greeting Card Shops: Visit greeting card shops to see a wide range of themes and designs.
- Gift Shops: Explore gift shops for unique and personalized gift ideas.
- Craft Blogs: Follow craft blogs for inspiration on occasion-based projects.
- Social Media: Check out Pinterest and Instagram for endless ideas.
- Family and Friends: Draw inspiration from the interests and preferences of your loved ones.
Let your creativity and thoughtfulness guide you in creating the perfect occasion-based embroidery.
 Wedding photo with delicate embroidery
8. Building A Community And Sharing Your Photo Embroidery
Sharing your photo embroidery and connecting with other artists can enhance your creative journey:
8.1 How To Share Your Work Online?
Sharing your work online can inspire others and build your audience:
- Social Media: Use platforms like Instagram, Pinterest, and Facebook to share your photos.
- Online Galleries: Upload your photos to online galleries and art communities.
- Personal Blog: Create a personal blog to showcase your work and share your process.
- Etsy Shop: Sell your embroidered photos on Etsy.
- Use Hashtags: Use relevant hashtags to reach a wider audience.
Sharing your work online can open up new opportunities and connections.
8.2 How To Join Embroidery Communities?
Joining embroidery communities can provide support, inspiration, and learning opportunities:
- Online Forums: Participate in online embroidery forums and discussion groups.
- Local Groups: Join local embroidery groups and guilds.
- Workshops and Classes: Attend embroidery workshops and classes.
- Social Media Groups: Join embroidery groups on social media.
- Craft Fairs: Attend craft fairs and meet other artists.
Being part of a community can enhance your skills and provide valuable connections.
8.3 What Are The Benefits Of Giving Workshops?
Giving workshops can be a rewarding experience:
- Share Your Knowledge: Share your skills and knowledge with others.
- Build Your Reputation: Establish yourself as an expert in your field.
- Generate Income: Earn income by teaching workshops.
- Connect With Others: Connect with like-minded individuals and build relationships.
- Inspire Creativity: Inspire others to explore their creativity.
Workshops can be a fulfilling way to give back to the community.
8.4 How To Get Feedback On Your Photo Embroidery?
Getting feedback can help you improve your skills:
- Ask for Constructive Criticism: Ask for specific and constructive feedback from trusted sources.
- Join Critique Groups: Participate in critique groups and provide feedback to others.
- Online Forums: Post your work on online forums and ask for feedback.
- Social Media: Share your work on social media and ask for comments.
- Be Open to Suggestions: Be open to suggestions and willing to make changes.
Feedback is essential for growth and improvement.
8.5 Where To Find Inspiration From Other Embroiderers?
Finding inspiration from other embroiderers can spark new ideas and techniques:
- Instagram: Follow embroidery artists on Instagram for daily inspiration.
- Pinterest: Explore embroidery boards on Pinterest for curated collections of designs.
- Blogs: Read embroidery blogs for tutorials, tips, and artist interviews.
- Books: Check out embroidery books for patterns, techniques, and inspiration.
- Museums: Visit museums to see historical and contemporary embroidery.
Let the creativity of others inspire your own unique creations.
At dfphoto.net, we encourage you to explore the world of photo embroidery, discover new techniques, and share your beautiful creations with the community.
 Community of embroiderers working together
Ready to start your photo embroidery journey? Visit dfphoto.net for tutorials, inspiration, and a supportive community of fellow artists. Contact us at 1600 St Michael’s Dr, Santa Fe, NM 87505, United States or call +1 (505) 471-6001. Let’s create something beautiful together!
FAQ: All About Photo Embroidery
1. Is photo embroidery difficult for beginners?
No, photo embroidery isn’t difficult for beginners; it’s accessible for all skill levels. Starting with simple stitches and designs makes it easy to learn. As you gain confidence, you can progress to more complex techniques.
2. What kind of photos are best for embroidering?
Matte or luster finish prints on high-quality photo paper work best for embroidering. According to Popular Photography magazine, these finishes reduce glare and provide a better surface for stitching.
3. Can I use regular embroidery floss for photo embroidery?
Yes, you can use regular embroidery floss for photo embroidery; cotton floss is a popular choice due to its wide range of colors and soft texture. Experiment with different materials like metallic threads for added flair.
4. How do I transfer my design onto the photo?
You can transfer your design onto the photo by tracing, stenciling, freehand drawing, or using digital templates. Ensure your method is accurate and doesn’t damage the photo’s surface.
5. What are the essential stitches to learn for photo embroidery?
The essential stitches to learn for photo embroidery are straight stitch, back stitch, satin stitch, French knot, running stitch and cross stitch. Mastering these will provide a strong foundation for more complex designs.
6. How do I prevent the photo from tearing while embroidering?
Prevent the photo from tearing while embroidering by pre-punching holes, using smaller needles, and reinforcing the back with fabric or tape. Avoid pulling the thread too tightly to minimize stress.
7. How do I display my embroidered photos?
Display your embroidered photos by using frames, mats, shadow boxes, or hanging displays. Choose a method that complements the style of your embroidery and protects it from damage.
8. What is thread painting in photo embroidery?
Thread painting in photo embroidery uses different colors and densities of stitches to create painterly effects, layering colors and varying stitch lengths to add texture and dimension.
9. Can I incorporate beads or sequins into my photo embroidery?
Yes, you can incorporate beads or sequins into your photo embroidery to add sparkle and texture, sewing them onto the photo to enhance visual interest.
10. How do I clean and maintain my embroidered photos?
Clean and maintain your embroidered photos by avoiding direct sunlight and moisture, handling them with clean hands, and storing them in a cool, dry place. Gently clean with a soft brush or slightly damp cloth if necessary.