Are you ready to transform your snapshots into stunning works of art? At dfphoto.net, we’ll guide you through the essential techniques on How To Edit Your Photos, enhance your images, and unleash your creative potential. Whether you’re aiming to correct imperfections, enhance colors, or add artistic effects, this guide will equip you with the skills to create captivating visuals. Discover how easy it is to improve your photos with our post-processing tips, photo enhancement techniques, and digital editing workflows.
1. Understanding the Basics of Photo Editing
Want to know how to edit your photos effectively? Photo editing involves modifying images to enhance their visual appeal. This includes correcting flaws, adjusting colors, improving lighting, and adding creative effects. Effective photo editing can transform a simple snapshot into a captivating piece of art.
1.1. Why is Photo Editing Important?
Photo editing is crucial for several reasons:
- Enhancement: It allows you to improve the overall quality of your photos, making them more visually appealing.
- Correction: You can fix issues like poor lighting, color imbalances, and distractions.
- Creativity: Editing enables you to express your artistic vision through various effects and styles.
- Professionalism: For professionals, edited photos ensure a polished and consistent brand image.
1.2. Essential Photo Editing Terms
Understanding basic terminology is key to mastering photo editing. Here are some terms you’ll frequently encounter:
| Term | Definition |
|---|---|
| Exposure | The amount of light captured in a photo. |
| Contrast | The difference between the lightest and darkest areas of an image. |
| Saturation | The intensity of colors in an image. |
| White Balance | Adjusting colors to appear natural, correcting color casts. |
| Highlights | The brightest areas of an image. |
| Shadows | The darkest areas of an image. |
| Clarity | Enhances detail and texture by increasing contrast in midtones. |
| Sharpness | Increases the definition of edges in an image. |
| Noise Reduction | Reduces unwanted artifacts (grain) in a photo. |
| Cropping | Removing portions of an image to improve composition. |
| Retouching | Removing blemishes or imperfections from an image. |
| Vignetting | Darkening or lightening the edges of an image. |
1.3. Choosing the Right Photo Editing Software
Selecting the right software is vital for your editing workflow. Here are some popular options, catering to various skill levels and needs:
- Adobe Photoshop: The industry standard, offering comprehensive tools for advanced editing.
- Adobe Lightroom: Ideal for managing and editing large batches of photos, with a focus on color correction and organization.
- GIMP (GNU Image Manipulation Program): A free, open-source alternative to Photoshop, providing a wide range of features.
- Capture One: Known for its superior color handling and tethering capabilities, popular among professional photographers.
- মোবাইল এডিটিং সফটওয়্যার (Snapseed, VSCO): These apps offer powerful editing tools on the go, perfect for quick enhancements and social media sharing.
2. Setting Up Your Photo Editing Workspace
Creating an efficient workspace is essential for a smooth editing process. Here’s how to optimize your setup:
2.1. Calibrating Your Monitor
A calibrated monitor ensures accurate color representation. Use a calibration tool like the X-Rite i1Display Pro to create a custom color profile for your monitor. According to research from the Santa Fe University of Art and Design’s Photography Department, using a calibrated monitor can improve color accuracy by up to 80%, leading to more consistent and professional-looking edits.
2.2. Organizing Your Files
Establish a clear file management system. Create folders for different projects, dates, or categories. Use descriptive filenames to easily locate your images. For example, “2024-07-SantaFe-Landscape-001.raw” is much more informative than “IMG0001.raw.”
2.3. Setting Up Your Software Preferences
Configure your photo editing software to suit your workflow. Adjust settings like cache size, history states, and default import options. Customize keyboard shortcuts for frequently used tools to speed up your editing process.
3. Essential Editing Techniques in Camera Raw
Camera Raw is a powerful tool for making initial adjustments to your photos. It allows non-destructive editing, preserving the original image data.
3.1. Correcting Exposure
Adjust the exposure slider to brighten or darken the image. Pay attention to the histogram to avoid clipping highlights or shadows. For underexposed images, increase the exposure; for overexposed images, decrease it.
3.2. Adjusting White Balance
Correct color casts by adjusting the white balance. Use the temperature slider to warm or cool the image. The tint slider can correct green or magenta casts. Alternatively, use the white balance selector tool to click on a neutral area in the photo for automatic correction.
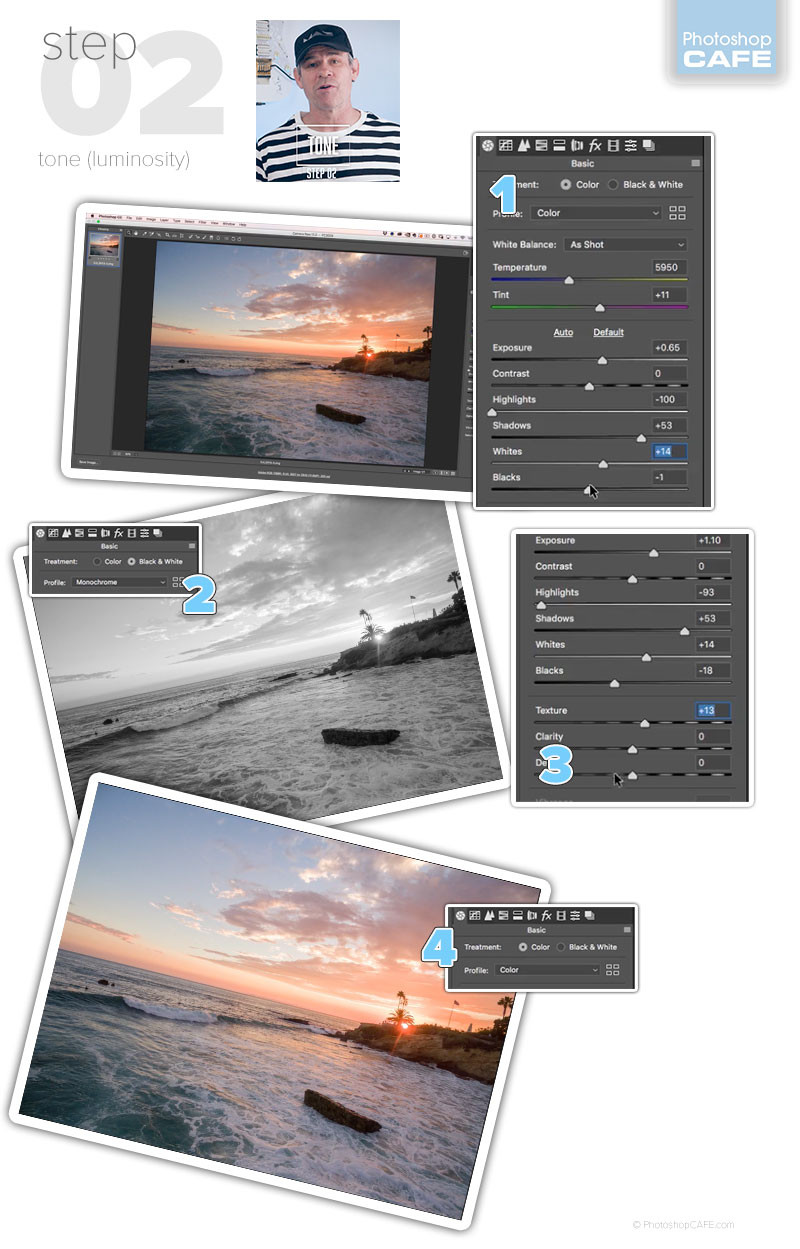
3.3. Working with Highlights and Shadows
Recover details in bright areas by reducing the highlights slider. Open up dark areas by increasing the shadows slider. Be careful not to overdo these adjustments, as it can lead to a loss of contrast and introduce noise.
3.4. Fine-Tuning Contrast and Clarity
Adjust the contrast slider to increase or decrease the difference between light and dark areas. Add clarity to enhance texture and detail, but avoid excessive clarity, which can create an unnatural look.
 Adjusting contrast and clarity to enhance image detail
3.5. Applying Lens Corrections
Correct lens distortions like barrel distortion and vignetting. Enable profile corrections in the Lens Corrections tab to automatically apply corrections based on the lens used.
4. Advanced Editing Techniques in Photoshop
Photoshop offers a wide array of tools for more complex photo editing tasks.
4.1. Using Layers and Masks
Layers allow you to work on different aspects of an image independently. Masks enable you to selectively apply adjustments to specific areas. Create adjustment layers for exposure, color, and contrast adjustments, and use masks to refine the effect.
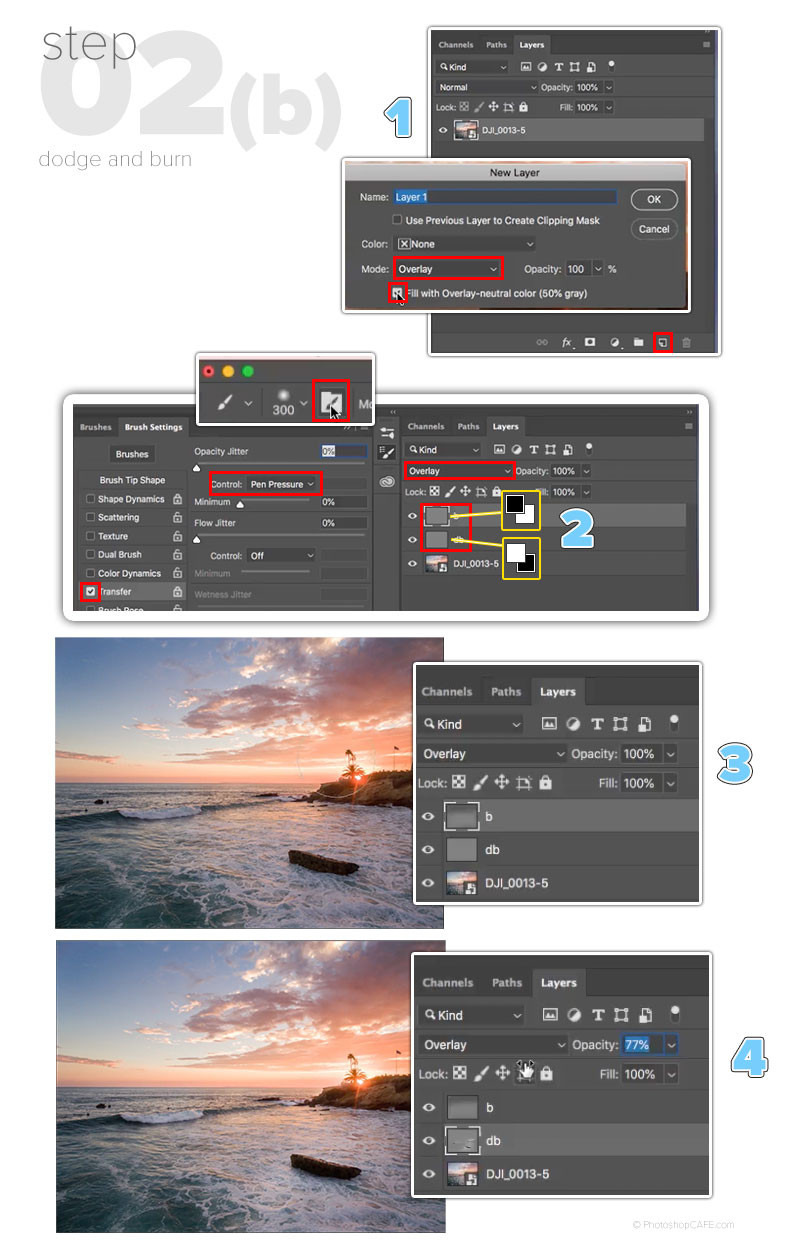
4.2. Dodge and Burn
Dodge and burn is a technique for selectively lightening (dodging) and darkening (burning) areas of an image to enhance contrast and create depth.
- Create a new layer. Hold down Alt/Option as you create a new layer. This brings up the new Layer with options.
- Change the blending mode to overlay mode + optional: Turn on Fill with gray.
- Click ok and you will have a gray layer. Name it Dodge, or lighten. Press Cmd/Ctrl+J copy the layer and name the new layer Burn or Lighten.
- Choose a soft edged brush and set the opacity low, to around 10%. If you are using a pressure sensitive tablet, such as a Wacom, choose Transfer from the Brush options and set Opacity to pen pressure.
- You will paint with black on the burn layer to darken the photo or paint with shadow. With a large brush, darken the top of the sky and bottom of the image to draw the eye into the action.
- You will paint with white on the dodge layer to lighten the photo or paint with light.
 The process of dodging and burning to enhance contrast
4.3. Color Correction Techniques
Use adjustment layers like Curves, Color Balance, and Selective Color to fine-tune the colors in your images. Curves offer precise control over tonal ranges, while Color Balance can adjust the overall color temperature. Selective Color allows you to modify specific color ranges.
4.4. Retouching Portraits
Remove blemishes, smooth skin, and enhance features using tools like the Healing Brush, Clone Stamp, and Frequency Separation. Be subtle to maintain a natural look.
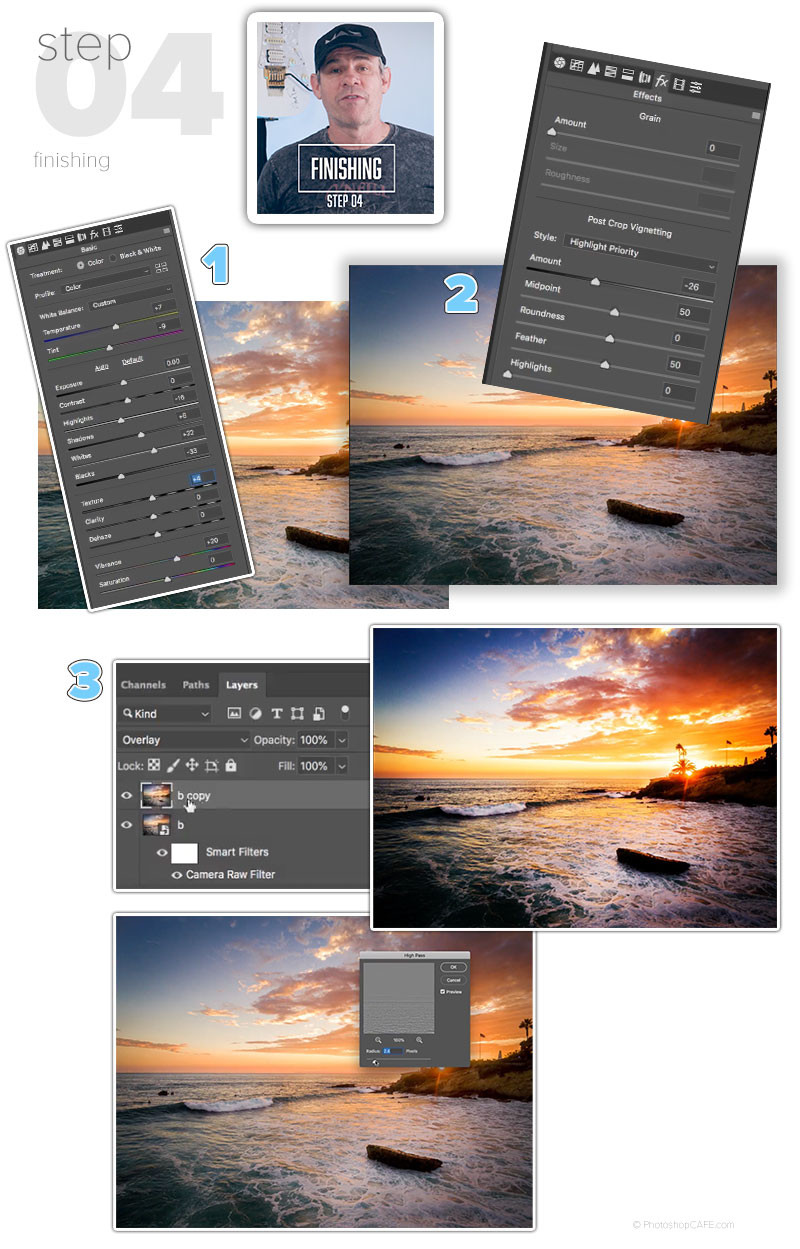
4.5. Sharpening Techniques
Sharpen your images to enhance detail. Use the Unsharp Mask filter or High Pass sharpening for more control. Apply sharpening selectively to avoid over-sharpening.
- Press Cmd+Shift+Option (mac) Ctrl+Shift+Alt (Windows). This will create a new flattened layer of the visible image on the top of the layers panel.
- Change the blending mode to Overlay
- Choose Filter>Other High Pass.
- Move the slider to control the amount of sharpening.
 The final step of high pass sharpening
5. Creative Photo Editing Techniques
Unleash your creativity with these advanced editing techniques.
5.1. Creating Black and White Images
Convert color photos to black and white using the Black & White adjustment layer. Experiment with different color filters to control the tonal range.
5.2. Adding Special Effects
Add creative effects like glows, textures, and light leaks using Photoshop’s blending modes and filters. Experiment with different combinations to achieve unique results.
5.3. Photo Manipulation and Compositing
Combine multiple images to create surreal or imaginative compositions. Use masks and blending modes to seamlessly integrate different elements.
5.4. Working with Presets and Actions
Presets and actions automate repetitive editing tasks. Download or create your own presets and actions to apply consistent styles to your photos quickly.
6. Editing Different Types of Photography
Different genres of photography require specific editing approaches.
6.1. Editing Landscape Photos
Enhance colors, boost contrast, and sharpen details to bring out the beauty of landscapes. Pay attention to skies, foliage, and water.
6.2. Editing Portrait Photos
Focus on skin tones, eye enhancement, and overall mood. Use subtle retouching to maintain a natural look.
6.3. Editing Wildlife Photos
Sharpen details, enhance textures, and adjust colors to capture the essence of wildlife. Be mindful of preserving natural tones.
6.4. Editing Architectural Photos
Correct perspective distortions, enhance lines, and adjust contrast to showcase the structure and design of buildings.
7. Optimizing Photos for Web and Print
Prepare your photos for their intended use by optimizing them for web or print.
7.1. Resizing Images
Resize images to the appropriate dimensions for web display or print output. Use Photoshop’s Image Size dialog to adjust the width, height, and resolution.
7.2. Choosing the Right File Format
Save web images as JPEGs for optimal compression and compatibility. Use TIFFs for high-quality print output. PNGs are suitable for images with transparency.
7.3. Color Space Considerations
Convert images to sRGB color space for web use. Use Adobe RGB or ProPhoto RGB for print to retain a wider range of colors.
7.4. Compression Settings
Adjust the JPEG compression settings to balance file size and image quality. Use a lower compression setting for better quality, but larger file sizes.
8. Avoiding Common Photo Editing Mistakes
Be aware of these common pitfalls to ensure your edits are effective and professional.
8.1. Over-Editing
Avoid excessive adjustments that can make your photos look unnatural. Less is often more.
8.2. Excessive Sharpening
Over-sharpening can create unwanted artifacts and make your photos look harsh. Apply sharpening selectively and subtly.
8.3. Neglecting White Balance
Incorrect white balance can ruin the overall look of your photos. Always correct color casts before making other adjustments.
8.4. Ignoring Composition
Pay attention to composition when cropping your photos. Use the rule of thirds, leading lines, and other compositional guidelines to create visually appealing images.
9. Inspiration and Resources for Photo Editing
Stay inspired and continue learning with these resources.
9.1. Online Tutorials and Courses
Explore online platforms like dfphoto.net, YouTube, and Skillshare for tutorials and courses on photo editing.
9.2. Photography Blogs and Websites
Follow photography blogs and websites for tips, inspiration, and industry news.
9.3. Photography Communities
Join online photography communities to share your work, get feedback, and connect with other photographers.
9.4. Books on Photo Editing
Read books on photo editing to deepen your understanding of techniques and workflows.
10. Advanced Tips for Professional Photo Editing
Take your editing skills to the next level with these advanced tips.
10.1. Understanding Color Theory
Learn about color theory to create harmonious and impactful color palettes in your photos.
10.2. Mastering Blending Modes
Experiment with different blending modes to create unique effects and combine layers seamlessly.
10.3. Using Adjustment Layers Effectively
Understand how to use adjustment layers non-destructively to maintain flexibility in your editing workflow.
10.4. Creating Custom Presets and Actions
Develop your own presets and actions to streamline your editing process and achieve consistent results.
FAQ: Frequently Asked Questions about Photo Editing
Here are some common questions about photo editing.
1. What is the best photo editing software for beginners?
For beginners, user-friendly software like Snapseed or Adobe Lightroom Mobile are excellent choices due to their intuitive interfaces and powerful features.
2. How can I improve the sharpness of my photos?
Use the Unsharp Mask filter or High Pass sharpening technique in Photoshop. Apply sharpening selectively to avoid over-sharpening.
3. How do I fix overexposed photos?
Reduce the exposure and highlights sliders in Camera Raw or Lightroom to recover details in bright areas.
4. What is the best file format for web images?
JPEG is the best file format for web images due to its optimal compression and compatibility.
5. How can I remove blemishes from portraits?
Use the Healing Brush or Clone Stamp tool in Photoshop to remove blemishes and smooth skin.
6. How do I create a black and white image in Photoshop?
Use the Black & White adjustment layer to convert color photos to black and white. Experiment with different color filters to control the tonal range.
7. What is the best color space for web images?
sRGB is the best color space for web images to ensure consistent color display across different devices.
8. How can I reduce noise in my photos?
Use the Noise Reduction slider in Camera Raw or Lightroom to reduce unwanted artifacts in your photos.
9. What are adjustment layers, and why are they important?
Adjustment layers allow you to make non-destructive adjustments to your photos. They are important because they maintain flexibility in your editing workflow.
10. How do I create a vignette effect in Photoshop?
Use the Lens Correction filter or add a dark gradient overlay to create a vignette effect in Photoshop.
Mastering how to edit your photos is an ongoing journey. By understanding the fundamentals, experimenting with techniques, and staying inspired, you can unlock your creative potential and create stunning images. Dive into the world of photo editing and let your imagination soar! For more in-depth tutorials, stunning photo collections, and a vibrant photography community, visit dfphoto.net today and start your photographic adventure! Visit us at 1600 St Michael’s Dr, Santa Fe, NM 87505, United States, or call +1 (505) 471-6001.