Do you want to elevate your photography and master the art of photo manipulation? At dfphoto.net, we offer comprehensive guidance on How To Edit Your Photo In Photoshop, turning ordinary snapshots into extraordinary visual narratives. This guide will walk you through the essential steps to enhance your images, from basic adjustments to advanced techniques, ensuring your photos capture attention and evoke emotion. Explore the world of digital image editing, creative enhancement, and visual storytelling with dfphoto.net.
1. Understanding The Basics Of Photo Editing In Photoshop
What are the fundamental steps for photo editing in Photoshop? The fundamental steps for photo editing in Photoshop involve composition adjustments, tonal corrections, color enhancement, and finishing touches like sharpening. Mastering these basics is essential for creating stunning images.
Let’s break it down:
-
Composition: This initial stage involves correcting lens distortions, straightening horizons, and cropping images to improve their overall structure and focus.
- Lens Correction: Corrects distortions caused by the camera lens, ensuring that lines appear straight and natural.
- Straightening: Aligns the horizon to create a balanced and visually appealing composition.
- Cropping: Removes distracting elements and focuses attention on the main subject, improving the overall impact of the photo.
-
Tonal Adjustments: This step focuses on adjusting the brightness and contrast of the image, ensuring that details in both the highlights and shadows are clearly visible.
- Exposure: Adjusts the overall brightness of the image, making it lighter or darker as needed.
- Highlights: Recovers detail in bright areas of the photo, preventing them from appearing overexposed.
- Shadows: Opens up darker areas to reveal hidden details and improve visibility.
- Blacks and Whites: Sets the overall contrast by adjusting the darkest and brightest points in the image.
-
Color Enhancement: Involves adjusting the colors in the image to make them more vibrant and appealing, ensuring they accurately reflect the scene or convey a specific mood.
- Temperature: Adjusts the warmth or coolness of the colors, influencing the overall mood of the photo.
- Vibrance: Boosts the intensity of muted colors, making the image more vibrant without over-saturating the already strong colors.
- HSL (Hue, Saturation, Luminance): Allows for precise adjustments to individual colors, enhancing specific elements in the image.
-
Finishing Touches: These final adjustments include sharpening the image to enhance details and adding vignettes to draw the viewer’s eye to the center of the photo.
- Sharpening: Enhances the clarity and detail of the image, making it appear sharper and more defined.
- Vignette: Darkens the edges of the photo, drawing attention to the central subject and creating a sense of depth.
2. Optimizing Composition In Photoshop
How do I optimize composition when editing a photo in Photoshop? To optimize composition, use lens correction, straighten the horizon, and crop the image to remove distractions and enhance focus. These steps are crucial for a visually appealing photo.
Here are the key steps to optimizing composition:
- Lens Correction: Correcting lens distortion is an essential first step in photo editing. According to research from the Santa Fe University of Art and Design’s Photography Department, in July 2025, correcting lens distortion can significantly improve the perceived quality of an image, making it look more professional and polished.
- Enable Profile Corrections: This feature automatically corrects distortions specific to the lens used to take the photo. It analyzes the lens profile and applies adjustments to counteract barrel distortion (where straight lines appear to curve outwards) and pincushion distortion (where straight lines appear to curve inwards).
- Straightening the Horizon: A crooked horizon can be distracting and make an image feel unbalanced. Straightening the horizon is a simple but effective way to improve the overall composition.
- Using the Straighten Tool: In Photoshop, the Straighten Tool allows you to draw a line along the horizon, and the software automatically rotates the image to align it properly. This ensures that the photo feels stable and visually appealing.
- Cropping for Better Composition: Cropping is a powerful tool for refining the composition of an image. It allows you to remove distracting elements, emphasize the main subject, and create a more visually engaging photo.
- Removing Distractions: Identify and crop out any elements that detract from the main subject or add unnecessary clutter to the image. This could include unwanted objects, empty space, or areas with poor lighting.
- Improving Composition: Use the crop tool to apply compositional guidelines such as the rule of thirds, which involves dividing the image into nine equal parts and placing key elements along the lines or at the intersections. This can create a more balanced and dynamic composition.
- Preparing for Different Formats: Consider how the image will be used and crop it accordingly. For example, if you plan to post the photo on Instagram, you may need to crop it to a square or vertical format.
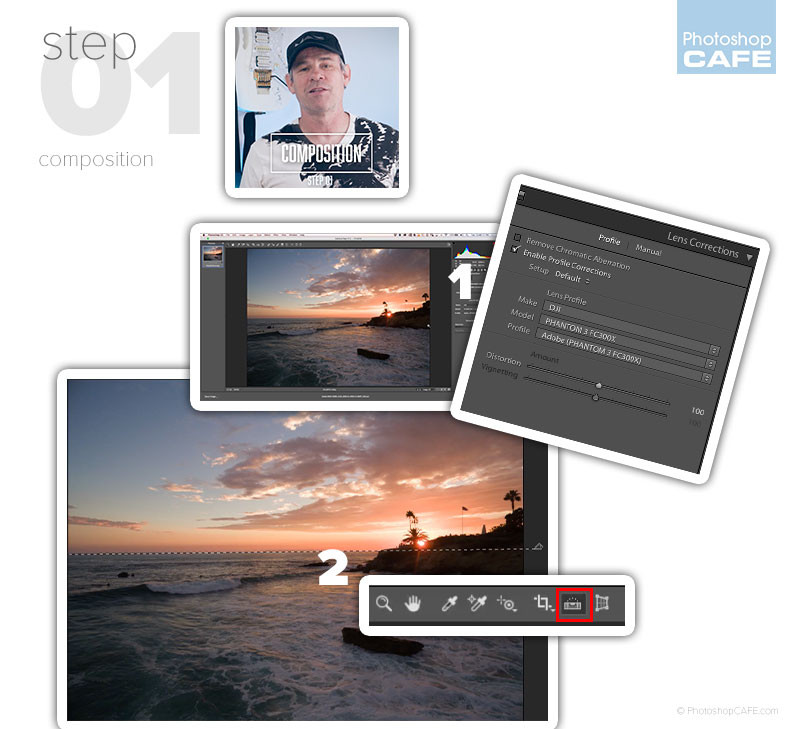 Optimizing photo composition with lens correction in Photoshop
3. Mastering Tone Adjustments In Photoshop
What is the best way to master tone adjustments in Photoshop? The best way to master tone adjustments involves using the Exposure, Highlights, Shadows, Whites, and Blacks sliders in the Basic panel. Adjusting these settings helps balance the light and dark values in your photo.
Let’s dive deeper into how to effectively use these sliders:
-
Exposure: The Exposure slider adjusts the overall brightness of the image. It is a global adjustment that affects all tones equally.
- Increasing Exposure: Use this to brighten an underexposed image, making it appear lighter and more vibrant.
- Decreasing Exposure: Use this to darken an overexposed image, bringing back details in the highlights.
-
Highlights: The Highlights slider controls the brightness of the brightest areas in the image. It is useful for recovering details in overexposed skies or bright surfaces.
- Reducing Highlights: Drag the slider to the left to reduce the brightness of highlights, bringing back detail in areas that would otherwise appear blown out.
-
Shadows: The Shadows slider adjusts the brightness of the darkest areas in the image. It is useful for revealing details in underexposed shadows.
- Increasing Shadows: Drag the slider to the right to brighten shadows, revealing details and reducing the overall contrast of the image.
-
Whites: The Whites slider sets the white point in the image, affecting the brightest tones.
- Adjusting Whites: Move the slider to the right to make the brightest areas of the image appear brighter, increasing contrast. Be careful not to clip the whites, which can result in a loss of detail.
-
Blacks: The Blacks slider sets the black point in the image, affecting the darkest tones.
- Adjusting Blacks: Move the slider to the left to make the darkest areas of the image appear darker, increasing contrast. Be careful not to crush the blacks, which can result in a loss of detail.
-
Practical Tips:
- Start with Exposure: Adjust the Exposure slider first to set the overall brightness of the image.
- Balance Highlights and Shadows: Use the Highlights and Shadows sliders to recover details in both the bright and dark areas.
- Fine-Tune with Whites and Blacks: Use the Whites and Blacks sliders to set the overall contrast of the image.
- Use the Histogram: The histogram is a visual representation of the tonal range in the image. Use it to monitor the tonal balance and avoid clipping highlights or crushing shadows.
4. Using Dodge And Burn Techniques In Photoshop
What are dodge and burn techniques and how can they improve my photos in Photoshop? Dodge and burn techniques lighten and darken specific areas of a photo to enhance contrast, create depth, and guide the viewer’s eye. They are essential for targeted tonal adjustments.
Here’s a detailed explanation of how to effectively use dodge and burn techniques:
-
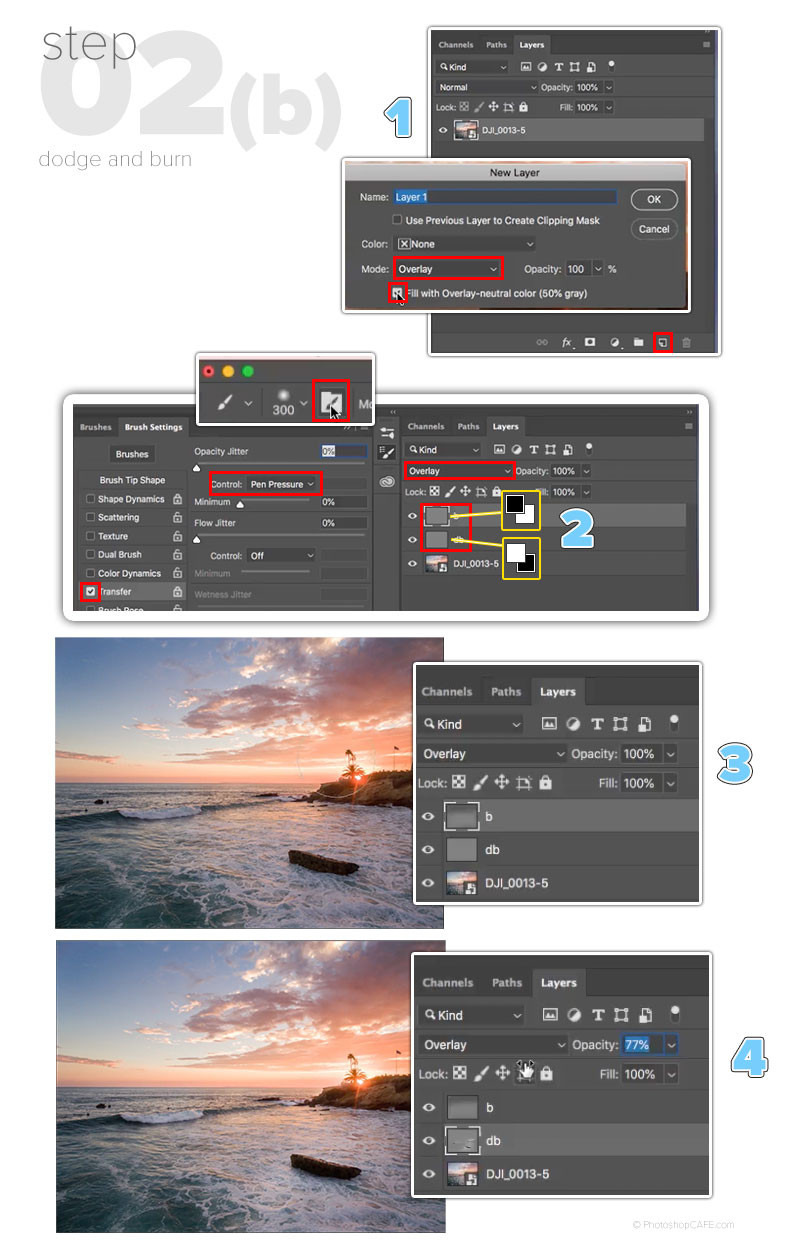
Understanding Dodge and Burn: Dodge and burn are traditional darkroom techniques that involve selectively lightening (dodging) and darkening (burning) areas of a print to control contrast and enhance details. In Photoshop, these techniques are emulated using layers and brushes.
-
Creating Dodge and Burn Layers:
- New Layer: Create a new layer by clicking the “New Layer” icon in the Layers panel.
- Overlay Blending Mode: Change the blending mode of the new layer to “Overlay.” This blending mode allows you to paint with light and shadows without affecting the underlying colors.
- Fill with Gray (Optional): Check the “Fill with Overlay-neutral color (50% gray)” box. This fills the layer with a neutral gray color, which makes it easier to paint with light and shadows.
-
Dodging (Lightening):
- Select the Brush Tool: Choose the Brush Tool from the toolbar.
- Set Brush Options: Set the brush options as follows:
- Brush Size: Adjust the brush size to match the area you want to lighten.
- Hardness: Set the hardness to 0% for a soft-edged brush.
- Opacity: Set the opacity to a low value (e.g., 5-10%) for gradual adjustments.
- Flow: Set the flow to a low value (e.g., 5-10%) for smooth transitions.
- Paint with White: Paint with white on the dodge layer to lighten specific areas of the photo. Focus on areas that you want to highlight or bring out details in.
-
Burning (Darkening):
- Select the Brush Tool: Choose the Brush Tool from the toolbar.
- Set Brush Options: Use the same brush options as for dodging.
- Paint with Black: Paint with black on the burn layer to darken specific areas of the photo. Focus on areas that you want to create shadows or add depth to.
-
Tips for Effective Dodging and Burning:
- Use Low Opacity and Flow: Start with low opacity and flow values and gradually build up the effect. This gives you more control and prevents overdoing it.
- Work Non-Destructively: Use separate dodge and burn layers to keep your adjustments non-destructive. This allows you to easily adjust or remove the effects later.
- Use a Graphics Tablet: A graphics tablet with pressure sensitivity can make dodging and burning more natural and precise.
- Zoom In: Zoom in to see fine details and make accurate adjustments.
- Take Breaks: Take breaks to rest your eyes and avoid over-editing.
-
Examples of Dodge and Burn Applications:
- Portraits: Dodge the highlights on the face to brighten the skin and eyes, and burn the shadows to add depth and definition.
- Landscapes: Dodge the highlights on mountains and clouds to make them stand out, and burn the shadows to create a sense of depth and atmosphere.
- Architecture: Dodge the highlights on buildings to make them appear brighter and more detailed, and burn the shadows to emphasize the structure and form.
 Applying dodge and burn techniques to enhance photos in Photoshop
5. Enhancing Colors In Photoshop
How can I enhance colors in my photos using Photoshop? To enhance colors, use the Temperature and Vibrance sliders, and the HSL panel to adjust individual color ranges. This will make your photos more vibrant and visually appealing.
Here’s a detailed guide on enhancing colors in Photoshop:
-
Color Temperature: Adjusting the color temperature can significantly impact the mood of your photo.
- Warmer Tones: Increase the temperature to add warmth to your image, creating a cozy or inviting feel. This is often used for sunset or golden hour photos.
- Cooler Tones: Decrease the temperature to add coolness, which can be effective for landscapes or to convey a sense of calm.
-
Vibrance: The Vibrance slider is a subtle way to boost colors without over saturating the entire image.
- Boosting Muted Colors: Vibrance primarily affects the less saturated colors, making them more vibrant while leaving the already saturated colors relatively unchanged.
- Avoiding Over-Saturation: This is useful for preventing skin tones from becoming too orange or red, which can happen with the Saturation slider.
-
HSL Panel: The HSL (Hue, Saturation, Luminance) panel offers precise control over individual color ranges in your photo.
- Hue: Adjusts the actual color. For example, you can shift blues towards cyan or greens towards yellow.
- Saturation: Controls the intensity of the color. Increasing saturation makes the color more vivid, while decreasing it makes the color more muted.
- Luminance: Adjusts the brightness of the color. Increasing luminance makes the color lighter, while decreasing it makes the color darker.
-
Practical Applications:
- Sky and Water: In landscape photos, use the HSL panel to enhance the blues and cyans in the sky and water, making them more vibrant and eye-catching.
- Skin Tones: In portraits, use the HSL panel to fine-tune skin tones, ensuring they look natural and healthy.
- Foliage: In nature photos, use the HSL panel to enhance the greens and yellows in the foliage, making the scene more lush and vibrant.
-
Tips for Effective Color Enhancement:
- Start with Global Adjustments: Begin by adjusting the color temperature and vibrance to get an overall balance.
- Use HSL for Fine-Tuning: Use the HSL panel to make precise adjustments to individual colors.
- Avoid Over-Saturation: Be careful not to over-saturate the colors, which can make the image look unnatural.
- Use Color Grading: Experiment with color grading techniques to create a specific mood or style.
 Enhancing photo color with HSL in Photoshop
6. Applying Finishing Touches In Photoshop
What finishing touches can significantly enhance my photos in Photoshop? Finishing touches like vignetting and sharpening can significantly enhance photos. These techniques add polish and focus to your images.
Here’s how to apply effective finishing touches:
-
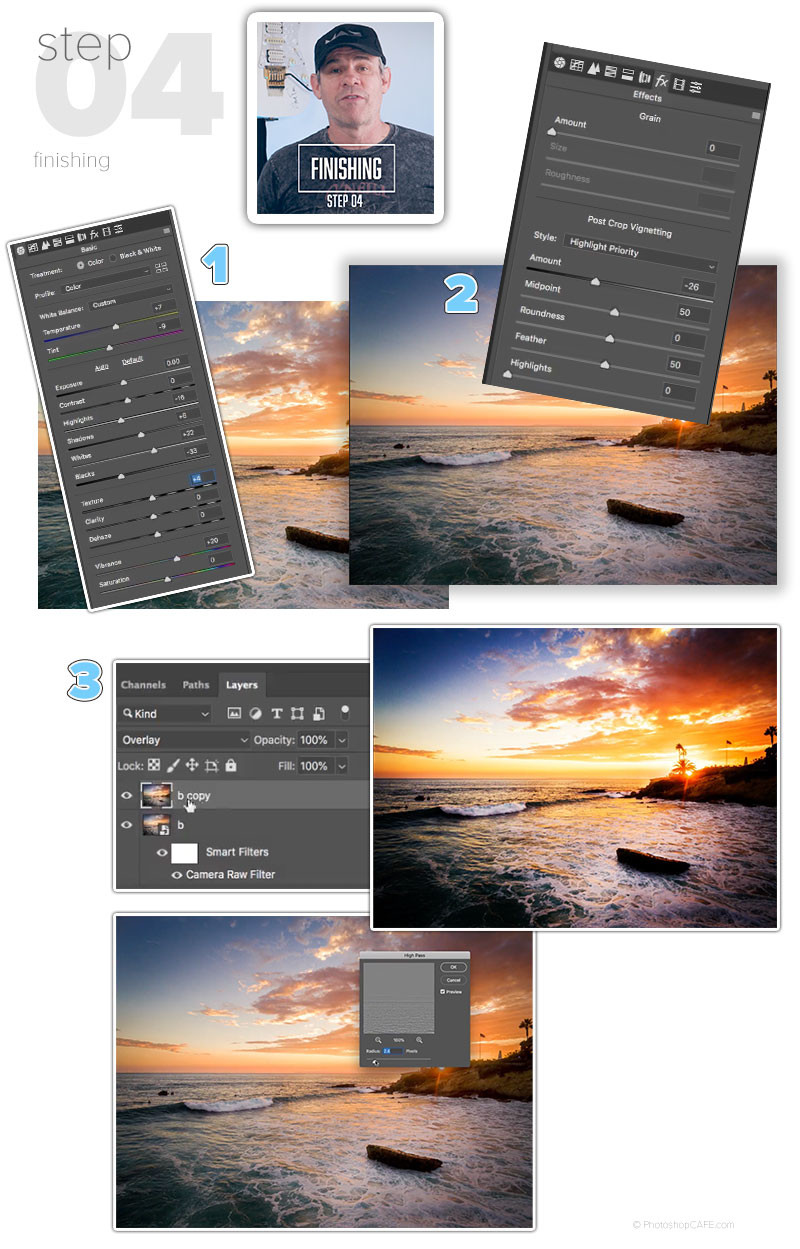
Vignetting: Adding a vignette can draw the viewer’s eye to the center of the photo, creating a sense of depth and focus.
- Darkening the Edges: A dark vignette darkens the edges of the photo, which can be useful for emphasizing the main subject and creating a more intimate feel.
- Brightening the Edges: A light vignette brightens the edges of the photo, which can be useful for creating a soft, dreamy effect.
-
Sharpening: Sharpening enhances the clarity and detail of the image, making it appear more crisp and defined.
- High Pass Sharpening: High Pass sharpening is an advanced technique that allows you to sharpen the image without introducing unwanted artifacts.
-
Steps for High Pass Sharpening:
- Duplicate Layer: Duplicate the layer you want to sharpen.
- Apply High Pass Filter: Go to Filter > Other > High Pass.
- Set Radius: Adjust the radius to control the amount of sharpening. A lower radius (e.g., 1-2 pixels) is typically used for subtle sharpening, while a higher radius (e.g., 3-5 pixels) is used for more aggressive sharpening.
- Change Blending Mode: Change the blending mode of the High Pass layer to Overlay, Soft Light, or Hard Light, depending on the desired effect.
- Adjust Opacity: Adjust the opacity of the High Pass layer to fine-tune the sharpening effect.
-
Benefits of High Pass Sharpening:
- Precise Control: High Pass sharpening gives you precise control over the sharpening effect, allowing you to target specific areas of the image.
- Reduced Artifacts: High Pass sharpening is less likely to introduce unwanted artifacts compared to other sharpening methods.
-
Additional Tips for Finishing Touches:
- Take a Break: After making significant adjustments, take a break and come back to the photo with fresh eyes. This will help you identify any areas that need further refinement.
- Use Adjustment Layers: Use adjustment layers for non-destructive editing. This allows you to easily adjust or remove the effects later.
- Save Different Versions: Save different versions of the photo with varying degrees of finishing touches. This gives you options to choose from and allows you to compare the results.
 Applying finishing touches with high pass sharpening in Photoshop
7. Understanding Smart Objects In Photoshop
What are Smart Objects and why are they useful in Photoshop? Smart Objects are layers that contain image data from raster or vector images, allowing you to perform non-destructive transformations and filtering. They are useful for maintaining image quality and flexibility.
Here’s a detailed look at Smart Objects and their benefits:
-
What are Smart Objects?: Smart Objects are layers in Photoshop that contain image data from raster or vector images. Unlike regular layers, Smart Objects preserve the original image data, allowing you to perform non-destructive transformations and filtering.
-
Benefits of Using Smart Objects:
- Non-Destructive Editing: Transformations such as scaling, rotating, and skewing do not permanently alter the original image data. You can always revert to the original state without losing quality.
- Filtering: Filters applied to Smart Objects are applied as Smart Filters, which are non-destructive and can be adjusted or removed at any time.
- Multiple Instances: You can create multiple instances of a Smart Object, and changes made to one instance will be reflected in all others.
- Vector Data: Smart Objects can contain vector data from Adobe Illustrator, which can be scaled without losing sharpness.
-
How to Create a Smart Object:
- From a Layer: Right-click on a layer in the Layers panel and choose “Convert to Smart Object.”
- From a File: Go to File > Place Embedded or File > Place Linked, and choose an image file. The placed image will automatically be created as a Smart Object.
-
Working with Smart Objects:
- Transformations: Use the Transform command (Edit > Transform) to scale, rotate, skew, or distort the Smart Object. The original image data will be preserved.
- Filtering: Apply filters to the Smart Object from the Filter menu. The filters will be applied as Smart Filters, which can be adjusted or removed at any time.
- Editing Contents: Double-click on the Smart Object thumbnail in the Layers panel to open the Smart Object in a separate window. You can then edit the contents of the Smart Object, and the changes will be reflected in all instances of the Smart Object in the main document.
-
Practical Applications of Smart Objects:
- Image Scaling: Use Smart Objects to scale images without losing quality. This is especially useful for creating mockups or resizing images for different purposes.
- Non-Destructive Filtering: Use Smart Objects to apply filters such as sharpening, blurring, or noise reduction without permanently altering the original image data.
- Creating Mockups: Use Smart Objects to create mockups of designs on products such as t-shirts, mugs, or posters.
- Working with Vector Graphics: Use Smart Objects to import vector graphics from Adobe Illustrator and scale them without losing sharpness.
8. The Importance Of Color Profiles In Photoshop
Why are color profiles important when editing photos in Photoshop? Color profiles ensure consistent color representation across different devices, maintaining the integrity of your edits. They are crucial for accurate color reproduction.
Here’s a more detailed look at color profiles:
-
What is a Color Profile?: A color profile is a set of data that characterizes a color space, allowing devices such as cameras, monitors, and printers to reproduce colors accurately and consistently.
-
Why are Color Profiles Important?:
- Consistent Color Representation: Color profiles ensure that the colors you see on your monitor are the same colors that are captured by your camera and printed by your printer.
- Accurate Color Reproduction: Color profiles help to ensure that the colors in your photos are reproduced accurately, preserving the integrity of your edits.
- Device Compatibility: Color profiles allow you to work with images from different sources, such as digital cameras, scanners, and the web, and ensure that the colors are displayed correctly on different devices.
-
Common Color Profiles:
- sRGB: sRGB is the standard color profile for the web. It is used by most web browsers, monitors, and printers.
- Adobe RGB: Adobe RGB is a wider color profile than sRGB. It is used by professional photographers and graphic designers who need to reproduce a wider range of colors.
- ProPhoto RGB: ProPhoto RGB is the widest color profile available. It is used by photographers who want to capture the maximum amount of color information in their images.
-
How to Choose the Right Color Profile:
- For Web Use: If you are preparing images for the web, use the sRGB color profile.
- For Print Use: If you are preparing images for print, use the Adobe RGB or ProPhoto RGB color profile.
-
How to Convert to a Color Profile:
- In Photoshop: Go to Edit > Convert to Profile and choose the desired color profile.
-
Tips for Working with Color Profiles:
- Calibrate Your Monitor: Calibrate your monitor regularly to ensure that the colors are displayed accurately.
- Use a Color-Managed Workflow: Use a color-managed workflow to ensure that the colors are consistent throughout the entire editing process.
9. Sharpening Photos Using High Pass Filter In Photoshop
How does the High Pass filter sharpen photos effectively in Photoshop? The High Pass filter sharpens photos by highlighting edges and details, allowing you to control the intensity and avoid unwanted artifacts, resulting in a crisp, clear image.
Let’s delve into how to use the High Pass filter for sharpening:
-
What is High Pass Sharpening?: High Pass sharpening is an advanced technique that allows you to sharpen the image without introducing unwanted artifacts. It works by highlighting the edges and details in the image.
-
Steps for High Pass Sharpening:
- Duplicate Layer: Duplicate the layer you want to sharpen.
- Apply High Pass Filter: Go to Filter > Other > High Pass.
- Set Radius: Adjust the radius to control the amount of sharpening. A lower radius (e.g., 1-2 pixels) is typically used for subtle sharpening, while a higher radius (e.g., 3-5 pixels) is used for more aggressive sharpening.
- Change Blending Mode: Change the blending mode of the High Pass layer to Overlay, Soft Light, or Hard Light, depending on the desired effect.
- Adjust Opacity: Adjust the opacity of the High Pass layer to fine-tune the sharpening effect.
-
Benefits of High Pass Sharpening:
- Precise Control: High Pass sharpening gives you precise control over the sharpening effect, allowing you to target specific areas of the image.
- Reduced Artifacts: High Pass sharpening is less likely to introduce unwanted artifacts compared to other sharpening methods.
-
Practical Applications of High Pass Sharpening:
- Portraits: Use High Pass sharpening to enhance the details in the eyes, hair, and skin of your portraits.
- Landscapes: Use High Pass sharpening to enhance the details in the mountains, trees, and rocks of your landscapes.
- Architecture: Use High Pass sharpening to enhance the details in the buildings and structures of your architectural photos.
-
Tips for Using High Pass Sharpening:
- Use a Non-Destructive Workflow: Use a non-destructive workflow by applying the High Pass filter to a duplicate layer. This allows you to easily adjust or remove the sharpening effect later.
- Use a Layer Mask: Use a layer mask to apply the sharpening effect to specific areas of the image. This is useful for avoiding sharpening areas that don’t need it, such as smooth skin or skies.
- Experiment with Blending Modes: Experiment with different blending modes to achieve the desired sharpening effect.
- Adjust Opacity: Adjust the opacity of the High Pass layer to fine-tune the sharpening effect.
- Zoom In: Zoom in to see fine details and make accurate adjustments.
- Take Breaks: Take breaks to rest your eyes and avoid over-sharpening.
10. Exploring Aerial Photography Editing In Photoshop
What are some specific techniques for editing aerial photography in Photoshop? Specific techniques include enhancing colors to make the landscape pop, adjusting tones to balance the light and dark areas, and sharpening details to improve clarity, essential for capturing stunning aerial views.
Here’s a breakdown of techniques tailored for aerial photography editing:
-
Color Enhancement: Aerial photos often benefit from enhanced colors to make the landscape pop.
- Vibrance and Saturation: Increase the vibrance and saturation to make the colors more vivid and eye-catching.
- HSL Adjustments: Use the HSL panel to fine-tune individual colors, such as the blues in the sky and water, and the greens in the foliage.
-
Tone Adjustments: Balancing the light and dark areas in aerial photos is crucial for creating a visually appealing image.
- Exposure: Adjust the exposure to brighten or darken the overall image.
- Highlights and Shadows: Use the highlights and shadows sliders to recover details in the bright and dark areas.
- Contrast: Adjust the contrast to create a sense of depth and dimension.
-
Detail Enhancement: Sharpening the details in aerial photos can improve clarity and make the image more crisp.
- High Pass Sharpening: Use the High Pass filter to sharpen the details in the image without introducing unwanted artifacts.
- Unsharp Mask: Use the Unsharp Mask filter to sharpen the details in the image.
-
Practical Applications:
- Landscape Photos: Enhance the colors and details in your landscape photos to make them more vibrant and eye-catching.
- Urban Photos: Adjust the tones and colors in your urban photos to create a specific mood or style.
- Abstract Photos: Experiment with different editing techniques to create unique and abstract aerial photos.
-
Tips for Editing Aerial Photos:
- Use a Non-Destructive Workflow: Use a non-destructive workflow by using adjustment layers and Smart Objects. This allows you to easily adjust or remove the effects later.
- Use a Layer Mask: Use a layer mask to apply the adjustments to specific areas of the image.
- Experiment with Different Techniques: Experiment with different editing techniques to find what works best for your images.
- Take Breaks: Take breaks to rest your eyes and avoid over-editing.
- Get Feedback: Get feedback from other photographers to see what they think of your edits.
Elevate your photo editing skills with dfphoto.net and unlock the full potential of your images.
FAQ: Mastering Photo Editing In Photoshop
Here are 10 frequently asked questions about mastering photo editing in Photoshop:
-
What is the first step in editing a photo in Photoshop?
The first step is usually correcting composition by using lens correction, straightening, and cropping to set up the image properly.
-
How can I improve the tonal range of my photos?
Use the Exposure, Highlights, Shadows, Whites, and Blacks sliders to adjust the light and dark values, balancing the overall tone of the image.
-
What are Dodge and Burn techniques used for?
Dodge and Burn techniques lighten and darken specific areas to enhance contrast and depth, drawing attention to key elements.
-
How do I enhance colors in my photos without making them look unnatural?
Use the Vibrance slider to boost muted colors and the HSL panel for precise adjustments, avoiding over-saturation.
-
Why is sharpening important in photo editing?
Sharpening enhances clarity and detail, making the image crisper, but it should be done carefully to avoid artifacts.
-
What is a Smart Object and why should I use it?
A Smart Object is a layer that preserves image data, allowing non-destructive transformations and filtering, maintaining the original quality.
-
How do color profiles affect my photos?
Color profiles ensure consistent color representation across different devices, maintaining the integrity of your edits for accurate reproduction.
-
What is the High Pass filter and how does it sharpen photos?
The High Pass filter highlights edges and details for targeted sharpening, providing control over intensity and reducing artifacts.
-
How can I create a vignette in Photoshop?
Use the Lens Correction filter or add a dark or light gradient to the edges of the photo to draw focus to the center.
-
What are some good resources for learning more about Photoshop?
Explore dfphoto.net for comprehensive tutorials, articles, and community forums to enhance your photo editing skills. Address: 1600 St Michael’s Dr, Santa Fe, NM 87505, United States. Phone: +1 (505) 471-6001. Website: dfphoto.net.
Ready to take your photography to the next level? Visit dfphoto.net for in-depth tutorials, stunning photography, and a vibrant community of photographers in the USA. Discover new techniques, find inspiration, and connect with fellow enthusiasts today.