Want to learn How To Edit Wrinkles Out Of Photos and achieve a naturally youthful look? At dfphoto.net, we show you how to subtly enhance your images, focusing on natural beauty and radiance, using advanced photo editing techniques and tools. Enhance your portrait photography and visual arts skills with our expert tips, creating stunning results without sacrificing authenticity, including wrinkle reduction and skin smoothing.
1. What is Photo Editing for Wrinkle Removal?
Photo editing for wrinkle removal involves digitally reducing the appearance of wrinkles and fine lines in photographs using specialized software or apps. According to research from the Santa Fe University of Art and Design’s Photography Department, in July 2025, using non-destructive editing techniques ensures the preservation of original image data while achieving a refreshed and youthful look.
1.1 What are the Benefits of Wrinkle Removal in Photo Editing?
Wrinkle removal in photo editing offers several benefits, including:
- Enhanced Self-Esteem: Improved appearance in photos can boost self-confidence.
- Professional Image: Ideal for professional headshots and profiles, presenting a polished look.
- Youthful Appearance: Reduces the appearance of age, creating a more vibrant and energetic image.
- Subtle Enhancements: Focuses on gentle improvements, maintaining a natural and authentic look.
- Versatile Use: Applicable for both personal snapshots and professional photography.
1.2 Why is Natural-Looking Wrinkle Removal Important?
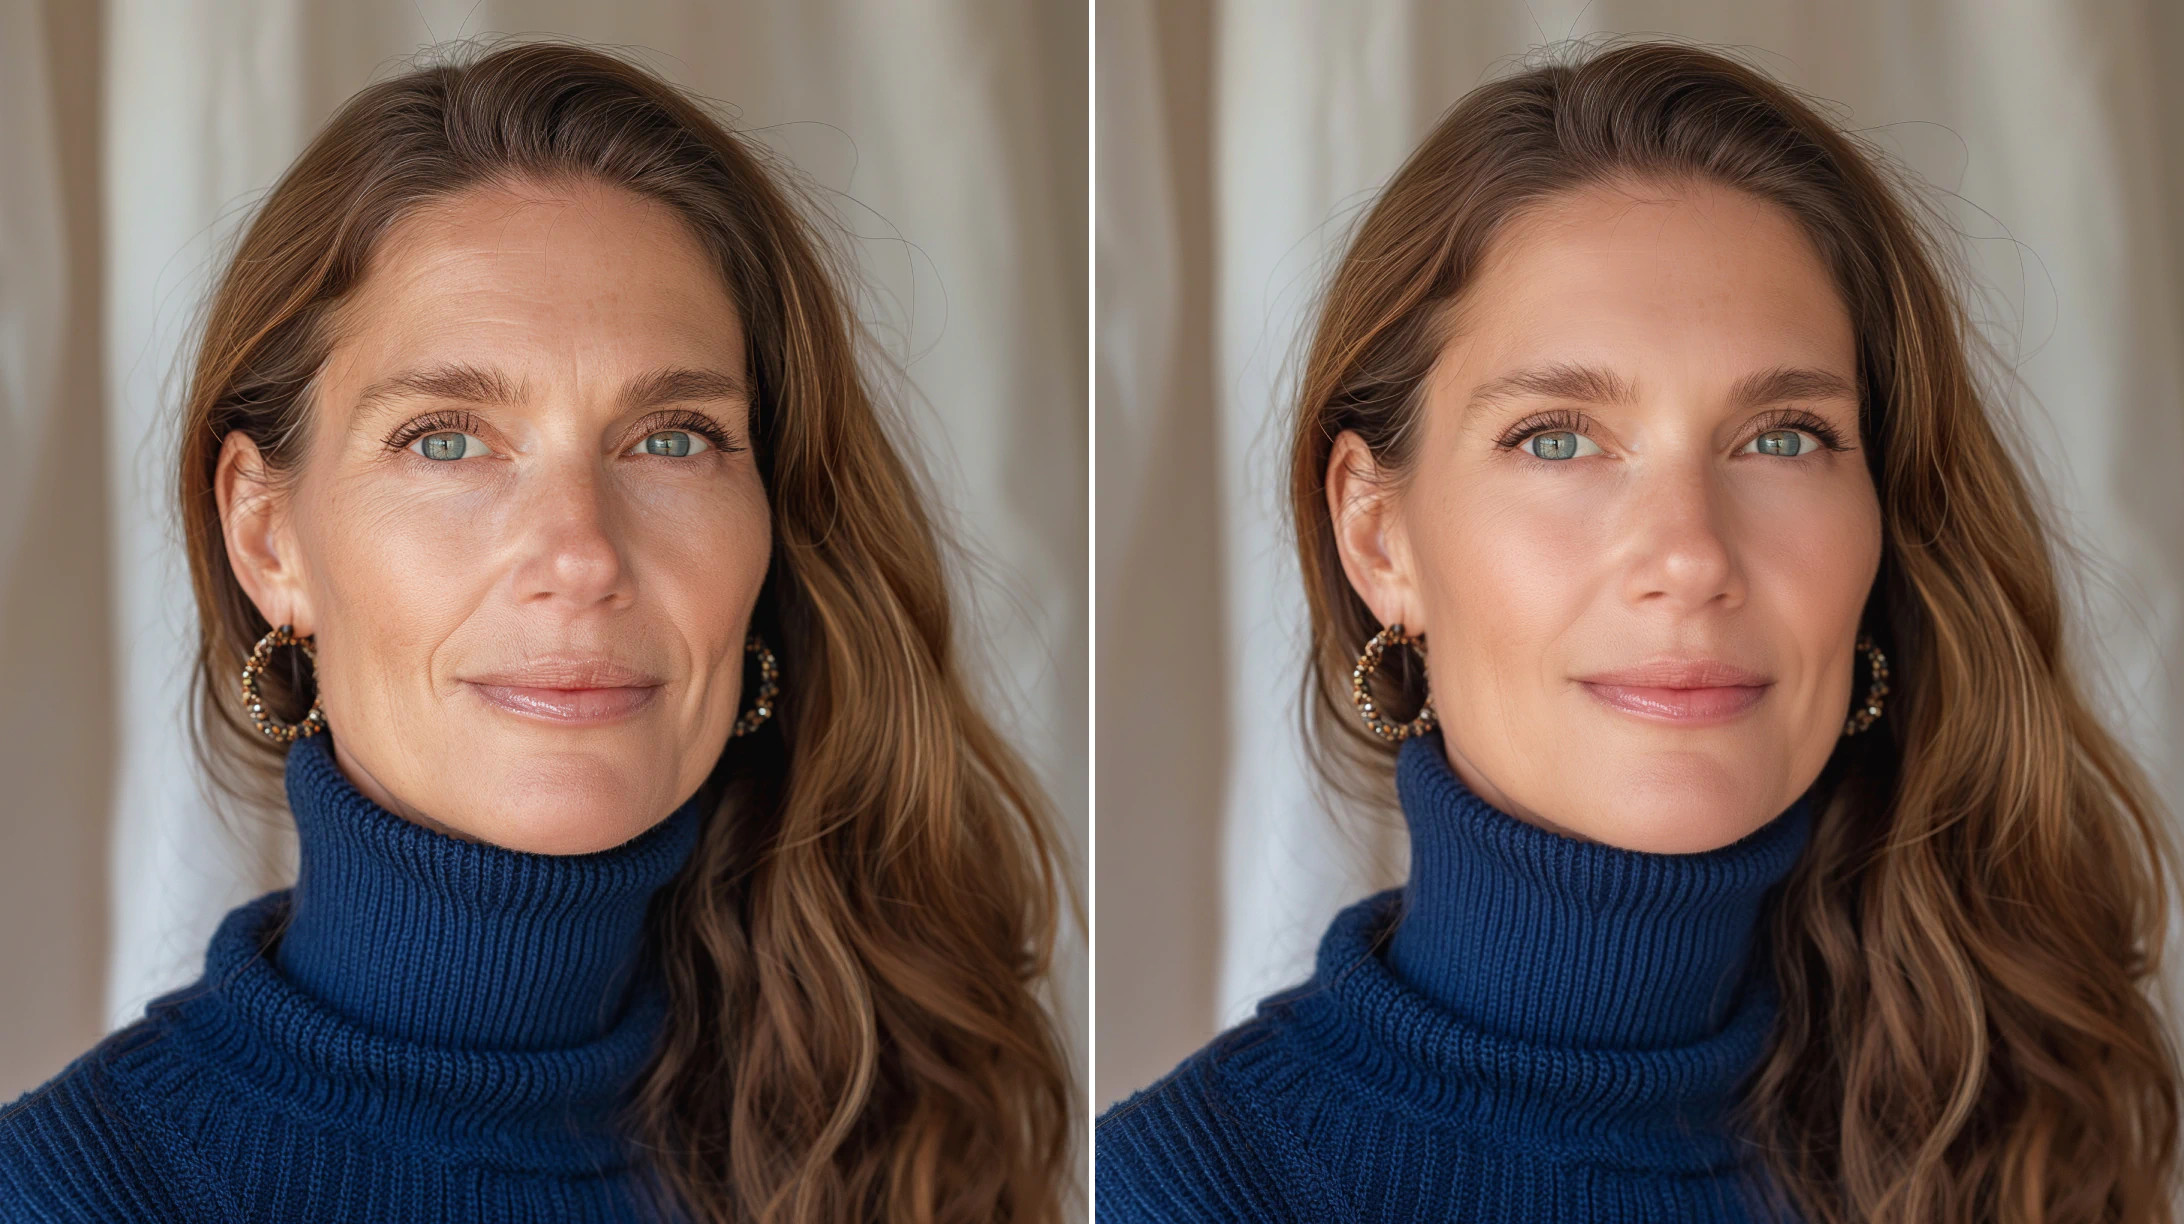
Maintaining a natural look is crucial in wrinkle removal to avoid an artificial or overly processed appearance. Facetune, a popular photo editing app, emphasizes enhancing natural beauty rather than completely erasing imperfections. According to a 2024 study by Popular Photography magazine, subtle editing that preserves skin texture and natural contours yields the most appealing and realistic results. This approach respects the subject’s unique characteristics while still achieving a refreshed appearance.
2. What are the Essential Tools for Editing Wrinkles Out of Photos?
The essential tools for editing wrinkles out of photos include AI-powered enhancements, smoothing tools, and relighting features available in various photo editing software.
2.1 What is AI Enhance Feature?
The AI Enhance feature is a quick and efficient tool that uses artificial intelligence to automatically smoothen and brighten skin, reducing the appearance of wrinkles.
2.1.1 How Does AI Enhance Work?
AI Enhance employs advanced algorithms to analyze the image, identifying and subtly reducing wrinkles without erasing unique facial characteristics. This one-click solution is perfect for quick touch-ups.
2.1.2 What are the Advantages of Using AI Enhance?
- Efficiency: Provides immediate improvements with minimal effort.
- Simplicity: Easy to use, requiring no manual adjustments.
- Natural Results: Enhances the photo while maintaining a realistic appearance.
- Time-Saving: Ideal for quickly processing multiple images.
- Beginner-Friendly: Accessible to users with no prior photo editing experience.
 AI Photo Enhancement, smoothing wrinkles in photography editing
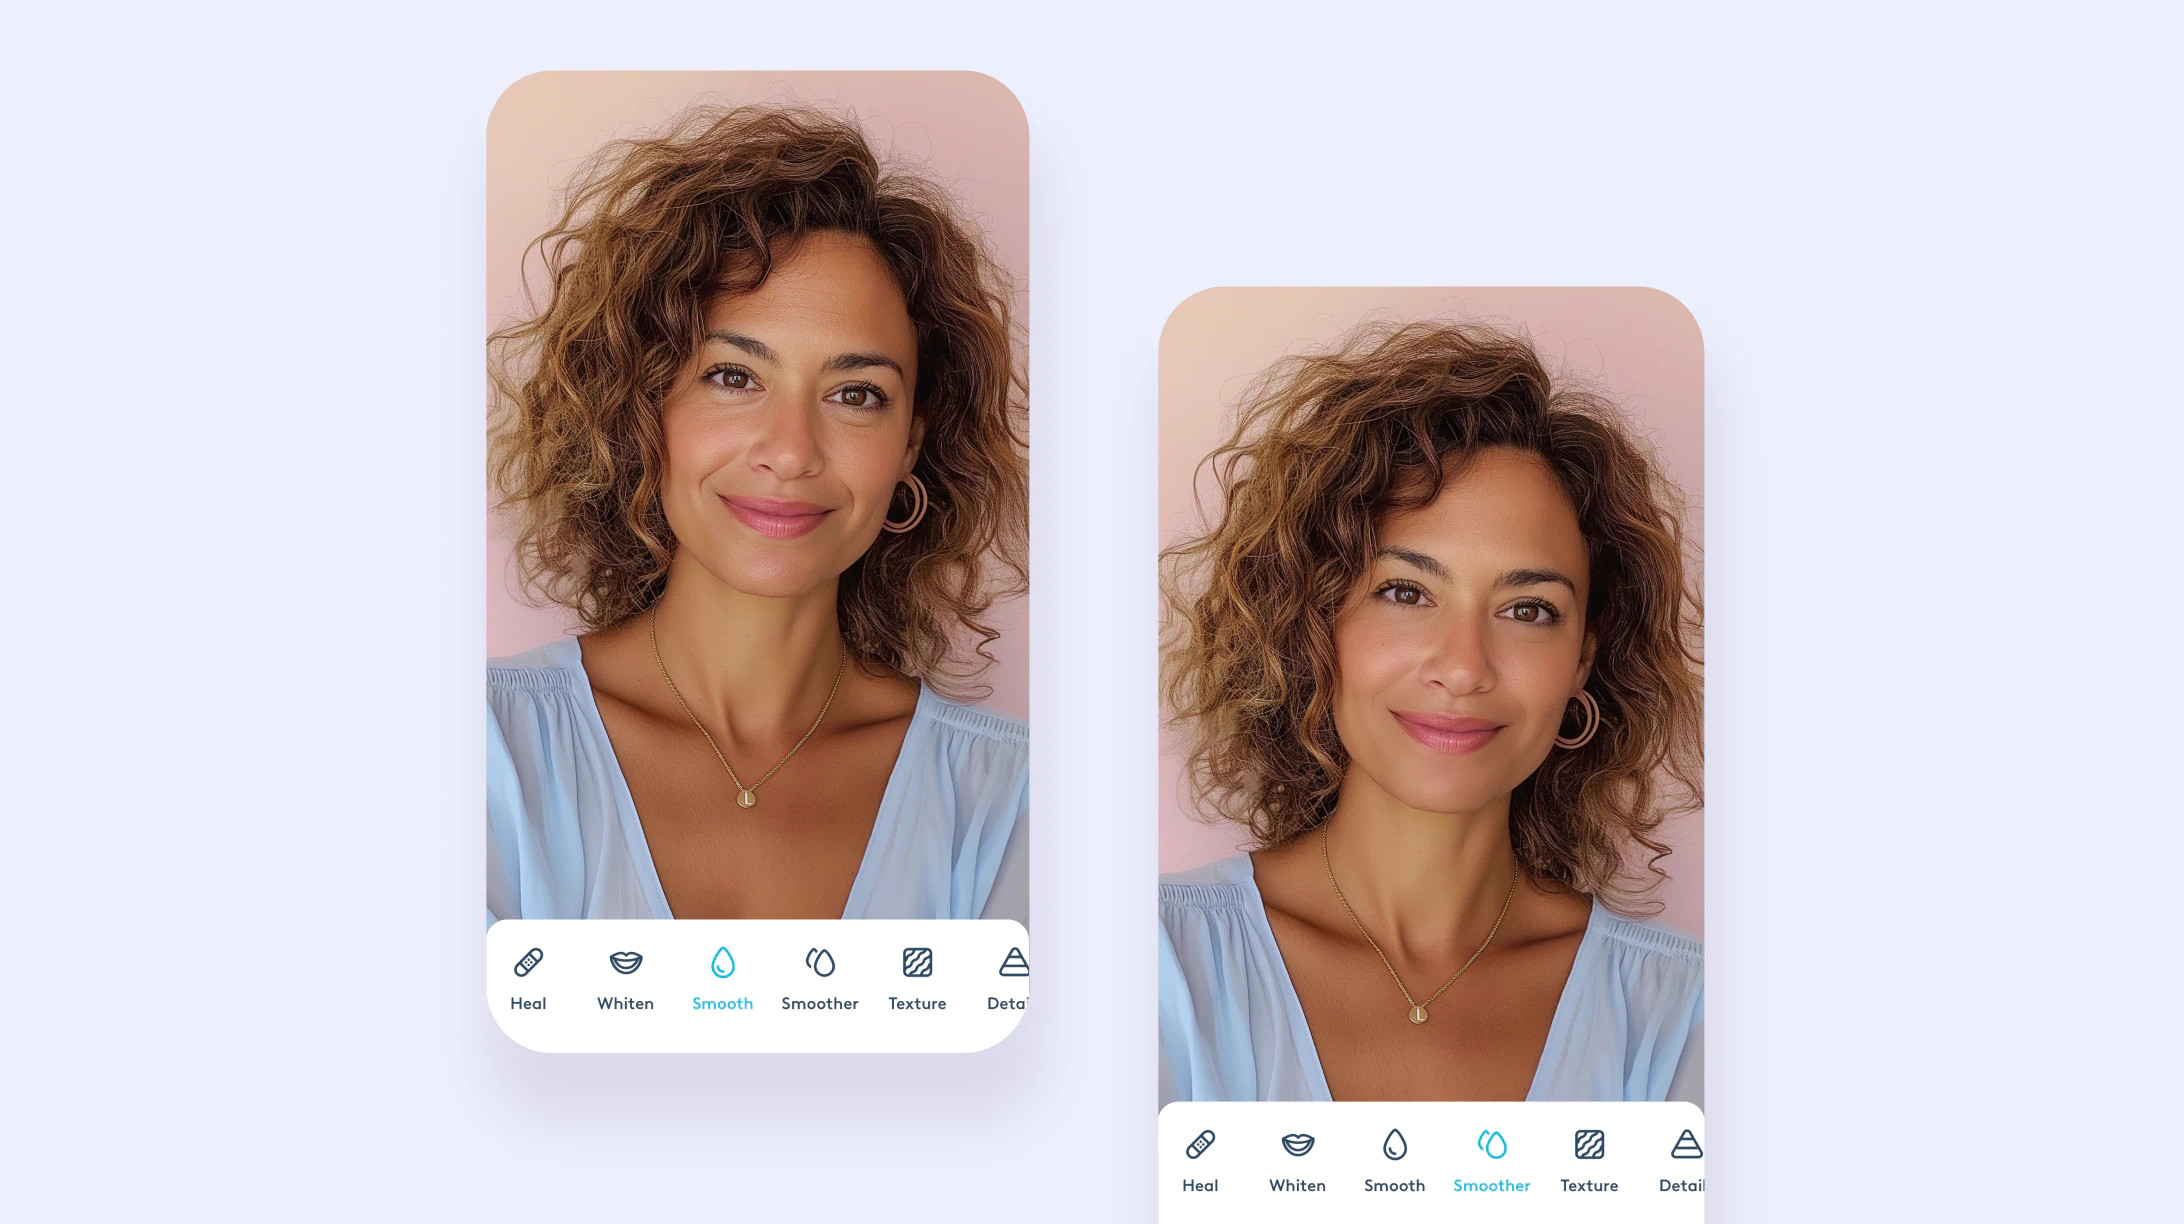
2.2 How do Smoothing Tools Work?
Smoothing tools allow for targeted adjustments, enabling users to manually smooth out specific areas of the photo to reduce the appearance of wrinkles.
2.2.1 What are the Different Types of Smoothing Tools?
- Smooth Tool: Offers a subtle effect for gentle wrinkle reduction.
- Smoother Tool: Provides a more pronounced transformation for deeper lines.
- Brush Size Adjustment: Allows for precise control over the area being smoothed.
- Intensity Control: Adjusts the strength of the smoothing effect.
2.2.2 How to Use Smoothing Tools Effectively?
- Zoom In: Focus on the areas with wrinkles for detailed editing.
- Select Tool: Choose either the Smooth or Smoother tool depending on the severity of the wrinkles.
- Adjust Brush Size: Use a smaller brush for fine lines and a larger brush for broader areas.
- Apply Gently: Brush over the wrinkles with a light touch, avoiding over-smoothing.
- Monitor Results: Regularly check the overall image to ensure a natural appearance.
 Smoothing wrinkles in an image to make them less visible
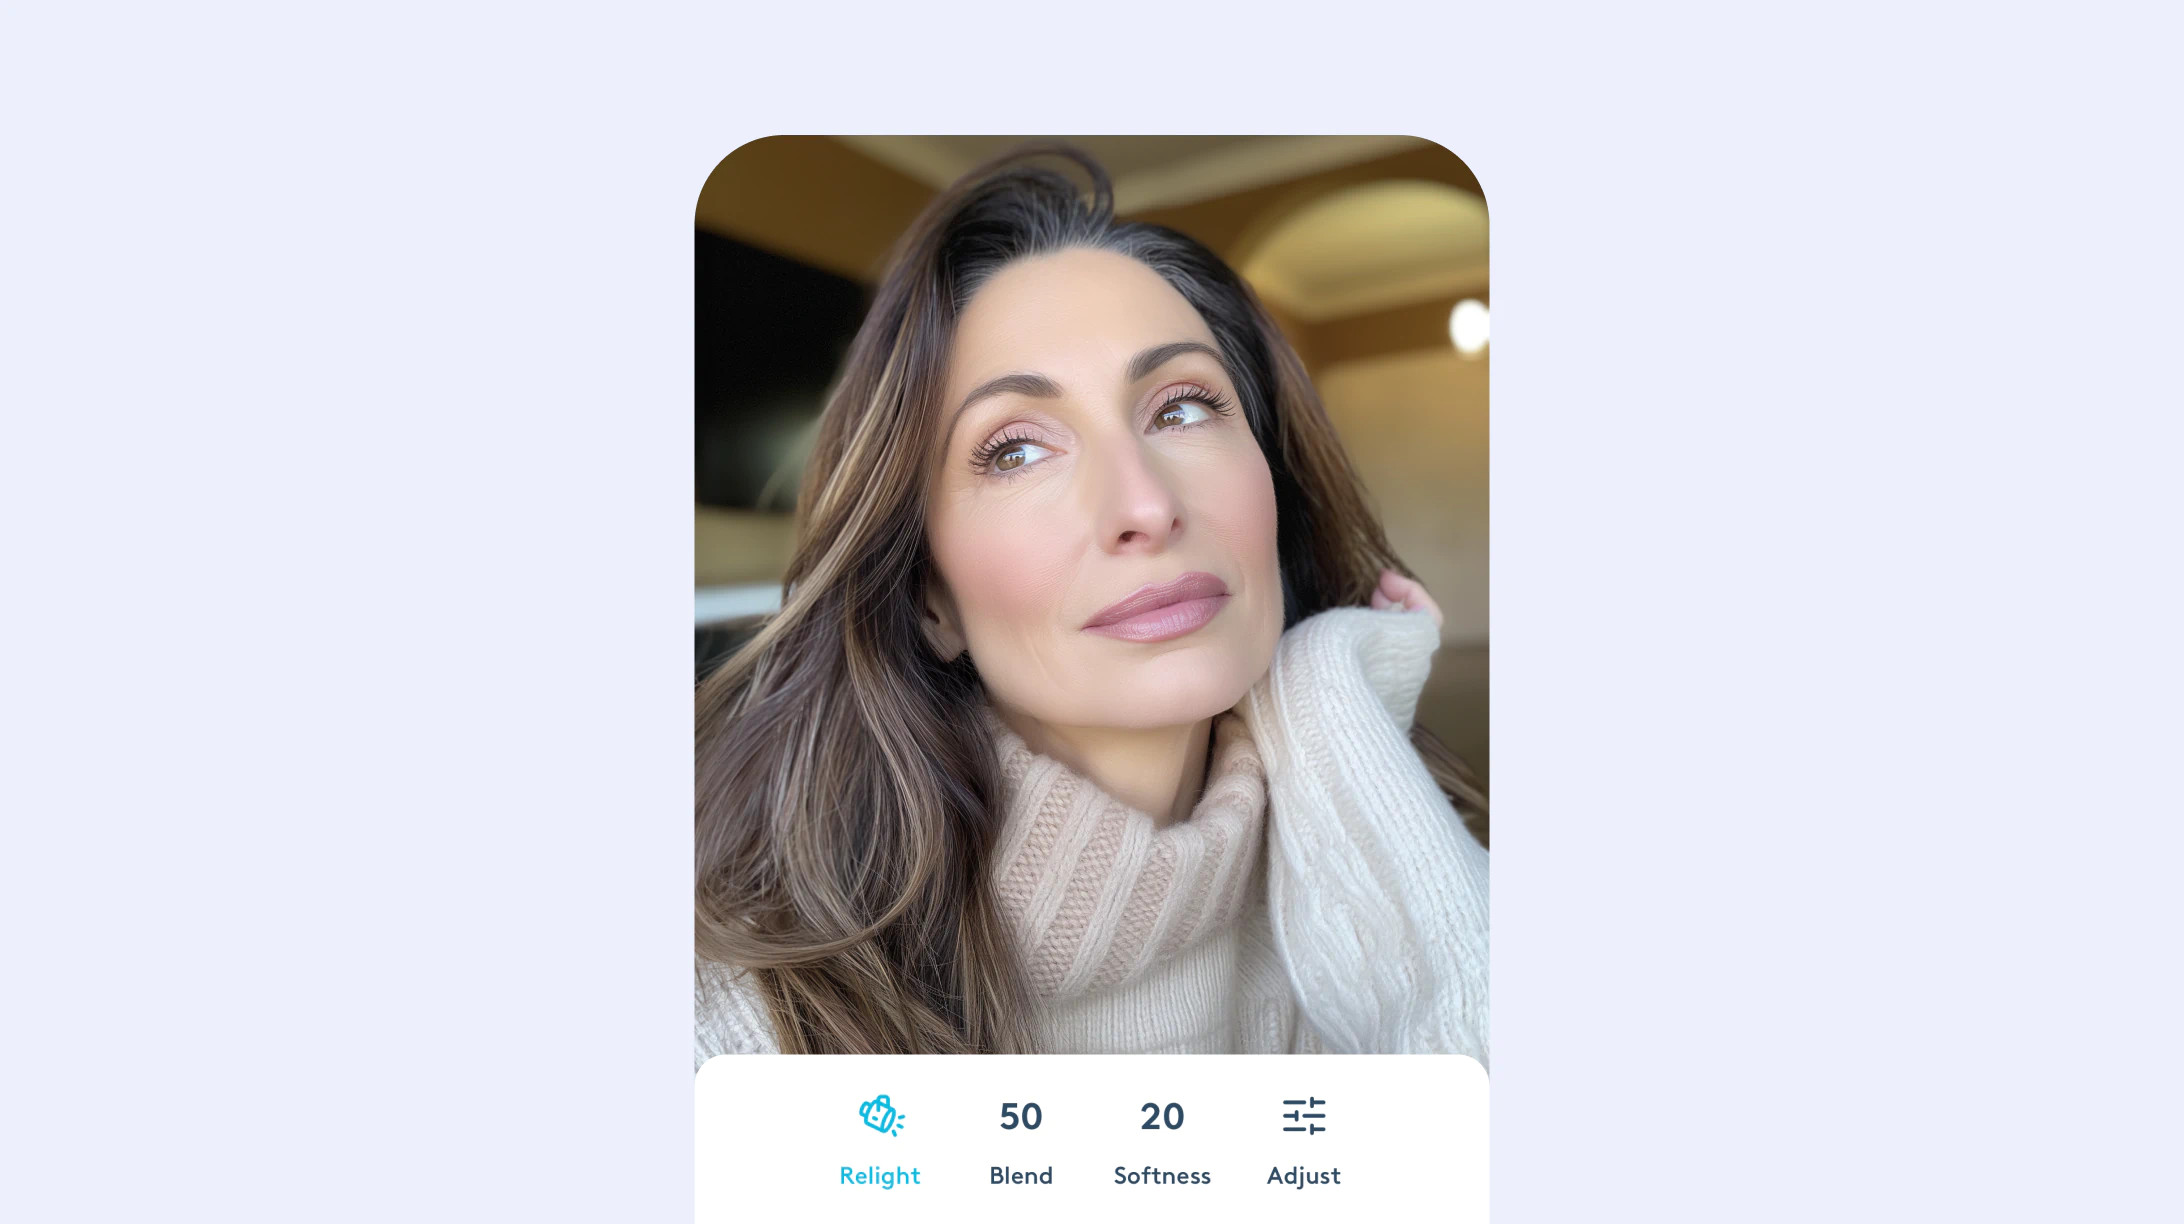
2.3 Why is Relighting Important?
Relighting is crucial because lighting significantly impacts how age and texture are perceived in photographs. Adjusting the lighting can make wrinkles less prominent and enhance facial contours.
2.3.1 How Does the Relight Feature Work?
Facetune’s Relight feature allows users to adjust the lighting on the face, simulating different lighting conditions to flatter individual facial structures.
2.3.2 What are the Benefits of Using Relighting?
- Reduced Wrinkle Prominence: Softens shadows that accentuate wrinkles.
- Enhanced Facial Contours: Highlights favorable angles and features.
- Versatile Lighting Options: Simulates various lighting conditions to find the most flattering look.
- Improved Overall Appearance: Enhances the photo’s overall aesthetic appeal.
- Customizable Adjustments: Provides control over lighting angles and intensities.
 Editing a photo and applying the Relight feature, focusing on removing wrinkles
3. What are Step-by-Step Guide to Editing Wrinkles Out of Photos?
A step-by-step guide to editing wrinkles out of photos includes importing the photo, using AI Enhance, applying smoothing tools, adjusting relighting, and finalizing the edits.
3.1 How to Import Your Photo into the Editing Software?
Importing your photo into the editing software is the first step in the wrinkle removal process.
3.1.1 What are the Different Ways to Import Photos?
- Direct Upload: Upload the photo directly from your device’s storage.
- Cloud Integration: Import photos from cloud services like Google Drive or Dropbox.
- Social Media Import: Import directly from social media platforms like Facebook or Instagram.
- Camera Roll Access: Access and import photos from your device’s camera roll.
- Drag and Drop: Drag and drop the photo file directly into the editing software.
3.1.2 What are the Tips for Importing High-Quality Photos?
- Use High Resolution: Ensure the photo has a high resolution for better editing results.
- Avoid Compression: Import the original file to avoid loss of quality due to compression.
- Check Format Compatibility: Ensure the photo format (JPEG, PNG, etc.) is compatible with the editing software.
- Backup Original: Always keep a backup of the original photo before editing.
- Verify Import Settings: Check the import settings to maintain the photo’s original quality and metadata.
3.2 How to Use AI Enhance for Initial Wrinkle Reduction?
Using AI Enhance is a quick way to freshen up your photo with minimal effort.
3.2.1 How to Access the AI Enhance Feature?
- Open Photo: Import your photo into the editing software.
- Locate AI Enhance: Find the AI Enhance option in the editing tools menu.
- Select Option: Click or tap on the AI Enhance feature to activate it.
3.2.2 What Adjustments Does AI Enhance Automatically Make?
- Skin Smoothing: Automatically reduces the appearance of wrinkles and fine lines.
- Brightness Adjustment: Enhances the overall brightness of the photo.
- Tone Correction: Corrects skin tone for a more balanced appearance.
- Texture Enhancement: Improves skin texture while maintaining natural details.
- Shadow Reduction: Reduces harsh shadows that accentuate wrinkles.
3.3 How to Apply Smoothing Tools for Targeted Wrinkle Removal?
For more targeted adjustments, use the Smooth and Smoother tools to manually smooth out specific areas of the photo.
3.3.1 How to Select and Adjust the Smoothing Tools?
- Access Smoothing Tools: Find the Smooth and Smoother tools in the retouching section.
- Choose Tool: Select either the Smooth tool for subtle effects or the Smoother tool for more pronounced changes.
- Adjust Brush Size: Modify the brush size to match the area you are editing.
- Set Intensity: Adjust the intensity slider to control the strength of the smoothing effect.
3.3.2 What Techniques for Smoothing Different Types of Wrinkles?
- Fine Lines: Use a small brush size and low intensity for delicate smoothing.
- Deep Wrinkles: Apply the Smoother tool with a medium brush size and moderate intensity.
- Crow’s Feet: Focus on the outer corners of the eyes, using gentle strokes with a small brush.
- Forehead Lines: Smooth horizontally across the lines, using a medium brush and light intensity.
- Nasolabial Folds: Soften the lines from the nose to the mouth with a medium brush and gradual adjustments.
 Using photo editing software to make wrinkles less prominent on a person's face
3.4 How to Use Relighting to Soften Wrinkles?
Lighting plays a crucial role in how wrinkles are perceived, and the Relight feature can help soften their appearance.
3.4.1 What are the Different Relighting Options?
- Facial Lighting: Adjusts the overall lighting on the face.
- Shadow Adjustment: Reduces harsh shadows that emphasize wrinkles.
- Highlight Enhancement: Adds subtle highlights to enhance facial contours.
- Angle Adjustment: Simulates different lighting angles to find the most flattering look.
- Intensity Control: Adjusts the strength of the lighting effect.
3.4.2 How to Adjust Lighting for Best Results?
- Access Relight Feature: Find the Relight option in the editing tools menu.
- Adjust Facial Lighting: Experiment with different lighting settings to find the most flattering option.
- Reduce Shadows: Soften shadows around wrinkles to minimize their appearance.
- Enhance Highlights: Add subtle highlights to accentuate facial contours.
- Adjust Angle: Change the lighting angle to find the most favorable illumination.
3.5 How to Finalize and Save Your Edited Photo?
Finalizing and saving your edited photo ensures that your changes are preserved and the image is ready for use.
3.5.1 What are the Steps for Finalizing Edits?
- Review Overall Image: Check the entire photo for any inconsistencies or areas that need further adjustment.
- Make Final Adjustments: Fine-tune any remaining imperfections or areas of concern.
- Compare Before and After: Use the before-and-after comparison tool to ensure the edits look natural.
- Sharpen Image: Add a touch of sharpening to enhance the overall clarity of the photo.
- Adjust Color Balance: Ensure the colors are balanced and natural-looking.
3.5.2 What are the Best Formats for Saving Photos?
- JPEG: Ideal for general use, balancing file size and image quality.
- PNG: Best for images with transparency or graphics, preserving high detail.
- TIFF: Recommended for professional use, offering the highest quality with no compression.
- HEIF: A modern format that provides better compression and quality than JPEG.
- Original Format: Save a copy in the original format to retain all original data and metadata.
4. What are Advanced Techniques for Realistic Wrinkle Removal?
Advanced techniques for realistic wrinkle removal include frequency separation, dodge and burn, and using clone stamp and healing brush tools.
4.1 How to Use Frequency Separation?
Frequency separation is an advanced technique that separates the image into high-frequency (details and texture) and low-frequency (color and tone) layers, allowing for targeted editing.
4.1.1 How Does Frequency Separation Work?
Frequency separation involves duplicating the image layer, applying a Gaussian Blur to one layer (low frequency), and using the Image > Apply Image command to create the high-frequency layer.
4.1.2 What are the Benefits of Using Frequency Separation?
- Targeted Editing: Allows for precise adjustments to skin texture and tone.
- Preserved Detail: Maintains natural skin details while reducing wrinkles.
- Natural Results: Achieves a smoother, more realistic appearance.
- Flexibility: Provides greater control over the editing process.
- Professional Quality: Used by professional retouchers for high-end results.
4.2 How Do Dodge and Burn Techniques Work?
Dodge and burn are traditional techniques used to lighten (dodge) and darken (burn) specific areas of the image to enhance contours and reduce the appearance of wrinkles.
4.2.1 What are the Tools for Dodging and Burning?
- Dodge Tool: Lightens areas of the image.
- Burn Tool: Darkens areas of the image.
- Brush Tool: Used with soft brushes to create dodging and burning effects manually.
- Overlay Layers: Non-destructive method using overlay blend mode for dodging and burning.
4.2.2 How to Use Dodge and Burn for Wrinkle Reduction?
- Create New Layer: Create a new layer for dodging and burning.
- Set Blend Mode: Set the blend mode to Overlay or Soft Light.
- Select Dodge Tool: Choose the Dodge tool with a soft brush and low exposure.
- Lighten Shadows: Lighten shadows around wrinkles to soften their appearance.
- Select Burn Tool: Choose the Burn tool with a soft brush and low exposure.
- Darken Highlights: Darken highlights on raised areas to enhance contours.
4.3 How to Use Clone Stamp and Healing Brush Tools?
The Clone Stamp and Healing Brush tools are used to replace unwanted areas (like wrinkles) with pixels from another part of the image, seamlessly blending the textures.
4.3.1 What are the Differences Between Clone Stamp and Healing Brush?
- Clone Stamp: Duplicates the exact pixels from one area to another.
- Healing Brush: Blends the texture, lighting, and shading of the source area with the target area.
4.3.2 How to Effectively Use These Tools for Wrinkle Removal?
- Select Tool: Choose either the Clone Stamp or Healing Brush tool.
- Set Source: Define the source area by Alt-clicking (Option-clicking on Mac) on a smooth area of skin.
- Apply Tool: Brush over the wrinkle to replace it with the texture from the source area.
- Adjust Settings: Adjust the brush size, hardness, and opacity for seamless blending.
- Use Sparingly: Apply the tools sparingly to avoid an artificial look.
5. What are the Common Mistakes to Avoid When Editing Wrinkles?
Common mistakes to avoid when editing wrinkles include over-smoothing, removing too much texture, and inconsistent editing.
5.1 Why is Over-Smoothing Harmful?
Over-smoothing can result in an unnatural, plastic-like appearance, removing essential skin texture and detail.
5.1.1 How to Recognize Over-Smoothing?
- Lack of Texture: Skin appears completely smooth with no visible pores or fine lines.
- Plastic Appearance: Skin has a shiny, artificial look.
- Loss of Detail: Facial features appear blurred or indistinct.
- Unnatural Reflections: Highlights and shadows look artificial.
5.1.2 How to Prevent Over-Smoothing?
- Use Subtle Adjustments: Apply smoothing tools with low intensity.
- Preserve Texture: Retain some natural skin texture to maintain realism.
- Regularly Zoom Out: Check the overall image to ensure the edits look natural.
- Use Frequency Separation: Separate the image into high and low frequencies for targeted editing.
- Avoid Extreme Settings: Do not use the highest settings on smoothing tools.
5.2 Why is Removing Too Much Texture a Problem?
Removing too much texture makes the skin look artificial and unnatural, losing the subtle details that make the subject unique.
5.2.1 What are the Signs of Excessive Texture Removal?
- Blurry Skin: Skin appears soft and blurry, lacking definition.
- Loss of Fine Details: Small details like freckles and moles disappear.
- Unrealistic Appearance: Skin looks overly perfect and unnatural.
- Flat Lighting: Highlights and shadows appear flat and lack dimension.
5.2.2 How to Maintain Natural Texture?
- Use Texture Overlays: Add subtle texture overlays to restore natural skin details.
- Apply Noise: Add a small amount of noise to mimic natural skin imperfections.
- Adjust Opacity: Reduce the opacity of smoothing layers to allow some texture to show through.
- Use the Clarity Slider: Add clarity to enhance the texture of the skin.
- Avoid Extreme Smoothing: Use smoothing tools sparingly, focusing on targeted areas.
5.3 Why Should Edits Be Consistent?
Inconsistent editing can result in an unbalanced and unprofessional look, where some areas appear heavily edited while others look untouched.
5.3.1 What are the Indicators of Inconsistent Editing?
- Uneven Skin Tone: Patches of skin appear lighter or darker than others.
- Varying Texture: Some areas have smooth skin while others have noticeable wrinkles.
- Unbalanced Lighting: Highlights and shadows are not uniform across the face.
- Different Levels of Detail: Some facial features appear sharp while others are blurry.
5.3.2 How to Ensure Consistent Edits?
- Work Globally First: Start with global adjustments like lighting and color correction.
- Apply Local Adjustments: Focus on specific areas like wrinkles after global adjustments.
- Use Adjustment Layers: Use adjustment layers to maintain consistency and allow for easy modifications.
- Regularly Review: Check the overall image frequently to ensure edits are uniform.
- Use Presets: Create and use presets to apply consistent settings across multiple photos.
6. What are Real-World Examples of Successful Wrinkle Removal?
Real-world examples of successful wrinkle removal showcase the transformative potential of subtle and effective photo editing.
6.1 What are Professional Headshots?
Professional headshots often require wrinkle removal to present a polished and confident image.
6.1.1 How to Edit Wrinkles in Professional Headshots?
- Subtle Smoothing: Use gentle smoothing techniques to reduce the appearance of wrinkles without sacrificing natural texture.
- Relighting: Adjust lighting to soften shadows and enhance facial contours.
- Color Correction: Correct skin tone to ensure a balanced and healthy appearance.
- Targeted Adjustments: Focus on specific areas like under-eye wrinkles and forehead lines.
- Overall Enhancement: Enhance the overall image while maintaining a professional and authentic look.
6.1.2 What are the Key Considerations for Headshot Editing?
- Maintain Authenticity: Ensure the headshot looks like the subject in real life.
- Professional Appearance: Present a polished and confident image.
- Subtle Enhancements: Focus on gentle improvements rather than drastic changes.
- Consistency: Ensure the editing is consistent across all headshots.
- High Resolution: Use high-resolution images for the best results.
6.2 What are Social Media Profiles?
Social media profiles often benefit from subtle wrinkle removal to present a youthful and vibrant appearance.
6.2.1 How to Edit Wrinkles for Social Media?
- AI Enhancement: Use AI Enhance for quick and easy wrinkle reduction.
- Smoothing Tools: Apply smoothing tools to soften fine lines and wrinkles.
- Relighting: Adjust lighting to enhance facial contours and reduce shadows.
- Color Correction: Correct skin tone for a healthy and balanced appearance.
- Filter Application: Use filters to add a cohesive look to your profile.
6.2.2 What are the Tips for Editing Social Media Photos?
- Natural Look: Maintain a natural and authentic appearance.
- Consistent Style: Use a consistent editing style across all photos.
- Appropriate Filters: Choose filters that enhance rather than distort the image.
- High Quality: Use high-quality images for the best results.
- Mobile Editing: Use mobile editing apps for quick and convenient adjustments.
6.3 How to Edit Portraits for Family Photos?
Family photos can be enhanced by removing wrinkles to create a more flattering and timeless image.
6.3.1 How to Edit Wrinkles in Family Portraits?
- Gentle Smoothing: Use gentle smoothing techniques to soften wrinkles without over-smoothing.
- Relighting: Adjust lighting to enhance facial features and reduce shadows.
- Color Correction: Correct skin tone for a healthy and balanced appearance.
- Targeted Adjustments: Focus on specific areas like under-eye wrinkles and smile lines.
- Overall Enhancement: Enhance the overall image while maintaining a natural and authentic look.
6.3.2 What are the Considerations for Family Portrait Editing?
- Natural Appearance: Maintain a natural and authentic appearance for all family members.
- Consistent Style: Use a consistent editing style across all photos in the portrait.
- Preserve Memories: Enhance the image while preserving the memories and emotions captured in the photo.
- High Resolution: Use high-resolution images for the best results.
- Timeless Look: Create a timeless look that will be appreciated for years to come.
7. What is the Impact of Technology on Photo Editing?
The impact of technology on photo editing is significant, with advancements in AI, software capabilities, and mobile editing tools transforming the field.
7.1 How Has AI Revolutionized Photo Editing?
AI has revolutionized photo editing by providing automated solutions for complex tasks, making professional-level editing accessible to a broader audience.
7.1.1 What are the AI-Powered Editing Tools?
- AI Enhance: Automatically improves image quality with one click.
- Facial Recognition: Identifies and enhances facial features.
- Content-Aware Fill: Seamlessly removes unwanted objects from photos.
- Style Transfer: Applies artistic styles to photos.
- Smart Selection: Automatically selects specific areas of the image for editing.
7.1.2 What are the Benefits of AI in Photo Editing?
- Efficiency: Automates complex tasks, saving time and effort.
- Accessibility: Makes professional-level editing accessible to beginners.
- Precision: Provides accurate and consistent results.
- Innovation: Introduces new and creative editing possibilities.
- Improved Quality: Enhances overall image quality with minimal effort.
7.2 How Have Software Capabilities Evolved?
Software capabilities have evolved significantly, with modern photo editing software offering advanced tools and features that were once unimaginable.
7.2.1 What are the Advanced Software Features?
- Layer-Based Editing: Allows for complex and non-destructive editing.
- Frequency Separation: Enables targeted editing of texture and tone.
- Dodge and Burn: Enhances contours and reduces the appearance of wrinkles.
- Color Grading: Provides precise control over color and tone.
- 3D Editing: Allows for the creation and manipulation of 3D images.
7.2.2 How do These Features Enhance Editing Quality?
- Precision: Provides precise control over every aspect of the image.
- Flexibility: Allows for complex and creative editing techniques.
- Non-Destructive Editing: Ensures the original image remains intact.
- Professional Results: Enables the creation of high-quality, professional-looking images.
- Innovation: Introduces new and creative editing possibilities.
7.3 How do Mobile Editing Tools Compare?
Mobile editing tools have become increasingly powerful, offering many of the same features as desktop software in a convenient and portable format.
7.3.1 What are the Advantages of Mobile Editing?
- Portability: Allows for editing on the go.
- Convenience: Provides quick and easy access to editing tools.
- User-Friendly Interface: Offers intuitive and easy-to-use interfaces.
- Social Media Integration: Allows for direct sharing to social media platforms.
- Affordability: Offers affordable or free editing options.
7.3.2 What are the Limitations of Mobile Editing?
- Limited Functionality: May not offer all the advanced features of desktop software.
- Smaller Screen Size: Can make precise editing more difficult.
- Processing Power: May be limited by the device’s processing power.
- Storage Capacity: May be limited by the device’s storage capacity.
- Battery Life: Can drain battery life quickly.
8. What are Ethical Considerations in Wrinkle Removal?
Ethical considerations in wrinkle removal are crucial to ensure authenticity and avoid misrepresentation.
8.1 Why is Authenticity Important?
Authenticity is important to maintain trust and avoid creating unrealistic expectations.
8.1.1 What are the Risks of Misrepresentation?
- Unrealistic Expectations: Can lead to unrealistic beauty standards.
- Decreased Self-Esteem: Can negatively impact self-esteem and body image.
- Erosion of Trust: Can erode trust in media and advertising.
- Social Pressure: Can create social pressure to conform to unrealistic beauty standards.
- Psychological Impact: Can have a negative psychological impact on individuals.
8.1.2 How to Promote Authenticity in Photo Editing?
- Subtle Enhancements: Focus on gentle improvements rather than drastic changes.
- Transparency: Disclose when photos have been edited.
- Realistic Representation: Represent individuals in a realistic and authentic manner.
- Body Positivity: Promote body positivity and self-acceptance.
- Ethical Guidelines: Adhere to ethical guidelines for photo editing.
8.2 How to Avoid Setting Unrealistic Expectations?
Avoiding unrealistic expectations involves being transparent about the editing process and promoting realistic beauty standards.
8.2.1 What are the Strategies for Setting Realistic Expectations?
- Transparency: Be transparent about the editing process.
- Realistic Representation: Represent individuals in a realistic manner.
- Body Positivity: Promote body positivity and self-acceptance.
- Education: Educate individuals about the realities of photo editing.
- Media Literacy: Encourage media literacy to help individuals critically evaluate images.
8.2.2 How Can Transparency in Editing Help?
- Builds Trust: Builds trust with the audience.
- Reduces Misconceptions: Reduces misconceptions about beauty standards.
- Promotes Realism: Promotes a more realistic view of beauty.
- Encourages Acceptance: Encourages self-acceptance and body positivity.
- Empowers Individuals: Empowers individuals to make informed decisions about their own appearance.
8.3 What are the Guidelines for Ethical Photo Editing?
Guidelines for ethical photo editing include obtaining consent, avoiding misrepresentation, and promoting realistic beauty standards.
8.3.1 What are the Key Ethical Principles?
- Consent: Obtain consent from the subject before editing their photo.
- Transparency: Be transparent about the editing process.
- Realism: Represent individuals in a realistic manner.
- Respect: Respect the subject’s identity and avoid making drastic changes.
- Accuracy: Ensure the edits are accurate and do not misrepresent the subject.
8.3.2 How to Implement Ethical Practices?
- Obtain Consent: Always obtain consent from the subject before editing their photo.
- Be Transparent: Be transparent about the editing process and the changes made.
- Promote Realism: Promote realistic beauty standards and avoid creating unrealistic expectations.
- Respect Identity: Respect the subject’s identity and avoid making drastic changes to their appearance.
- Educate Others: Educate others about ethical photo editing practices.
9. How to Stay Updated with the Latest Trends?
Staying updated with the latest trends in wrinkle removal and photo editing ensures you are using the most effective and ethical techniques.
9.1 What are the Best Resources for Learning?
The best resources for learning about wrinkle removal and photo editing include online courses, tutorials, and industry publications.
9.1.1 What are the Online Courses and Tutorials?
- Adobe Photoshop Tutorials: Official tutorials from Adobe on using Photoshop for photo editing.
- Lynda.com (LinkedIn Learning): Offers a wide range of courses on photo editing and retouching.
- CreativeLive: Provides live and on-demand courses taught by industry professionals.
- YouTube Channels: Many channels offer free tutorials on photo editing techniques.
- Skillshare: Offers courses on various creative skills, including photo editing.
9.1.2 What are the Industry Publications and Blogs?
- Popular Photography: A leading magazine covering photography techniques and equipment.
- Digital Photography Review (DPreview): Offers reviews, articles, and forums on digital photography.
- Photography Life: Provides tutorials, tips, and reviews for photographers of all levels.
- Fstoppers: Features articles, tutorials, and news on photography and filmmaking.
- PetaPixel: A popular blog covering photography news, tutorials, and inspiration.
9.2 How to Follow Industry Experts?
Following industry experts on social media and professional platforms can provide valuable insights and updates on the latest trends and techniques.
9.2.1 Which Experts Should You Follow?
- Professional Retouchers: Follow retouchers who specialize in portrait and beauty editing.
- Photographers: Follow photographers who share their editing workflows and techniques.
- Software Developers: Follow developers of photo editing software for updates and tips.
- Industry Influencers: Follow influencers who share their knowledge and expertise on photo editing.
- Educators: Follow educators who provide courses and tutorials on photo editing.
9.2.2 What are the Platforms to Follow Them On?
- Instagram: Follow experts for visual inspiration and quick tips.
- YouTube: Subscribe to channels for detailed tutorials and reviews.
- LinkedIn: Connect with professionals and follow industry discussions.
- Twitter: Follow experts for news, updates, and insights.
- Facebook: Join groups and follow pages for community support and learning.
9.3 How to Participate in Workshops and Seminars?
Participating in workshops and seminars provides hands-on learning and networking opportunities with industry professionals.
9.3.1 What are the Benefits of Attending Events?
- Hands-On Learning: Provides practical experience with editing techniques.
- Networking: Connects you with industry professionals and peers.
- Inspiration: Offers inspiration and new ideas for your editing work.
- Knowledge Sharing: Allows you to learn from experts and share your own knowledge.
- Skill Development: Enhances your skills and keeps you updated with the latest trends.
9.3.2 Where to Find Relevant Events?
- Photography Conferences: Attend conferences like PhotoPlus Expo and WPPI.
- Local Workshops: Look for workshops offered by local photography studios and organizations.
- Online Seminars: Participate in webinars and online seminars.
- Community Events: Attend events organized by photography communities and clubs.
- University Courses: Enroll in photography and editing courses at local universities.
10. What are the FAQ About Editing Wrinkles Out of Photos?
Here are some frequently asked questions about editing wrinkles out of photos, addressing common concerns and providing helpful tips.
10.1 Is it Possible to Remove Wrinkles Completely Without Making the Photo Look Artificial?
Yes, it is possible to remove wrinkles subtly while maintaining a natural look by using gentle smoothing techniques, preserving skin texture, and adjusting lighting.
10.2 What is the Best Software for Removing Wrinkles from Photos?
The best software options include Adobe Photoshop, Facetune, and other professional photo editing tools that offer a range of features for wrinkle removal and skin enhancement.
10.3 How Do I Edit Wrinkles on Mobile Devices?
You can edit wrinkles on mobile devices using apps like Facetune, Adobe Photoshop Express, and other user-friendly photo editing applications.
10.4 What is the Best Way to Smooth Skin in Photos?
The best way to smooth skin in photos is to use smoothing tools with low intensity, preserve skin texture, and avoid over-smoothing to maintain a natural appearance.
10.5 How Can I Make My Skin Look Younger in Photos?
You can make your skin look younger by reducing wrinkles, enhancing skin tone, adjusting lighting, and using subtle enhancements to create a refreshed and vibrant look.
10.6 How Do I Preserve Natural Skin Texture When Removing Wrinkles?
Preserve natural skin texture by using frequency separation, applying texture overlays, and avoiding excessive smoothing to maintain realistic skin details.
10.7 What are the Ethical Considerations When Removing Wrinkles from Photos?
Ethical considerations include obtaining consent, avoiding misrepresentation, and promoting realistic beauty standards to ensure authenticity and avoid creating unrealistic expectations.
10.8 Can AI Really Help with Wrinkle Removal in Photos?
Yes, AI-powered editing tools can quickly and efficiently reduce the appearance of wrinkles while maintaining a natural look, making professional-level editing accessible to a broader audience.
10.9 How Do I Avoid Over-Editing Photos?
Avoid over-editing by using subtle adjustments, regularly zooming out to check the overall image, and comparing the before-and-after results to ensure a natural appearance.
10.10 Where Can I Learn More About Advanced Photo Editing Techniques?
You can learn more about advanced photo editing techniques through online courses, tutorials, industry publications, and by following industry experts on social media and professional platforms.
Visit dfphoto.net to explore more resources, connect with our community, and enhance your photography skills. Whether you’re looking for detailed tutorials, stunning photo collections, or a vibrant community to share your passion, dfphoto.net is your go-to destination. Discover the beauty and art of photography with us. Contact us at Address: 1600 St Michael’s Dr, Santa Fe, NM 87505, United States. Phone: +1 (505) 471-6001, or visit our website at dfphoto.net.