Are you ready to transform your sports photos from good to extraordinary? Editing sports photos involves a few key steps, and at dfphoto.net, we’re dedicated to helping you master these techniques. By focusing on clarity, color correction, and strategic cropping, you can highlight the intensity and emotion of every shot.
Whether you’re aiming for vibrant action shots or impactful black and white conversions, understanding the nuances of photo editing will elevate your sports photography. Explore advanced editing techniques, discover the latest software, and refine your skills with expert guidance to unlock the full potential of your sports photography, with cutting-edge resources and a vibrant community.
1. Correct Blurry Sports Photographs
Can blurry sports photos be fixed? Yes, while it’s always better to capture sharp images in-camera, you can try to rescue slightly blurry shots using photo editing software.
The best way to avoid blurry shots is to ensure your shutter speed is fast enough to capture the action and prevent camera shake. According to research from the Santa Fe University of Art and Design’s Photography Department, in July 2025, a faster shutter speed provides sharper images. However, even seasoned photographers make mistakes. Software like Topaz Photo AI and ON1 NoNoise AI uses AI to recover blurry images, fix missed focus, and reduce camera shake. It’s not a guaranteed fix, but it’s worth a try to enhance your action shots.
2. Sports Photograph Cropping and Resizing
How can cropping and resizing improve my sports photos? Cropping focuses attention on the subject, and resizing optimizes the image for its intended use.
It’s not always possible to frame sports shots to exclude unwanted elements. Cropping photos can fix that while improving composition. If you edit often, it’ll get easier to crop your shots. But if you want some assistance, most editing apps will allow you to turn on a crop preview with a grid that uses the rule of thirds. The intersecting lines give you four focal points for placing your subject to draw attention for a pleasing result. That’s not to say you shouldn’t use your creative initiative, but it can be a good starting point for learning how to frame your subjects.
 Male track athlete preparing for a sprint, showing pre-race focus and readiness.
For the most part, you’ll want to crop out unnecessary parts of the image to turn focus on the subject while keeping context included where relevant.
In the example below, we cropped the image to remove the partial capture of the other athlete in the back and turn the focus to the runner in the front. You can use freeform crop or stick to set aspect ratios, depending on how you want to use the photo later.
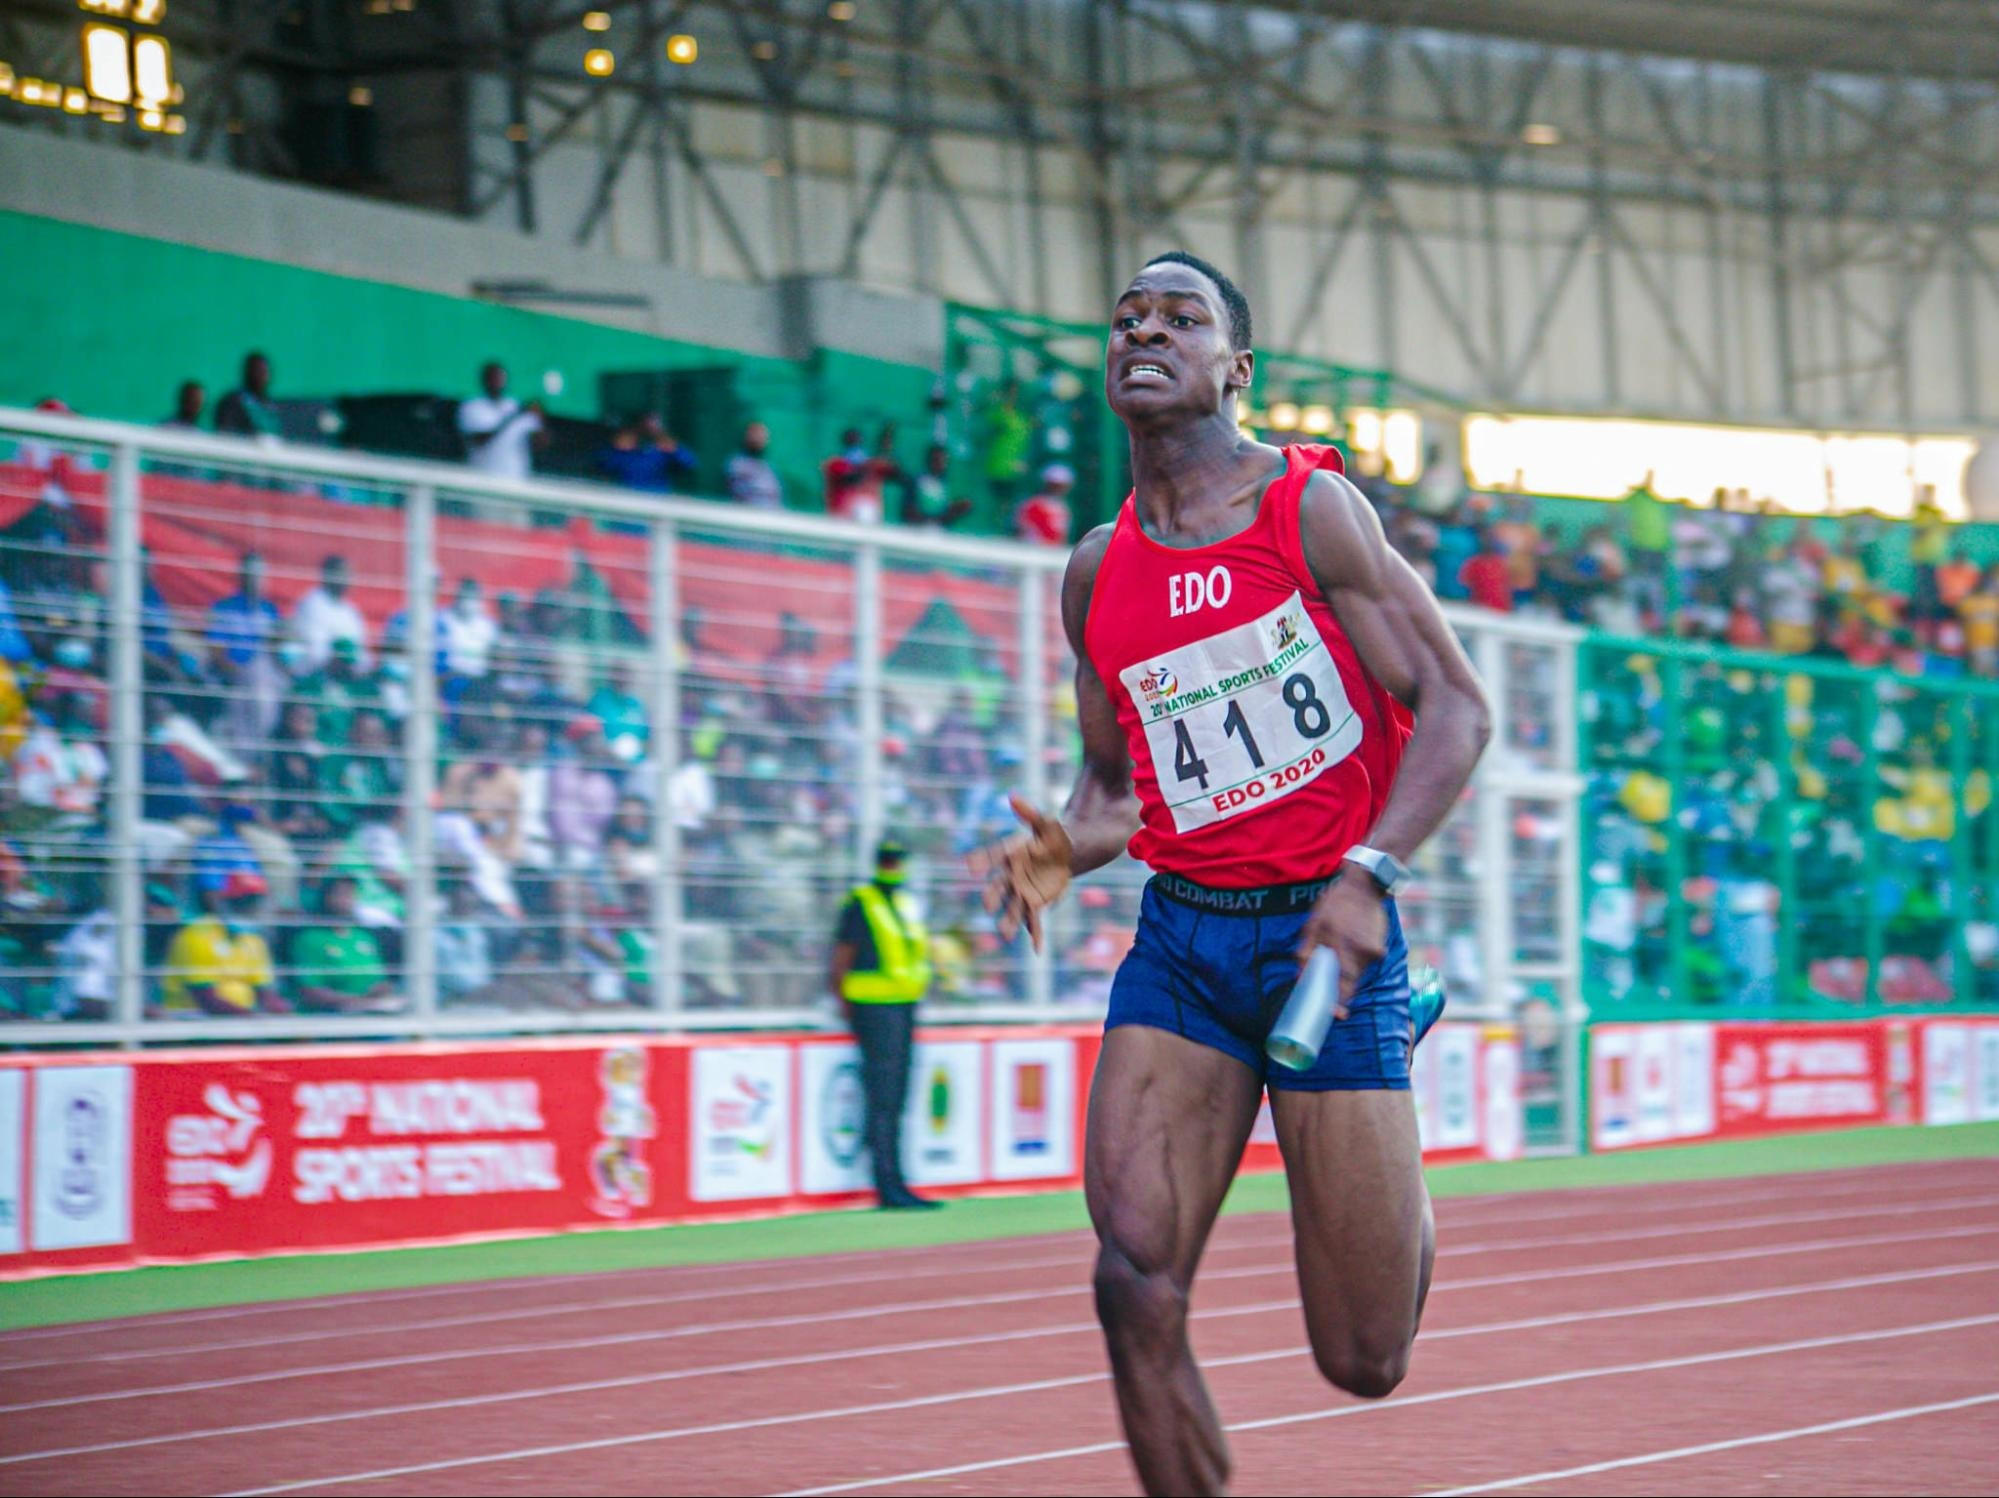 Male track athlete mid-sprint, showcasing speed and athletic form.
Once cropped, resize your photos based on image use. If you need to publish photos, ensure they match the required output. For example, print labs or magazines will inform you of particular photo export requirements. For web use, you’ll want to reduce image size without losing quality to improve page load speed and SEO efforts.
3. Adjusting Sports Photograph Highlights and Shadows
How do I correct brightness in sports photos? Adjusting exposure, highlights, shadows, and blacks can balance the lighting and reveal important details.
When editing your image, the first thing you should do is correct image brightness. It’s very possible the lighting in the venue or on the track wasn’t the best, so start by adjusting exposure, highlights, whites, shadows, and blacks and using the tone curve—depending on which sliders are available in your editing app.
For any local spots that need fixing—such as your subject’s face—use brushes to avoid affecting the rest of the photo.
Like in the example below, we first increased the image’s overall brightness. Then, followed with a brush to lightly brighten the athlete’s face.
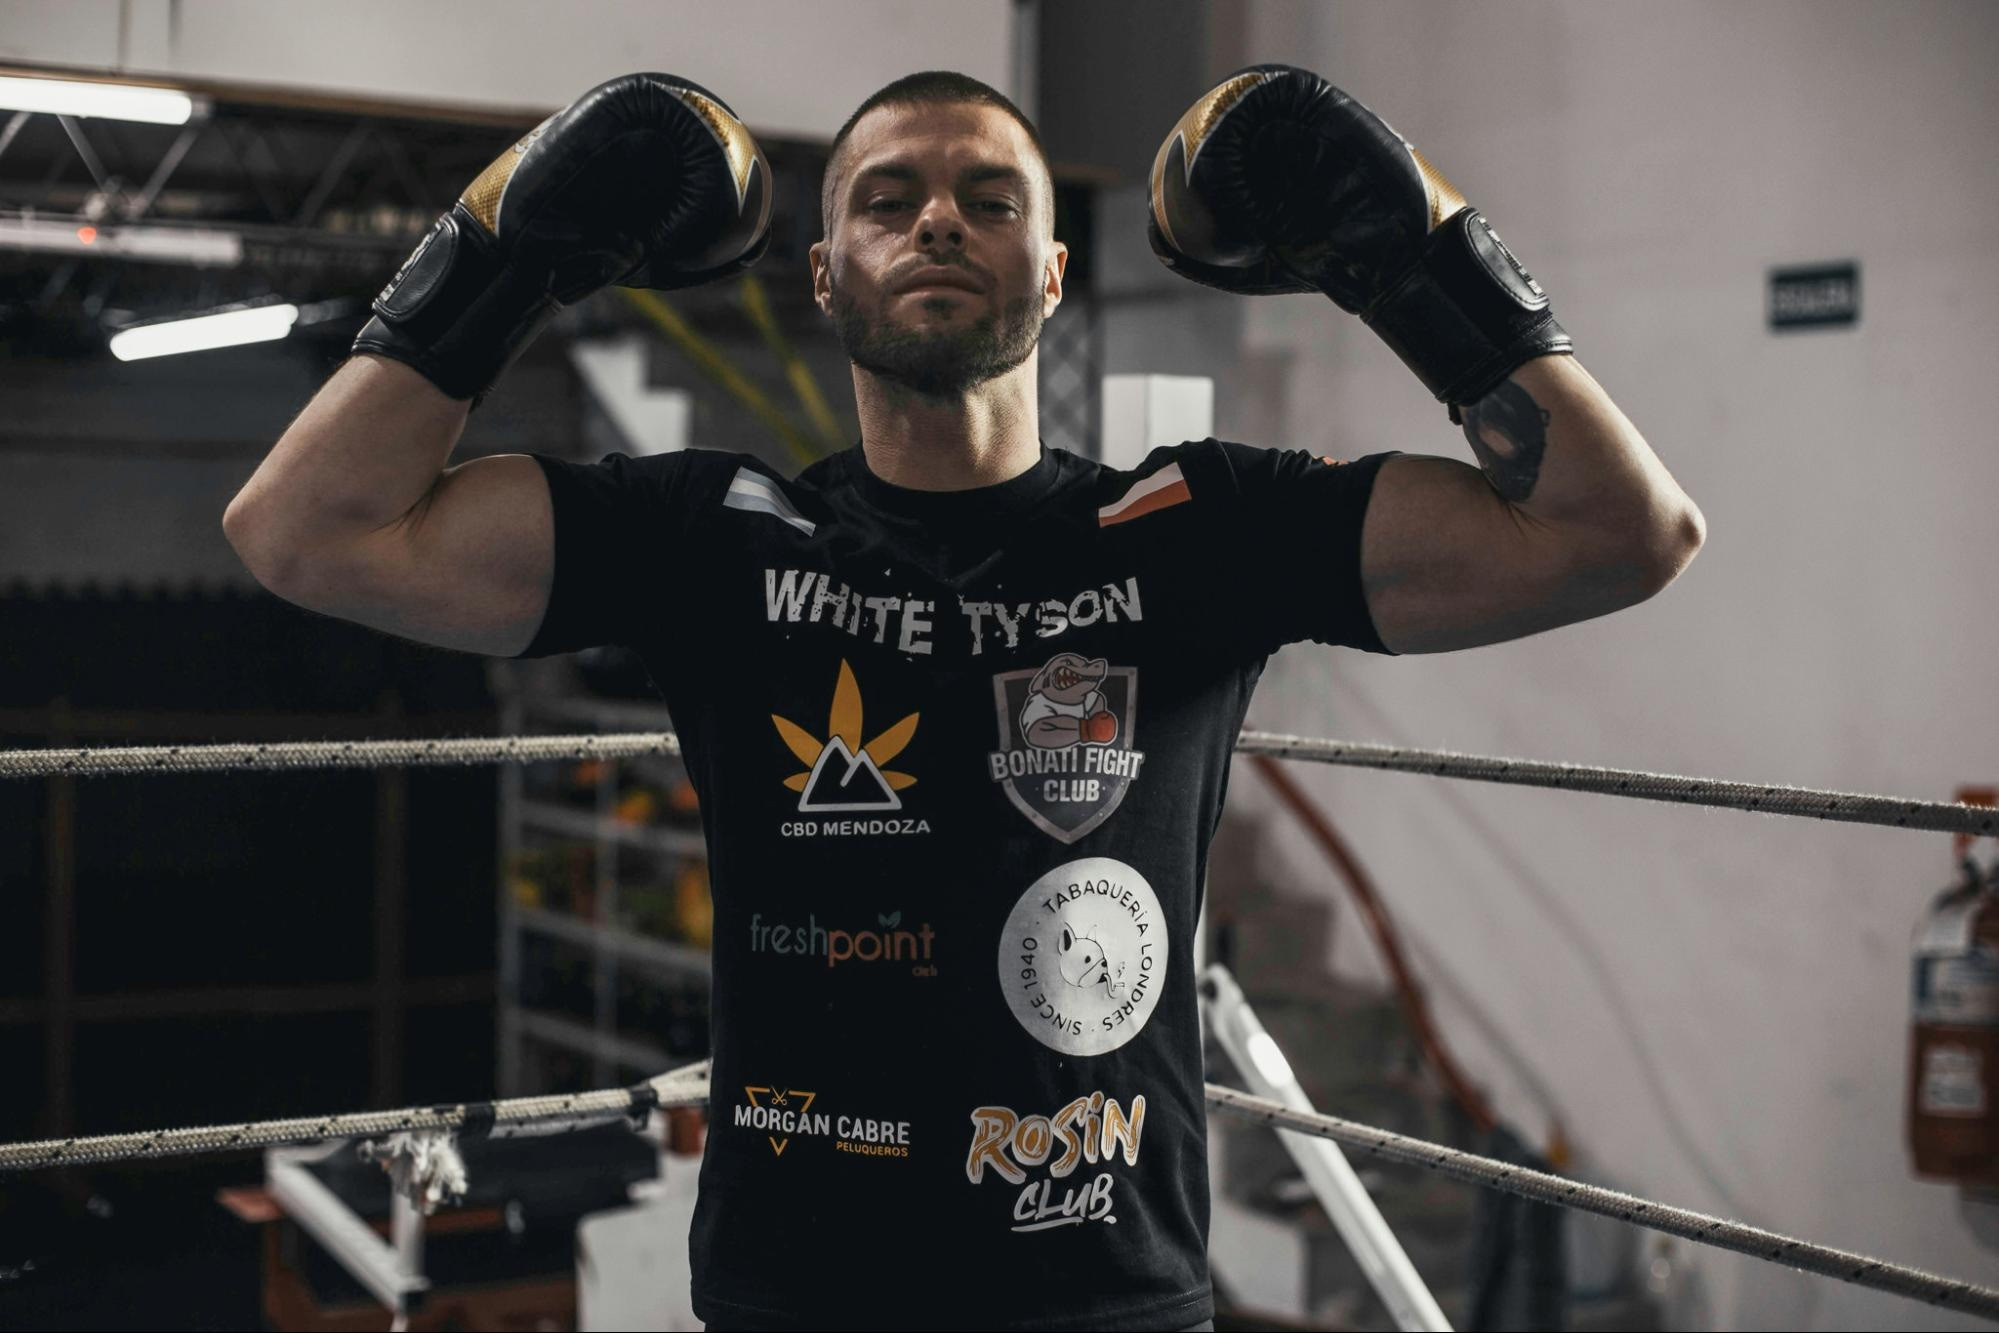 Boxer in ring with sponsor-branded t-shirt, after highlights and shadows adjustment for balanced lighting.
4. Adjusting Colors in Sports Photographs
How can I fix the colors in my sports photos? Adjusting white balance and using hue sliders can correct color casts and ensure accurate team colors.
The next step is to fix the image colors. Sports events can feature a mix of natural and artificial lighting, which can be difficult to handle in editing. But start by adjusting the white balance, using temperature and tint sliders in Lightroom or your editing app of choice.
If you use Lightroom, you can select the eyedropper tool and click on a pure gray or white part of your photo. Lightroom will use that as the neutral target and adjust the rest of the photo accordingly.
However, as in the example below, you’ll likely still need to use the sliders manually to refine the result if the image features a mix of lights. To edit this photo, we adjusted the temperature slider to reduce the warmth from the venue lighting and bring it closer to the actual scene.
 After images displaying color enhancement in Gym Scene with Athlete
It’s also important to consider the colors of athlete uniforms. You want to ensure they match the actual colors, particularly for club or media photos. Using the hue sliders, you can adjust specific colors in your photo—use masks or brushes for any local adjustments if needed. Vibrance and saturation sliders can also enhance team colors, but use them in moderation to maintain a realistic look.
5. Correcting Skin Tones in Sports Photographs
How do I fix skin tones in sports photos? Adding warmth and adjusting hue sliders can correct color casts and ensure natural-looking skin tones.
Similar to adjusting colors, pay attention to skin tones. Many sports environments—from indoor gyms to evening outdoor events—can cast a different light on athletes’ skin. This includes fluorescent and different color LED lights, which can create an overly cool cast, making skin appear pale or unnatural.
We only made a few changes in the example below to fix skin tones. The result? Drastically different from the original image. Here are the steps to take to do the same:
- Add more warmth and magenta to the entire image
- Use red and orange hue sliders to shift the athlete’s skin color towards deeper reds
- Reduce the saturation of blues to remove the blue cast on the athlete’s vest
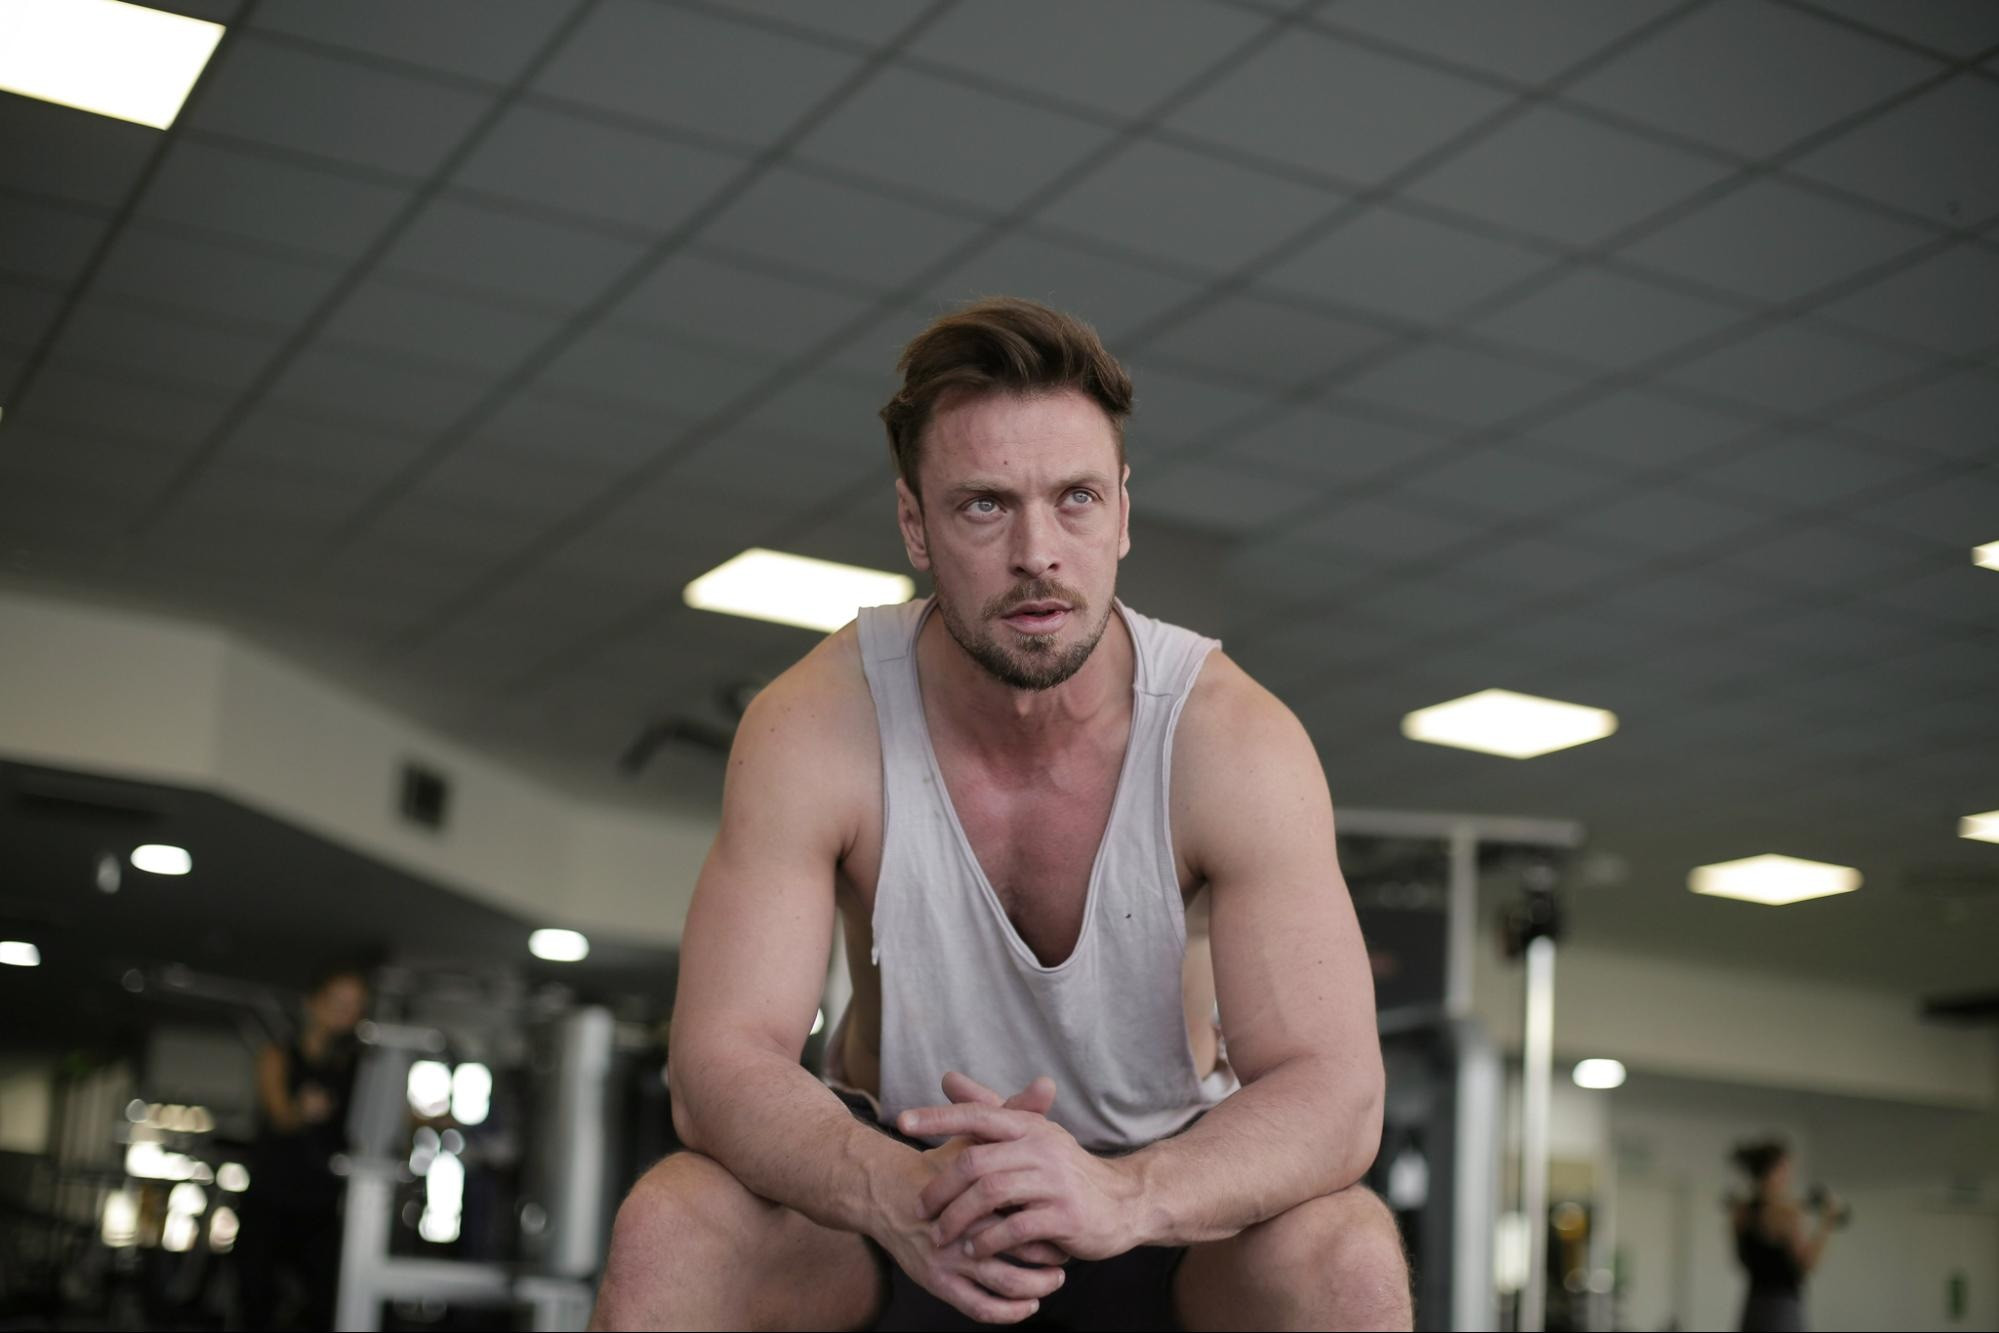 Male athlete seated in gym with corrected skin tones for a more natural appearance; before and after comparison.
Light cast can happen outdoors, too. For example, if you shoot in a location with lots of greenery on a sunny day, you’ll notice a slight green cast on the subject’s skin. Start by introducing more magenta to neutralize greens on your subject’s skin, but remember, different skin shades require different approaches—check each athlete’s skin tones individually.
6. Reducing Sweat and Shine in Sports Photographs
How can I reduce sweat and shine on athletes’ skin? Use the Brush Tool or Clone Stamp in Photoshop to sample colors or pixels over the problem area.
Some sweat on an athlete’s skin can add to the story of perseverance and hard work in the sport. But if you’re going for a cleaner look, there are a few different tools to tone down sweat and shine on the subject’s skin.
Use Photoshop tools, like the Brush Tool or Clone Stamp, to paint sampled color or pixels over the problem area.
7. Sports Photograph Photo Retouching to Remove Distractions
How do I remove distractions from my sports photos? Tools like the Healing Brush, Clone Stamp, and Content Aware Fill in Photoshop can eliminate unwanted elements.
Have you got a distracting person, wall sign, or other element ruining your sports shot? There are plenty of ways to remove them using Photoshop so you can keep your photo:
- Select the Healing Brush or Clone Stamp for smaller spots and imperfections
- Use Content Aware Fill for larger sections
- Try the new Generative Fill to let the AI remove larger elements and give you several options to pick from
Once you see the difference tools like these can make to an image, it’s difficult not to “tidy up” every photo you edit—unless you’re shooting for the media and need to get those images to your editor as soon as possible.
8. Enhancing Athlete Details in Sports Photographs
What details should I enhance in sports photos? It depends on the client’s preferences, but contrast, texture, and clarity can highlight muscle definition and other key features.
If you work with clients, knowing what they consider a good sports photo is key for your editing. Not everyone subscribes to the same idea, so understanding the desired results will help you bring out the right details in photos:
- Gym trainers and weightlifters might want images to show more grit and enhanced muscle definition or sweat.
- Yoga and pilates studios might want light, airy colors and softer details.
- Press and media outlets might need natural, realistic edits with only minor or no improvements at all.
For enhanced muscle definition, you can use a mix of sliders—contrast, texture, and clarity. Preferably, work using brushes so you only apply the changes to specific parts of the photo. Use the tonal curve, too.
In the example below, we only worked on the model’s arms, shoulders, and abdominal area to highlight the model’s muscle definition and left the rest of the photo untouched. However, remember to always consult clients on the desired result and take the “less is more” approach for media images.
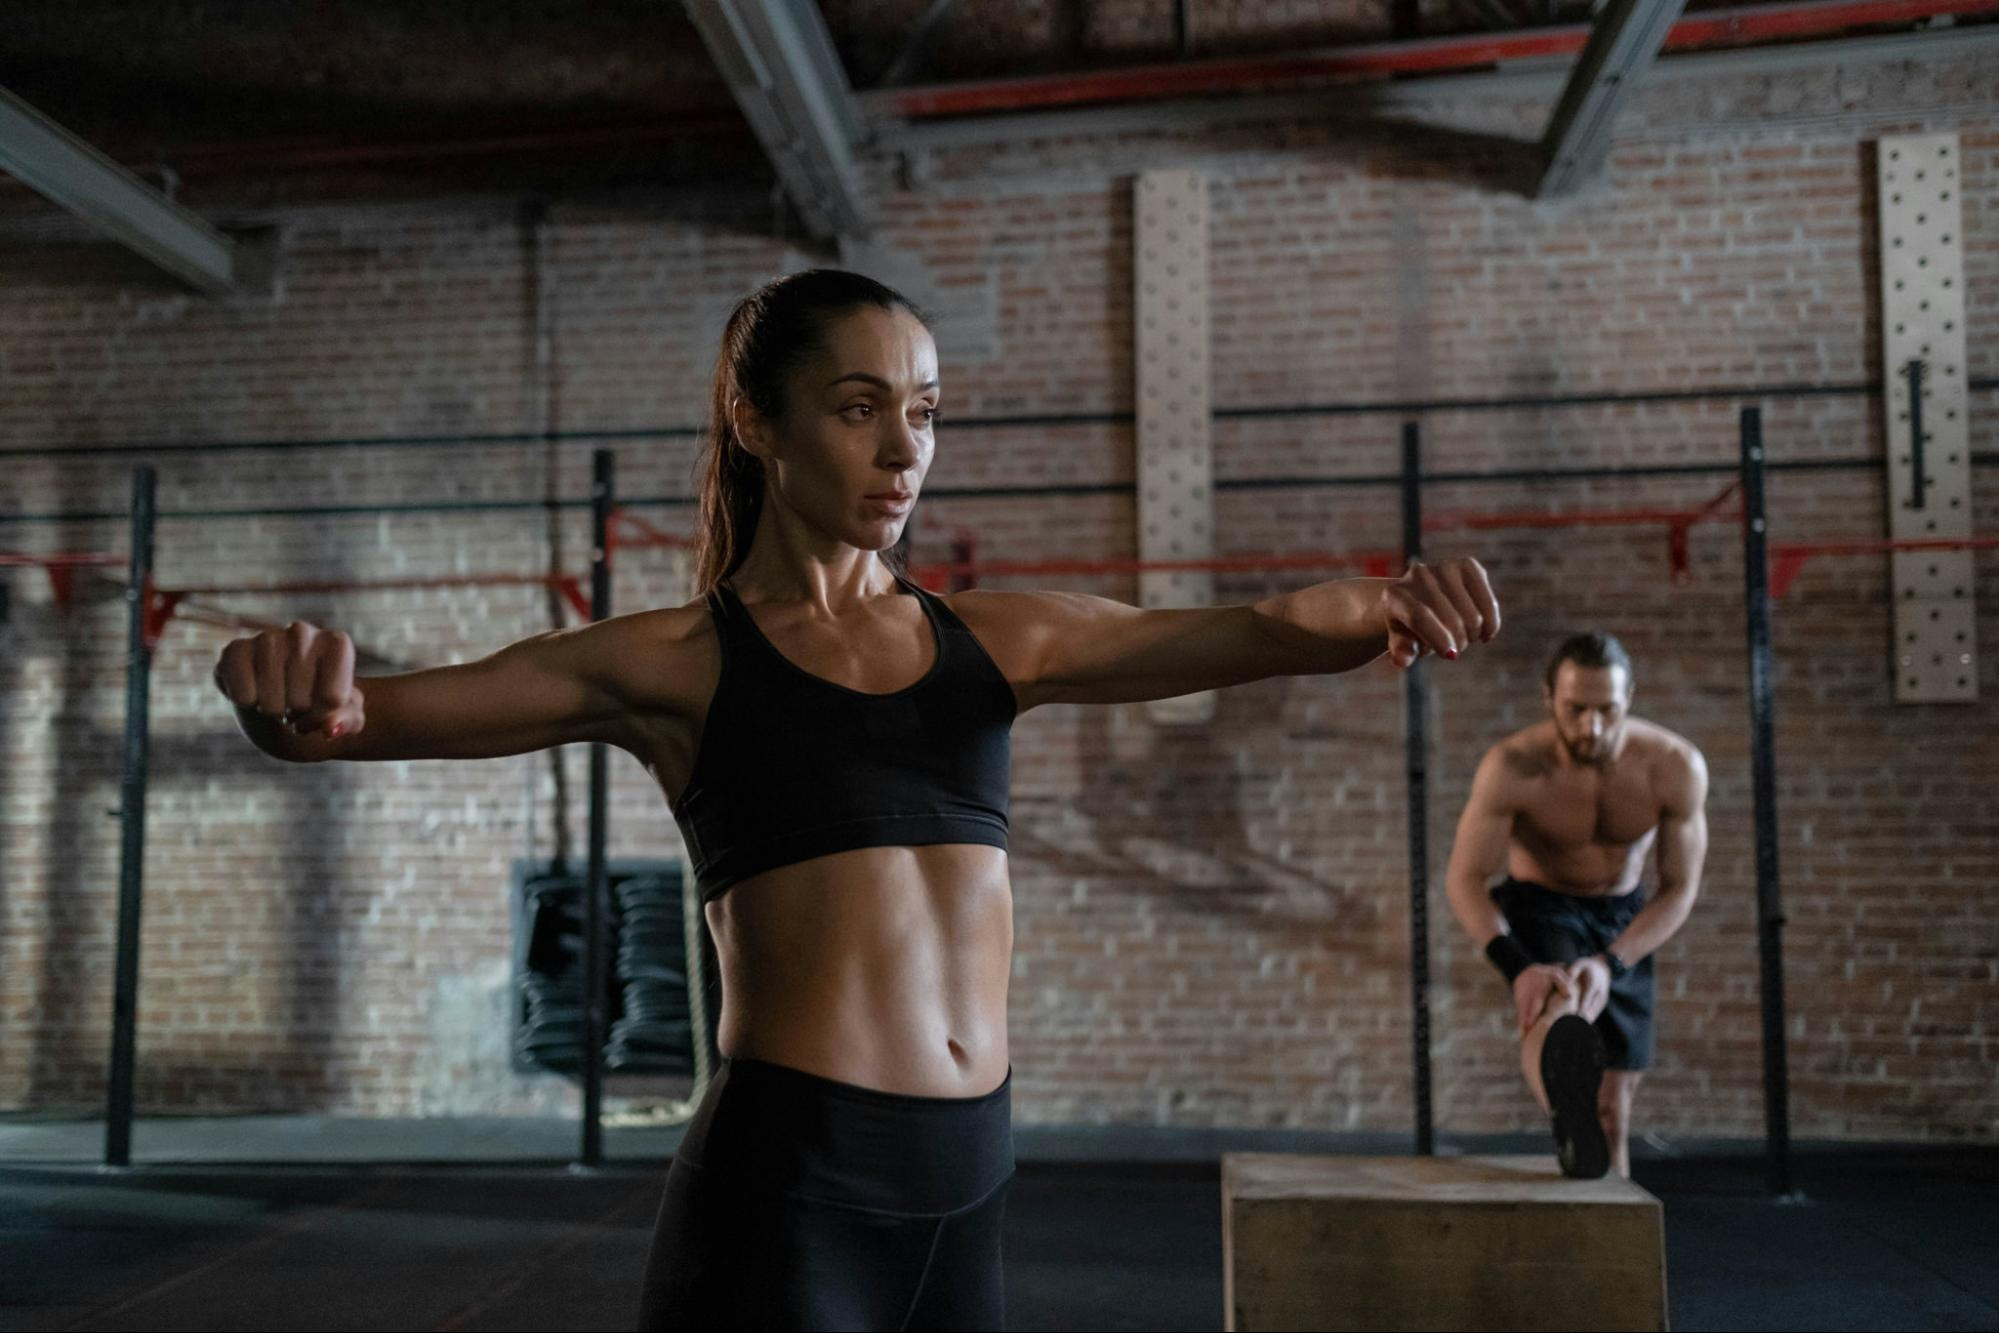 Female athlete in gym performing arm stretch, edited image after enhancing details.
9. Clipping Athlete Photos in Sports Photographs
Why would I need to clip athlete photos? Clipping removes the background for media compliance, marketing materials, composite team photos, and to focus on the athlete.
If you shoot sports photos for commercial or media use, you might need to clip athlete photos and remove the image background.
Reasons for this can include:
- Media compliance: Some media outlets, like ESPN or CBS Sports, might need athlete photos without backgrounds to ensure consistency in their broadcasts or online platforms.
- Marketing materials: Many team websites, posters, and social media posts feature player profiles with consistent backgrounds and matching branding. The designer might change.
- Composite team photos: Individual athlete photos can be combined to create team photos, especially if it’s not feasible to gather all players in one place.
- Focus on the athlete: Removing distracting backgrounds helps highlight the athlete’s pose, uniform, or expression.
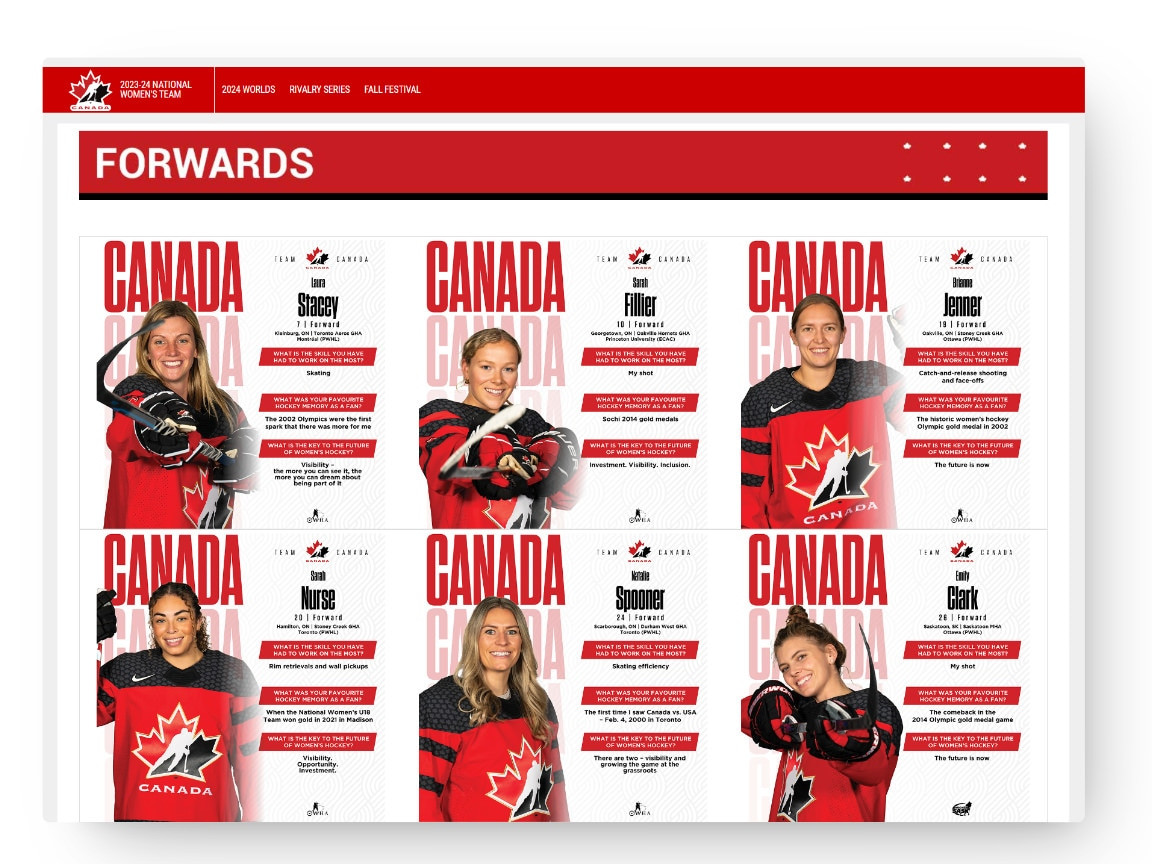 Team Canada Women’s Hockey forwards profiles featuring players in red jerseys with personal highlights and achievements.
While you can do basic clipping with tools like Photoshop’s Quick Selection or Pen Tool, achieving professional results requires skill and time. Especially if you need precise image masking or more complex clipping paths to tackle hair and other fine details. For that reason, many photographers and organizations turn to specialized clipping services, like Path, to handle large volumes of images or tight deadlines.
10. Black and White Conversion for High-Impact Sports Photographs
When should I use black and white for sports photos? Black and white conversions can enhance drama and focus attention on emotions, body shapes, and lighting.
If you have more creative freedom with your sports photos, turn them into powerful black-and-white shots. Some action photographs will look more dramatic in monochrome because as you remove the color, the viewer’s attention will naturally go to the athlete’s emotions, body shapes, or where the light falls in the image.
The key to impactful black-and-white sports photography is to convert your shots to black-and-white first instead of removing color using the saturation slider. In Lightroom, find the conversion button in your Basic panel.
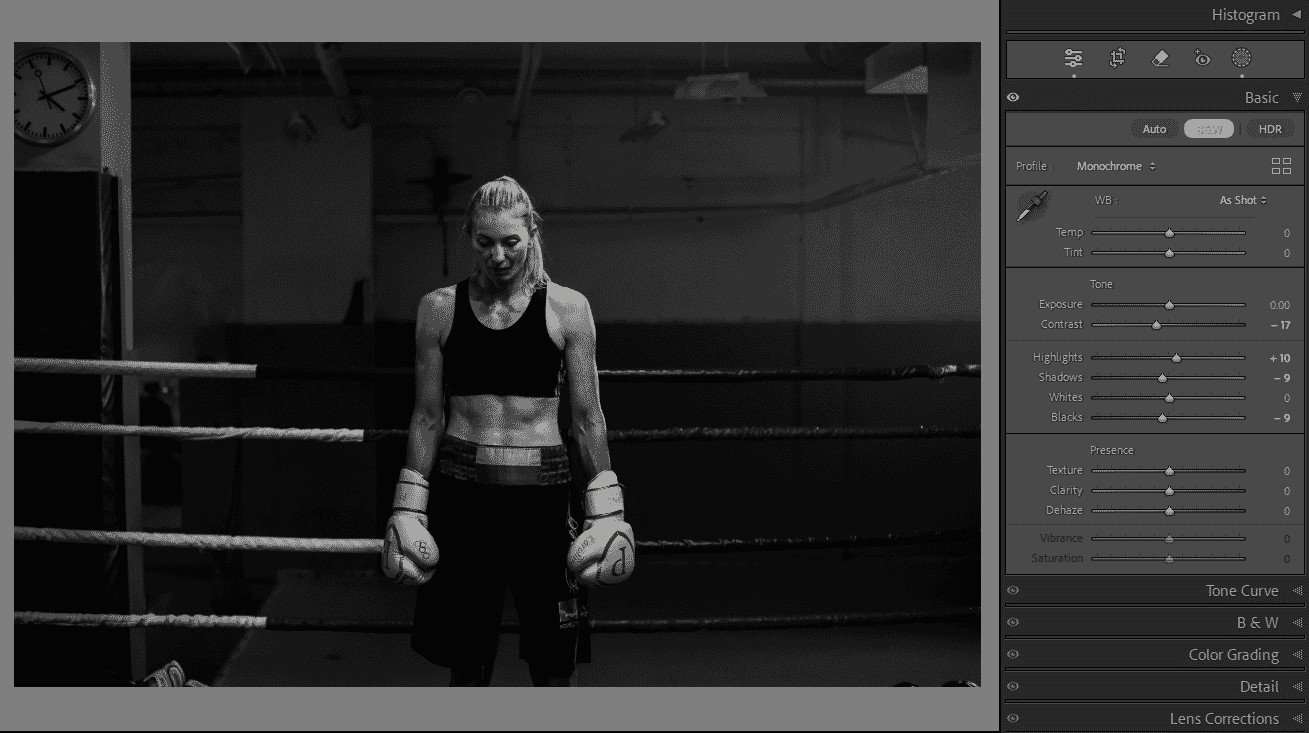 Black and white image of a female boxer in the ring, edited in Adobe Lightroom with monochrome settings and adjustments.
Then, work with the tone curve, contrast, whites, highlights, shadows, and blacks. Finetune your photo with hue, saturation, and luminance sliders for powerful results. This approach gives you precise control, allowing you to create dramatic, high-impact black-and-white photos.
11. Knowing When to Outsource Sports Photograph Editing
When should I consider outsourcing my sports photo editing? Outsource when handling high volumes, facing tight deadlines, dealing with repetitive tasks, or needing consistent results.
Recognizing when to outsource your editing can be a game-changer for sports photographers. Consider outsourcing when:
- Handling high-volume photography work for teams, clubs, or events
- You have tight deadlines for media or time-critical projects
- Dealing with repetitive, less complex edits, such as background removal and basic retouching
- You need to maintain consistency across images
By outsourcing the more time-consuming editing tasks, you can free up time for higher-value activities like shooting, building client relations, or doing more complex post-processing. Just like this freelance photographer did with Path’s editors’ help to manage photography for 16 teams.
Sports Photography Editing Software Options
What are some popular software options for editing sports photos? Adobe Lightroom, Adobe Photoshop, Capture One, Affinity Photo, and Snapseed are all excellent choices.
There are plenty of editing apps to enhance your sports photography, with varying complexity of tools and matching different price ranges.
Popular editing software for sports shots include:
| Software | Description | Price |
|---|---|---|
| Adobe Lightroom | Best for overall editing and color correction, user-friendly interface. | Subscription-based (Adobe Creative Cloud) |
| Adobe Photoshop | Best for advanced editing, retouching, and complex manipulations. | Subscription-based (Adobe Creative Cloud) |
| Capture One | Used by many professionals and offers fast tethered shooting, excellent color handling. | One-time purchase or subscription |
| Affinity Photo | A budget alternative to Photoshop with plenty of advanced tools, one-time purchase. | One-time purchase |
| Snapseed | A powerful, free option for mobile editing, great for quick adjustments on the go. | Free |
| Topaz Photo AI | Uses AI to recover blurry images, fix missed focus, and reduce camera shake. | Paid |
| ON1 NoNoise AI | Uses AI to recover blurry images, fix missed focus, and reduce camera shake. | Paid |
Sports photography captures the excitement and intensity of athletic performance. For a striking, powerful photo, both shooting skills and editing expertise matter. Think of it as building a house—your photography lays the foundation and framework, while editing adds the finishing touches that turn it into a home.You can transform good shots into great ones, highlighting the emotion and energy of the moment.
If you’re ready to elevate your sports photography, visit dfphoto.net for more tips, tutorials, and a vibrant community of photographers. Explore our resources to master editing techniques, discover the latest software, and find inspiration for your next shoot. Join us and transform your photos into stunning visual stories that capture the essence of sports. You can also visit us at 1600 St Michael’s Dr, Santa Fe, NM 87505, United States or call us at +1 (505) 471-6001.
Editing Sports Photos FAQs
How do you crop a sports picture?
Focus on the main subject, usually the athlete. Use the rule of thirds for composition. Crop out distractions, but keep important context. For action shots, leave enough space in front of the athlete’s movement. Experiment with different aspect ratios.
What is the best app for editing sports photos?
Adobe Lightroom and Photoshop are best for advanced editing and retouching. Capture One is used by many professionals and offers fast tethered shooting. Affinity Photo is a budget alternative to Photoshop with plenty of advanced tools. Snapseed is a powerful, free option for mobile editing.
How do I edit a sports photo on my iPhone?
Use the native Photos app or a third-party app like Snapseed. Crop to improve composition. Adjust exposure, contrast, and highlights to enhance details and subject. Change color temperature to correct the white balance. Use selective adjustments to enhance specific areas of the photo. Apply light sharpening.
How do you fix blurry sports pictures?
While it’s best to get sharp images during the shoot, you can sometimes improve slightly blurry photos. Experiment with different sharpening tools in your editing app. Blur the background to distract from the blur on your subject. Apply noise reduction if the blur is due to high ISO. Try converting to black and white, which can sometimes mask minor blur. For highly blurry images, try specialized AI software like Topaz Photo AI.
