Are you looking to elevate your photography and learn How To Edit Photos To Make Them Look Professional? Achieving that polished, high-quality look is easier than you think with the right techniques and tools, and dfphoto.net is here to guide you through the process. By understanding key adjustments and leveraging modern AI technology, you can transform your images into stunning visual masterpieces, mastering post processing techniques and creating a professional photo finish.
Photography enthusiasts and professionals alike continually seek methods to refine their images, and dfphoto.net offers a wealth of resources to help you master these essential skills. Dive in to discover how to use basic adjustments, color correction, and AI-powered tools to enhance your photos. Explore the art of digital enhancement and improve your image refinement skills with dfphoto.net.
1. What To Do Before Editing Photos?
Before you even think about touching those editing sliders, there are some crucial steps to take. Ensuring you have these foundations in place will make the editing process smoother and more effective.
1.1. Back Up Your Images For Safety
Backing up your images is absolutely non-negotiable. Losing client photos could potentially destroy a wedding photographer’s reputation or even career. From the moment you click the shutter, you need to think about how safe your files are. According to research from the Santa Fe University of Art and Design’s Photography Department, in July 2025, implementing a robust backup strategy significantly reduces the risk of data loss for photographers.
My photographs are always written to two memory cards in the camera. When I’m at my computer, my goal is to then have three copies of the files: my working files, one backup drive, and one stored off-site, which, in my case, is in the cloud.
1.2. How To Cull Your Photos?
Culling is the process of selecting the best photos from a larger set. This can be daunting, so having an efficient workflow can save hours of your precious time. At weddings, we can shoot thousands of images, and not all of them will be delivered to the client.
There are a few popular approaches to culling.
1.2.1. Culling Photos Within Lightroom
Lightroom can be a powerful tool for culling and is great if you want to keep everything within the same program. You can quickly flag or rate your photos and immediately start editing your favorites.
My tip is to use Smart Previews within Lightroom, as this will make it quicker to sift through the images. The downside is that Lightroom can be slower than a dedicated culling program, especially when dealing with the large number of photographs we shoot at weddings.
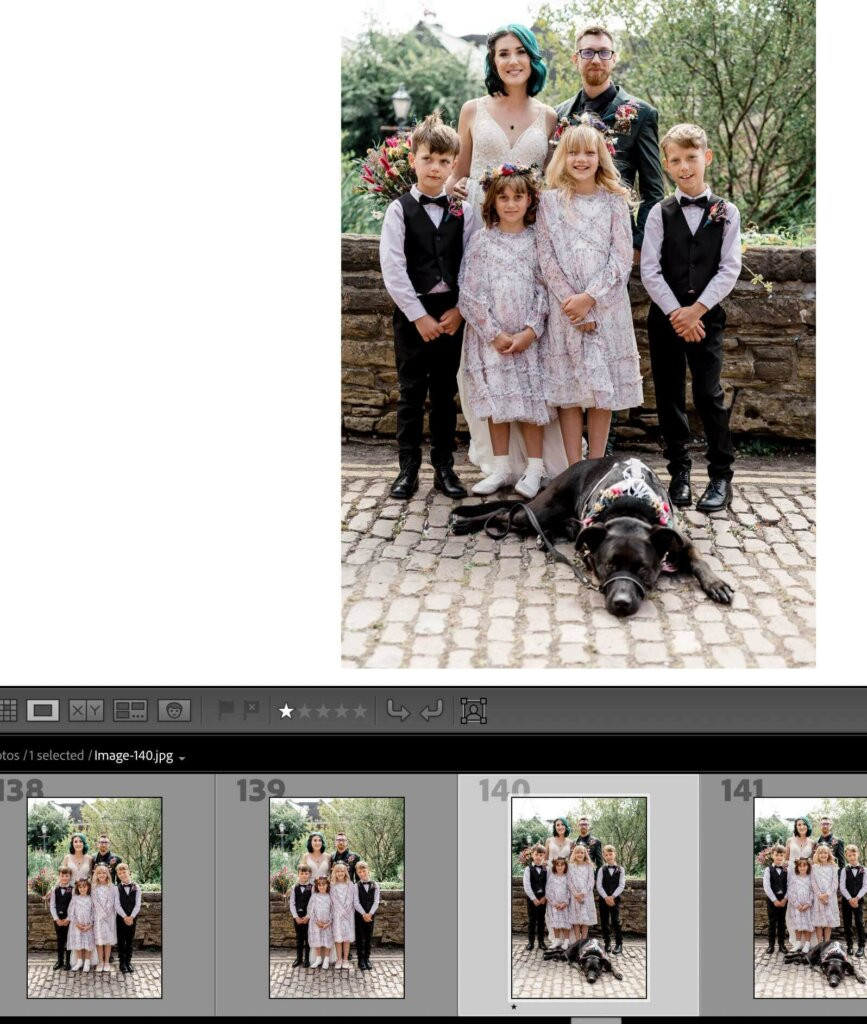 Culling Photos in Lightroom with star ratings
1.2.2. Using External Culling Programs
If, like me, you find Lightroom’s culling process a bit sluggish, external programs can speed up the process. A classic favorite for many wedding photographers is Photo Mechanic, although newer software exists. This software is great for handling a large number of images without lagging. You can then import only the selected images into Lightroom.
1.2.3. Using AI Culling Tools
More recently, new AI tools have emerged to assist with the culling process. AI culling software like Aftershoot analyzes your images and helps decide which photographs are the best. This has recently become my preferred option. I can drastically reduce the time spent culling while still casting my final judgment on which photographs I’ll be editing.
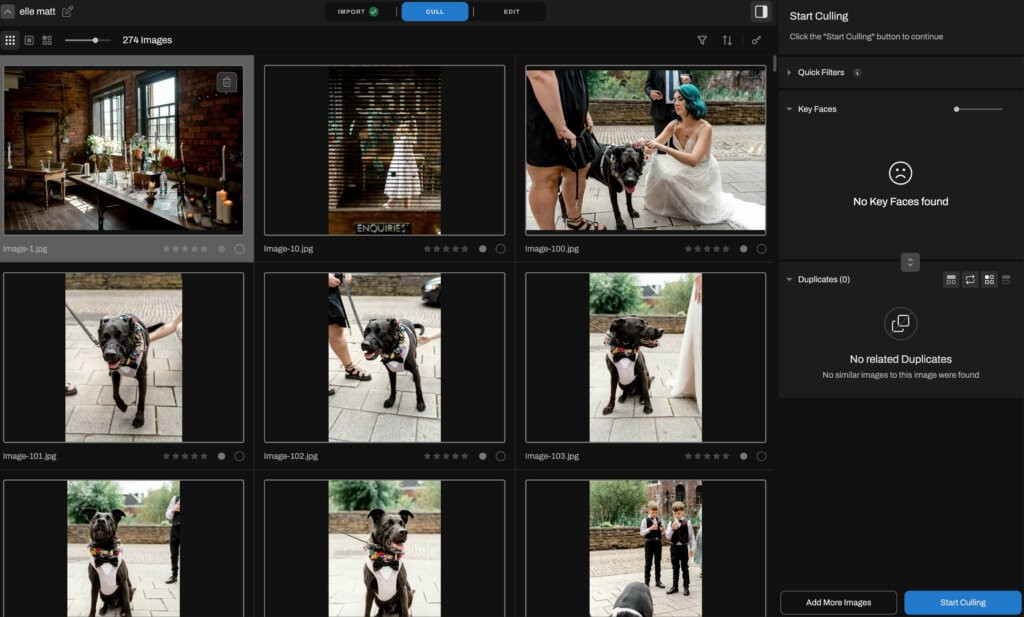 Culling photos in Aftershoot AI culling & editing software for faster workflow
1.3. How To Organize Your Photos Logically?
For the sake of your future self, organizing your images is crucial. Create a folder structure that is logical to you, such as organizing by date, event, or client name. Keep this consistent.
I like to organize my files in a large folder by year. I then break this down into subcategories like ’01. Katie & Andrew’ and ’02. Joanne & Michael.’ Within these folders, I keep subfolders for RAW files, selected images, and the exported JPEG files once edited.
A well-organized photo library not only saves time but also helps you stay focused on the creative aspects of editing rather than getting bogged down in administrative tasks.
1.4. How To Set Up Your Physical And Digital Workspace Properly?
Creating an efficient and comfortable workspace is crucial, as it enhances both productivity and the quality of your work. I also like to make my office a pleasant place to spend time.
Start by investing in a supportive chair, a spacious desk, and proper lighting to reduce eye strain and accurately view colors. Organizing your physical workspace to minimize distractions allows you to focus fully on your editing tasks.
In Lightroom, you can collapse and hide the tools you don’t use. I prefer to use the Develop tools in ‘Solo Mode,’ which lets you concentrate on the specific tools you’re working with.
It’s worth investing in a computer with enough processing power and RAM to handle your camera’s files without struggling, enabling you to work quickly.
2. What Additional Software And Tools Can Enhance Photo Editing?
Additional software and physical tools can further enhance your photography workflow. Plugins offer advanced filters, effects, and AI-powered enhancements that can save time and add creative options to your edits. These plugins integrate seamlessly with Lightroom, giving you more control and flexibility in achieving your desired look.
Physical tools like the TourBox and Loupedeck can also significantly improve your editing efficiency. These nifty devices provide customizable dials, buttons, and knobs that offer tactile control over Lightroom’s functions, allowing for quicker adjustments. I personally use the TourBox, which speeds up my photo editing workflow and reduces strain from repetitive mouse movements, making the editing process smoother and more intuitive.
| Software/Tool | Description | Benefits |
|---|---|---|
| Plugins | Advanced filters, effects, and AI-powered enhancements for photo editing software like Lightroom. | Saves time, adds creative options, and provides more control over edits. |
| TourBox | A physical device with customizable dials, buttons, and knobs that offer tactile control over Lightroom functions. | Improves editing efficiency, reduces strain from repetitive mouse movements, and makes the editing process smoother and more intuitive. |
| Loupedeck | Similar to TourBox, Loupedeck offers customizable controls for photo editing software. | Enhances editing speed and precision, offering a more ergonomic and intuitive editing experience. |
| Adobe Photoshop | Adobe Photoshop is the industry standard for photo editing and graphic design, offering a wide array of tools and features for image manipulation, retouching, and compositing. | Provides unparalleled control and flexibility for complex editing tasks, making it ideal for professionals seeking high-quality results. |
| Capture One | Capture One is a high-end photo editing software known for its exceptional color handling and tethering capabilities, making it a favorite among professional photographers for studio work and commercial shoots. | Offers superior image quality, advanced color correction tools, and efficient workflow management, catering to the needs of demanding photographers who prioritize precision and detail. |
3. What Photo Editing Software Do Professionals Use?
Professional photographers use a variety of powerful photo editing software to enhance their images. Adobe Lightroom is a staple in the photography world, ideal for batch editing, color correction, and basic retouching. Capture One, Affinity Photo, and Skylum Luminar are some of the other editing software that professional photographers use.
4. What Are The Editing Alternatives To Adobe Lightroom?
Lightroom is the most popular RAW editing software used by professionals. However, it’s not the only option. You may also want to check out Capture One or Affinity Software. My experience with these is limited, but most editing programs have similar core functions and will create similar results in different ways.
5. How To Edit Photos Like A Professional In 7 Steps?
5.1. Import Your Images Into Your Editing Software
The first step in any editing workflow is importing and organizing your photos. In Adobe Lightroom, start by importing your images. I like to do this after the images have been backed up and culled. As you import, you can add metadata, keywords, and copyright information. This not only helps with future searches but also protects your work.
You can select the size of your previews. I find ‘standard’ previews work well for me. I also like to create smart previews, as this allows me to work faster.
5.2. Make Basic Adjustments To Brightness, Contrast, And More
Basic adjustments are the foundation of your editing process. Start with the Exposure slider to correct overall brightness, followed by Contrast to add depth. Next, adjust Highlights and Shadows to recover detail in bright and dark areas, and fine-tune Whites and Blacks to set the dynamic range.
You can use the Clarity slider to add midtone contrast, giving your image a punchier look, but be careful not to overdo this. These adjustments set the stage for more detailed editing, ensuring your image has a balanced and polished appearance.
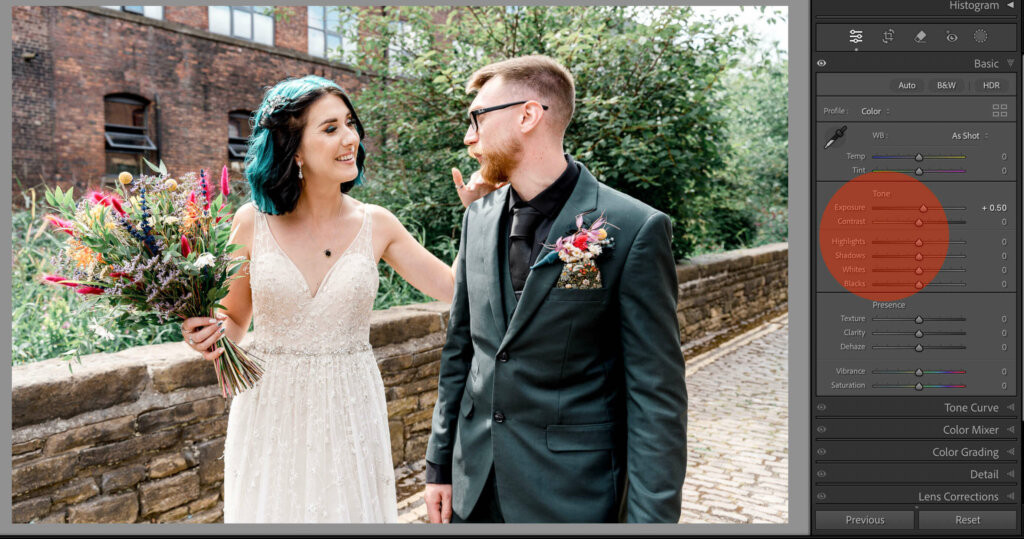 Doing basic adjustments when editing photos in Lightroom with exposure and contrast
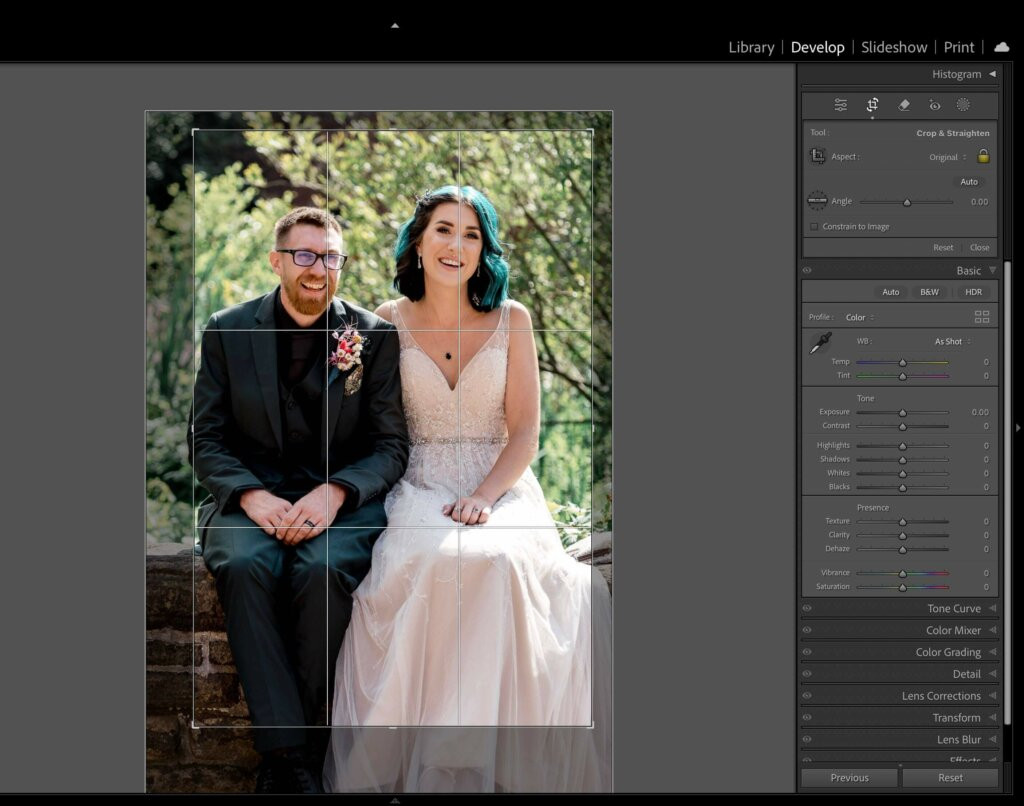
5.3. Crop And Straighten Your Photos To Enhance Composition
Cropping and straightening are essential steps to perfect your composition. In Lightroom, use the Crop Overlay tool to remove distractions or to focus on your subject. Consider using the rule of thirds or other compositional guides to improve the framing.
If the horizon is slightly tilted, use the Straighten tool to correct it. You can also manually rotate the image or use the Auto function to let Lightroom straighten it for you. Cropping and straightening not only enhance composition but also help to maintain consistency across the clients images.
Pro tip – Use the ‘R’ key to quickly enter the crop tool.
 Cropping photos in Lightroom to improve composition
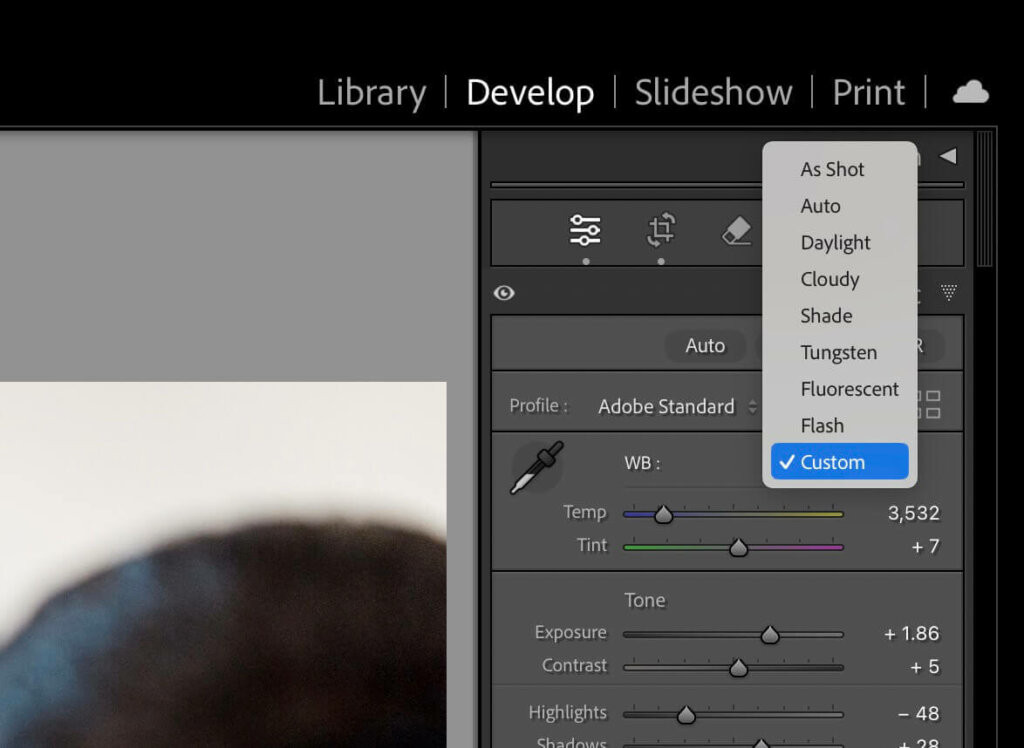
5.4. Apply Color Correction And Enhancements For Visual Appeal
Color correction is crucial for creating a consistent and appealing look in your images. Start by fine-tuning the Temperature and Tint sliders to achieve the desired warmth or coolness. You can also try a white balance preset, such as Daylight or Shade.
Next, use the Vibrance and Saturation sliders to enhance colors, being careful not to overdo it. If necessary, use the HSL panel to selectively adjust individual colors, ensuring skin tones and other key elements are natural.
 Color correction and white balance adjustment in Lightroom with temperature and tint sliders
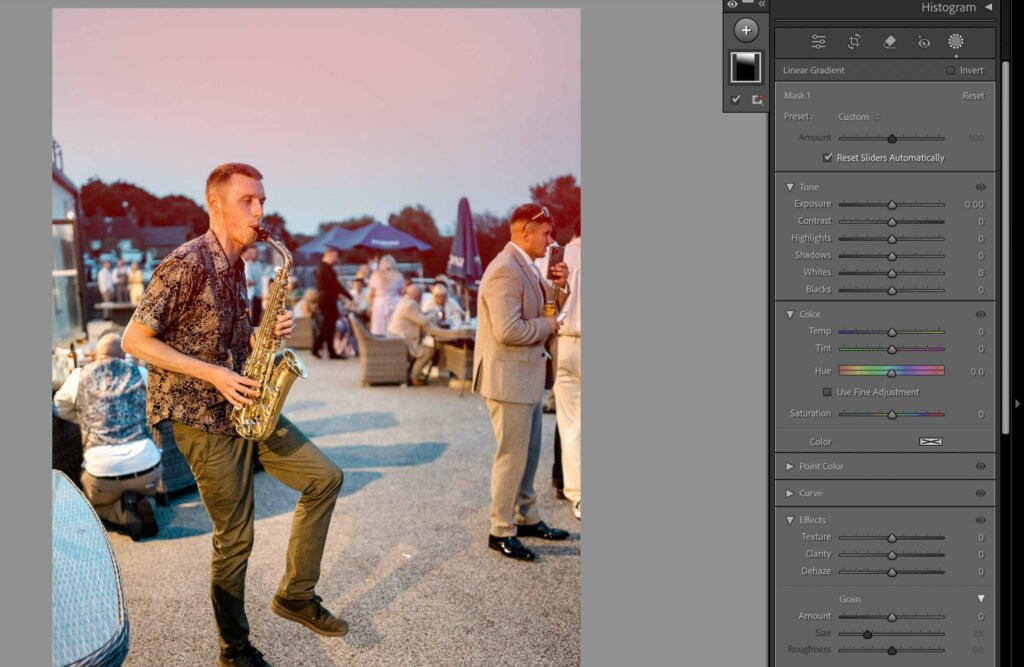
5.5. Fine Tune With Masking And Local Adjustments For Targeted Enhancement
Once the global adjustments are done, it’s time to fine-tune your image with local adjustments. In Lightroom, tools like the Adjustment Brush, Radial Filter, and Graduated Filter allow you to target specific areas for enhancement. Whether it’s adding a touch of brightness to the bride’s face or darkening the sky for more drama, these tools give you precise control.
You can also use Masking to apply adjustments selectively, ensuring that only certain parts of the image are affected. I keep saying this, but be careful not to overdo it. The image should look refined, but not overly edited.
 Masking photos in Lightroom for selective adjustments
5.6. Sharpen And Reduce Noise For Image Quality
Sharpening and noise reduction are the finishing touches that can significantly enhance the quality of your images. In Lightroom, use the Detail panel to apply sharpening, focusing on bringing out the fine details without making the image look overly crisp.
Adjust the Radius and Detail sliders to control how sharpening is applied, and use the Masking slider to protect areas that don’t need sharpening. For noise reduction, increase the Luminance slider to reduce graininess in the image, especially in low-light shots. Balance these adjustments carefully to maintain a natural look.
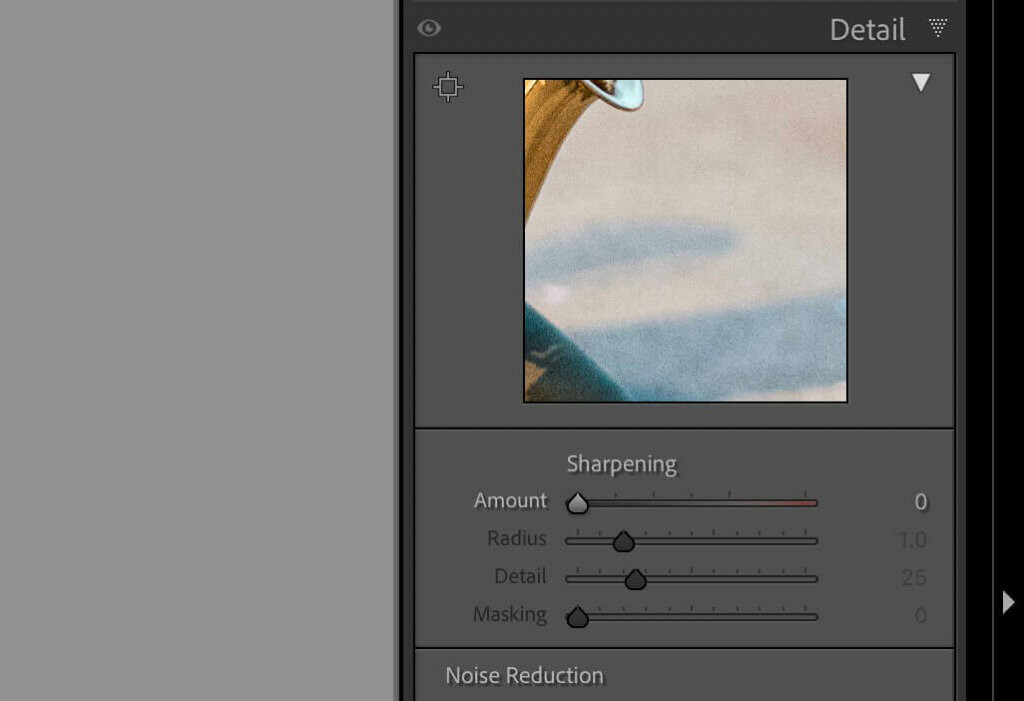 Image sharpening and noise reduction in Lightroom for fine details
5.7. Apply Final Touches Before Exporting
The final touches bring your edit together and prepare your image for export. Review your image at full screen (use the ‘F’ key), checking for any remaining spots or distractions using the Spot Removal tool.
Consider adding a subtle vignette using the Effects panel to draw attention to the center of the image. If your image will be printed, ensure it’s in the correct color profile and consider soft proofing to see how it will look in print.
Finally, export your images with the appropriate settings for your intended use, whether for print, web, or client delivery.
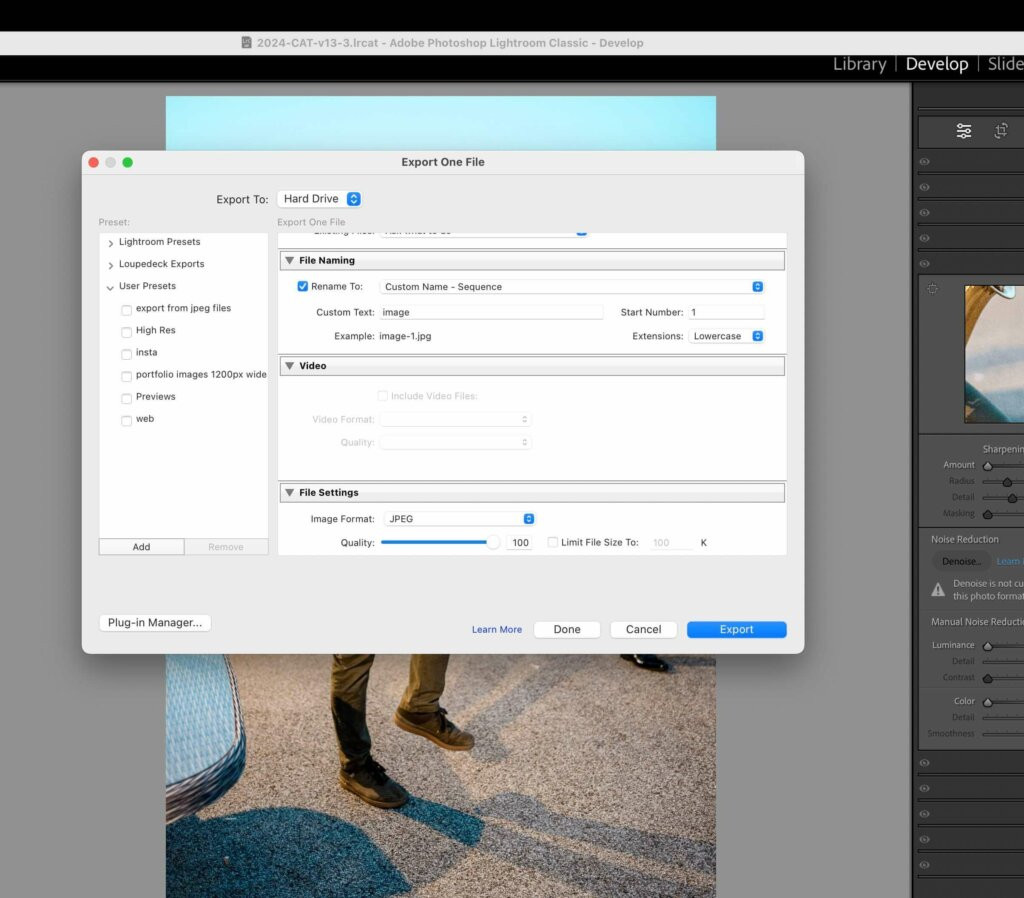 Exporting edited images from Lightroom with correct settings
6. Should You Be Using Lightroom Presets?
Editing presets in Adobe Lightroom are a powerful tool that can significantly speed up your workflow and help you achieve a consistent look across your images. Presets are essentially pre-configured settings that you can apply to your photos with a single click, instantly adjusting parameters like exposure, contrast, color balance, and more.
Whether you’re working with your own custom presets or those created by other photographers, they can be a game-changer in your editing process.
As a wedding photographer, the reason I use presets is to maintain a consistent aesthetic across an entire set of photographs. For example, if you want all the images from a wedding to have a warm or desaturated feel, applying a preset design for that look can quickly set the tone for your edits.
Lightroom also allows you to fine-tune the presets after applying them, so you can make minor adjustments to suit each individual photo. This flexibility makes presets a great starting point, saving time on repetitive tasks while still allowing room for creative decisions.
By applying various presets to the same image, you can quickly see how different looks might enhance your photo. This is especially useful when you’re trying to define your personal editing style.
I personally have a set of personalized presets, which I can call upon in different scenarios. While they should not replace manual adjustments entirely, presets can serve as a valuable starting point in your editing, helping you achieve greater efficiency.
7. How AI Photo Editing Helps You Edit Like A Pro?
7.1. What Is AI Editing And How Does It Work?
AI editing has become an essential tool for myself and many industry friends, offering efficiency and consistency that was hard to get manually. AI editing uses machine learning algorithms to analyze and adjust your images based on patterns and preferences, often with just a few clicks for setup. AI editing can save countless hours.
7.2. How To Use AI Tools Within Lightroom?
Adobe Lightroom has embraced AI with several powerful features designed to streamline your workflow.
Tools like Enhance Details and AI Noise Reduction use advanced algorithms to automatically refine your images, bringing out the best in certain scenarios. AI Noise Reduction has been a game-changer in improving the quality of low-light wedding shots, reducing noise without messing around with the detail.
The Enhance Details feature, on the other hand, helps me to achieve sharper, more defined images with just a click, particularly useful when dealing with intricate bridal gowns.
7.3. How To Use Stand-Alone AI Editing Software Like Aftershoot?
Beyond Lightroom, stand-alone AI editing software like Aftershoot has completely changed the way I approach my editing. Aftershoot’s AI-driven culling and editing features let me quickly sort through thousands of wedding photos, automatically picking out the best ones without needing to check each image myself. This has saved me a ton of time on culling, so I can focus more on the creative side of editing.
Here’s how I use Aftershoot in my workflow:
7.3.1. Culling With AI
First, I import all my photos into Aftershoot. The AI quickly analyzes and sorts through my gallery, selecting and grouping the images based on factors like sharpness, composition, and even facial expressions. It’s like having an extra pair of eyes that’s never tired. I can then go in and select the final images that I want to deliver.
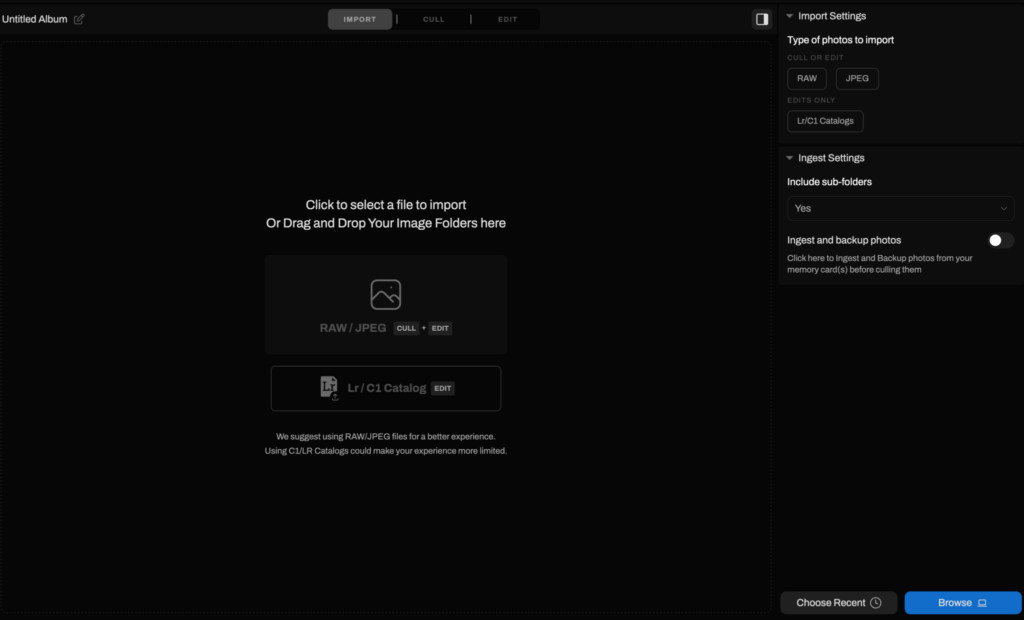 Import images on Aftershoot for AI-powered culling
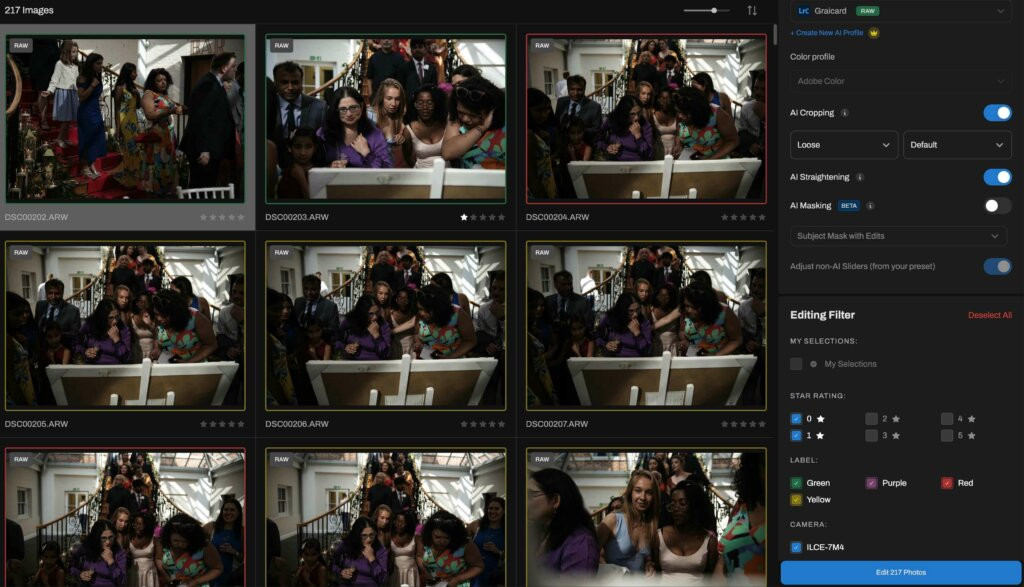
7.3.2. Select Images
Next, I select the images by using Star Ratings and Color Labels to choose the images I want to edit.
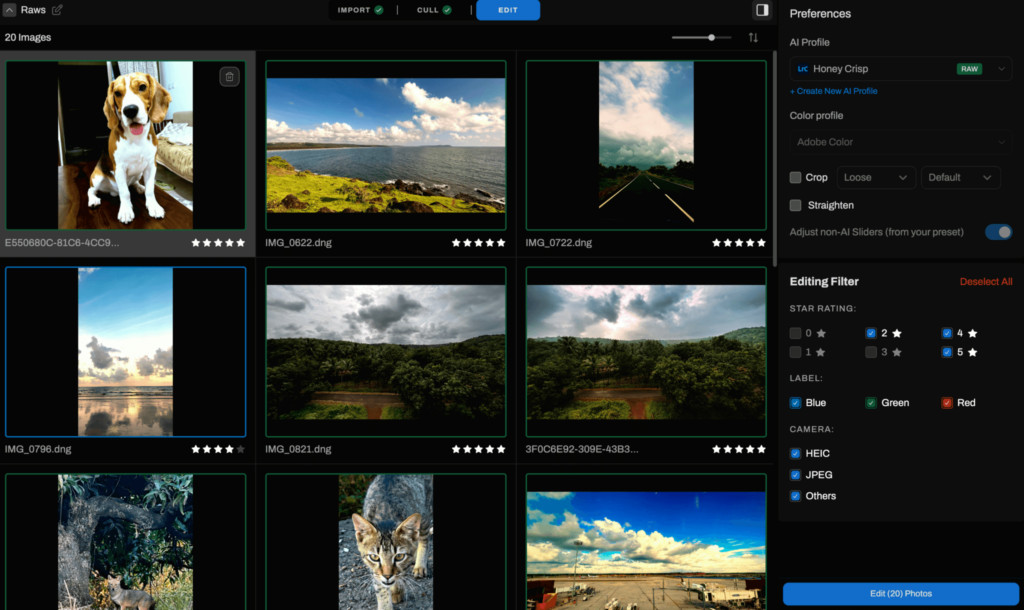 AI culling on Aftershoot to streamline image selection
7.3.3. AI-Driven Editing For Quick Adjustments
After culling, I let Aftershoot apply my editing style. The software has learned how I typically adjust my images, so it replicates those edits across the selected photos.
The image below shows the difference between an image edited completely by Aftershoot vs the original file.
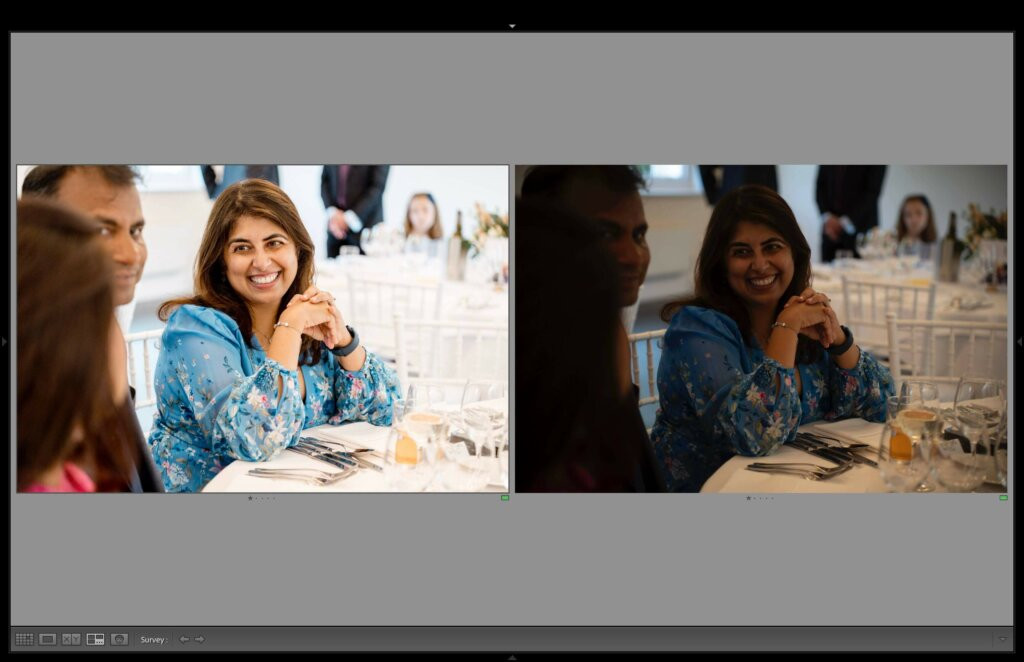 AI edited image straight out of Aftershoot with automatic style application
7.3.4. Final Tweaks In Lightroom
Once Aftershoot has worked its magic, I import the edited photos into Lightroom. Since Aftershoot has already applied my general style, I just need to make a few minor tweaks, like fine-tuning the color balance for something creative or different. With most of the heavy lifting done, these final adjustments are quick and easy, especially using my Tourbox for assistance.
This process has really streamlined my workflow. With Aftershoot handling a lot of the repetitive tasks, I can deliver consistent, high-quality results without spending endless hours in front of the screen.
7.4. How To Balance AI With Manual Editing For Best Results?
While AI tools offer incredible convenience, it’s crucial to balance their use with manual editing to maintain full creative control, and know what to fix when it doesn’t quite get things right. I view AI as a personal editing assistant, one that can handle repetitive and time-consuming tasks but still leaves artistic decisions in my hands.
By combining Aftershoot’s efficiency with my own adjustments, I ensure that every image reflects my unique style and meets my professional standards. AI can enhance your workflow, but it’s your creative vision that ultimately defines the final product.
 AI editing in Aftershoot balanced with manual tweaks for personalized style
8. How To Enhance Your Photo Editing Workflow With AI?
AI photo editing tools have become a game-changing tool for professional photographers, helping streamline workflows and enhance image quality. However, it’s important to remember that while these tools can save time and improve efficiency, they are most powerful when used in conjunction with your own creative insights.
I encourage you to explore how AI can complement your editing process, and if you’re looking to take your workflow to the next level, give Aftershoot a try. Like myself, It might just become your new favorite editing assistant.
9. FAQ: How To Edit Photos To Make Them Look Professional
Q1: What is the most important step in editing photos to make them look professional?
The most important step is to start with a high-quality image. Ensure your photos are well-composed, properly exposed, and sharply focused before you begin editing.
Q2: What are the key adjustments I should make in Lightroom to enhance my photos?
Focus on basic adjustments like exposure, contrast, highlights, shadows, whites, and blacks. These adjustments will help balance the tones and bring out the details in your images.
Q3: How can I improve the colors in my photos during editing?
Use the temperature, tint, vibrance, and saturation sliders to fine-tune the colors. The HSL panel allows you to adjust individual colors for more precise control.
Q4: Should I use presets or edit my photos manually?
Presets can be a great starting point to save time and achieve a consistent look, but it’s important to fine-tune them to suit each individual photo. Manual adjustments allow for more creative control and customization.
Q5: What is the role of AI in professional photo editing?
AI tools can automate repetitive tasks like culling and basic adjustments, saving time and improving efficiency. However, it’s important to balance AI with manual editing to maintain your unique style and creative vision.
Q6: How do I sharpen my photos without making them look artificial?
Use the detail panel in Lightroom to apply sharpening. Adjust the radius and detail sliders to control how sharpening is applied, and use the masking slider to protect areas that don’t need sharpening.
Q7: What is the best way to reduce noise in my photos?
Increase the luminance slider in the detail panel to reduce graininess in the image. Be careful not to overdo it, as it can also reduce detail.
Q8: How do I maintain consistency when editing a large batch of photos?
Use presets or copy and paste adjustments from one photo to another. Fine-tune each photo individually to ensure it looks its best while maintaining a consistent style.
Q9: What are some common mistakes to avoid when editing photos?
Avoid over-editing, using too much clarity, oversaturating colors, and neglecting basic adjustments. Always aim for a natural and balanced look.
Q10: What are the best resources for learning more about professional photo editing?
Websites like dfphoto.net offer tutorials, articles, and resources to help you improve your photo editing skills. Consider taking online courses or workshops to learn from experienced professionals.
Mastering the art of professional photo editing involves understanding key adjustments, leveraging AI tools, and maintaining your unique creative vision. Remember to balance AI with manual editing, avoid common mistakes, and continuously seek knowledge to refine your skills.
Ready to transform your photos into professional-grade masterpieces? Explore dfphoto.net for in-depth tutorials, expert tips, and a vibrant community of photographers. Discover the techniques, tools, and inspiration you need to elevate your photography and create stunning visual stories. Visit dfphoto.net today and unlock your full creative potential.
Address: 1600 St Michael’s Dr, Santa Fe, NM 87505, United States
Phone: +1 (505) 471-6001
Website: dfphoto.net