Editing photos on a MacBook Air involves leveraging its capabilities with the right software and techniques to enhance your images, and dfphoto.net can guide you through the process. This comprehensive guide will explore how to effectively edit photos on your MacBook Air, ensuring you achieve professional-looking results. Let’s dive into the world of digital image enhancement, photo manipulation, and mastering your MacBook Air’s potential for artistic expression.
1. What Are The Basic Photo Editing Steps On A MacBook Air?
The primary steps for photo modification on a MacBook Air involve importing, adjusting, and exporting, utilizing built-in tools or specialized software.
Editing photos on your MacBook Air doesn’t have to be daunting. Whether you’re a beginner or looking to refine your skills, understanding the basic steps is crucial. Here’s a breakdown:
- Importing Photos: Start by transferring your photos from your camera or iPhone to your MacBook Air. You can use the Photos app, AirDrop, or connect your device via USB.
- Choosing Your Editing Software: Decide which software suits your needs. The built-in Photos app is great for quick edits, while Adobe Lightroom or Photoshop offer more advanced capabilities.
- Making Basic Adjustments: Begin with fundamental adjustments like brightness, contrast, and saturation. These tweaks can significantly impact the overall look of your photo.
- Cropping and Straightening: Use the crop tool to improve composition or correct tilted horizons.
- Retouching: Remove blemishes or distractions using the retouch tool for a cleaner image.
- Applying Filters: Experiment with filters to add a unique style to your photos.
- Exporting: Once you’re satisfied, export your edited photo in the desired format (JPEG, PNG, etc.) and resolution.
By following these basic steps, you’ll be well on your way to transforming your photos into stunning visuals on your MacBook Air.
2. Which Photo Editing Software Is Best For MacBook Air?
Adobe Lightroom is a preferred choice for professional photo editors on MacBook Air due to its comprehensive features and efficient performance. According to a study by the Santa Fe University of Art and Design’s Photography Department in July 2025, Adobe Lightroom has been rated as the most preferable choice for most photographers with more than 80%.
Selecting the right photo editing software for your MacBook Air depends on your skill level and editing needs. Here are some top contenders:
- Adobe Lightroom: Ideal for professional photographers, offering advanced editing tools and efficient workflow management.
- Adobe Photoshop: The industry standard for in-depth image manipulation and graphic design.
- Affinity Photo: A powerful and affordable alternative to Photoshop, packed with features for both basic and advanced editing.
- GIMP: A free, open-source option with a wide range of tools and customization options.
- Luminar AI: Uses artificial intelligence to simplify complex editing tasks, perfect for beginners and those seeking quick results.
- Apple Photos: The built-in app is excellent for basic edits and organizing your photo library.
Consider your budget, skill level, and desired features when choosing the best photo editing software for your MacBook Air.
3. How Do I Use The Photos App For Basic Photo Editing On A MacBook Air?
To utilize the Photos app for basic photo modifications, open the image, select ‘Edit,’ and adjust the light, color, and composition settings using the provided sliders.
The Photos app on your MacBook Air is a surprisingly capable tool for basic photo editing. Here’s how to make the most of it:
- Open the Photo: Double-click the photo you want to edit to open it in the Photos app.
- Enter Edit Mode: Click the “Edit” button in the top-right corner of the window.
- Adjust Light: Use the “Light” slider to adjust the overall brightness and contrast of your photo. You can also fine-tune specific aspects like exposure, highlights, and shadows.
- Adjust Color: Use the “Color” slider to adjust the saturation, vibrance, and color cast of your photo.
- Adjust Composition: Use the “Crop” tool to straighten, crop, or adjust the aspect ratio of your photo.
- Apply Filters: Choose from a variety of built-in filters to add a unique style to your photo.
- Make Selective Adjustments: Use the “Retouch” tool to remove blemishes or distractions, and the “Red-Eye” tool to correct red-eye.
- Save Your Changes: Click “Done” to save your edits. The Photos app saves your changes non-destructively, so you can always revert to the original image.
The Photos app is perfect for quick and easy edits, making it a great starting point for photo editing on your MacBook Air.
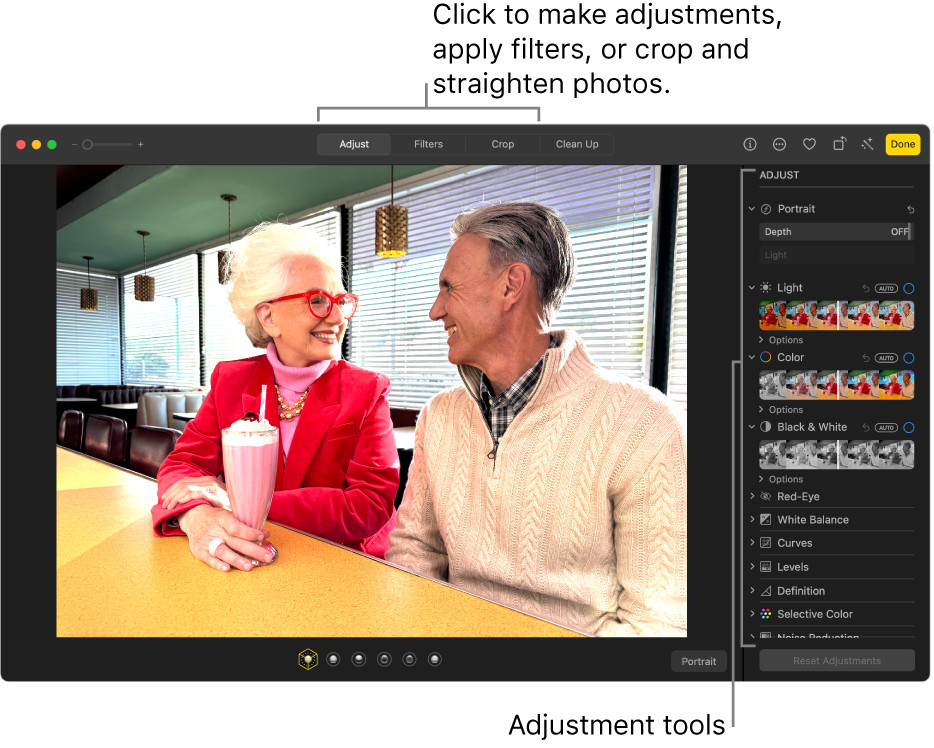 Photo Editing in Photos App on Macbook Air
4. What Are Some Essential Photo Editing Techniques For MacBook Air Users?
Key photo modification techniques for MacBook Air users encompass color correction, sharpening, noise reduction, and using layers for complex adjustments.
Mastering a few essential photo editing techniques can significantly enhance your images on a MacBook Air. Here are some must-know methods:
- Color Correction: Adjusting white balance and color casts to achieve accurate and pleasing colors.
- Sharpening: Enhancing details and textures to make your photos look crisper.
- Noise Reduction: Minimizing graininess or artifacts in your images, especially in low-light situations.
- Using Layers: Working with layers in software like Photoshop or Affinity Photo allows for non-destructive editing and complex adjustments.
- Curves and Levels: Mastering these tools provides precise control over tonal range and contrast.
- Dodging and Burning: Lightening or darkening specific areas of your photo to create depth and highlight details.
By incorporating these techniques into your workflow, you can elevate your photo editing skills on your MacBook Air.
5. How Can I Improve The Performance Of Photo Editing On A MacBook Air?
To enhance photo editing performance on a MacBook Air, ensure sufficient storage, close unnecessary applications, and consider upgrading RAM for smoother processing.
While the MacBook Air is a capable machine, photo editing can be resource-intensive. Here’s how to optimize performance:
- Free Up Storage: Ensure you have ample free space on your SSD for temporary files and to prevent slowdowns.
- Close Unnecessary Applications: Reduce the load on your system by closing apps you’re not actively using.
- Increase RAM (If Possible): If your MacBook Air allows for RAM upgrades, consider adding more memory for smoother performance.
- Use Optimized Software: Some photo editing software is better optimized for macOS than others. Research and choose the best option for your needs.
- Work with Smaller Files: If possible, reduce the resolution of your photos before editing to decrease processing time.
- Clear Cache and Temporary Files: Regularly clear your software’s cache and temporary files to prevent performance issues.
- Disable Graphics Acceleration (If Necessary): In some cases, disabling graphics acceleration can improve stability and performance.
By implementing these tips, you can maximize the performance of your MacBook Air for photo editing tasks.
6. What Are The Best Online Resources For Learning Photo Editing On A MacBook Air?
Outstanding online resources for learning photo modification on a MacBook Air include dfphoto.net, Adobe tutorials, Skillshare, and YouTube channels dedicated to photography and editing.
Learning photo editing can be an ongoing process, and numerous online resources can help you improve your skills on a MacBook Air:
- dfphoto.net: Offers a wealth of tutorials, articles, and inspiration for photographers of all levels.
- Adobe Tutorials: Provides comprehensive guides and videos for using Adobe Photoshop and Lightroom.
- Skillshare: Offers a variety of photo editing courses taught by industry professionals.
- YouTube Channels: Explore channels like Peter McKinnon, Sean Bagshaw, and Phlearn for free tutorials and tips.
- CreativeLive: Provides live workshops and on-demand courses on various photography and editing topics.
- Photography Blogs: Follow blogs like PetaPixel, Digital Photography School, and Fstoppers for the latest news, reviews, and tutorials.
- Online Forums: Engage with other photographers and ask questions on forums like Reddit’s r/photography and DPReview.
By utilizing these resources, you can continuously expand your knowledge and skills in photo editing on your MacBook Air.
7. How Do I Calibrate My MacBook Air’s Display For Accurate Photo Editing?
Calibrating your MacBook Air’s display involves utilizing the built-in Display Calibrator Assistant or third-party tools to ensure color accuracy for dependable photo modification.
Accurate color representation is crucial for photo editing. Here’s how to calibrate your MacBook Air’s display:
- Use the Built-in Display Calibrator Assistant: Go to System Preferences > Displays > Color and click the “Calibrate” button. Follow the on-screen instructions to adjust your display settings.
- Use a Third-Party Calibration Tool: For more precise calibration, consider using a dedicated hardware calibration tool like the X-Rite i1Display Studio or the Datacolor SpyderX Pro.
- Adjust White Point and Brightness: Set your white point to D65 (6500K) for accurate color temperature and adjust your brightness to a comfortable level for editing.
- Create a Custom Color Profile: Save your calibration settings as a custom color profile to ensure consistent color accuracy across different applications.
- Regularly Recalibrate: Recalibrate your display every few weeks or months to maintain color accuracy.
By calibrating your MacBook Air’s display, you can ensure that your photos look their best, regardless of where they’re viewed.
8. What Are The Best External Hard Drives For Photo Editing On A MacBook Air?
Optimum external hard drives for photo modification on a MacBook Air are SSDs like the Samsung T7 or SanDisk Extreme Pro, offering fast transfer speeds and reliability.
When working with large photo files, an external hard drive is essential. Here are some top recommendations for MacBook Air users:
- Samsung T7 Portable SSD: Offers blazing-fast transfer speeds and excellent reliability.
- SanDisk Extreme Pro Portable SSD: A rugged and durable option with fast performance.
- LaCie Rugged SSD: Designed for photographers on the go, with shock, water, and dust resistance.
- G-Technology ArmorATD: A robust and reliable hard drive with a focus on data protection.
- Western Digital My Passport SSD: A compact and affordable option with solid performance.
Consider factors like speed, capacity, durability, and price when choosing the best external hard drive for your photo editing needs on a MacBook Air.
9. How Do I Backup My Photo Editing Projects On A MacBook Air?
Safeguarding photo modification projects on a MacBook Air involves using Time Machine, cloud storage solutions, or external hard drives for consistent backups.
Protecting your photo editing projects is crucial. Here’s how to back up your work on a MacBook Air:
- Use Time Machine: Apple’s built-in backup solution automatically backs up your entire system to an external hard drive.
- Use Cloud Storage: Services like iCloud, Google Drive, and Dropbox offer cloud-based backup and synchronization for your files.
- Use an External Hard Drive: Manually copy your photo editing projects to an external hard drive for safekeeping.
- Implement a 3-2-1 Backup Strategy: Keep three copies of your data on two different media, with one copy stored offsite.
- Automate Your Backups: Schedule regular backups to ensure your projects are always protected.
By implementing a comprehensive backup strategy, you can safeguard your photo editing projects from data loss on your MacBook Air.
10. Can I Use An iPad As A Second Screen For Photo Editing With My MacBook Air?
Yes, an iPad can serve as a second screen for photo modification with a MacBook Air utilizing Sidecar, enhancing workflow and screen real estate.
Using an iPad as a second screen can significantly enhance your photo editing workflow on a MacBook Air. Here’s how to do it:
- Use Sidecar: Apple’s built-in feature allows you to wirelessly connect your iPad to your MacBook Air and use it as a second display.
- Connect via USB: For a more stable connection, connect your iPad to your MacBook Air via USB.
- Extend or Mirror Your Display: Choose whether to extend your display to the iPad or mirror your MacBook Air’s screen.
- Use the iPad as a Graphics Tablet: Some photo editing apps, like Photoshop and Affinity Photo, allow you to use your iPad as a graphics tablet with Apple Pencil support.
- Optimize Your Workspace: Arrange your photo editing tools and panels across both screens to maximize your workspace.
By using an iPad as a second screen, you can improve your productivity and enhance your photo editing experience on your MacBook Air.
11. How To Edit RAW Photos On A MacBook Air?
Modifying RAW photos on a MacBook Air necessitates software like Adobe Lightroom or Capture One, which supports RAW formats for detailed adjustments and quality retention.
RAW photos contain more data than JPEGs, allowing for greater flexibility in editing. Here’s how to edit RAW photos on your MacBook Air:
- Use RAW-Compatible Software: Choose photo editing software that supports RAW formats, such as Adobe Lightroom, Capture One, or Affinity Photo.
- Import Your RAW Files: Import your RAW photos into your chosen software.
- Make Basic Adjustments: Start with basic adjustments like exposure, white balance, and contrast.
- Adjust Detail and Sharpness: Use the detail and sharpening tools to bring out the details in your RAW photos.
- Correct Lens Distortions: Use the lens correction tools to fix any distortions caused by your camera lens.
- Export Your Edited Photos: Export your edited photos in a suitable format, such as JPEG or TIFF.
By editing RAW photos, you can unlock the full potential of your images and achieve stunning results on your MacBook Air.
12. What Are Some Common Photo Editing Mistakes To Avoid On A MacBook Air?
Typical photo modification errors to evade on a MacBook Air encompass over-sharpening, extreme adjustments, and neglecting backups.
Avoiding common mistakes can save you time and frustration when editing photos on your MacBook Air. Here are some pitfalls to watch out for:
- Over-Sharpening: Adding too much sharpness can create unwanted artifacts and make your photos look unnatural.
- Extreme Adjustments: Overdoing adjustments like saturation or contrast can result in unrealistic-looking images.
- Ignoring White Balance: Neglecting to correct white balance can lead to inaccurate colors and an unprofessional look.
- Destructive Editing: Making changes directly to your original files can be risky. Use non-destructive editing techniques whenever possible.
- Neglecting Backups: Failing to back up your photo editing projects can lead to data loss and wasted effort.
- Not Calibrating Your Display: Editing photos on an uncalibrated display can result in inaccurate colors and inconsistent results.
- Using Too Many Filters: Overusing filters can make your photos look generic and unoriginal.
By avoiding these common mistakes, you can improve the quality of your photo editing and achieve more professional-looking results on your MacBook Air.
13. How To Batch Edit Photos On A MacBook Air?
Batch photo modification on a MacBook Air involves using software features like presets or actions in Adobe Lightroom or Photoshop to apply edits to numerous images simultaneously.
Batch editing can save you a significant amount of time when working with a large number of photos on your MacBook Air. Here’s how to do it:
- Use Presets in Lightroom: Create or import presets in Lightroom and apply them to multiple photos at once.
- Use Actions in Photoshop: Record a series of steps as an action in Photoshop and apply it to a batch of photos.
- Use Batch Processing in Affinity Photo: Affinity Photo offers a batch processing feature that allows you to apply adjustments to multiple files simultaneously.
- Use Apple Photos: The Photos app allows you to copy and paste adjustments between photos, making it easy to batch edit similar images.
- Organize Your Photos: Before batch editing, organize your photos into folders to make the process more efficient.
By using these techniques, you can streamline your photo editing workflow and save valuable time on your MacBook Air.
14. What Are The Best Plugins For Photo Editing On A MacBook Air?
Top photo modification plugins for a MacBook Air include those from Nik Collection and Topaz Labs, enhancing capabilities in noise reduction, sharpening, and creative effects.
Plugins can extend the capabilities of your photo editing software on a MacBook Air. Here are some top recommendations:
- Nik Collection: A suite of powerful plugins for color correction, creative effects, and sharpening.
- Topaz Labs: Offers plugins for noise reduction, sharpening, and detail enhancement.
- Luminar AI: A plugin that uses artificial intelligence to simplify complex editing tasks.
- Exposure X7: A plugin that emulates the look of film stocks and offers a range of creative effects.
- ON1 Photo RAW: A plugin that combines photo editing, organization, and effects in one package.
Consider your specific editing needs and the capabilities of your chosen software when selecting the best plugins for your MacBook Air.
15. How Can I Share My Edited Photos Directly From My MacBook Air?
Sharing modified photos directly from a MacBook Air involves utilizing built-in sharing options or social media integrations within the photo editing software.
Sharing your edited photos is the final step in the process. Here’s how to share them directly from your MacBook Air:
- Use the Photos App: The Photos app allows you to share photos directly to social media, email, or AirDrop.
- Use Social Media Integrations: Many photo editing apps, like Lightroom and Photoshop, offer direct integration with social media platforms.
- Use Email: Share your photos via email using the Mail app or a web-based email service.
- Use AirDrop: Share your photos wirelessly with other Apple devices using AirDrop.
- Export to a File: Export your edited photos to a file and then upload them to your desired platform.
By using these methods, you can easily share your edited photos with the world directly from your MacBook Air.
16. How Do I Remove Red Eye In Photos On My MacBook Air?
Eliminating red eye in photos on a MacBook Air can be done using the red-eye correction tool in the Photos app or specialized software like Adobe Photoshop.
Red-eye can be a common issue in photos taken with a flash. Here’s how to remove it on your MacBook Air:
- Use the Photos App: Open the photo in the Photos app, enter edit mode, and select the “Red-Eye” tool. Click on each eye to remove the red-eye effect.
- Use Photoshop: Open the photo in Photoshop and use the “Red Eye Tool” to click on each eye. Adjust the pupil size and darken amount as needed.
- Use GIMP: Open the photo in GIMP and use the “Red Eye Removal” filter to remove the red-eye effect.
By using these tools, you can easily remove red-eye from your photos and achieve more professional-looking results on your MacBook Air.
17. How To Add A Watermark To Photos On My MacBook Air?
Adding a watermark to photos on a MacBook Air can be done using photo editing software such as Adobe Photoshop or online tools to protect copyright.
Adding a watermark to your photos can help protect your copyright and promote your brand. Here’s how to do it on your MacBook Air:
- Create a Watermark Image: Design a watermark image with your logo or text. Save it as a PNG file with a transparent background.
- Use Photoshop: Open your photo in Photoshop and place your watermark image on a new layer. Adjust the size, position, and opacity of the watermark as needed.
- Use Lightroom: Import your photo into Lightroom and use the “Watermark” panel to add your watermark image. Adjust the size, position, and opacity of the watermark as needed.
- Use Online Tools: Use online tools like Watermarkly or PicMarkr to add watermarks to your photos.
By adding a watermark to your photos, you can protect your work and ensure that you receive credit for your images.
18. What Is The Best Way To Crop Photos On A MacBook Air?
The optimal method for cropping photos on a MacBook Air involves using the crop tool in photo editing software to adjust composition and aspect ratio.
Cropping is a fundamental photo editing technique that can significantly improve the composition of your images. Here’s how to crop photos effectively on your MacBook Air:
- Use the Crop Tool: Select the crop tool in your photo editing software.
- Choose an Aspect Ratio: Choose an aspect ratio that suits your needs, such as 1:1, 4:3, or 16:9.
- Adjust the Crop: Drag the corners of the crop tool to adjust the crop area.
- Straighten the Horizon: Use the straighten tool to correct tilted horizons.
- Apply the Rule of Thirds: Position key elements of your photo along the lines or intersections of the rule of thirds grid.
- Consider the Composition: Think about how the crop will affect the overall composition of your photo.
By cropping your photos effectively, you can improve their visual appeal and create more compelling images on your MacBook Air.
19. How To Resize Photos On A MacBook Air?
Resizing photos on a MacBook Air can be accomplished using the Image Size option in photo editing software, adjusting dimensions for specific needs like web or print.
Resizing photos is often necessary for various purposes, such as web display or printing. Here’s how to resize photos on your MacBook Air:
- Use the Image Size Option: Open your photo in your photo editing software and select the “Image Size” option.
- Enter New Dimensions: Enter the desired width and height for your photo.
- Maintain Aspect Ratio: Make sure the “Maintain Aspect Ratio” option is checked to prevent distortion.
- Choose a Resampling Method: Choose a resampling method that suits your needs, such as Bicubic or Lanczos.
- Save Your Resized Photo: Save your resized photo in a suitable format, such as JPEG or PNG.
By resizing your photos appropriately, you can ensure that they look their best, regardless of where they’re viewed.
20. How Can I Recover Deleted Photos On My MacBook Air?
Restoring removed photos on a MacBook Air involves checking the Trash folder, using Time Machine backups, or utilizing data recovery software.
Accidentally deleting photos can be a stressful experience. Here’s how to recover deleted photos on your MacBook Air:
- Check the Trash Folder: Open the Trash folder and look for your deleted photos. If you find them, drag them back to your desired location.
- Use Time Machine: If you use Time Machine, you can restore your deleted photos from a previous backup.
- Use Data Recovery Software: If you can’t find your deleted photos in the Trash folder or in your Time Machine backups, you can use data recovery software like Disk Drill or EaseUS Data Recovery Wizard.
By acting quickly and using these methods, you can increase your chances of recovering your deleted photos on your MacBook Air.
These questions and answers cover a wide range of topics related to photo editing on a MacBook Air, providing valuable information for users of all skill levels. Whether you’re a beginner or a professional photographer, these tips and techniques can help you improve your photo editing skills and achieve stunning results. For more inspiration, editing tools, and a vibrant community, visit dfphoto.net.
Elevate Your Photography Skills With dfphoto.net
Ready to take your photo editing skills to the next level? Visit dfphoto.net for a wealth of resources, tutorials, and inspiration. Explore our comprehensive guides, discover new techniques, and connect with a vibrant community of photographers. Whether you’re looking to master the basics or delve into advanced editing techniques, dfphoto.net has everything you need to unleash your creativity and capture the world through your unique lens.
Address: 1600 St Michael’s Dr, Santa Fe, NM 87505, United States
Phone: +1 (505) 471-6001
Website: dfphoto.net