Are you looking for ways How To Edit Photos On Mac Air effectively? At dfphoto.net, we’ve compiled a comprehensive guide to help you master photo editing on your Mac Air, from basic adjustments to advanced techniques, enhancing your visual storytelling and artistic expression. Our guide offers insights into using built-in tools and third-party software to achieve stunning results, making your photos stand out with professional-level quality. Explore advanced photo editing skills, digital image manipulation, and visual content creation.
1. What Are The Basic Photo Editing Steps On A Mac Air?
Basic photo editing on a Mac Air involves simple adjustments to improve the overall look of your images. Start by opening your photo in the Photos app, then click ‘Edit.’ Adjust the light, color, and sharpness using the provided sliders. Crop or rotate the image to improve its composition. These fundamental edits can significantly enhance your photo’s quality.
The Photos app on Mac Air offers a user-friendly interface for these tasks. You can fine-tune the exposure, contrast, highlights, and shadows to achieve the desired lighting. Color adjustments include saturation, vibrance, and white balance, allowing you to correct color casts or enhance specific hues. Sharpening can make your image appear more detailed, but be careful not to overdo it, as it can introduce artifacts.
Cropping and rotating are essential for refining the composition. Cropping can remove distracting elements and focus attention on the subject, while rotating can fix tilted horizons or create interesting perspectives. Experiment with different aspect ratios to find the most pleasing composition.
- Exposure: Adjusting the overall brightness of the image.
- Contrast: Modifying the difference between the darkest and brightest areas.
- Highlights: Tuning the brightness of the lightest parts of the image.
- Shadows: Tuning the brightness of the darkest parts of the image.
- Saturation: Adjusting the intensity of the colors.
- Vibrance: Enhancing muted colors while protecting already saturated ones.
- White Balance: Correcting color casts to make colors appear more accurate.
- Sharpen: Enhancing the clarity and detail of the image.
- Crop: Removing unwanted areas from the edge of the image.
- Rotate: Changing the orientation of the image.
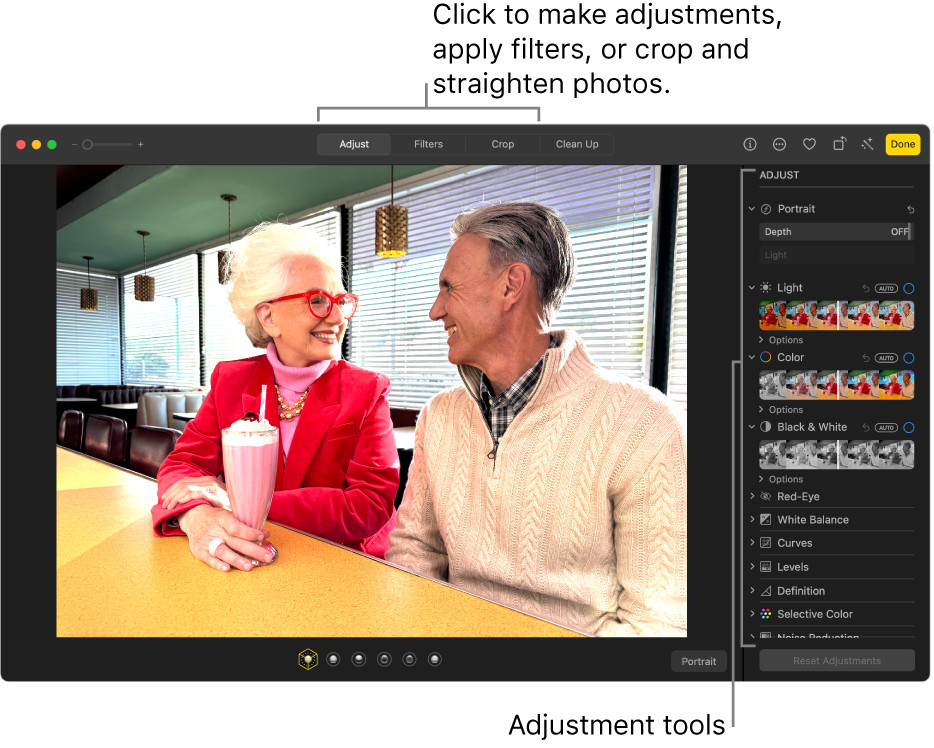 Photo editing interface on a Mac Air, showcasing basic adjustment sliders
2. Which Built-In Tools Can I Use To Edit Photos On My Mac Air?
Mac Air offers several built-in tools for photo editing, primarily through the Photos app. Key features include:
- Adjustments: Fine-tune exposure, contrast, highlights, shadows, saturation, and more.
- Filters: Apply pre-set styles to quickly change the look and feel of your photos.
- Crop and Rotate: Adjust the framing and orientation of your images.
- Retouch: Remove blemishes and imperfections.
- Red-Eye Correction: Eliminate red-eye caused by flash photography.
These tools provide a solid foundation for basic to intermediate photo editing.
The Adjustments tool is particularly versatile, allowing for precise control over various aspects of your image. Experiment with each slider to understand its effect and how it can improve your photo.
Filters can be a quick way to achieve a specific look, but it’s often better to make manual adjustments for more control. Use filters as a starting point and then fine-tune the settings to your liking.
The Crop and Rotate tools are essential for perfecting the composition. Use the crop tool to remove distracting elements or change the aspect ratio, and use the rotate tool to straighten horizons or create dynamic angles.
The Retouch tool is useful for removing small blemishes or distractions. Zoom in close to the area you’re working on and use a small brush size for the best results.
Red-Eye Correction is a simple but effective tool for fixing red-eye caused by flash photography. Simply click on the red eyes, and the tool will automatically correct them.
- Pros:
- Easy to use interface.
- Sufficient for basic editing needs.
- No additional cost.
- Cons:
- Limited advanced features.
- Fewer options compared to dedicated photo editing software.
3. How Do I Crop And Rotate Photos On Mac Air?
To crop and rotate photos on your Mac Air:
- Open the photo in the Photos app.
- Click ‘Edit’ in the toolbar.
- Select the ‘Crop’ tool.
- Adjust the crop area by dragging the corners of the selection box. You can also choose a pre-set aspect ratio from the options above.
- To rotate the photo, use the ‘Rotate’ button or the ‘Straighten’ slider.
- Click ‘Done’ to save your changes.
Cropping is a fundamental technique for improving composition. By removing unnecessary elements, you can draw the viewer’s eye to the main subject. Experiment with different aspect ratios to find the most visually appealing composition. Common aspect ratios include 1:1 (square), 4:3, 3:2, and 16:9.
Rotating is useful for correcting tilted horizons or creating more dynamic compositions. Use the Straighten slider to make fine adjustments or the Rotate button to rotate the image in 90-degree increments.
- Composition: The arrangement of elements within a photograph.
- Aspect Ratio: The ratio of the width to the height of an image.
- Straighten: To correct the angle of an image so that horizontal lines are level.
4. Can I Adjust The Exposure And Color In Photos On Mac Air?
Yes, you can easily adjust the exposure and color in photos on your Mac Air using the Photos app. In edit mode, the ‘Adjust’ panel offers sliders for:
- Exposure: Controls the overall brightness of the image.
- Contrast: Adjusts the difference between the light and dark areas.
- Highlights: Affects the brightest parts of the image.
- Shadows: Affects the darkest parts of the image.
- Brightness: Similar to exposure but affects the midtones more.
- Black Point: Sets the darkest point in the image.
- Saturation: Controls the intensity of the colors.
- Vibrance: Enhances muted colors without over-saturating the already vibrant ones.
- White Balance: Corrects color casts to make colors appear more accurate.
- Cast: Allows you to fine-tune the overall color tone.
These adjustments can significantly improve the look and feel of your photos.
Experiment with each slider to understand its effect. Start with Exposure and Contrast to get the overall brightness and tonal range right. Then, use Highlights and Shadows to fine-tune the details in the lightest and darkest areas.
Color adjustments are equally important. Saturation and Vibrance can make your colors pop, but be careful not to overdo it, as it can make the image look artificial. White Balance is crucial for correcting color casts and ensuring that colors appear accurate.
- Tonal Range: The range of tones from the darkest to the brightest in an image.
- Color Cast: An unwanted color tint that affects the overall color balance.
- Color Balance: The accuracy and harmony of colors in an image.
5. How To Remove Blemishes And Red-Eye From Photos On Mac Air?
The Photos app on Mac Air includes tools to remove blemishes and red-eye:
- Retouch Tool: This tool is used to remove blemishes and other small imperfections. Simply click or drag over the area you want to correct.
- Red-Eye Correction Tool: This tool is specifically designed to remove red-eye caused by flash photography. Click on each red eye to correct it.
These tools are simple to use but can greatly improve the appearance of your photos.
When using the Retouch tool, zoom in close to the area you’re working on and use a small brush size for the best results. Adjust the size of the brush to match the size of the blemish you’re trying to remove.
The Red-Eye Correction tool is very straightforward. Simply click on the red eyes, and the tool will automatically correct them. If the tool doesn’t work perfectly, you can try adjusting the pupil size and strength settings.
- Brush Size: The diameter of the area affected by a tool.
- Pupil Size: The size of the pupil in the eye.
- Strength: The intensity of the effect applied by a tool.
6. What Are Some Third-Party Photo Editing Apps For Mac Air?
While the built-in Photos app is useful for basic editing, third-party apps offer more advanced features and capabilities. Popular options include:
- Adobe Photoshop: The industry-standard for professional photo editing.
- Adobe Lightroom: A powerful tool for organizing, editing, and sharing photos.
- Affinity Photo: A full-featured photo editor that rivals Photoshop.
- GIMP (GNU Image Manipulation Program): A free, open-source alternative to Photoshop.
- Pixelmator Pro: A user-friendly photo editor with a wide range of features.
These apps offer a variety of tools and features that go beyond the capabilities of the Photos app.
Adobe Photoshop is the most powerful and versatile photo editor available, but it also has a steep learning curve. It’s best suited for professionals and serious enthusiasts who need the most advanced features.
Adobe Lightroom is a great choice for photographers who need to organize and edit large numbers of photos. It offers powerful editing tools and a streamlined workflow.
Affinity Photo is a full-featured photo editor that rivals Photoshop in terms of features and capabilities, but it’s available at a lower price.
GIMP is a free, open-source alternative to Photoshop. It’s a powerful tool with a wide range of features, but it can be more difficult to learn than some other options.
Pixelmator Pro is a user-friendly photo editor with a wide range of features. It’s a good choice for users who want a powerful editor that’s easy to learn and use.
| App | Price | Key Features |
|---|---|---|
| Adobe Photoshop | Subscription | Advanced editing, layers, masking, retouching, filters |
| Adobe Lightroom | Subscription | Photo organization, non-destructive editing, RAW processing, presets |
| Affinity Photo | One-time | Full-featured editing, layers, masking, RAW processing |
| GIMP | Free | Open-source editing, layers, masking, scripting |
| Pixelmator Pro | One-time | User-friendly interface, non-destructive editing, machine learning-enhanced tools |
7. How Do I Use Adobe Photoshop On My Mac Air?
Adobe Photoshop is a powerful tool for photo editing on Mac Air. Here’s a basic overview:
- Open an Image: Go to File > Open and select your image.
- Layers: Photoshop uses layers to organize edits. The Layers panel is usually on the right side of the screen.
- Tools: The Tools panel on the left contains various tools for selection, painting, retouching, and more.
- Adjustments: Use the Adjustments panel (Window > Adjustments) to modify exposure, color, and tone.
- Filters: Apply filters from the Filter menu for special effects.
- Save Your Work: Go to File > Save As and choose a format like JPEG or PSD (for layered files).
Photoshop’s interface can be overwhelming at first, but it becomes more manageable with practice. Start by familiarizing yourself with the basic tools and panels.
Layers are a fundamental concept in Photoshop. Each layer is like a transparent sheet that you can edit independently. This allows you to make changes without affecting other parts of the image.
Adjustments are non-destructive, meaning they don’t permanently alter the original image data. This allows you to experiment with different settings and undo changes if needed.
Filters can be used to create a variety of special effects, but it’s important to use them sparingly and with purpose. Overusing filters can make an image look artificial and unprofessional.
- Layers: Transparent sheets that can be edited independently.
- Non-Destructive Editing: Editing that doesn’t permanently alter the original image data.
- Filters: Special effects that can be applied to an image.
8. What Is The Best Way To Sharpen Photos On Mac Air?
Sharpening photos on Mac Air can enhance detail and clarity. Here’s how:
- In Photos App: Use the ‘Sharpen’ slider in the Adjust panel. Adjust it subtly to avoid over-sharpening.
- In Photoshop: Use the ‘Unsharp Mask’ filter (Filter > Sharpen > Unsharp Mask). Adjust the Amount, Radius, and Threshold settings for optimal results.
- In Lightroom: Use the ‘Sharpening’ panel in the Develop module. Adjust the Amount, Radius, Detail, and Masking settings.
Over-sharpening can create unwanted artifacts and make the image look unnatural. It’s important to sharpen subtly and carefully.
The Unsharp Mask filter in Photoshop is a powerful tool for sharpening, but it can be tricky to use. The Amount setting controls the intensity of the sharpening, the Radius setting controls the size of the area that is sharpened, and the Threshold setting controls the minimum amount of contrast that is required for sharpening to occur.
The Sharpening panel in Lightroom offers similar controls to the Unsharp Mask filter in Photoshop, but it also includes a Masking setting that allows you to selectively sharpen different parts of the image. This can be useful for sharpening details while avoiding sharpening noise in areas like skies.
- Unsharp Mask: A sharpening filter that works by increasing contrast along edges.
- Amount: The intensity of the sharpening effect.
- Radius: The size of the area that is sharpened.
- Threshold: The minimum amount of contrast required for sharpening to occur.
- Masking: Selectively applying sharpening to different parts of the image.
9. How Can I Correct The White Balance In Photos On My Mac Air?
Correcting the white balance in photos on your Mac Air ensures accurate colors.
- In Photos App: Use the ‘White Balance’ slider in the Adjust panel. Choose ‘Auto’ for automatic correction or adjust manually.
- In Photoshop: Use the ‘Color Balance’ adjustment layer (Layer > New Adjustment Layer > Color Balance). Adjust the sliders for shadows, midtones, and highlights.
- In Lightroom: Use the ‘White Balance’ selector in the Develop module. Choose a preset or adjust the Temperature and Tint sliders.
White balance refers to the color temperature of a light source. Incorrect white balance can cause colors to appear too warm (yellowish) or too cool (bluish).
The Auto White Balance setting in the Photos app can often correct white balance issues automatically, but it’s not always perfect. Manual adjustments may be necessary to achieve the desired result.
The Color Balance adjustment layer in Photoshop allows for precise control over the color balance in different tonal ranges. This can be useful for correcting complex white balance issues.
The White Balance selector in Lightroom allows you to click on a neutral area in the image to set the white balance. This can be a quick and easy way to correct white balance issues.
- Color Temperature: The warmth or coolness of a light source, measured in Kelvin.
- Auto White Balance: An automatic setting that attempts to correct white balance issues.
- Color Balance Adjustment Layer: A non-destructive way to adjust the color balance in Photoshop.
- White Balance Selector: A tool that allows you to click on a neutral area in the image to set the white balance.
10. How To Use Layers For Photo Editing On Mac Air With Photoshop?
Layers are essential for advanced photo editing in Photoshop on Mac Air. Here’s how to use them:
- Create a New Layer: Go to Layer > New > Layer.
- Layer Order: Drag layers in the Layers panel to change their order. Layers at the top appear in front of layers below.
- Layer Opacity: Adjust the opacity of a layer to make it more or less transparent.
- Blending Modes: Change the blending mode of a layer to affect how it interacts with the layers below.
- Masks: Use layer masks to selectively hide or reveal parts of a layer.
Layers allow you to make changes to specific parts of an image without affecting other parts. This is essential for complex edits.
Layer order is crucial. Layers at the top of the Layers panel appear in front of layers below, so the order in which you stack your layers can have a big impact on the final result.
Layer opacity controls how transparent a layer is. A layer with 100% opacity is completely opaque, while a layer with 0% opacity is completely transparent.
Blending modes control how a layer interacts with the layers below. There are many different blending modes to choose from, each with its own unique effect.
Layer masks allow you to selectively hide or reveal parts of a layer. This is a powerful tool for creating complex composites and effects.
- Layer Order: The order in which layers are stacked in the Layers panel.
- Layer Opacity: The transparency of a layer.
- Blending Modes: Settings that control how a layer interacts with the layers below.
- Layer Masks: Tools that allow you to selectively hide or reveal parts of a layer.
11. What Are Some Useful Keyboard Shortcuts For Photo Editing On Mac Air?
Keyboard shortcuts can speed up your photo editing workflow on Mac Air. Here are some useful ones:
- Command-Z: Undo
- Shift-Command-Z: Redo
- Command-C: Copy
- Command-V: Paste
- Command-S: Save
- Command-Plus (+): Zoom In
- Command-Minus (-): Zoom Out
- Spacebar: Temporarily switch to the Hand tool (for panning)
Learning these shortcuts can significantly improve your efficiency.
Undo and Redo are essential for experimenting with different edits and undoing mistakes.
Copy and Paste are useful for duplicating layers and applying the same edits to multiple layers.
Save is crucial for saving your work and preventing data loss.
Zoom In and Zoom Out are important for examining details and making precise edits.
The Spacebar shortcut allows you to quickly switch to the Hand tool, which is useful for panning around the image when zoomed in.
- Undo: To reverse the last action.
- Redo: To repeat the last undone action.
- Copy: To duplicate selected content.
- Paste: To insert copied content.
- Zoom In: To enlarge the view of an image.
- Zoom Out: To reduce the view of an image.
- Hand Tool: A tool used for panning around an image when zoomed in.
12. How Can I Reduce Noise In My Photos On Mac Air?
Reducing noise in photos on Mac Air improves image quality, especially in low-light situations.
- In Photos App: The Photos app does not have a dedicated noise reduction tool.
- In Photoshop: Use the ‘Reduce Noise’ filter (Filter > Noise > Reduce Noise). Adjust the Strength, Preserve Details, and Reduce Color Noise settings.
- In Lightroom: Use the ‘Noise Reduction’ panel in the Develop module. Adjust the Luminance and Color sliders.
Noise is most noticeable in shadows and areas with uniform color.
The Reduce Noise filter in Photoshop is a powerful tool for reducing noise, but it can also soften the image. It’s important to find a balance between reducing noise and preserving detail.
The Noise Reduction panel in Lightroom offers similar controls to the Reduce Noise filter in Photoshop, but it also includes a Detail slider that allows you to fine-tune the amount of detail that is preserved.
- Noise: Random variations in color or brightness that can degrade image quality.
- Strength: The intensity of the noise reduction effect.
- Preserve Details: A setting that controls how much detail is preserved during noise reduction.
- Luminance: The brightness of a color.
- Color Noise: Noise that appears as random variations in color.
13. How Do I Save Edited Photos On My Mac Air In The Correct Format?
Saving edited photos on your Mac Air in the correct format ensures quality and compatibility:
- JPEG: A common format for photos, offering good compression and compatibility.
- PNG: A lossless format that preserves image quality, ideal for graphics with text or transparency.
- TIFF: A lossless format often used for archival purposes and professional printing.
- PSD: Photoshop’s native format, preserving layers and editing information.
Choose the format that best suits your needs.
JPEG is a good choice for most photos, as it offers a good balance between image quality and file size. However, it’s a lossy format, meaning that it discards some image data during compression. This can result in a loss of quality if the image is saved repeatedly.
PNG is a lossless format, meaning that it preserves all of the image data. This makes it a good choice for graphics with text or transparency, as well as for images that will be edited repeatedly. However, PNG files are typically larger than JPEG files.
TIFF is another lossless format that is often used for archival purposes and professional printing. TIFF files are typically very large, but they offer the highest possible image quality.
PSD is Photoshop’s native format. It preserves all of the layers and editing information in the image, making it a good choice for saving your work in progress. However, PSD files can only be opened in Photoshop.
| Format | Compression | Quality | Compatibility | Use Cases |
|---|---|---|---|---|
| JPEG | Lossy | Good | High | Most photos, web images |
| PNG | Lossless | Excellent | High | Graphics with text or transparency, images that will be edited repeatedly |
| TIFF | Lossless | Excellent | Medium | Archival purposes, professional printing |
| PSD | Lossless | Excellent | Low | Saving work in progress in Photoshop |
14. How Can I Batch Edit Photos On My Mac Air?
Batch editing photos on your Mac Air saves time when processing multiple images with similar adjustments.
- In Photos App: Select multiple photos, then go to Image > Adjustments. Changes will apply to all selected photos.
- In Lightroom: Import photos, apply adjustments to one, then sync those settings to others.
- In Photoshop: Use Actions to record a series of steps, then apply them to a batch of photos.
Batch editing is ideal for correcting exposure, white balance, or applying a consistent style to a group of photos.
In the Photos app, batch editing is limited to basic adjustments. For more advanced batch editing, you’ll need to use Lightroom or Photoshop.
In Lightroom, you can sync adjustments between photos by selecting the photos you want to sync, then clicking the Sync button. You can choose which adjustments to sync, allowing you to apply different settings to different groups of photos.
In Photoshop, Actions allow you to record a series of steps and then apply them to a batch of photos. This is a powerful tool for automating complex editing tasks.
- Batch Editing: Applying the same adjustments to multiple photos at once.
- Sync: To copy settings from one photo to another.
- Actions: A series of steps that can be recorded and then applied to a batch of photos.
15. How To Create Presets For Photo Editing On Mac Air?
Creating presets for photo editing on Mac Air allows you to quickly apply consistent styles to your photos.
- In Lightroom: Adjust a photo, then click the “+” icon in the Presets panel to save the settings as a preset.
- In Photoshop: Create an Action, recording your editing steps. Save the Action as a preset.
Presets are useful for creating a signature style or applying consistent corrections to a series of photos.
In Lightroom, presets can be organized into folders for easy access. You can also import and export presets to share them with others.
In Photoshop, Actions can be more complex than Lightroom presets, allowing you to record a wider range of editing steps. However, they can also be more difficult to create and manage.
- Presets: Saved settings that can be applied to photos to quickly achieve a consistent look.
- Actions: A series of steps that can be recorded and then applied to a batch of photos in Photoshop.
16. How Do I Use The Healing Brush Tool In Photoshop On Mac Air?
The Healing Brush tool in Photoshop on Mac Air is used to remove blemishes and imperfections.
- Select the Healing Brush Tool: From the Tools panel.
- Set the Source: Alt-click (Option-click) on a clean area near the blemish to set the source point.
- Paint Over the Blemish: Click or drag over the blemish to replace it with the texture from the source point.
- Adjust Settings: Change the brush size, hardness, and blending mode in the Options bar for best results.
The Healing Brush tool blends the texture, lighting, transparency, and shading of the sampled pixels into the pixels being healed.
The key to using the Healing Brush tool effectively is to choose a source point that is close to the blemish and has similar texture and lighting.
Adjusting the brush size and hardness can also improve the results. A smaller brush size is better for small blemishes, while a larger brush size is better for larger areas. A softer brush hardness will create a more seamless blend.
- Healing Brush Tool: A tool used to remove blemishes and imperfections by blending texture and lighting.
- Source Point: The area from which the Healing Brush tool samples texture and lighting.
- Brush Size: The diameter of the area affected by the Healing Brush tool.
- Brush Hardness: The softness of the edge of the Healing Brush tool.
17. What Is Content-Aware Fill And How Do I Use It On Mac Air?
Content-Aware Fill in Photoshop on Mac Air intelligently fills selected areas with surrounding content.
- Select the Area: Use a selection tool (e.g., Lasso Tool) to select the area you want to fill.
- Go to Edit > Content-Aware Fill: Photoshop will analyze the surrounding area and fill the selection.
- Adjust Settings: In the Content-Aware Fill panel, refine the sampling area and blending options.
Content-Aware Fill is useful for removing unwanted objects or extending backgrounds.
The key to using Content-Aware Fill effectively is to make a precise selection and to choose a sampling area that is representative of the surrounding content.
The Content-Aware Fill panel allows you to refine the sampling area and blending options. You can also choose to have Photoshop automatically generate the fill or to manually select the sampling area.
- Content-Aware Fill: A feature that intelligently fills selected areas with surrounding content.
- Selection Tool: A tool used to select a specific area of an image.
- Sampling Area: The area from which Content-Aware Fill samples content.
- Blending Options: Settings that control how Content-Aware Fill blends the new content with the existing content.
18. How Can I Add Text To Photos On My Mac Air?
Adding text to photos on your Mac Air can enhance storytelling or branding.
- In Photos App: The Photos app does not have a text tool.
- In Photoshop: Select the Type Tool (T) and click on the image to add text.
- Adjust Text: Change the font, size, color, and style in the Options bar or Character panel.
Text can add context, convey messages, or create visual interest.
In Photoshop, you can add text to photos using the Type Tool. The Type Tool allows you to create point text (text that is entered directly onto the image) or paragraph text (text that is entered into a text box).
The Options bar and Character panel provide a wide range of options for customizing the appearance of your text. You can change the font, size, color, style, alignment, and more.
- Type Tool: A tool used to add text to an image.
- Point Text: Text that is entered directly onto the image.
- Paragraph Text: Text that is entered into a text box.
- Options Bar: A bar at the top of the Photoshop window that provides options for the currently selected tool.
- Character Panel: A panel that provides options for customizing the appearance of text.
19. What Are Some Tips For Improving Photo Composition On My Mac Air?
Improving photo composition on your Mac Air involves arranging elements in a visually appealing way. Consider these tips:
- Rule of Thirds: Divide the image into nine equal parts and place key elements along the lines or intersections.
- Leading Lines: Use lines to guide the viewer’s eye towards the subject.
- Symmetry and Patterns: Capture symmetrical scenes or repeating patterns for visual appeal.
- Framing: Use elements in the foreground to frame the subject.
- Depth of Field: Use a shallow depth of field to isolate the subject from the background.
Good composition can transform an ordinary photo into a captivating one.
The Rule of Thirds is a classic composition technique that involves dividing the image into nine equal parts and placing key elements along the lines or intersections. This can create a more balanced and visually appealing composition.
Leading lines can be used to guide the viewer’s eye towards the subject. Leading lines can be anything from roads and rivers to fences and walls.
Symmetry and patterns can create a sense of order and visual appeal. Look for symmetrical scenes or repeating patterns in your surroundings.
Framing involves using elements in the foreground to frame the subject. This can add depth and interest to the image.
Depth of field refers to the amount of the image that is in focus. A shallow depth of field can be used to isolate the subject from the background, while a deep depth of field can be used to keep everything in focus.
- Rule of Thirds: A composition technique that involves dividing the image into nine equal parts and placing key elements along the lines or intersections.
- Leading Lines: Lines that guide the viewer’s eye towards the subject.
- Symmetry: A sense of balance created by mirroring elements on either side of a central axis.
- Patterns: Repeating elements that create a sense of order and visual appeal.
- Framing: Using elements in the foreground to frame the subject.
- Depth of Field: The amount of the image that is in focus.
20. How To Edit RAW Photos On Mac Air?
Editing RAW photos on Mac Air offers greater flexibility and control compared to JPEGs.
- Use a RAW-Compatible App: Apps like Lightroom, Photoshop, and Affinity Photo are designed for RAW editing.
- Adjust Exposure and White Balance: Start by correcting these fundamental settings.
- Fine-Tune Details: Adjust highlights, shadows, contrast, and clarity.
- Apply Noise Reduction and Sharpening: These steps can enhance image quality.
RAW files contain unprocessed data from the camera sensor, allowing for more extensive adjustments.
RAW files are larger than JPEGs and require more processing power, but they offer a significant advantage in terms of image quality and editing flexibility.
When editing RAW files, it’s important to start by correcting the exposure and white balance. These settings are fundamental to the overall look of the image.
Once you’ve corrected the exposure and white balance, you can fine-tune the details by adjusting the highlights, shadows, contrast, and clarity.
Finally, you can apply noise reduction and sharpening to enhance the image quality.
- RAW Files: Unprocessed data from the camera sensor.
- Exposure: The overall brightness of an image.
- White Balance: The color temperature of a light source.
- Highlights: The brightest parts of an image.
- Shadows: The darkest parts of an image.
- Contrast: The difference between the light and dark areas of an image.
- Clarity: A setting that enhances detail and texture.
- Noise Reduction: A process that reduces random variations in color or brightness.
- Sharpening: A process that enhances detail and clarity.
21. How Do I Convert Photos To Black And White On Mac Air?
Converting photos to black and white on your Mac Air can create a dramatic effect.
- In Photos App: Use the ‘B&W’ filter in the Adjust panel.
- In Photoshop: Use the ‘Black & White’ adjustment layer (Layer > New Adjustment Layer > Black & White).
- In Lightroom: Use the ‘Black & White’ Mix panel in the Develop module.
A good black and white conversion preserves tonal range and detail.
In the Photos app, the B&W filter provides a simple way to convert a photo to black and white. However, it offers limited control over the conversion process.
The Black & White adjustment layer in Photoshop allows for more precise control over the conversion process. You can adjust the brightness of different color ranges to create a custom black and white look.
The Black & White Mix panel in Lightroom offers similar controls to the Black & White adjustment layer in Photoshop. You can adjust the luminance of different color ranges to create a custom black and white look.
- Black & White Conversion: The process of converting a color image to a black and white image.
- Tonal Range: The range of tones from the darkest to the brightest in an image.
- Luminance: The brightness of a color.
22. How To Create A Panorama On Mac Air?
Creating a panorama on Mac Air involves stitching together multiple photos to create a wide-angle image.
- Take Overlapping Photos: Capture a series of photos with slight overlap.
- In Photos App: Select the photos, then go to Image > Create Panorama.
- In Photoshop: Go to File > Automate > Photomerge.
A good panorama aligns and blends the photos seamlessly.
In the Photos app, the Create Panorama feature automatically stitches together the photos. However, it may not always produce the best results.
Photomerge in Photoshop offers more advanced options for creating panoramas. You can choose from different layout options and blending methods.
- Panorama: A wide-angle image created by stitching together multiple photos.
- Overlapping Photos: A series of photos that are taken with slight overlap.
- Photomerge: A feature in Photoshop that automatically stitches together multiple photos.
- Layout Options: Different ways of arranging the photos in a panorama.
- Blending Methods: Different ways of blending the photos together in a panorama.
23. What Are Some Common Photo Editing Mistakes To Avoid On Mac Air?
Avoiding common photo editing mistakes on your Mac Air ensures better results:
- Over-Sharpening: Can create unwanted artifacts.
- Over-Saturating Colors: Can make images look unnatural.
- Excessive Noise Reduction: Can soften details.
- Ignoring Composition: Can result in uninteresting photos.
- Not Saving in the Correct Format: Can lead to quality loss.
Subtlety and attention to detail are key to effective photo editing.
Over-sharpening can create unwanted artifacts, such as halos around edges. It’s important to sharpen subtly and carefully.
Over-saturating colors can make images look unnatural and garish. It’s important to use saturation sparingly and with purpose.
Excessive noise reduction can soften details and make images look blurry. It’s important to find a balance between reducing noise and preserving detail.
Ignoring composition can result in uninteresting and unappealing photos. It’s important to pay attention to composition and to use techniques such as the Rule of Thirds, leading lines, and framing to create visually appealing images.
Not saving in the correct format can lead to quality loss. It’s important to choose the format that best suits your needs.
- Over-Sharpening: Sharpening an image too much, resulting in unwanted artifacts.
- Over-Saturating Colors: Saturating the colors in an image too much, resulting in an unnatural look.
- Excessive Noise Reduction: Reducing noise too much, resulting in a loss of detail.
- Ignoring Composition: Not paying attention to the arrangement of elements in