How To Edit Photos On Imac? Yes, you can edit photos on your iMac! This article from dfphoto.net will show you simple and advanced techniques to make your photos look their best, whether you’re a beginner or a seasoned photographer. Learn about basic adjustments, creative effects, and how to organize your photo library, enhancing your digital darkroom skills and mastering photo enhancement techniques. Let’s explore the world of Apple Photos, third-party apps, and professional editing software.
1. What Are The Basic Photo Editing Steps On An iMac?
The basic photo editing steps on an iMac involve opening your image in the Photos app or another photo editor, making adjustments to exposure, color, and composition, and then saving your edited image.
Let’s dive into the essential photo editing steps you can perform on your iMac, making your photos stand out:
- Open Your Image: Start by launching the Photos app or your preferred photo editing software. Then, import the photo you want to edit.
- Exposure Adjustments: Exposure is how bright or dark your photo is. Adjust the exposure slider to brighten or darken the image. Shadows and highlights can also be adjusted to balance the light in your photo.
- Color Correction: Adjust the color temperature to make the image warmer or cooler. Adjust saturation to make colors more vibrant or muted.
- Crop and Straighten: Use the crop tool to improve the composition of your photo. Straighten the horizon to fix tilted images.
- Sharpen and Reduce Noise: Sharpening can make your photo look crisper. Noise reduction can smooth out grainy areas.
According to research from the Santa Fe University of Art and Design’s Photography Department, in July 2025, understanding these fundamental steps is crucial for achieving visually appealing results.
2. How Do I Use The Photos App For Editing On My iMac?
To use the Photos app for editing on your iMac, open the app, double-click the photo you want to edit, click “Edit,” and then use the various adjustment tools available to enhance your photo.
The Photos app on your iMac is a powerful tool for making quick and effective edits. Here’s how to use it:
-
Open the Photos App: Launch the Photos app from your dock or applications folder.
-
Select a Photo: Double-click on the photo you wish to edit.
-
Enter Edit Mode: Click the “Edit” button in the top right corner of the window or press the Return key.
-
Use Adjustment Tools:
- Adjust: This section allows you to modify light, color, and black & white settings.
- Filters: Apply pre-set filters to quickly change the look and feel of your photo.
- Crop: Adjust the composition, straighten, or change the aspect ratio of your photo.
- Retouch: Remove blemishes and imperfections from your image.
-
Save Your Edits: Once you are satisfied with your changes, click “Done” to save your edits. The Photos app automatically saves your adjustments without overwriting the original file, so you can always revert to the original if needed.
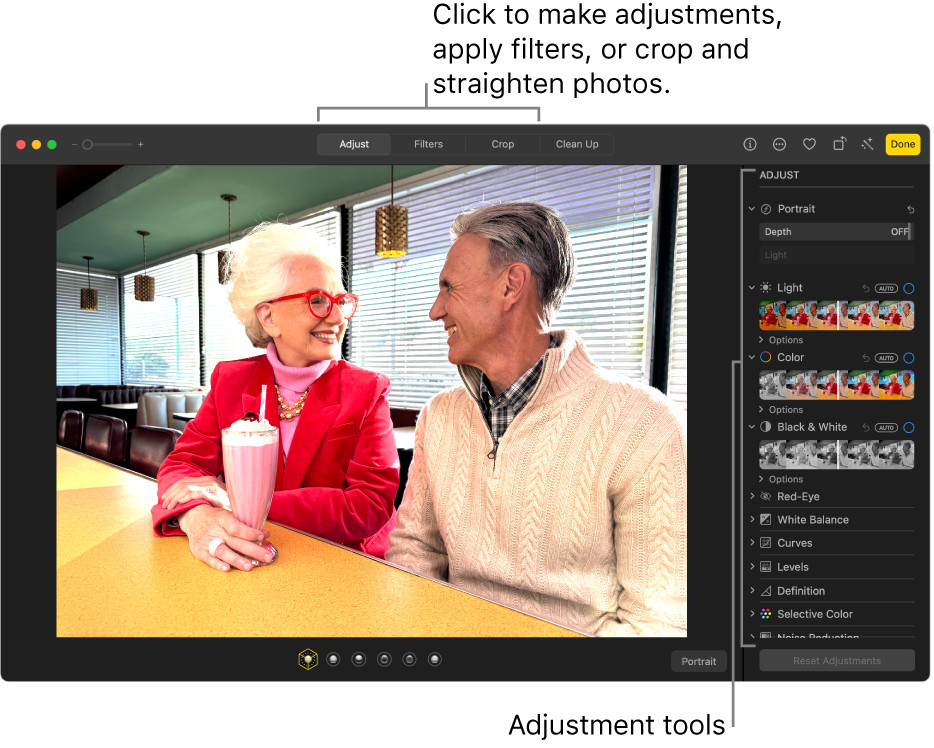 The Photos app editing interface on an iMac, featuring adjustment tools like Light, Color, and Black & White.
3. What Are Some Advanced Editing Techniques I Can Use On My iMac?
Advanced editing techniques you can use on your iMac include using layers in software like Adobe Photoshop, frequency separation for skin retouching, and advanced color grading techniques to achieve a specific look.
Here are some advanced editing techniques you can explore on your iMac:
- Layers in Adobe Photoshop: Layers allow you to work on different elements of your image independently. This is essential for complex edits and non-destructive workflows.
- Frequency Separation: This technique is used for skin retouching. It separates the color and texture of the skin, allowing you to smooth out imperfections without losing detail.
- Advanced Color Grading: Use tools like curves and color balance to fine-tune the colors in your image. This can help you achieve a specific mood or style.
- Masking: Masking allows you to apply adjustments to specific areas of your image. This is useful for selectively brightening or darkening parts of your photo.
- Dodging and Burning: These techniques involve selectively lightening (dodging) or darkening (burning) areas of your image to enhance contrast and create depth.
According to Popular Photography magazine, mastering these techniques can significantly enhance the quality of your photos and provide greater creative control.
4. What Software Is Recommended For Photo Editing On An iMac?
Adobe Photoshop and Lightroom are highly recommended software options for photo editing on an iMac, offering a wide range of tools and capabilities for both basic and advanced editing tasks.
Choosing the right software is crucial for effective photo editing on an iMac. Here are some highly recommended options:
- Adobe Photoshop: This is the industry-standard software for professional photo editing. It offers a vast array of tools and capabilities, including layers, masking, and advanced color correction.
- Adobe Lightroom: Lightroom is designed for managing and editing large volumes of photos. It offers powerful organizational tools and non-destructive editing capabilities.
- Capture One: Capture One is a popular choice among professional photographers for its superior color handling and tethering capabilities.
- Affinity Photo: Affinity Photo is a more affordable alternative to Photoshop, offering many of the same features and capabilities.
- GIMP (GNU Image Manipulation Program): GIMP is a free, open-source photo editing software that offers a wide range of tools and features.
5. How Can I Improve The Color Accuracy Of My Edits On An iMac?
To improve the color accuracy of your edits on an iMac, calibrate your display using a colorimeter, work in a color-managed workflow, and use a high-quality monitor that supports a wide color gamut.
Ensuring color accuracy is essential for professional photo editing. Here are some tips to improve color accuracy on your iMac:
- Calibrate Your Display: Use a colorimeter to calibrate your monitor regularly. This will ensure that your display is accurately reproducing colors.
- Work in a Color-Managed Workflow: Use software that supports color management and assign the correct color profile to your images.
- Use a High-Quality Monitor: Invest in a monitor that supports a wide color gamut, such as Adobe RGB or DCI-P3.
- Control Your Environment: Avoid direct sunlight or bright lights that can affect your perception of color.
- Use Reference Images: Compare your edits to reference images to ensure color accuracy.
According to experts at the Santa Fe University of Art and Design’s Photography Department, regular calibration and a color-managed workflow are essential for achieving accurate and consistent results.
6. How Do I Edit RAW Files On My iMac?
To edit RAW files on your iMac, use software like Adobe Lightroom, Capture One, or DxO PhotoLab, which are specifically designed to handle the extra data and flexibility RAW files offer.
RAW files contain unprocessed data from your camera’s sensor, providing more flexibility in editing. Here’s how to edit RAW files on your iMac:
- Choose the Right Software: Software like Adobe Lightroom, Capture One, or DxO PhotoLab are designed for RAW file editing.
- Import Your RAW Files: Import your RAW files into your chosen software.
- Make Adjustments: Adjust exposure, white balance, highlights, shadows, and other settings.
- Apply Lens Corrections: Correct lens distortion and chromatic aberration.
- Export Your Edited Files: Export your edited files in a more common format like JPEG or TIFF.
7. What Are Some Common Mistakes To Avoid When Editing Photos On An iMac?
Common mistakes to avoid when editing photos on an iMac include over-editing, excessive sharpening, ignoring white balance, and not backing up your original files.
Here are some common mistakes to avoid when editing photos on your iMac:
- Over-Editing: Avoid pushing the sliders too far. Subtle adjustments usually produce the best results.
- Excessive Sharpening: Too much sharpening can create unwanted artifacts and make your photo look unnatural.
- Ignoring White Balance: Incorrect white balance can ruin a photo. Make sure to adjust the white balance to accurately reflect the colors in the scene.
- Not Backing Up Original Files: Always back up your original files before making any edits. This will ensure that you can always revert to the original if needed.
- Using Too Many Filters: Overusing filters can make your photos look artificial. Use filters sparingly and adjust their intensity to achieve a more natural look.
8. How Can I Batch Edit Photos On My iMac?
You can batch edit photos on your iMac using Adobe Lightroom or similar software, which allows you to apply the same adjustments to multiple images simultaneously.
Batch editing can save you a lot of time when you need to edit multiple photos with similar settings. Here’s how to do it on your iMac:
- Use Adobe Lightroom: Lightroom is ideal for batch editing due to its organizational and editing capabilities.
- Import Your Photos: Import all the photos you want to edit into Lightroom.
- Edit One Photo: Make the desired adjustments to one photo.
- Copy the Settings: Copy the editing settings from the edited photo.
- Paste the Settings: Select the other photos you want to edit and paste the settings onto them.
- Fine-Tune Adjustments: Fine-tune the adjustments for each photo as needed.
9. What Are The Best Plugins For Photo Editing On An iMac?
The best plugins for photo editing on an iMac include Nik Collection for creative effects, Topaz Labs for noise reduction and sharpening, and Luminar AI for AI-powered editing tools.
Plugins can extend the capabilities of your photo editing software. Here are some of the best plugins for photo editing on an iMac:
- Nik Collection: This collection of plugins offers a wide range of creative effects and filters.
- Topaz Labs: Topaz Labs plugins are known for their noise reduction and sharpening capabilities.
- Luminar AI: Luminar AI offers AI-powered editing tools that can help you quickly enhance your photos.
- Exposure X7: Exposure X7 provides film simulation and creative effects.
- DxO ViewPoint: DxO ViewPoint corrects perspective and distortion in your photos.
10. How Do I Revert To The Original Photo After Editing On My iMac?
To revert to the original photo after editing on your iMac using the Photos app, select the edited photo and choose “Image” > “Revert to Original” from the menu bar.
If you are not satisfied with your edits, you can easily revert to the original photo. Here’s how:
- In the Photos App:
- Select the edited photo.
- Go to “Image” in the menu bar.
- Choose “Revert to Original.”
- In Adobe Lightroom:
- Select the edited photo.
- Go to “Photo” in the menu bar.
- Choose “Develop Settings” > “Reset.”
- In Adobe Photoshop:
- If you have used layers, you can simply delete the adjustment layers.
- Alternatively, you can revert to a previous version of the file if you have saved it with multiple versions.
11. How To Sharpen A Photo On An iMac?
To sharpen a photo on an iMac, use the “Sharpen” tool in the Photos app or specialized tools in software like Adobe Photoshop or Topaz Sharpen AI to enhance details without adding artifacts.
Sharpening is a crucial step in photo editing to enhance details and clarity. Here’s how to sharpen a photo effectively on an iMac:
- Using the Photos App:
- Open the photo in the Photos app.
- Click “Edit” and go to the “Adjust” tab.
- Find the “Sharpness” slider and adjust it to your liking. Be careful not to over-sharpen.
- Using Adobe Photoshop:
- Open the photo in Photoshop.
- Go to “Filter” > “Sharpen” > “Unsharp Mask.”
- Adjust the “Amount,” “Radius,” and “Threshold” to get the desired effect.
- Using Topaz Sharpen AI:
- Open the photo in Topaz Sharpen AI.
- Choose the appropriate sharpening mode (e.g., “Standard,” “Motion Blur,” “Too Soft”).
- Adjust the settings as needed.
According to professional photographer tips, it’s essential to sharpen photos subtly to avoid introducing unwanted artifacts or noise.
12. How Can I Remove Blemishes In Photos On An iMac?
To remove blemishes in photos on an iMac, use the “Retouch” tool in the Photos app or the “Spot Healing Brush” in Adobe Photoshop for more precise corrections.
Removing blemishes and imperfections is a common task in photo editing. Here’s how to do it on an iMac:
- Using the Photos App:
- Open the photo in the Photos app.
- Click “Edit” and go to the “Retouch” tool.
- Adjust the size of the brush and click on the blemishes to remove them.
- Using Adobe Photoshop:
- Open the photo in Photoshop.
- Select the “Spot Healing Brush Tool.”
- Adjust the size and hardness of the brush and click on the blemishes to remove them.
- For more complex blemishes, use the “Healing Brush Tool” or the “Patch Tool.”
13. How Do I Change The White Balance Of A Photo On My iMac?
To change the white balance of a photo on your iMac, use the “White Balance” adjustment in the Photos app or the “Color Temperature” and “Tint” sliders in Adobe Lightroom.
Adjusting the white balance is crucial for correcting color casts and ensuring that your photo looks natural. Here’s how to do it on your iMac:
- Using the Photos App:
- Open the photo in the Photos app.
- Click “Edit” and go to the “Adjust” tab.
- Find the “White Balance” adjustment and use the “Auto” option or adjust the “Temperature” and “Tint” sliders manually.
- Using Adobe Lightroom:
- Open the photo in Lightroom.
- Go to the “Develop” module.
- Adjust the “Temperature” and “Tint” sliders in the “Basic” panel.
- Use the “White Balance Selector” tool to click on a neutral area in the photo to set the white balance automatically.
14. How Can I Adjust The Exposure Of A Photo On My iMac?
To adjust the exposure of a photo on your iMac, use the “Light” adjustment in the Photos app or the “Exposure” slider in Adobe Lightroom to brighten or darken the image.
Adjusting the exposure is essential for correcting images that are too dark or too bright. Here’s how to adjust the exposure on your iMac:
- Using the Photos App:
- Open the photo in the Photos app.
- Click “Edit” and go to the “Adjust” tab.
- Find the “Light” adjustment and use the “Exposure” slider to brighten or darken the image.
- Adjust the “Highlights,” “Shadows,” “Brightness,” and “Contrast” sliders for more fine-tuned control.
- Using Adobe Lightroom:
- Open the photo in Lightroom.
- Go to the “Develop” module.
- Adjust the “Exposure” slider in the “Basic” panel.
- Use the “Highlights,” “Shadows,” “Whites,” and “Blacks” sliders for more precise adjustments.
15. How Do I Crop And Straighten Photos On My iMac?
To crop and straighten photos on your iMac, use the “Crop” tool in the Photos app or similar tools in other photo editing software to adjust the composition and fix tilted horizons.
Cropping and straightening are essential for improving the composition of your photos. Here’s how to do it on your iMac:
- Using the Photos App:
- Open the photo in the Photos app.
- Click “Edit” and go to the “Crop” tool.
- Use the crop handles to adjust the composition.
- Use the “Straighten” slider to fix tilted horizons.
- Choose a preset aspect ratio or use the “Original” aspect ratio.
- Using Adobe Photoshop:
- Open the photo in Photoshop.
- Select the “Crop Tool.”
- Use the crop handles to adjust the composition.
- Use the “Straighten” option in the toolbar to fix tilted horizons.
 Screenshot of using the Crop Tool in the Photos app on an iMac to adjust the composition of a photo.
16. How To Reduce Noise In Photos On An iMac?
To reduce noise in photos on an iMac, use the “Noise Reduction” tool in Adobe Lightroom or specialized plugins like Topaz DeNoise AI to smooth out grainy areas without sacrificing detail.
Noise can degrade the quality of your photos, especially in low-light situations. Here’s how to reduce noise on your iMac:
- Using Adobe Lightroom:
- Open the photo in Lightroom.
- Go to the “Develop” module.
- Scroll down to the “Detail” panel.
- Adjust the “Noise Reduction” sliders for “Luminance” and “Color” to reduce noise.
- Using Topaz DeNoise AI:
- Open the photo in Topaz DeNoise AI.
- Choose the appropriate noise reduction mode.
- Adjust the settings as needed.
17. How Can I Add A Vignette To A Photo On My iMac?
To add a vignette to a photo on your iMac, use the “Vignette” adjustment in the Photos app or the “Effects” panel in Adobe Lightroom to darken the edges of the image.
Adding a vignette can help draw attention to the center of your photo. Here’s how to add a vignette on your iMac:
- Using the Photos App:
- Open the photo in the Photos app.
- Click “Edit” and go to the “Adjust” tab.
- Find the “Vignette” adjustment and adjust the slider to darken the edges of the image.
- Using Adobe Lightroom:
- Open the photo in Lightroom.
- Go to the “Develop” module.
- Scroll down to the “Effects” panel.
- Adjust the “Amount” slider in the “Vignette” section to darken the edges of the image.
- Adjust the “Midpoint,” “Roundness,” and “Feather” sliders for more fine-tuned control.
18. How Do I Convert A Photo To Black And White On My iMac?
To convert a photo to black and white on your iMac, use the “Black & White” filter in the Photos app or the “Black & White” mix in Adobe Lightroom for more control over tonal ranges.
Converting a photo to black and white can create a dramatic and timeless effect. Here’s how to do it on your iMac:
- Using the Photos App:
- Open the photo in the Photos app.
- Click “Edit” and go to the “Adjust” tab.
- Click on “Black & White” to convert the photo.
- Adjust the “Intensity” slider to control the strength of the effect.
- Using Adobe Lightroom:
- Open the photo in Lightroom.
- Go to the “Develop” module.
- Click on “Black & White” in the “Basic” panel.
- Use the “Black & White Mix” panel to adjust the tonal ranges of the black and white conversion.
19. How Can I Add Text To A Photo On My iMac?
Adding text directly within the Photos app is not supported. To add text to a photo on your iMac, use software like Adobe Photoshop or other third-party apps designed for adding text and graphics.
Adding text to your photos can be a great way to create memes, add captions, or create promotional images. Here’s how to add text on your iMac:
- Using Adobe Photoshop:
- Open the photo in Photoshop.
- Select the “Type Tool” (T).
- Click on the image where you want to add text.
- Type your text and adjust the font, size, color, and other settings in the “Character” panel.
- Using Third-Party Apps:
- There are many third-party apps available on the Mac App Store that allow you to add text to photos.
- Some popular options include Pixelmator Pro, Affinity Photo, and Canva.
20. How To Resize An Image On An iMac?
To resize an image on an iMac, use the “Adjust Size” option in the “Tools” menu of the Preview app or the “Image Size” dialog in Adobe Photoshop.
Resizing images is a common task, whether you need to reduce the file size for sharing online or increase the resolution for printing. Here’s how to resize an image on your iMac:
- Using Preview:
- Open the image in Preview.
- Go to “Tools” in the menu bar.
- Choose “Adjust Size.”
- Enter the desired width or height and adjust the resolution as needed.
- Using Adobe Photoshop:
- Open the image in Photoshop.
- Go to “Image” in the menu bar.
- Choose “Image Size.”
- Enter the desired width or height and adjust the resolution as needed.
- Make sure to check the “Resample” option to avoid pixelation.
21. What Are Some Free Photo Editing Alternatives For iMac?
Some free photo editing alternatives for iMac include GIMP, Darktable, and Photopea, offering a range of editing tools without the cost of commercial software.
If you’re looking for free photo editing options for your iMac, here are some great alternatives:
- GIMP (GNU Image Manipulation Program):
- GIMP is a powerful, open-source photo editing software that offers many of the same features as Photoshop.
- It includes layers, masking, color correction, and a wide range of filters and effects.
- Darktable:
- Darktable is a free, open-source photo editing software designed for RAW image processing.
- It offers non-destructive editing capabilities and a wide range of tools for adjusting exposure, color, and sharpness.
- Photopea:
- Photopea is a free, web-based photo editor that supports many of the same file formats as Photoshop.
- It includes layers, masking, and a variety of editing tools.
22. How Can I Share My Edited Photos Directly From My iMac?
You can share your edited photos directly from your iMac using the “Share” button in the Photos app or exporting the images and then sharing them via email, social media, or other platforms.
Sharing your edited photos is easy on an iMac. Here’s how:
- Using the Photos App:
- Select the photo you want to share.
- Click the “Share” button in the top right corner of the window.
- Choose the desired sharing method, such as email, Messages, or social media.
- Exporting and Sharing:
- Select the photo you want to share.
- Go to “File” in the menu bar.
- Choose “Export” and select the desired file format, quality, and size.
- Share the exported file via email, social media, or other platforms.
23. How Do I Backup My Photo Library On My iMac?
To back up your photo library on your iMac, use Time Machine, iCloud Photos, or external hard drives to ensure your photos are safe from data loss.
Backing up your photo library is crucial for preventing data loss. Here are some ways to back up your photo library on your iMac:
- Time Machine:
- Time Machine is a built-in backup utility on macOS that automatically backs up your entire system, including your photo library.
- To use Time Machine, you’ll need an external hard drive.
- iCloud Photos:
- iCloud Photos automatically syncs your photo library across all your Apple devices and stores your photos in the cloud.
- To use iCloud Photos, you’ll need an iCloud account and sufficient storage space.
- External Hard Drives:
- You can manually back up your photo library to an external hard drive by copying the Photos Library file to the drive.
According to data security experts, it’s best to have multiple backups in different locations to ensure that your photos are safe from data loss.
24. Can I Use Keyboard Shortcuts For Photo Editing On My iMac?
Yes, you can use keyboard shortcuts for photo editing on your iMac in software like Adobe Photoshop and Lightroom to speed up your workflow.
Keyboard shortcuts can significantly speed up your photo editing workflow. Here are some common keyboard shortcuts for photo editing on an iMac:
- Adobe Photoshop:
- Command + Z: Undo
- Command + Shift + Z: Redo
- Command + C: Copy
- Command + V: Paste
- Command + S: Save
- Command + +: Zoom In
- Command + -: Zoom Out
- Spacebar: Temporarily switch to the Hand Tool
- Adobe Lightroom:
- Command + Z: Undo
- Command + Shift + Z: Redo
- Command + C: Copy Settings
- Command + V: Paste Settings
- Command + S: Save Metadata
- +: Increase Exposure
- -: Decrease Exposure
25. What Are The Best Monitors For Photo Editing On An iMac?
The best monitors for photo editing on an iMac are those with high color accuracy, wide color gamut (Adobe RGB or DCI-P3), and high resolution (4K or 5K), such as the Apple Pro Display XDR or BenQ SW series.
Choosing the right monitor is crucial for accurate and effective photo editing. Here are some of the best monitors for photo editing on an iMac:
- Apple Pro Display XDR:
- The Apple Pro Display XDR offers stunning image quality, high brightness, and a wide color gamut.
- It is designed to work seamlessly with macOS and is ideal for professional photo editing.
- BenQ SW Series:
- The BenQ SW series monitors are designed specifically for photographers and offer high color accuracy and a wide color gamut.
- They come with features like hardware calibration and a built-in SD card reader.
- Eizo ColorEdge Series:
- Eizo ColorEdge series monitors are known for their exceptional color accuracy and consistency.
- They are a popular choice among professional photographers and graphic designers.
- Dell UltraSharp Series:
- The Dell UltraSharp series monitors offer a good balance of price and performance.
- They provide accurate colors and a wide viewing angle.
26. How Can I Organize My Photo Library On My iMac?
To organize your photo library on your iMac, use the Photos app’s album and folder features, along with keywords and facial recognition, to easily find and manage your images.
Keeping your photo library organized is essential for easy access and management. Here’s how to organize your photo library on your iMac:
- Using Albums and Folders:
- Create albums to group photos by event, date, or subject.
- Use folders to organize albums into categories.
- Using Keywords:
- Add keywords to your photos to make them searchable.
- Use descriptive keywords that accurately reflect the content of the photo.
- Using Facial Recognition:
- The Photos app can automatically recognize faces in your photos.
- Use this feature to tag people in your photos and make them searchable by name.
- Using Smart Albums:
- Create smart albums that automatically update based on specific criteria, such as keywords, dates, or locations.
27. What Is The Best Way To Print Photos From My iMac?
The best way to print photos from your iMac is to use a high-quality photo printer, calibrate your monitor, and use the correct color profiles to ensure accurate and vibrant prints.
Printing your photos can bring them to life and allow you to share them with others. Here’s the best way to print photos from your iMac:
- Use a High-Quality Photo Printer:
- Invest in a photo printer that is designed for printing high-quality photos.
- Some popular options include Epson, Canon, and HP photo printers.
- Calibrate Your Monitor:
- Calibrate your monitor to ensure accurate color reproduction.
- Use a colorimeter to calibrate your monitor regularly.
- Use the Correct Color Profiles:
- Use the correct color profiles for your printer and paper to ensure accurate colors.
- Download the color profiles from the printer manufacturer’s website.
- Use High-Quality Photo Paper:
- Use high-quality photo paper to ensure that your prints look their best.
- Choose a paper type that is appropriate for the type of photo you are printing.
28. How Can I Learn More About Photo Editing Techniques For My iMac?
You can learn more about photo editing techniques for your iMac through online courses, tutorials on websites like dfphoto.net, books, and workshops offered by photography experts.
To learn more about photo editing techniques for your iMac, here are some resources:
- Online Courses:
- Websites like Skillshare, Udemy, and Coursera offer a wide range of photo editing courses.
- These courses cover everything from basic editing techniques to advanced workflows.
- Tutorials on dfphoto.net:
- dfphoto.net provides tutorials and guides on photo editing techniques.
- Books:
- There are many books available on photo editing techniques for various software programs.
- Some popular options include “The Adobe Photoshop Lightroom Classic CC Book” by Scott Kelby and “Understanding Exposure” by Bryan Peterson.
- Workshops:
- Attend workshops offered by photography experts to learn new techniques and get hands-on experience.
FAQ: Editing Photos on iMac
1. Is the built-in Photos app on iMac sufficient for basic photo editing?
Yes, the built-in Photos app on iMac is great for basic photo editing. It offers tools for adjusting light, color, cropping, and removing blemishes, which are perfect for quick enhancements.
2. What are the advantages of using Adobe Photoshop over the Photos app on iMac?
Adobe Photoshop offers advanced features like layers, masking, and more precise color correction, providing greater control and flexibility for complex editing tasks compared to the simpler Photos app.
3. How often should I calibrate my monitor for photo editing on iMac?
For accurate color representation, it’s recommended to calibrate your monitor at least once a month, or more frequently if you notice color inconsistencies.
4. Can I edit photos on my iMac without an internet connection?
Yes, you can edit photos offline using software like Adobe Photoshop, Lightroom, GIMP, or the built-in Photos app. An internet connection is only needed for cloud-based services or downloading software.
5. What is the best file format for saving edited photos on iMac to maintain quality?
To maintain the highest quality, save your edited photos as TIFF or PNG files. JPEG is suitable for sharing but compresses the image, potentially reducing quality.
6. How do I ensure my iMac’s performance is optimized for photo editing?
Ensure your iMac has sufficient RAM (at least 16GB), a fast processor, and an SSD for quick access to files. Close unnecessary applications and keep your macOS updated for optimal performance.
7. What are some essential keyboard shortcuts for photo editing in the Photos app on iMac?
Some essential shortcuts include Command + Z (Undo), Shift + Command + Z (Redo), Command + C (Copy Edits), and Command + V (Paste Edits) for efficient editing.
8. How can I remove red-eye in photos using my iMac?
Use the red-eye correction tool in the Photos app or Adobe Photoshop. Simply select the tool, adjust the pupil size, and click on the red areas to correct them.
9. What is the best way to learn advanced photo editing techniques on iMac?
Take online courses on platforms like dfphoto.net, read books by professional photographers, and practice regularly. Experiment with different tools and techniques to improve your skills.
10. How do I revert to the original state of a photo after making multiple edits in Photoshop on my iMac?
In Photoshop, use the History panel to revert to any previous state of your photo. Alternatively, if you saved the original, you can simply reopen the original file.
Ready to take your photo editing skills to the next level? Visit dfphoto.net today for more in-depth tutorials, expert tips, and a vibrant community of photographers. Discover the tools and techniques you need to create stunning images and bring your creative vision to life. Explore dfphoto.net and unleash your photographic potential. You can find us at 1600 St Michael’s Dr, Santa Fe, NM 87505, United States or give us a call at +1 (505) 471-6001.