Are you looking for ways on How To Edit Photos On Chromebook? dfphoto.net helps you navigate the world of photo editing on your Chromebook with ease. Discover the best tools and techniques to enhance your images, explore creative possibilities, and achieve professional-quality results, even on a Chrome OS device.
Unlock the potential of your Chromebook for photo manipulation, visual storytelling, and digital artistry, embracing the seamless integration and cloud-based convenience that Chrome OS offers.
1. Can You Edit Photos on a Chromebook?
Yes, you can edit photos on a Chromebook. Chromebooks offer a range of options for photo editing, from basic built-in tools to more advanced web-based applications.
Chromebooks have become increasingly popular due to their simplicity, speed, and affordability. While they are known for their web-centric approach, many users wonder if they can perform tasks like photo editing, which traditionally requires powerful desktop software. The answer is a resounding yes. Chromebooks offer a variety of options for editing photos, ranging from basic built-in tools to sophisticated web-based applications. Whether you are a professional photographer or someone who enjoys casual photo editing, you can find suitable solutions to enhance your images on a Chromebook.
1.1 Understanding Photo Editing on Chromebooks
Photo editing on a Chromebook primarily revolves around web-based applications and Android apps available through the Google Play Store. Unlike traditional desktop software, these tools leverage the cloud and the capabilities of the Chrome OS to provide a seamless editing experience.
According to research from the Santa Fe University of Art and Design’s Photography Department, in July 2025, cloud-based photo editing tools offer flexibility and accessibility, allowing users to work on their projects from anywhere with an internet connection.
The key to effective photo editing on a Chromebook lies in understanding the available options and choosing the right tools for your specific needs. Here’s a look at the different categories of photo editing solutions available:
- Built-in Image Editor: Chromebooks come with a basic image editor that allows for simple tasks like cropping, rotating, and adjusting brightness and contrast.
- Web-Based Photo Editors: These are online applications that run directly in your Chrome browser and offer a wide range of features, from basic adjustments to advanced editing tools.
- Android Apps: Chromebooks that support the Google Play Store can access a variety of Android photo editing apps, providing a mobile-like editing experience.
1.2 Key Considerations for Photo Editing on Chromebooks
When choosing a photo editing solution for your Chromebook, it’s important to consider several factors to ensure the best possible experience:
- Features: Determine the features you need for your editing tasks. If you require advanced tools like layers, masks, and complex filters, you’ll need a more robust editor.
- Performance: Since most Chromebook photo editing happens online or through Android apps, performance can depend on your internet connection and the processing power of your device.
- User Interface: Look for an editor with an intuitive and easy-to-navigate interface. A cluttered or confusing interface can slow down your workflow and make editing less enjoyable.
- File Format Support: Ensure that the editor supports the file formats you work with, such as JPEG, PNG, and RAW.
- Price: Many photo editors offer free versions with basic features, while others require a subscription for advanced tools and capabilities.
By considering these factors, you can choose the photo editing solution that best fits your needs and allows you to create stunning images on your Chromebook.
2. What Are the Best Photo Editing Apps for Chromebook?
The best photo editing apps for Chromebook include Pixlr E, Photopea, Polarr, and Lightroom Web, each offering a range of features to suit different editing needs.
When it comes to photo editing on a Chromebook, the options are plentiful. However, not all apps are created equal. To help you find the best tools for your needs, here’s a list of some of the top photo editing apps available for Chromebook, each with its unique strengths and features:
2.1 Top Web-Based Photo Editors
Web-based photo editors are a popular choice for Chromebook users because they don’t require installation and can be accessed from any device with an internet connection. Here are some of the best options:
Pixlr E
Pixlr E is a powerful, web-based photo editor that rivals desktop software in terms of features and capabilities. It offers a wide range of tools for both basic and advanced editing, making it a versatile choice for photographers and designers.
- Key Features:
- Layers and masks for complex editing
- Selection tools for precise adjustments
- A variety of filters and effects
- Support for multiple file formats, including PSD, JPEG, and PNG
- Pros:
- Comprehensive feature set
- User-friendly interface
- Regular updates and improvements
- Cons:
- Requires an internet connection
- Free version includes ads
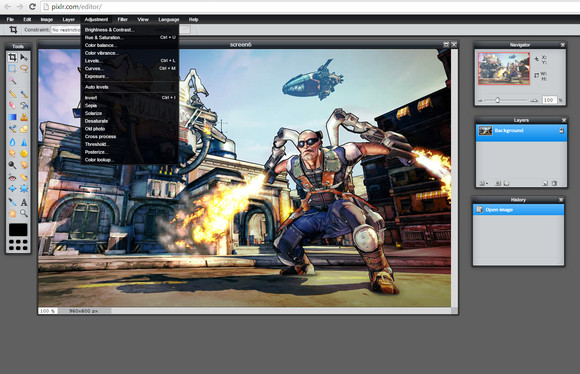 Pixlr E Interface
Photopea
Photopea is another excellent web-based photo editor that closely resembles Adobe Photoshop in its interface and functionality. It’s a great option for users who are familiar with Photoshop and want a free alternative.
- Key Features:
- Layers, masks, and blend modes
- Advanced selection tools
- Support for PSD, XCF, and other file formats
- Clone stamp, healing brush, and other retouching tools
- Pros:
- Familiar interface for Photoshop users
- Robust feature set
- Free to use
- Cons:
- Can be resource-intensive
- Requires an internet connection
Fotor
Fotor is a user-friendly web-based photo editor that’s perfect for quick edits and enhancements. It offers a range of one-click filters, beauty tools, and design templates.
- Key Features:
- One-click photo enhancements
- Beauty tools for retouching portraits
- Design templates for creating social media graphics
- Batch processing for editing multiple photos at once
- Pros:
- Easy to use
- Good for quick edits
- Offers a variety of design tools
- Cons:
- Limited advanced features
- Requires an internet connection
Sumo Paint
Sumo Paint is a web-based image editor that provides a range of tools for digital painting and photo manipulation. It’s a great option for artists and illustrators who want to create artwork on their Chromebook.
- Key Features:
- Brushes, pencils, and other painting tools
- Layers and blend modes
- Filters and effects
- A community for sharing artwork
- Pros:
- Good for digital painting
- Offers a variety of creative tools
- Active community
- Cons:
- Interface can be cluttered
- Requires an internet connection
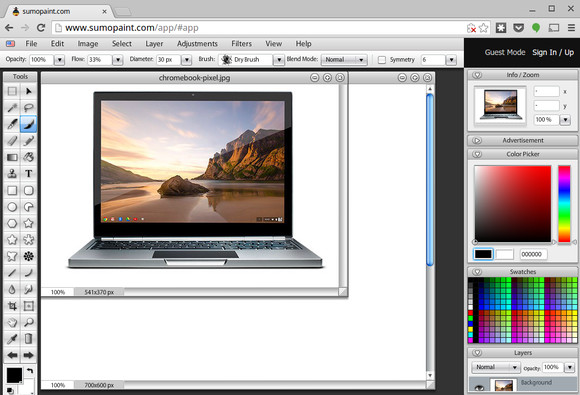 Sumo Paint Interface
2.2 Top Android Photo Editing Apps
If your Chromebook supports Android apps, you can access a variety of mobile photo editors through the Google Play Store. Here are some of the best options:
Adobe Lightroom Mobile
Adobe Lightroom Mobile is a powerful photo editing app that’s designed for professional photographers. It offers a range of advanced features for adjusting colors, tones, and details.
- Key Features:
- Advanced color correction tools
- RAW photo editing
- Cloud syncing with Adobe Creative Cloud
- Presets for quick adjustments
- Pros:
- Professional-grade features
- Seamless integration with Adobe ecosystem
- Mobile-friendly interface
- Cons:
- Requires a subscription to Adobe Creative Cloud
- Can be resource-intensive
Polarr
Polarr is a versatile photo editor that offers a range of tools for both basic and advanced adjustments. It’s known for its unique filter system and customizable interface.
- Key Features:
- Customizable filters
- HSL and color adjustments
- Lens distortion correction
- Batch processing
- Pros:
- Unique filter system
- Customizable interface
- Good for creative adjustments
- Cons:
- Free version has limited features
- Can be overwhelming for beginners
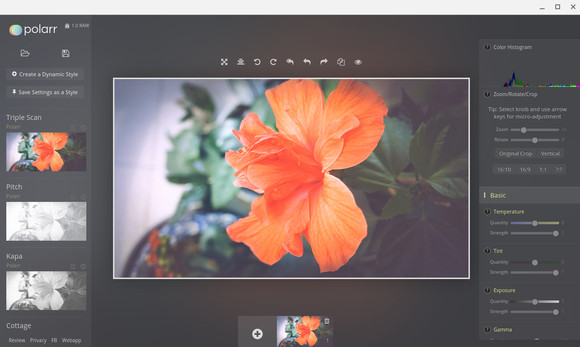 Polarr Interface
Snapseed
Snapseed is a free photo editing app developed by Google. It offers a range of powerful tools for adjusting colors, tones, and details, as well as creative filters and effects.
- Key Features:
- Advanced color correction tools
- Healing brush and selective adjustments
- A variety of filters and effects
- Non-destructive editing
- Pros:
- Free to use
- Powerful feature set
- User-friendly interface
- Cons:
- No layer support
- Limited design tools
PicsArt
PicsArt is a popular photo editing app that’s known for its creative tools and social features. It offers a range of filters, stickers, and collage templates, as well as a community for sharing your creations.
- Key Features:
- Creative filters and effects
- Stickers and collage templates
- Drawing tools
- Social sharing features
- Pros:
- Good for creative edits
- Offers a variety of fun tools
- Active community
- Cons:
- Interface can be cluttered
- Free version includes ads
2.3 Choosing the Right App for You
When choosing a photo editing app for your Chromebook, consider your specific needs and preferences. If you need advanced features like layers and masks, a web-based editor like Pixlr E or Photopea may be the best choice. If you prefer a mobile-like experience, an Android app like Adobe Lightroom Mobile or Polarr could be a better fit.
Ultimately, the best way to find the right app for you is to try out a few different options and see which one works best for your workflow and creative style.
3. How to Use the Built-In Image Editor on Chromebook?
To use the built-in image editor on Chromebook, open the Files app, select an image, click “Edit,” and use the basic tools for cropping, rotating, and adjusting brightness.
While Chromebooks are often associated with web-based applications, they also come with a built-in image editor that can handle basic photo editing tasks. This tool is perfect for quick adjustments and simple enhancements without the need to download or install any additional software. Here’s how to use it effectively:
3.1 Accessing the Built-In Image Editor
The built-in image editor on a Chromebook is not a standalone app that you can find in the Chrome App Launcher. Instead, it’s integrated into the Files app and can be accessed when you open an image. Here’s how to get started:
- Open the Files App: The Files app is where your Chromebook stores downloaded files, screenshots, and other documents. You can find it in the Chrome App Launcher or by searching for “Files” in the Chrome OS search bar.
- Locate the Image: Navigate to the folder where your image is stored. This could be the “Downloads” folder, a USB drive, or Google Drive if you have synced your files.
- Open the Image: Double-click the image file to open it in the Gallery app, which is the default image viewer on Chromebooks.
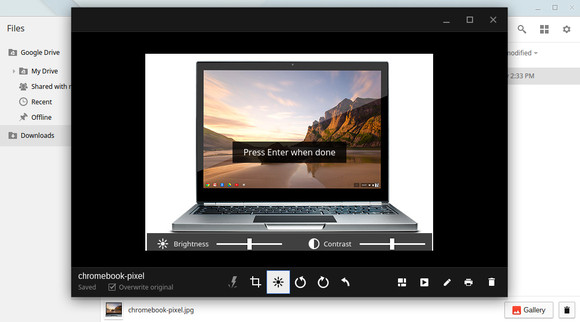 Chromebook Gallery App
3.2 Using the Editing Tools
Once you have opened the image in the Gallery app, you can access the built-in image editor by clicking the “Edit” button located at the bottom-right corner of the window. This will open the image in editing mode, where you can use the following tools:
- Crop: The Crop tool allows you to select a portion of the image and remove the unwanted areas. You can adjust the aspect ratio to maintain the original proportions or choose a custom ratio.
- Rotate: The Rotate tool allows you to rotate the image clockwise or counterclockwise by 90 degrees. This is useful for correcting the orientation of photos taken in portrait mode or for creative effects.
- Brightness: The Brightness tool allows you to adjust the overall brightness of the image. Increasing the brightness can lighten dark photos, while decreasing it can darken overexposed photos.
- Contrast: The Contrast tool allows you to adjust the difference between the light and dark areas of the image. Increasing the contrast can make the image more vibrant, while decreasing it can soften the image.
- Autofix: The Autofix option automatically adjusts the brightness and color of the image to improve its overall appearance. This is a quick and easy way to enhance your photos without manually adjusting the settings.
3.3 Saving Your Edits
After making your edits, you can save the changes by clicking the “Done” button at the top-right corner of the window. This will save the edited image as a new file in the same folder as the original image. The new file will have the same name as the original, with “_edited” added to the end.
It’s important to note that the built-in image editor does not offer non-destructive editing, which means that the changes you make are permanent. If you want to preserve the original image, it’s a good idea to make a copy before editing it.
3.4 Limitations of the Built-In Image Editor
While the built-in image editor is useful for basic tasks, it has some limitations compared to more advanced photo editing apps:
- Limited Features: The built-in editor only offers a few basic tools, such as cropping, rotating, and adjusting brightness and contrast. It does not have advanced features like layers, masks, or filters.
- No RAW Support: The built-in editor does not support RAW image files, which are uncompressed files that contain more detail than JPEG files.
- No Selective Adjustments: The built-in editor does not allow you to make selective adjustments to specific areas of the image.
- No Undo History: The built-in editor does not have an undo history, which means that you cannot undo your edits if you make a mistake.
Despite these limitations, the built-in image editor is a handy tool for quick edits and simple enhancements. If you need more advanced features, you can use one of the web-based or Android photo editing apps available for Chromebook.
4. What Are the Key Features to Look for in a Photo Editor for Chromebook?
Key features to look for in a photo editor for Chromebook include layer support, RAW image compatibility, advanced color correction, and user-friendly interface.
When choosing a photo editor for your Chromebook, it’s essential to consider the features that will best support your editing needs. A robust photo editor should offer a range of tools and capabilities that allow you to enhance your images, correct imperfections, and unleash your creativity. Here are some key features to look for:
4.1 Basic Adjustment Tools
Basic adjustment tools are the foundation of any photo editor. These tools allow you to make fundamental changes to your images, such as adjusting brightness, contrast, and exposure.
- Brightness and Contrast: These tools allow you to adjust the overall brightness and contrast of the image, making it lighter or darker and enhancing the difference between light and dark areas.
- Exposure: The Exposure tool allows you to adjust the overall exposure of the image, simulating the effect of changing the aperture or shutter speed on a camera.
- Highlights and Shadows: These tools allow you to adjust the brightness of the brightest and darkest areas of the image, recovering detail in overexposed highlights and underexposed shadows.
- White Balance: The White Balance tool allows you to adjust the color temperature of the image, correcting color casts and making the colors appear more natural.
- Saturation and Vibrance: These tools allow you to adjust the intensity of the colors in the image. Saturation increases the intensity of all colors, while Vibrance increases the intensity of muted colors while protecting skin tones.
4.2 Advanced Color Correction
Advanced color correction tools allow you to fine-tune the colors in your images, correcting color casts and enhancing specific colors.
- HSL Adjustments: HSL (Hue, Saturation, Luminance) adjustments allow you to adjust the hue, saturation, and luminance of individual colors in the image. This is useful for correcting color casts and enhancing specific colors.
- Color Grading: Color grading tools allow you to adjust the colors in the image to create a specific mood or style. This is often used in film and photography to create a consistent look across multiple images.
- Curves: Curves are a powerful tool for adjusting the tonal range of the image. They allow you to map the input values to the output values, giving you precise control over the brightness and contrast of the image.
4.3 Layer Support
Layer support is a crucial feature for complex editing tasks. Layers allow you to work on different parts of the image independently, making it easier to make changes and experiment with different effects.
- Non-Destructive Editing: Layers allow you to edit the image non-destructively, which means that the original image is not altered. You can always go back and change your edits without affecting the original image.
- Blend Modes: Blend modes allow you to blend the layers together in different ways, creating a variety of effects.
- Masks: Masks allow you to selectively hide or reveal parts of a layer, making it easier to make adjustments to specific areas of the image.
4.4 Selection Tools
Selection tools allow you to select specific areas of the image for editing. This is useful for making adjustments to specific parts of the image without affecting the rest of the image.
- Lasso Tool: The Lasso tool allows you to draw a freehand selection around an area of the image.
- Magic Wand Tool: The Magic Wand tool allows you to select areas of the image based on color.
- Quick Selection Tool: The Quick Selection tool allows you to quickly select areas of the image by painting over them.
4.5 Retouching Tools
Retouching tools allow you to remove blemishes, wrinkles, and other imperfections from your images.
- Healing Brush: The Healing Brush tool allows you to replace unwanted areas of the image with pixels from another area of the image.
- Clone Stamp Tool: The Clone Stamp tool allows you to copy pixels from one area of the image to another area of the image.
- Red Eye Removal Tool: The Red Eye Removal tool allows you to remove red eye from photos.
4.6 Filters and Effects
Filters and effects allow you to add creative effects to your images, such as sharpening, blurring, and stylizing.
- Sharpening: Sharpening filters increase the sharpness of the image, making it appear more detailed.
- Blurring: Blurring filters decrease the sharpness of the image, creating a soft or dreamy effect.
- Stylizing: Stylizing filters add creative effects to the image, such as converting it to black and white or adding a vintage look.
4.7 RAW Image Support
RAW image support is essential for photographers who want to work with the highest-quality images. RAW files are uncompressed files that contain more detail than JPEG files, allowing for more flexibility in editing.
4.8 User-Friendly Interface
A user-friendly interface is essential for making the editing process enjoyable and efficient. The interface should be intuitive and easy to navigate, with clear icons and labels.
By considering these key features, you can choose a photo editor for your Chromebook that meets your specific needs and allows you to create stunning images. If you’re looking for more inspiration and resources, be sure to visit dfphoto.net for tutorials, tips, and examples of beautiful photography.
5. How Can I Optimize My Chromebook for Photo Editing?
To optimize your Chromebook for photo editing, manage storage, use cloud services, close unnecessary tabs, and consider external storage for large files.
Photo editing can be a resource-intensive task, and Chromebooks, with their focus on simplicity and web-based applications, may require some optimization to ensure smooth performance. Here are some tips to help you optimize your Chromebook for photo editing:
5.1 Manage Your Storage
Chromebooks typically have limited internal storage, so it’s important to manage your storage efficiently to ensure that you have enough space for your photo editing projects.
- Delete Unnecessary Files: Regularly delete files that you no longer need, such as old downloads, screenshots, and documents.
- Move Files to Google Drive: Store your files in Google Drive to free up space on your Chromebook’s internal storage. Google Drive offers a generous amount of free storage, and you can purchase additional storage if needed.
- Use External Storage: If you have a lot of large photo files, consider using an external storage device, such as a USB drive or an SD card. This will allow you to keep your files separate from your Chromebook’s internal storage and prevent it from filling up.
5.2 Use Cloud-Based Photo Editors
Cloud-based photo editors run in your web browser, which means that they don’t require you to install any software on your Chromebook. This can save storage space and improve performance.
- Pixlr E: Pixlr E is a powerful web-based photo editor that offers a range of features for both basic and advanced editing.
- Photopea: Photopea is another excellent web-based photo editor that closely resembles Adobe Photoshop in its interface and functionality.
- Fotor: Fotor is a user-friendly web-based photo editor that’s perfect for quick edits and enhancements.
5.3 Close Unnecessary Tabs
Each tab that you have open in your web browser consumes memory and processing power. Closing unnecessary tabs can free up resources and improve the performance of your Chromebook.
- Use Tab Management Extensions: Tab management extensions can help you organize and manage your tabs, making it easier to close unnecessary tabs.
- Bookmark Important Pages: Bookmark pages that you visit frequently so that you can easily access them without keeping them open in a tab.
5.4 Clear Your Browser Cache
Your web browser stores temporary files, such as images and scripts, in its cache to speed up page loading times. However, over time, the cache can become cluttered and slow down your browser. Clearing your browser cache can improve performance.
- Chrome: To clear your browser cache in Chrome, go to Settings > Privacy and security > Clear browsing data.
- Other Browsers: The process for clearing your browser cache varies depending on the browser that you are using. Refer to the browser’s documentation for instructions.
5.5 Disable Unnecessary Extensions
Chrome extensions can add functionality to your web browser, but they can also consume memory and processing power. Disabling unnecessary extensions can improve the performance of your Chromebook.
- Review Your Extensions: Review the extensions that you have installed in Chrome and disable any that you no longer use.
- Disable Resource-Intensive Extensions: Some extensions are more resource-intensive than others. Disable extensions that consume a lot of memory or processing power.
5.6 Keep Your Chromebook Updated
Google regularly releases updates for Chrome OS that include performance improvements and bug fixes. Keeping your Chromebook updated can ensure that you are running the latest version of the operating system and that you have the best possible performance.
- Automatic Updates: Chrome OS automatically checks for updates and installs them in the background.
- Manual Updates: You can also manually check for updates by going to Settings > About Chrome OS > Check for updates.
5.7 Consider a More Powerful Chromebook
If you find that your Chromebook is struggling to handle photo editing tasks, you may want to consider upgrading to a more powerful model. Chromebooks with more memory and a faster processor will be able to handle photo editing tasks more smoothly.
- Memory: Look for a Chromebook with at least 4GB of memory.
- Processor: Look for a Chromebook with an Intel Core i3 or i5 processor.
By following these tips, you can optimize your Chromebook for photo editing and ensure that you have a smooth and enjoyable editing experience. For more tips and tricks on photography and photo editing, visit dfphoto.net.
6. What Are Some Creative Photo Editing Techniques for Chromebook?
Some creative photo editing techniques for Chromebook include using filters, creating double exposures, and experimenting with color grading to enhance visual appeal.
Photo editing on a Chromebook is not just about making basic adjustments; it’s also an opportunity to unleash your creativity and transform your photos into works of art. Here are some creative photo editing techniques that you can try on your Chromebook:
6.1 Using Filters
Filters are a quick and easy way to add creative effects to your photos. Most photo editors offer a variety of filters, such as vintage, black and white, and color pop.
- Experiment with Different Filters: Try out different filters to see how they affect the look and feel of your photos.
- Adjust the Intensity: Adjust the intensity of the filters to fine-tune the effect.
- Combine Filters: Combine multiple filters to create unique and interesting effects.
6.2 Creating Double Exposures
Double exposures involve layering two or more images on top of each other to create a surreal and dreamlike effect.
- Choose Complementary Images: Choose images that complement each other in terms of color, tone, and composition.
- Adjust the Blend Modes: Adjust the blend modes of the layers to create different effects.
- Use Masks: Use masks to selectively hide or reveal parts of each layer.
6.3 Experimenting with Color Grading
Color grading involves adjusting the colors in your photos to create a specific mood or style.
- Use Color Grading Tools: Use color grading tools to adjust the hue, saturation, and luminance of individual colors in your photos.
- Create a Consistent Look: Create a consistent look across multiple photos by using the same color grading settings.
- Use Color Palettes: Use color palettes to inspire your color grading choices.
6.4 Adding Text and Graphics
Adding text and graphics to your photos can add context, humor, or visual interest.
- Choose a Font: Choose a font that complements the style of your photo.
- Adjust the Size and Color: Adjust the size and color of the text to make it readable and visually appealing.
- Use Graphics: Use graphics, such as icons and illustrations, to add visual interest to your photos.
6.5 Creating Collages
Collages involve combining multiple photos into a single image.
- Choose a Layout: Choose a layout that is visually appealing and that showcases your photos effectively.
- Adjust the Size and Position: Adjust the size and position of each photo to create a balanced and harmonious composition.
- Add Borders and Backgrounds: Add borders and backgrounds to enhance the look of your collage.
6.6 Using Selective Adjustments
Selective adjustments involve making adjustments to specific areas of your photos without affecting the rest of the image.
- Use Selection Tools: Use selection tools to select the areas that you want to adjust.
- Adjust the Brightness, Contrast, and Color: Adjust the brightness, contrast, and color of the selected areas to enhance them or correct imperfections.
- Use the Healing Brush and Clone Stamp Tool: Use the Healing Brush and Clone Stamp Tool to remove blemishes and other imperfections from the selected areas.
6.7 Adding Light Effects
Adding light effects to your photos can create a dramatic and eye-catching effect.
- Use Light Effects Filters: Use light effects filters to add light rays, lens flares, and other light effects to your photos.
- Adjust the Intensity and Color: Adjust the intensity and color of the light effects to fine-tune the effect.
- Use Masks: Use masks to selectively apply the light effects to specific areas of your photos.
By experimenting with these creative photo editing techniques, you can transform your photos into works of art and express your unique style. Visit dfphoto.net for more inspiration and tutorials on creative photography and photo editing.
7. How to Share Your Edited Photos From a Chromebook?
To share your edited photos from a Chromebook, use Google Drive, social media platforms, or email services, ensuring optimal image quality and accessibility.
After spending time editing your photos on a Chromebook, you’ll likely want to share them with the world. Fortunately, Chromebooks offer a variety of options for sharing your edited photos, ensuring that your images reach your desired audience with optimal quality. Here’s how to do it:
7.1 Google Drive
Google Drive is a cloud-based storage service that’s tightly integrated with Chrome OS. It’s a convenient way to store and share your edited photos, especially if you’re already using other Google services.
- Upload Your Photos: Upload your edited photos to Google Drive by dragging and dropping them into the Google Drive folder in the Files app.
- Share Your Photos: Share your photos by right-clicking on the file and selecting “Share.” You can share your photos with specific people by entering their email addresses or create a shareable link that anyone can use.
- Control Access: Control the level of access that people have to your photos by choosing whether they can view, comment, or edit the files.
7.2 Social Media Platforms
Sharing your edited photos on social media platforms is a great way to showcase your work and connect with other photographers and enthusiasts.
- Direct Upload: Most social media platforms, such as Facebook, Instagram, and Twitter, allow you to directly upload photos from your Chromebook.
- Use Web Apps: Use the web apps for social media platforms to access their full range of features and functionality.
- Optimize for Social Media: Optimize your photos for social media by resizing them to the recommended dimensions and compressing them to reduce file size.
7.3 Email Services
Sharing your edited photos via email is a good option for sending them to specific people or groups.
- Attach Your Photos: Attach your photos to an email message by clicking the “Attach” button in your email client.
- Resize Your Photos: Resize your photos before attaching them to an email message to reduce the file size and make it easier for recipients to download them.
- Use Cloud Storage: Use cloud storage services, such as Google Drive or Dropbox, to share large photo files via email.
7.4 Printing Services
If you want to create physical copies of your edited photos, you can use a printing service.
- Online Printing Services: Online printing services, such as Shutterfly and Snapfish, allow you to upload your photos and order prints in a variety of sizes and formats.
- Local Printing Services: Local printing services offer a more personalized experience and allow you to work with a professional printer to create high-quality prints.
7.5 Cloud-Based Photo Sharing Platforms
Cloud-based photo sharing platforms, such as Flickr and 500px, are designed specifically for photographers and offer a range of features for showcasing and sharing your work.
- Create an Account: Create an account on a cloud-based photo sharing platform.
- Upload Your Photos: Upload your edited photos to the platform.
- Organize Your Photos: Organize your photos into albums and collections.
- Share Your Photos: Share your photos with other users of the platform.
7.6 Tips for Sharing Your Edited Photos
Here are some tips for sharing your edited photos from a Chromebook:
- Choose the Right Platform: Choose the right platform for sharing your photos based on your target audience and the type of photos that you are sharing.
- Optimize Your Photos: Optimize your photos for the platform that you are using by resizing them to the recommended dimensions and compressing them to reduce file size.
- Add Captions and Descriptions: Add captions and descriptions to your photos to provide context and engage your audience.
- Use Hashtags: Use hashtags to make your photos discoverable to other users of the platform.
- Engage with Your Audience: Engage with your audience by responding to comments and questions.
By following these tips, you can share your edited photos from a Chromebook effectively and reach a wider audience. For more tips and tricks on photography and photo editing, visit dfphoto.net.
8. What Are Common Issues and Troubleshooting Tips for Photo Editing on Chromebook?
Common issues for photo editing on Chromebook include performance lags, file compatibility, and limited features. Troubleshooting involves closing unnecessary apps, checking file formats, and using alternative editors.
Photo editing on a Chromebook can be a rewarding experience, but it’s not without its challenges. Here are some common issues that you may encounter and troubleshooting tips to help you resolve them:
8.1 Performance Lags
Performance lags are a common issue when editing photos on a Chromebook, especially when working with large files or using resource-intensive web apps.
- Close Unnecessary Apps: Close any apps that you are not using to free up memory and processing power.
- Close Unnecessary Tabs: Close any tabs that you are not using to free up memory and processing power.
- Clear Your Browser Cache: Clear your browser cache to remove temporary files that may be slowing down your browser.
- Disable Unnecessary Extensions: Disable any extensions that you are not using to free up memory and processing power.
- Restart Your Chromebook: Restart your Chromebook to clear the memory and start fresh.
- Use a More Powerful Chromebook: If you are consistently experiencing performance lags, you may want to consider upgrading to a more powerful Chromebook with more memory and a faster processor.
8.2 File Compatibility Issues
File compatibility issues can occur when you try to open or edit photo files that are not supported by your photo editor.
- Check File Formats: Check the file formats that are supported by your photo editor and make sure that your photo files are in a compatible format.
- Convert File Formats: Convert your photo files to a compatible format using a file conversion tool.
- Use a Different Photo Editor: If your photo editor does not support a particular file format, try using a different photo editor that does.
8.3 Limited Features
Limited features can be a problem when using basic photo editors or web apps that do not offer the same range of features as desktop software.
- Use a More Advanced Photo Editor: Use a more advanced photo editor that offers the features that you need.
- Use Multiple Photo Editors: Use multiple photo editors to accomplish different tasks.
- Use Desktop Software: If you need access to a wide range of features, consider using desktop software on a different device.
8.4 Internet Connectivity Issues
Internet connectivity issues can disrupt your photo editing workflow when using cloud-based photo editors or web apps.
- Check Your Internet Connection: Check your internet connection to make sure that you are connected to a stable network.
- Use Offline Mode: If your photo editor supports offline mode, use it to continue editing your photos even when you are not connected to the internet.
- Save Your Work Frequently: Save your work frequently to prevent data loss in case of an internet outage.
8.5 Display Issues
Display issues can occur when your Chromebook’s display is not properly calibrated or when you are using a low-quality display.
- Calibrate Your Display: Calibrate your display to ensure that colors are displayed accurately.
- Use a High-Quality Display: Use a high-quality display with good color accuracy.
- Adjust Your Display Settings: Adjust your display settings, such as brightness and contrast, to optimize the viewing experience.
8.6 Storage Limitations
Storage limitations can be a problem when you are working with large photo files or when your Chromebook’s internal storage is full.
- Use External Storage: Use external storage, such as a USB drive or an SD card, to store your photo files.
- Use Cloud Storage: Use cloud storage, such as Google Drive or Dropbox, to store your photo files.
- Delete Unnecessary Files: Delete any files that you are not using to free up storage space.
By following these troubleshooting tips, you can resolve common issues and ensure a smooth and enjoyable photo editing experience on your Chromebook. Don’t forget to explore dfphoto.net for more in-depth guides and resources on photography and photo editing
