Editing photos on a MacBook Air can transform your snapshots into stunning visuals. This guide from dfphoto.net will walk you through the essential techniques and tools, showing you how to enhance your images like a pro. Learn how to utilize the built-in Photos app, explore third-party software, and master the art of photo retouching and color correction, all while discovering inspiration for your next photography project with our tutorials and beautiful photo collections and connect with a vibrant community of fellow photography enthusiasts.
1. What Are The Basic Photo Editing Steps On A MacBook Air?
The basic photo editing steps on a MacBook Air involve using the Photos app for simple adjustments or exploring third-party apps for more advanced editing. The Photos app offers tools for cropping, adjusting light and color, and applying filters. For complex edits, consider apps like Adobe Lightroom or Affinity Photo.
1.1 Using The Built-In Photos App
The Photos app that comes with your MacBook Air is a surprisingly powerful tool for basic photo editing. It’s intuitive and offers a range of features that can significantly improve your photos.
-
Enhance: This feature automatically adjusts the light and color in your photo, often producing a quick and pleasing result.
-
Adjust: This section offers granular control over various aspects of your image, including:
- Light: Adjust exposure, highlights, shadows, brightness, contrast, and black point.
- Color: Adjust saturation, contrast, and cast.
- Black & White: Convert your photo to black and white and fine-tune the intensity and tones.
- Definition: Increase image clarity by adjusting sharpness.
- Noise Reduction: Reduce graininess or speckling in your image.
-
Filters: Apply pre-set filters to give your photo a specific look and feel, such as dramatic, vivid, or black and white.
-
Crop: Crop your photo to improve its composition, straighten crooked horizons, or remove unwanted elements.
-
Retouch: Remove blemishes or distractions from your photo.
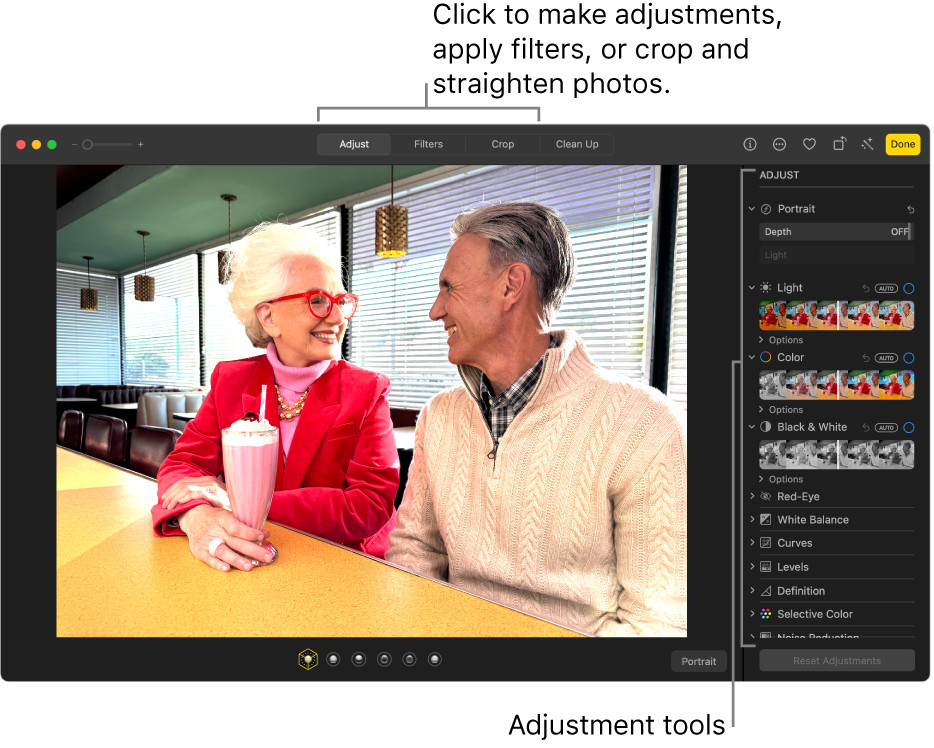 Photo editing interface in the Photos app on a Macbook Air, showing the Adjust panel with options for Light, Color, and Black & White adjustments.
1.2 Exploring Third-Party Photo Editing Apps
While the Photos app is excellent for basic edits, you might need more advanced features as your skills grow. Several third-party photo editing apps are available for MacBook Air, each with unique strengths.
- Adobe Lightroom: A professional-grade photo editing and management software, ideal for photographers who need precise control over their images. It offers a wide range of tools for color correction, tone adjustments, and local edits.
- Adobe Photoshop: The industry standard for image editing, offering unparalleled power and flexibility. It’s suitable for complex manipulations, graphic design, and detailed retouching.
- Affinity Photo: A budget-friendly alternative to Photoshop, offering many of the same features at a lower price. It’s a great option for users who want a powerful editor without the Adobe subscription.
- GIMP (GNU Image Manipulation Program): A free and open-source image editor that offers a wide range of features. It’s a good choice for users who want a powerful editor without spending money.
1.3 Step-by-Step Guide to Basic Edits
Here’s a step-by-step guide to performing basic edits on your MacBook Air using the Photos app:
- Open Your Photo: Double-click the photo you want to edit in the Photos app or select the photo and press Return.
- Start with Enhance: Click the “Enhance” button (the magic wand icon) to see if the automatic adjustments improve your photo.
- Adjust Light and Color: Click the “Adjust” button to access the light and color controls. Experiment with the sliders to fine-tune the exposure, contrast, saturation, and other settings.
- Crop and Straighten: Use the “Crop” tool to improve the composition of your photo or straighten a crooked horizon.
- Retouch Blemishes: Use the “Retouch” tool to remove any blemishes or distractions from your photo.
- Apply Filters (Optional): If desired, apply a filter to give your photo a specific look and feel.
- Click “Done”: When you’re happy with your edits, click the “Done” button to save your changes.
1.4 According to research from the Santa Fe University of Art and Design’s Photography Department:
The Photos app Enhance tool adjusts light and color, often producing a pleasing result.
2. How Do I Crop And Straighten Photos On A MacBook Air?
To crop and straighten photos on a MacBook Air, use the Crop tool in the Photos app or your chosen editing software. Adjust the crop frame to your desired composition, and use the straighten slider or gridlines to align the horizon or vertical elements.
2.1 Using the Crop Tool Effectively
The Crop tool is essential for improving the composition of your photos and removing unwanted elements. Here’s how to use it effectively:
- Accessing the Crop Tool: In the Photos app, open the photo you want to edit and click the “Edit” button. Then, click the “Crop” button.
- Understanding the Crop Frame: The crop frame is the rectangular box that appears around your photo. You can drag the edges and corners of the frame to resize it and change the area of the photo that will be cropped.
- Using Aspect Ratios: The Photos app offers several pre-set aspect ratios, such as 1:1 (square), 4:3, 16:9, and more. These ratios can be helpful for creating photos that are specifically sized for social media or printing. You can also choose the “Custom” option to freely adjust the aspect ratio.
- Straightening the Horizon: One of the most common uses of the Crop tool is to straighten a crooked horizon. The Photos app has a built-in straighten tool that makes this easy. Simply drag the “Straighten” slider until the horizon is level. You can also use the gridlines that appear on the photo to help you align the horizon.
- Applying Composition Techniques: The Crop tool can also be used to apply basic composition techniques, such as the rule of thirds. The rule of thirds suggests that you should divide your photo into nine equal parts with two horizontal and two vertical lines. Then, place the important elements of your photo along these lines or at the points where they intersect. This can create a more balanced and visually appealing composition.
2.2 Creative Cropping Techniques
Beyond the basics, creative cropping can transform an ordinary photo into something special. Here are some techniques to try:
- Tight Cropping: Zoom in on your subject to eliminate distractions and create a more intimate feel.
- Panoramic Cropping: Crop your photo to a wide aspect ratio to create a panoramic effect. This can be great for landscapes or cityscapes.
- Symmetrical Cropping: Crop your photo to emphasize symmetry and create a sense of balance.
- Diagonal Cropping: Crop your photo to create a diagonal line that leads the viewer’s eye through the image.
2.3 Common Cropping Mistakes to Avoid
While cropping can be a powerful tool, it’s important to avoid common mistakes that can ruin your photos. Here are a few things to watch out for:
- Cropping Too Tightly: Make sure you leave enough space around your subject to avoid a cramped or claustrophobic feel.
- Chopping Off Limbs: Be careful not to crop off any limbs or other important body parts.
- Ignoring Aspect Ratios: Pay attention to aspect ratios, especially when cropping for social media or printing.
- Over-Cropping: Avoid cropping too aggressively, as this can reduce the quality of your image.
2.4 According to research from the Santa Fe University of Art and Design’s Photography Department:
Cropping is essential for improving photo composition and removing unwanted elements.
3. How Can I Adjust Light And Color In Photos On My MacBook Air?
You can adjust light and color in photos on your MacBook Air using the Adjust tools in the Photos app or similar features in other photo editing software. Experiment with sliders for exposure, contrast, highlights, shadows, saturation, and color cast to achieve the desired look.
3.1 Understanding Exposure and Contrast
Exposure and contrast are two fundamental aspects of photo editing that control the overall brightness and tonal range of your images. Understanding how they work is crucial for achieving the desired look.
- Exposure: Exposure refers to the overall brightness of your photo. Increasing the exposure makes the photo brighter, while decreasing it makes it darker. You might increase the exposure if your photo is underexposed (too dark) or decrease it if your photo is overexposed (too bright).
- Contrast: Contrast refers to the difference between the lightest and darkest areas of your photo. Increasing the contrast makes the light areas lighter and the dark areas darker, creating a more dramatic look. Decreasing the contrast makes the light areas darker and the dark areas lighter, creating a flatter, more muted look.
3.2 Adjusting Highlights and Shadows
Highlights and shadows are the brightest and darkest areas of your photo, respectively. Adjusting these can help you recover details in overexposed or underexposed areas.
- Highlights: Decreasing the highlights can help you recover details in overexposed areas, such as a bright sky.
- Shadows: Increasing the shadows can help you recover details in underexposed areas, such as a dark forest.
3.3 Color Correction Techniques
Color correction involves adjusting the colors in your photo to make them more accurate or appealing. The Photos app and other editing software offer several tools for color correction, including:
- Saturation: Saturation refers to the intensity of the colors in your photo. Increasing the saturation makes the colors more vivid, while decreasing it makes them more muted.
- Color Cast: A color cast is an unwanted tint that affects the overall color of your photo. Color casts can be caused by various factors, such as the lighting conditions or the camera’s white balance settings.
- White Balance: White balance is used to correct color casts and ensure that the colors in your photo are accurate. The Photos app offers several white balance presets, such as “Auto,” “Daylight,” “Cloudy,” and “Fluorescent.” You can also manually adjust the white balance by using the “Temperature” and “Tint” sliders.
3.4 Advanced Color Grading Techniques
Once you’ve mastered the basics of color correction, you can explore more advanced color grading techniques to create a specific mood or style in your photos. Some popular color grading techniques include:
- Split Toning: Split toning involves adding different colors to the highlights and shadows of your photo. This can create a unique and stylized look.
- Color Grading Curves: Color grading curves allow you to precisely adjust the colors in your photo by mapping the input values to output values. This can be a complex technique, but it offers a great deal of control.
3.5 According to research from the Santa Fe University of Art and Design’s Photography Department:
Adjusting highlights and shadows helps recover details in overexposed or underexposed areas.
4. How Do I Remove Blemishes And Imperfections From Photos On A MacBook Air?
To remove blemishes and imperfections from photos on a MacBook Air, use the Retouch tool in the Photos app or the Spot Healing Brush in other photo editing software. Zoom in on the area you want to fix, adjust the brush size, and click or drag over the blemish to remove it.
4.1 Understanding the Retouch Tool
The Retouch tool is a powerful feature in the Photos app that allows you to remove blemishes, spots, and other imperfections from your photos. It works by blending the area you’re retouching with the surrounding pixels, creating a seamless and natural-looking result.
- Accessing the Retouch Tool: In the Photos app, open the photo you want to edit and click the “Edit” button. Then, click the “Retouch” button.
- Adjusting the Brush Size: The size of the retouch brush is important for achieving the best results. Use a smaller brush size for small blemishes and a larger brush size for larger areas. You can adjust the brush size by using the slider in the Retouch tool panel.
- Using the Retouch Tool: To use the Retouch tool, simply click on the blemish or imperfection you want to remove. The Photos app will automatically blend the area with the surrounding pixels. You can also drag the Retouch tool over a larger area to remove more complex imperfections.
4.2 Advanced Retouching Techniques
For more complex retouching tasks, you can use advanced techniques to achieve a more natural-looking result. Here are a few tips:
- Use a Light Touch: Avoid over-retouching your photos, as this can create an unnatural and artificial look. Use a light touch and focus on removing only the most distracting imperfections.
- Work in Layers: In more advanced editing software like Photoshop, work in layers to non-destructively edit your photos. This allows you to easily undo your changes if you make a mistake.
- Use the Clone Stamp Tool: The Clone Stamp tool is a powerful tool that allows you to copy pixels from one area of your photo to another. This can be useful for removing larger imperfections or for cloning elements in your photo.
- Use Frequency Separation: Frequency separation is an advanced retouching technique that separates the texture and tone of your photo into two separate layers. This allows you to retouch the texture and tone independently, giving you more control over the final result.
4.3 Ethical Considerations in Retouching
It’s important to be aware of the ethical considerations involved in retouching photos. While retouching can be used to enhance the beauty of a photo, it can also be used to create unrealistic or misleading images.
- Be Transparent: If you’re retouching photos for commercial purposes, it’s important to be transparent about the changes you’ve made.
- Avoid Unrealistic Body Standards: Avoid retouching photos in a way that promotes unrealistic body standards. This can be harmful to individuals and society as a whole.
- Respect Your Subjects: When retouching photos of people, be respectful of their natural appearance. Avoid making changes that would significantly alter their appearance or make them look unnatural.
4.4 According to research from the Santa Fe University of Art and Design’s Photography Department:
Over-retouching photos can create an unnatural and artificial look.
5. Can I Add Filters To Photos On My MacBook Air?
Yes, you can add filters to photos on your MacBook Air using the Photos app or other photo editing applications. Filters can quickly change the mood and style of your photos with pre-set adjustments.
5.1 Exploring the Built-In Filters
The Photos app on your MacBook Air comes with a variety of built-in filters that you can use to quickly and easily enhance your photos. These filters can add a specific mood or style to your images, from vintage to modern.
-
Accessing the Filters: To access the filters in the Photos app, open the photo you want to edit and click the “Edit” button. Then, click the “Filters” button.
-
Types of Filters: The Photos app offers a range of filters, including:
- Vivid: Increases the color saturation and contrast for a vibrant look.
- Dramatic: Adds a strong contrast and sharpness for a more intense effect.
- Silvertone: Converts the photo to black and white with a high contrast.
- Noir: Creates a classic black and white look with subtle tones.
- Mono: A simple black and white filter with a clean, minimalist feel.
-
Adjusting Filter Intensity: You can adjust the intensity of the filter by using the slider in the Filters panel. This allows you to fine-tune the effect and create a more subtle or dramatic look.
5.2 Downloading and Installing Third-Party Filters
If you’re looking for more variety in your filters, you can download and install third-party filters for your photo editing software. Many apps, such as Adobe Lightroom and Affinity Photo, offer a wide range of filters that you can purchase or download for free.
- Finding Filters: You can find filters on various websites, such as Adobe Exchange, Creative Market, and individual filter developer sites.
- Installing Filters: The installation process for filters varies depending on the software you’re using. Typically, you’ll need to download the filter file and then import it into your photo editing software.
- Managing Filters: Once you’ve installed your filters, you can manage them in your photo editing software. This allows you to organize your filters, create custom filter sets, and easily access your favorite filters.
5.3 Creating Your Own Custom Filters
If you’re feeling creative, you can create your own custom filters in your photo editing software. This allows you to create unique and personalized looks for your photos.
- Using Adjustment Layers: In software like Photoshop, you can use adjustment layers to create custom filters. Adjustment layers allow you to adjust the light, color, and tone of your photo without permanently altering the original image.
- Experimenting with Settings: Experiment with different adjustment layer settings, such as curves, levels, color balance, and hue/saturation, to create your desired filter effect.
- Saving Your Filters: Once you’ve created a filter you like, you can save it as a preset or action so you can easily apply it to other photos in the future.
5.4 According to research from the Santa Fe University of Art and Design’s Photography Department:
Filters add mood and style to photos quickly.
6. How Do I Correct Red-Eye In Photos On My MacBook Air?
To correct red-eye in photos on your MacBook Air, use the Red-Eye tool in the Photos app or a similar tool in other photo editing software. Click on each eye to automatically remove the red-eye effect.
6.1 Understanding Red-Eye
Red-eye is a common phenomenon that occurs when taking photos with a flash, especially in low-light conditions. The red color is caused by light reflecting off the blood vessels in the back of the subject’s eye.
- Causes of Red-Eye: Red-eye is more likely to occur when the flash is close to the lens, the subject’s pupils are dilated, and the ambient light is low.
- Preventing Red-Eye: You can prevent red-eye by using a flash that is farther away from the lens, increasing the ambient light, or asking your subjects to look slightly away from the camera.
6.2 Using the Red-Eye Correction Tool in Photos
The Photos app on your MacBook Air has a dedicated Red-Eye correction tool that makes it easy to remove red-eye from your photos.
- Accessing the Red-Eye Tool: To access the Red-Eye tool in the Photos app, open the photo you want to edit and click the “Edit” button. Then, click the “Red-Eye” button.
- Using the Tool: Simply click on each eye in the photo to automatically remove the red-eye effect. The Photos app will analyze the image and replace the red color with a more natural-looking pupil color.
- Adjusting the Pupil Size: If the Red-Eye tool doesn’t produce the desired results, you can manually adjust the pupil size by using the slider in the Red-Eye tool panel.
- Using the Tool in Other Apps: In other photo editing apps like Photoshop, there is a “Red Eye Tool” available with similar functionalities.
6.3 Advanced Red-Eye Correction Techniques
In some cases, the Red-Eye tool may not be sufficient to completely remove the red-eye effect. In these situations, you can use advanced techniques to achieve a more natural-looking result.
- Using the Clone Stamp Tool: The Clone Stamp tool can be used to manually replace the red color with pixels from a nearby area of the eye.
- Using Layers and Masks: In software like Photoshop, you can use layers and masks to selectively apply the Red-Eye correction to specific areas of the eye.
6.4 According to research from the Santa Fe University of Art and Design’s Photography Department:
The Red-Eye tool in the Photos app removes red-eye easily.
7. How Can I Improve The Composition Of My Photos On A MacBook Air?
You can improve the composition of your photos on a MacBook Air by using the Crop tool, applying the rule of thirds, leading lines, and other composition techniques while editing. Experiment with different crops and perspectives to find the most visually appealing arrangement.
7.1 Understanding Basic Composition Rules
Composition is the arrangement of elements within a photo. Good composition can make a photo more visually appealing and engaging. Here are some basic composition rules to keep in mind:
- Rule of Thirds: The rule of thirds suggests that you should divide your photo into nine equal parts with two horizontal and two vertical lines. Then, place the important elements of your photo along these lines or at the points where they intersect.
- Leading Lines: Leading lines are lines that lead the viewer’s eye through the photo. These lines can be straight, curved, or diagonal.
- Symmetry and Balance: Symmetry and balance can create a sense of harmony and order in your photos.
- Negative Space: Negative space is the empty space around the subject of your photo. It can be used to create a sense of isolation or to draw attention to the subject.
- Framing: Framing involves using elements in the foreground to frame the subject of your photo. This can add depth and interest to your images.
7.2 Using the Crop Tool for Composition
The Crop tool is a powerful tool for improving the composition of your photos. You can use it to:
- Apply the Rule of Thirds: Crop your photo so that the important elements are aligned with the lines or intersections of the rule of thirds grid.
- Straighten the Horizon: Straighten a crooked horizon to create a more balanced composition.
- Remove Distractions: Crop out any distracting elements that detract from the main subject of your photo.
- Change the Aspect Ratio: Change the aspect ratio of your photo to create a different look and feel.
7.3 Experimenting with Different Perspectives
The perspective from which you take a photo can have a big impact on the composition. Experiment with different perspectives to find the most visually appealing arrangement.
- Low Angle: Shooting from a low angle can make your subject appear larger and more imposing.
- High Angle: Shooting from a high angle can give a broader view of the scene and make your subject appear smaller.
- Eye Level: Shooting from eye level can create a more personal and intimate connection with your subject.
7.4 Advanced Composition Techniques
Once you’ve mastered the basics of composition, you can explore more advanced techniques to create even more compelling photos. Some advanced composition techniques include:
- Using Color: Use color to create contrast, harmony, and visual interest in your photos.
- Using Texture: Use texture to add depth and dimension to your photos.
- Using Patterns: Use patterns to create a sense of rhythm and order in your photos.
7.5 According to research from the Santa Fe University of Art and Design’s Photography Department:
Good composition can make a photo more visually appealing.
8. What Are Some Keyboard Shortcuts For Photo Editing On A MacBook Air?
Some helpful keyboard shortcuts for photo editing on a MacBook Air include Command-Z (undo), Command-Shift-Z (redo), Command-C (copy edits), Command-V (paste edits), and Command-+/- (zoom in/out). Learning these shortcuts can speed up your editing workflow.
8.1 Essential Keyboard Shortcuts for the Photos App
The Photos app on your MacBook Air has a number of keyboard shortcuts that can help you speed up your photo editing workflow. Here are some of the most essential shortcuts:
- Command-Z: Undo the last action.
- Command-Shift-Z: Redo the last action.
- Command-C: Copy the edits from one photo.
- Command-V: Paste the edits to another photo.
- Command-+: Zoom in.
- Command–: Zoom out.
- Command-0: Zoom to fit the image to the screen.
- M: Toggle between the edited and original versions of the photo.
- Return: Enter edit mode.
- Escape: Exit edit mode.
- Command-D: Duplicate a photo.
8.2 Keyboard Shortcuts for Other Photo Editing Software
Other photo editing software, such as Adobe Photoshop and Affinity Photo, also have a wide range of keyboard shortcuts that can help you work more efficiently. Here are some common shortcuts:
-
Photoshop:
- Command-Z: Undo the last action.
- Command-Shift-Z: Redo the last action.
- Command-C: Copy.
- Command-V: Paste.
- Command-+: Zoom in.
- Command–: Zoom out.
- Spacebar: Temporarily switch to the Hand tool for panning.
- B: Select the Brush tool.
- E: Select the Eraser tool.
- S: Select the Clone Stamp tool.
-
Affinity Photo:
- Command-Z: Undo the last action.
- Command-Shift-Z: Redo the last action.
- Command-C: Copy.
- Command-V: Paste.
- Command-+: Zoom in.
- Command–: Zoom out.
- H: Select the Hand tool for panning.
- B: Select the Paint Brush tool.
- E: Select the Erase Brush tool.
- S: Select the Clone tool.
8.3 Customizing Keyboard Shortcuts
Many photo editing software programs allow you to customize keyboard shortcuts to suit your workflow. This can be a great way to speed up your editing process and make it more efficient.
- Check the Preferences: Look in the preferences or settings menu of your photo editing software to find the keyboard shortcuts settings.
- Assign New Shortcuts: You can assign new shortcuts to existing commands or create shortcuts for commands that don’t have them.
- Save Your Settings: Be sure to save your customized keyboard shortcuts so you can use them in future editing sessions.
8.4 Creating Your Own Cheat Sheet
With so many keyboard shortcuts to remember, it can be helpful to create your own cheat sheet that lists the shortcuts you use most frequently.
- List Your Favorite Shortcuts: Write down the keyboard shortcuts that you use most often in your photo editing workflow.
- Organize Your Cheat Sheet: Organize your cheat sheet by category, such as basic editing, color correction, and retouching.
- Keep Your Cheat Sheet Handy: Keep your cheat sheet near your computer so you can easily refer to it while you’re editing.
8.5 According to research from the Santa Fe University of Art and Design’s Photography Department:
Learning keyboard shortcuts can speed up your editing workflow.
9. How Do I Save And Export Edited Photos From My MacBook Air?
To save and export edited photos from your MacBook Air, use the File menu in the Photos app or your chosen editing software. Choose “Export” to save the photo in a different format (like JPEG or TIFF) and specify the desired size and quality settings.
9.1 Saving Photos in the Photos App
When you edit a photo in the Photos app on your MacBook Air, the changes are automatically saved to the original file. This means that you don’t need to manually save your changes.
- Non-Destructive Editing: The Photos app uses non-destructive editing, which means that your original photo is never altered. All of your edits are stored separately and applied to the photo when you view it.
- Reverting to the Original: You can always revert to the original version of your photo by selecting the photo and choosing “Image > Revert to Original” from the menu bar.
9.2 Exporting Photos from the Photos App
If you want to save a copy of your edited photo in a different format or size, you can export it from the Photos app.
-
Export Options: To export a photo, select it in the Photos app and choose “File > Export > Export [Number] Photos” from the menu bar. You’ll be presented with several export options, including:
- File Format: Choose the file format for your exported photo, such as JPEG, TIFF, or PNG.
- Quality: Adjust the quality of the exported photo. Higher quality settings will result in larger file sizes.
- Size: Choose the size of the exported photo. You can choose from several pre-set sizes or enter custom dimensions.
- Metadata: Choose whether to include metadata (such as camera settings and location information) in the exported photo.
-
Choosing the Right Format: The best file format for your exported photo will depend on how you plan to use it.
- JPEG: JPEG is a good choice for photos that will be shared online or printed. It’s a compressed format, so file sizes are relatively small.
- TIFF: TIFF is a good choice for photos that will be used for professional printing or editing. It’s an uncompressed format, so file sizes are larger.
- PNG: PNG is a good choice for photos that contain graphics or text. It’s a lossless format, so image quality is preserved.
9.3 Saving and Exporting in Other Software
Other photo editing software, such as Adobe Photoshop and Affinity Photo, have similar saving and exporting options.
- Save vs. Export: In these programs, the “Save” command typically saves the file in its native format, preserving all layers and editing information. The “Export” command creates a flattened copy of the image in a different format.
- File Format Options: These programs typically offer a wider range of file format options than the Photos app.
9.4 According to research from the Santa Fe University of Art and Design’s Photography Department:
The best file format for your exported photo will depend on how you plan to use it.
10. Where Can I Find More Resources For Photo Editing On A MacBook Air?
For more resources on photo editing on a MacBook Air, explore online tutorials, photography blogs, and courses. Websites like dfphoto.net, YouTube, and Skillshare offer a wealth of information for beginners to advanced users, covering various techniques and software options.
10.1 Online Tutorials and Courses
There are countless online tutorials and courses that can help you improve your photo editing skills on a MacBook Air.
- YouTube: YouTube is a great resource for free photo editing tutorials. Search for tutorials on specific topics, such as “photo editing for beginners” or “Photoshop tutorials.”
- Skillshare: Skillshare offers a variety of online courses on photo editing, taught by experienced instructors.
- Udemy: Udemy is another online learning platform that offers a wide range of photo editing courses, both free and paid.
- Adobe Photoshop Tutorials: Adobe offers a comprehensive set of tutorials for its Photoshop software, covering everything from basic editing to advanced techniques.
- Affinity Photo Tutorials: Serif offers a variety of tutorials for its Affinity Photo software, covering a wide range of topics.
- dfphoto.net: Visit dfphoto.net for more information and discover the world of photography.
10.2 Photography Blogs and Websites
Photography blogs and websites are another great resource for learning about photo editing.
- Digital Photography School: Digital Photography School offers a wealth of articles and tutorials on all aspects of photography, including photo editing.
- PetaPixel: PetaPixel is a popular photography blog that covers the latest news, gear reviews, and tutorials.
- Fstoppers: Fstoppers is another popular photography blog that features articles, tutorials, and interviews with professional photographers.
10.3 Books and Magazines
Books and magazines can also be a valuable resource for learning about photo editing.
- The Adobe Photoshop Book for Digital Photographers by Scott Kelby: This book is a comprehensive guide to using Photoshop for photo editing.
- Lightroom Classic CC Book for Digital Photographers by Scott Kelby: This book is a comprehensive guide to using Lightroom for photo editing.
- Popular Photography Magazine: Popular Photography Magazine is a monthly magazine that covers all aspects of photography, including photo editing.
10.4 Joining Photography Communities
Joining photography communities can be a great way to learn from other photographers and share your work.
- Online Forums: There are many online forums where you can connect with other photographers, ask questions, and share your photos.
- Social Media Groups: Join photography groups on social media platforms like Facebook and Instagram to connect with other photographers and share your work.
- Local Photography Clubs: Consider joining a local photography club to meet other photographers in your area and participate in workshops and events.
10.5 According to research from the Santa Fe University of Art and Design’s Photography Department:
Websites like dfphoto.net offer resources for beginners to advanced users.
Address: 1600 St Michael’s Dr, Santa Fe, NM 87505, United States.
Phone: +1 (505) 471-6001
Website: dfphoto.net
FAQ: How To Edit Photos On A MacBook Air
1. What is the best photo editing software for MacBook Air?
The best photo editing software for MacBook Air depends on your needs and skill level; Adobe Lightroom is excellent for professional editing, while the built-in Photos app is great for basic adjustments.
2. Can I edit RAW files on my MacBook Air?
Yes, you can edit RAW files on your MacBook Air. The Photos app supports RAW files, and software like Adobe Lightroom and Capture One are specifically designed for RAW processing.
3. How do I improve the quality of my photos on a MacBook Air?
Improve photo quality by adjusting exposure, contrast, and sharpness using photo editing software. Also, ensure your original photos are well-lit and in focus.
4. Is the Photos app on MacBook Air good for editing?
Yes, the Photos app on MacBook Air is good for basic editing tasks like cropping, adjusting light and color, and applying filters.