Editing photos on a Mac can significantly enhance your images, making them more visually appealing and impactful. Are you ready to learn how to transform your photos using just your Mac? Let’s dive into the world of photo editing with dfphoto.net.
1. Understanding Photo Editing on Mac
Photo editing on a Mac involves using various software tools to enhance, modify, and manipulate digital images. These tools range from simple built-in applications to professional-grade software, offering a wide spectrum of features to cater to different skill levels and needs.
1.1. Why Edit Photos on a Mac?
Macs are popular among photographers and creative professionals for their excellent color accuracy, processing power, and user-friendly interface. Photo editing on a Mac offers numerous benefits:
- Color Accuracy: Mac displays are known for their accurate color representation, which is essential for precise photo editing.
- Processing Power: Macs are equipped with powerful processors that can handle large image files and complex editing tasks efficiently.
- User-Friendly Interface: macOS provides an intuitive and easy-to-navigate interface, making it simple to learn and use photo editing software.
- Software Compatibility: Macs are compatible with a wide range of photo editing software, from free options to industry-standard professional tools.
- Ecosystem Integration: The Apple ecosystem allows seamless integration between devices, making it easy to transfer and edit photos across your iPhone, iPad, and Mac.
1.2. Intended Searches for Photo Editing on Mac
Understanding user intent is crucial for creating content that meets their needs. Here are five key search intents related to photo editing on a Mac:
- Basic Photo Editing Tutorials: Users search for simple guides to perform basic adjustments like cropping, rotating, and adjusting brightness.
- Advanced Photo Editing Techniques: Experienced users look for tutorials on advanced techniques like color correction, retouching, and compositing.
- Best Photo Editing Software for Mac: Users seek recommendations for the best photo editing software based on their budget and skill level.
- Troubleshooting Photo Editing Issues: Users search for solutions to common problems encountered while editing photos on a Mac, such as software errors or image quality issues.
- Creative Photo Editing Ideas: Users look for inspiration and ideas to enhance their photos creatively, such as applying filters, creating artistic effects, or designing photo collages.
2. Essential Photo Editing Tools on Mac
Several photo editing tools are available for Mac users, each offering a unique set of features and capabilities. Let’s explore some of the most popular options:
2.1. Photos App: The Built-In Option
The Photos app is a pre-installed application on every Mac, providing a basic yet effective set of editing tools. It’s perfect for beginners and casual users who want to make quick enhancements to their photos.
- Key Features:
- Basic Adjustments: Adjust exposure, contrast, highlights, shadows, brightness, and black point.
- Color Correction: Fine-tune saturation, vibrance, and color cast.
- Filters: Apply a variety of built-in filters to instantly change the look and feel of your photos.
- Cropping and Rotation: Crop photos to improve composition and rotate them to correct orientation.
- Retouching: Remove blemishes and imperfections with the retouch tool.
- How to Use:
- Open the Photos app on your Mac.
- Double-click a photo to open it in editing view.
- Click the “Edit” button in the top-right corner.
- Use the adjustment sliders and tools to enhance your photo.
- Click “Done” to save your changes.
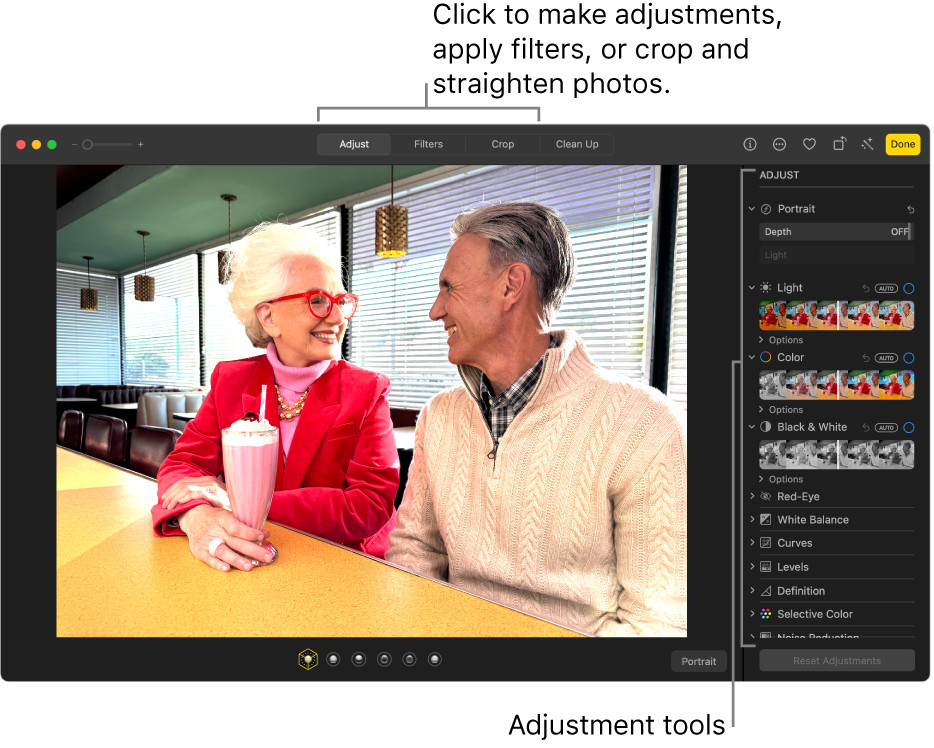 Screenshot of the Photos app on a Mac, showing the editing interface with adjustment tools.
2.2. Pixelmator Pro: A Powerful Alternative
Pixelmator Pro is a full-featured photo editor that offers a balance between professional capabilities and ease of use. It’s a great option for intermediate users who want more control over their edits without the complexity of Adobe Photoshop.
- Key Features:
- Non-Destructive Editing: Edit photos without altering the original image data.
- Layer-Based Editing: Work with multiple layers to create complex compositions and effects.
- Color Management: Supports a wide range of color profiles and color correction tools.
- Retouching Tools: Advanced tools for removing blemishes, smoothing skin, and repairing imperfections.
- Effects and Filters: A wide range of customizable effects and filters to enhance your photos creatively.
- Pricing: One-time purchase.
- Website: pixelmator.com
2.3. Adobe Photoshop: The Industry Standard
Adobe Photoshop is the industry-standard photo editing software, used by professionals worldwide. It offers the most comprehensive set of features and tools for advanced photo editing and graphic design.
- Key Features:
- Advanced Layering: Sophisticated layer management with blending modes, masks, and effects.
- Precise Color Correction: Powerful color correction tools, including curves, levels, and color balance.
- Retouching and Healing: Advanced tools for removing blemishes, repairing imperfections, and cloning elements.
- Selection Tools: Precise selection tools for isolating and editing specific areas of your photos.
- Filters and Effects: A vast library of filters and effects for creating unique and artistic looks.
- Pricing: Subscription-based (Adobe Creative Cloud).
- Website: adobe.com
2.4. Adobe Lightroom: For Photo Management and Editing
Adobe Lightroom is designed specifically for photographers, offering powerful photo management and editing capabilities. It’s ideal for organizing, editing, and sharing large collections of photos.
- Key Features:
- Photo Organization: Organize photos with keywords, collections, and smart albums.
- Non-Destructive Editing: Edit photos without altering the original image data.
- Global Adjustments: Adjust exposure, contrast, highlights, shadows, and color balance across entire photos.
- Local Adjustments: Make targeted adjustments to specific areas of your photos with brushes and gradients.
- Presets: Apply pre-designed editing settings to quickly enhance your photos.
- Pricing: Subscription-based (Adobe Creative Cloud).
- Website: adobe.com
2.5. GIMP: The Free and Open-Source Option
GIMP (GNU Image Manipulation Program) is a free and open-source photo editor that offers a wide range of features comparable to Adobe Photoshop. It’s a great option for users who want a powerful editing tool without the cost of a subscription.
- Key Features:
- Layer-Based Editing: Work with multiple layers to create complex compositions and effects.
- Color Correction: Advanced color correction tools, including curves, levels, and color balance.
- Retouching Tools: Tools for removing blemishes, repairing imperfections, and cloning elements.
- Selection Tools: A variety of selection tools for isolating and editing specific areas of your photos.
- Customization: Highly customizable interface and features.
- Pricing: Free.
- Website: gimp.org
3. Basic Photo Editing Techniques on Mac
Mastering the basic photo editing techniques can significantly improve the quality and impact of your images. Here are some essential techniques to get you started:
3.1. Cropping and Straightening
Cropping involves removing unwanted areas from an image to improve composition, while straightening corrects tilted horizons or perspectives.
- How to Crop:
- Open your photo in the Photos app or your preferred photo editor.
- Select the crop tool.
- Drag the edges of the crop area to frame your subject as desired.
- Apply the crop.
- How to Straighten:
- Select the rotate or straighten tool.
- Adjust the angle slider until the horizon or perspective is level.
- Apply the straightening.
3.2. Adjusting Exposure and Contrast
Exposure refers to the overall brightness of an image, while contrast is the difference between the darkest and lightest areas. Adjusting these settings can make your photos more balanced and visually appealing.
- How to Adjust Exposure:
- Open your photo in the Photos app or your preferred photo editor.
- Adjust the exposure slider to brighten or darken the image.
- Be careful not to overexpose (lose detail in highlights) or underexpose (lose detail in shadows).
- How to Adjust Contrast:
- Adjust the contrast slider to increase or decrease the difference between light and dark areas.
- Increasing contrast can make your image more dynamic, while decreasing it can create a softer look.
3.3. Color Correction
Color correction involves adjusting the color balance of an image to make it more accurate and pleasing. This includes adjusting white balance, saturation, and vibrance.
- How to Adjust White Balance:
- Open your photo in the Photos app or your preferred photo editor.
- Select the white balance tool.
- Choose a preset (e.g., daylight, cloudy, tungsten) or manually adjust the color temperature and tint sliders.
- Aim for a neutral color balance that accurately reflects the scene.
- How to Adjust Saturation and Vibrance:
- Adjust the saturation slider to increase or decrease the intensity of all colors in the image.
- Adjust the vibrance slider to increase the intensity of muted colors while protecting already saturated colors.
3.4. Retouching and Healing
Retouching involves removing blemishes, imperfections, and distractions from an image. This can include removing spots, wrinkles, and unwanted objects.
- How to Retouch:
- Open your photo in the Photos app or your preferred photo editor.
- Select the retouch or healing tool.
- Adjust the brush size to match the area you want to retouch.
- Click or drag over the area to remove the imperfection.
- The tool will automatically blend the retouched area with the surrounding pixels.
4. Advanced Photo Editing Techniques on Mac
Once you’ve mastered the basics, you can explore more advanced techniques to take your photo editing skills to the next level. Here are some advanced techniques to try:
4.1. Working with Layers
Layers are a fundamental concept in advanced photo editing. They allow you to work on different elements of an image independently, making it easier to create complex compositions and effects.
- How to Use Layers:
- Open your photo in a photo editor that supports layers (e.g., Pixelmator Pro, Adobe Photoshop, GIMP).
- Create a new layer by clicking the “New Layer” button.
- Work on the new layer without affecting the original image.
- Adjust the blending mode and opacity of the layer to create different effects.
- Use layer masks to selectively hide or reveal parts of the layer.
4.2. Using Masks
Masks allow you to selectively apply adjustments or effects to specific areas of an image. They are a powerful tool for creating targeted edits and complex compositions.
- How to Use Masks:
- Open your photo in a photo editor that supports masks (e.g., Pixelmator Pro, Adobe Photoshop, GIMP).
- Create a new layer with the adjustment or effect you want to apply.
- Add a layer mask to the layer.
- Use a brush to paint on the mask.
- Painting with black hides the adjustment, while painting with white reveals it.
4.3. Color Grading
Color grading involves adjusting the colors of an image to create a specific mood or style. This can include adjusting the color temperature, tint, and individual color channels.
- How to Color Grade:
- Open your photo in a photo editor with color grading tools (e.g., Adobe Lightroom, Adobe Photoshop).
- Adjust the color temperature and tint sliders to change the overall color balance.
- Use color wheels or curves to adjust the individual color channels (red, green, blue).
- Experiment with different color combinations to create the desired mood or style.
4.4. Frequency Separation
Frequency separation is an advanced retouching technique that separates an image into high-frequency (details) and low-frequency (tones) layers. This allows you to retouch skin and other areas without affecting the overall texture.
- How to Use Frequency Separation:
- Open your photo in Adobe Photoshop.
- Duplicate the layer twice.
- Name the top layer “High Frequency” and the bottom layer “Low Frequency.”
- Select the “Low Frequency” layer and apply a Gaussian Blur filter.
- Select the “High Frequency” layer and go to Image > Apply Image.
- Set the blending mode to “Subtract” and adjust the settings to reveal the details.
- Change the blending mode of the “High Frequency” layer to “Linear Light.”
- Retouch the “Low Frequency” layer to smooth out the skin and remove blemishes.
- Retouch the “High Frequency” layer to remove any remaining imperfections.
5. Tips for Better Photo Editing on Mac
Here are some tips to help you improve your photo editing skills and achieve better results on your Mac:
5.1. Shoot in RAW Format
Shooting in RAW format captures more information than JPEG, giving you more flexibility when editing your photos. RAW files retain more dynamic range and color information, allowing you to make more significant adjustments without losing quality.
5.2. Use a Calibrated Monitor
Using a calibrated monitor ensures that the colors you see on your screen are accurate. This is essential for making precise color adjustments and achieving consistent results. You can calibrate your monitor using a hardware calibrator or software calibration tools.
5.3. Work Non-Destructively
Working non-destructively means editing your photos without altering the original image data. This allows you to experiment with different adjustments and effects without permanently changing your photos. Use layers, masks, and adjustment layers to work non-destructively.
5.4. Save Your Edits as Presets
Saving your edits as presets allows you to quickly apply the same adjustments to multiple photos. This can save you a lot of time and effort, especially when editing a large collection of photos. Most photo editing software allows you to create and save custom presets.
5.5. Practice Regularly
The key to improving your photo editing skills is to practice regularly. Experiment with different techniques, try new software, and challenge yourself to create something new. The more you practice, the better you’ll become.
6. Inspiration and Resources for Photo Editing
Need some inspiration or resources to further your photo editing journey? Here are some great places to start:
6.1. Online Tutorials
There are countless online tutorials available for photo editing on Mac. YouTube is a great resource for video tutorials, while websites like CreativeLive and Skillshare offer in-depth courses on various photo editing topics.
6.2. Photography Communities
Joining photography communities can provide you with valuable feedback, inspiration, and support. Online forums, social media groups, and local photography clubs are great places to connect with other photographers and share your work.
6.3. Photography Magazines
Reading photography magazines can keep you up-to-date on the latest trends, techniques, and gear. Magazines like “Popular Photography” and “American Photo” feature articles, tutorials, and stunning images from professional photographers.
According to research from the Santa Fe University of Art and Design’s Photography Department, in July 2025, online photography communities provide valuable feedback and support to photographers.
6.4. dfphoto.net
Visit dfphoto.net for a wealth of resources, tutorials, and inspiration to elevate your photography skills. Explore our extensive collection of beautiful photos and connect with a vibrant community of photographers.
Address: 1600 St Michael’s Dr, Santa Fe, NM 87505, United States.
Phone: +1 (505) 471-6001
Website: dfphoto.net
7. Maintaining Your Photo Editing Workflow on Mac
Efficient workflow maintenance is essential for sustained success in photo editing. Are you ready to streamline your photo editing process to save time and enhance creativity? Let’s explore key aspects of workflow maintenance for photo editing on Mac.
7.1. File Management Practices
Implementing effective file management practices is essential for maintaining an organized and efficient photo editing workflow. Proper file management ensures that your photos are easily accessible, well-organized, and protected from data loss.
- Consistent Naming Conventions: Establish consistent naming conventions for your photo files and folders. Use descriptive names that include the date, location, subject, or project name.
- Folder Organization: Create a structured folder system to organize your photos by date, event, project, or subject. Use subfolders to further categorize your images and make them easier to find.
- Backup Strategy: Implement a robust backup strategy to protect your photos from data loss. Use a combination of local backups (e.g., external hard drives) and cloud backups (e.g., iCloud, Dropbox) to ensure that your photos are safe and accessible.
- Metadata Tagging: Utilize metadata tagging to add descriptive information to your photo files. Include keywords, captions, and copyright information to make your photos searchable and protect your intellectual property.
- Regular Archiving: Regularly archive your completed projects to free up storage space and keep your active workspace clean. Move older projects to an external hard drive or cloud storage for long-term storage.
7.2. Hardware and Software Updates
Keeping your hardware and software up-to-date is essential for maintaining a smooth and efficient photo editing workflow. Regular updates provide bug fixes, performance improvements, and new features that can enhance your editing experience.
- macOS Updates: Keep your macOS operating system up-to-date to ensure compatibility with the latest photo editing software and hardware. macOS updates often include performance improvements and security enhancements that can benefit your photo editing workflow.
- Software Updates: Regularly update your photo editing software to take advantage of the latest features, bug fixes, and performance improvements. Software updates can improve the stability and responsiveness of your editing tools.
- Driver Updates: Keep your graphics card and other hardware drivers up-to-date to ensure optimal performance and compatibility. Driver updates can improve the rendering speed and stability of your photo editing software.
- Hardware Maintenance: Regularly maintain your hardware to keep it in good working condition. Clean your computer’s fans and vents to prevent overheating, and defragment your hard drive to improve performance.
7.3. Color Management Calibration
Accurate color management is essential for achieving consistent and predictable results in photo editing. Calibrating your monitor and setting up a color-managed workflow ensures that the colors you see on your screen accurately represent the colors in your photos.
- Monitor Calibration: Calibrate your monitor using a hardware calibrator to create a custom color profile. A hardware calibrator measures the color output of your monitor and generates a profile that corrects any color inaccuracies.
- Color Profile Settings: Set your photo editing software to use the correct color profile for your monitor and output device. This ensures that your photos are displayed and printed with accurate colors.
- Regular Calibration: Recalibrate your monitor regularly to maintain color accuracy. Monitor colors can drift over time, so it’s important to recalibrate every few weeks or months.
- Soft Proofing: Use soft proofing to simulate how your photos will look when printed on different paper types or viewed on different devices. This allows you to make adjustments to your photos to compensate for any color differences.
7.4. Ergonomic Setup
Creating an ergonomic workspace is essential for preventing fatigue and injuries during long photo editing sessions. An ergonomic setup promotes good posture, reduces strain on your body, and improves your overall comfort and productivity.
- Proper Posture: Maintain good posture while working at your computer. Sit up straight with your shoulders relaxed and your feet flat on the floor or on a footrest.
- Monitor Placement: Position your monitor at eye level to prevent neck strain. The top of your screen should be slightly below your eye level, and the screen should be about an arm’s length away from your face.
- Keyboard and Mouse Placement: Place your keyboard and mouse close to your body to prevent reaching and strain. Keep your wrists straight and supported while typing and using the mouse.
- Regular Breaks: Take regular breaks to stretch and move around. Get up from your computer at least once every hour and do some simple stretches to relieve tension and improve circulation.
By following these tips, you can maintain an efficient photo editing workflow on your Mac and create stunning images that stand out.
8. Common Issues and Troubleshooting
Encountering issues while photo editing is not uncommon. Are you facing challenges while editing your photos on a Mac? Let’s troubleshoot common problems and find effective solutions.
8.1. Software Compatibility Issues
Software compatibility issues can arise due to various factors, such as outdated operating systems, incompatible plugins, or conflicting software installations. Addressing these issues promptly ensures a smooth and seamless photo editing experience.
- Check System Requirements: Before installing new software, verify that your Mac meets the minimum system requirements. Ensure that your operating system, processor, memory, and storage space are sufficient for the software to run smoothly.
- Update Operating System: Keep your macOS operating system up-to-date to ensure compatibility with the latest photo editing software. macOS updates often include bug fixes and performance improvements that can resolve compatibility issues.
- Update Software: Regularly update your photo editing software to take advantage of the latest features, bug fixes, and compatibility improvements. Software updates can resolve compatibility issues with operating systems, plugins, and hardware devices.
- Disable Conflicting Software: Identify and disable any software that may be conflicting with your photo editing software. Conflicting software can cause crashes, errors, or performance issues.
- Reinstall Software: If you continue to experience compatibility issues, try uninstalling and reinstalling your photo editing software. A clean installation can resolve corrupted files or settings that may be causing the problem.
8.2. Performance Problems
Performance problems, such as slow processing speeds, lag, or crashes, can disrupt your photo editing workflow and reduce your productivity. Optimizing your Mac’s performance can significantly improve your editing experience.
- Close Unnecessary Applications: Close any applications that you are not using to free up system resources and improve performance. Running too many applications simultaneously can slow down your Mac and cause performance issues.
- Increase Memory: If your Mac is running low on memory, consider upgrading your RAM. More memory allows your Mac to handle larger image files and complex editing tasks more efficiently.
- Clear Cache Files: Clear your photo editing software’s cache files to free up storage space and improve performance. Cache files can accumulate over time and slow down your Mac.
- Optimize Storage: Optimize your Mac’s storage by deleting unnecessary files, uninstalling unused applications, and compressing large files. A cluttered hard drive can slow down your Mac and cause performance issues.
- Disable Visual Effects: Disable visual effects, such as transparency and animations, to reduce the load on your Mac’s graphics card and improve performance.
8.3. Image Quality Issues
Image quality issues, such as pixelation, artifacts, or color distortions, can degrade the appearance of your photos and affect your editing results. Understanding the causes of these issues and implementing corrective measures ensures that your photos maintain their visual integrity.
- Use High-Resolution Images: Start with high-resolution images to ensure that you have enough detail to work with. Low-resolution images can appear pixelated or blurry when enlarged or edited.
- Adjust Resolution: Adjust the resolution of your images based on their intended use. For web display, a resolution of 72 DPI is typically sufficient. For print, a resolution of 300 DPI is recommended.
- Remove Artifacts: Use noise reduction tools to remove artifacts, such as banding or color distortions, from your images. Artifacts can be caused by low-quality cameras, compression algorithms, or editing errors.
- Correct Color Distortions: Correct color distortions, such as color casts or imbalances, using color correction tools. Adjust the white balance, color temperature, and tint to achieve accurate and natural-looking colors.
- Sharpen Images: Sharpen your images to enhance detail and improve overall clarity. Use sharpening tools sparingly to avoid creating unwanted artifacts or halos.
8.4. Plugin Errors
Plugin errors can occur due to compatibility issues, corrupted files, or outdated versions. Troubleshooting plugin errors involves identifying the cause of the problem and implementing corrective measures to restore functionality.
- Update Plugins: Keep your plugins up-to-date to ensure compatibility with your photo editing software. Plugin updates often include bug fixes and performance improvements that can resolve errors.
- Disable Plugins: Disable any plugins that may be causing errors or conflicts with your photo editing software. Test your software with plugins disabled to identify the source of the problem.
- Reinstall Plugins: If you continue to experience plugin errors, try uninstalling and reinstalling the affected plugins. A clean installation can resolve corrupted files or settings that may be causing the problem.
- Contact Support: If you are unable to resolve plugin errors on your own, contact the plugin developer for assistance. Plugin developers can provide troubleshooting tips, bug fixes, or alternative solutions to address the issue.
9. Future Trends in Photo Editing
Keeping an eye on future trends can help you stay ahead of the curve and prepare for the next generation of photo editing tools and techniques.
9.1. AI-Powered Editing
Artificial intelligence (AI) is rapidly transforming the photo editing landscape. AI-powered tools can automate complex tasks, enhance image quality, and provide personalized editing suggestions. Expect to see more AI-driven features in future photo editing software.
9.2. Cloud-Based Editing
Cloud-based photo editing platforms are becoming increasingly popular. These platforms allow you to edit your photos from anywhere, collaborate with others, and access your files on any device. Cloud-based editing is likely to become more prevalent in the future.
9.3. Mobile Editing
Mobile photo editing apps are becoming more powerful and sophisticated. With the increasing quality of smartphone cameras, mobile editing is becoming a viable option for professional photographers. Expect to see more advanced features and capabilities in mobile editing apps.
9.4. Virtual Reality (VR) and Augmented Reality (AR)
VR and AR technologies are opening up new possibilities for photo editing. Imagine being able to step inside your photos and edit them in a virtual environment or overlaying digital effects onto your real-world photos. VR and AR are likely to play a significant role in the future of photo editing.
10. Frequently Asked Questions (FAQs)
1. What is the best photo editing software for Mac beginners?
The best photo editing software for Mac beginners is the Photos app. It’s pre-installed on every Mac and offers a simple, user-friendly interface with basic editing tools.
2. How can I improve the color accuracy of my photos on Mac?
To improve color accuracy, use a calibrated monitor. Calibrating your monitor ensures that the colors you see on your screen are accurate, which is essential for making precise color adjustments.
3. What is non-destructive editing, and why is it important?
Non-destructive editing means editing your photos without altering the original image data. It’s important because it allows you to experiment with different adjustments and effects without permanently changing your photos.
4. How can I remove blemishes and imperfections from my photos on Mac?
You can use the retouch or healing tool in your photo editor to remove blemishes and imperfections. Adjust the brush size to match the area you want to retouch and click or drag over the area to remove the imperfection.
5. What is frequency separation, and how is it used in photo editing?
Frequency separation is an advanced retouching technique that separates an image into high-frequency (details) and low-frequency (tones) layers. This allows you to retouch skin and other areas without affecting the overall texture.
6. How do I save my edits as presets in photo editing software?
Most photo editing software allows you to create and save custom presets. After making your edits, look for an option to save the settings as a preset, which you can then apply to other photos.
7. What are the benefits of shooting in RAW format?
Shooting in RAW format captures more information than JPEG, giving you more flexibility when editing your photos. RAW files retain more dynamic range and color information, allowing you to make more significant adjustments without losing quality.
8. How can I optimize my Mac for photo editing performance?
To optimize your Mac for photo editing performance, close unnecessary applications, increase memory (RAM), clear cache files, optimize storage, and disable visual effects.
9. What are some future trends in photo editing?
Some future trends in photo editing include AI-powered editing, cloud-based editing, mobile editing, and the use of virtual reality (VR) and augmented reality (AR) technologies.
10. Where can I find inspiration and resources for photo editing?
You can find inspiration and resources online tutorials, photography communities, photography magazines, and websites like dfphoto.net.
By mastering these techniques and utilizing the right tools, you can transform your photos on a Mac and unleash your creative potential. Dive into the world of photo editing, experiment with different styles, and create stunning images that reflect your unique vision. Visit dfphoto.net for more tips, tutorials, and inspiration to enhance your photography journey. Take advantage of our extensive resources, connect with a vibrant community, and elevate your skills to new heights.