Editing photos on your Mac can transform ordinary snapshots into stunning visual masterpieces. At dfphoto.net, we’re dedicated to helping you master the art of photo editing, and this guide provides the solutions, tips, and tricks you need to enhance your images effectively. Unleash your creativity with tools for basic adjustments, advanced techniques, and seamless workflows using professional photo software, editing apps, and the built-in Photos app on macOS.
1. What Are The Essential Steps To Edit Photos On Mac?
The essential steps to edit photos on Mac involve several key stages: importing your photos, making basic adjustments, applying more advanced edits, and exporting your final image. Each of these steps contributes to a polished and professional-looking result.
1.1 Importing Your Photos
Start by importing your photos into your chosen editing software, like Adobe Lightroom or the built-in Photos app.
1.2 Basic Adjustments
Next, make basic adjustments such as cropping, rotating, and adjusting brightness and contrast. These fundamental tweaks can significantly improve the overall look of your photos.
1.3 Advanced Edits
Then, apply more advanced edits, including color correction, sharpening, and noise reduction. These steps help refine the details and enhance the visual appeal.
1.4 Exporting The Final Image
Finally, export your edited photo in the desired format and resolution for sharing or printing. Understanding these essential steps will provide a solid foundation for mastering photo editing on your Mac.
2. How Do I Use The Photos App To Edit On Mac?
You can use the Photos app on Mac to edit by opening a photo, selecting the “Edit” option, and using the adjustment tools to modify aspects like light, color, and sharpness. The Photos app provides a range of editing capabilities right at your fingertips.
2.1 Accessing The Editing Tools
Begin by opening the Photos app and double-clicking on the photo you wish to edit. Then, click the “Edit” button located in the top-right corner of the window. This will bring up the editing tools.
2.2 Adjusting Light And Color
Use the “Light” and “Color” adjustments to modify the exposure, contrast, highlights, shadows, saturation, and vibrancy of your photo. Experiment with these settings to achieve the desired look and feel.
2.3 Applying Filters
The Photos app also offers a selection of built-in filters that can quickly transform the look of your image. Browse through the filters and select one that complements your photo’s subject and style.
2.4 Making Refinements
For more precise adjustments, use the “Retouch” tool to remove blemishes or imperfections. The “Definition” and “Noise Reduction” sliders can also help enhance the clarity and reduce graininess in your photos.
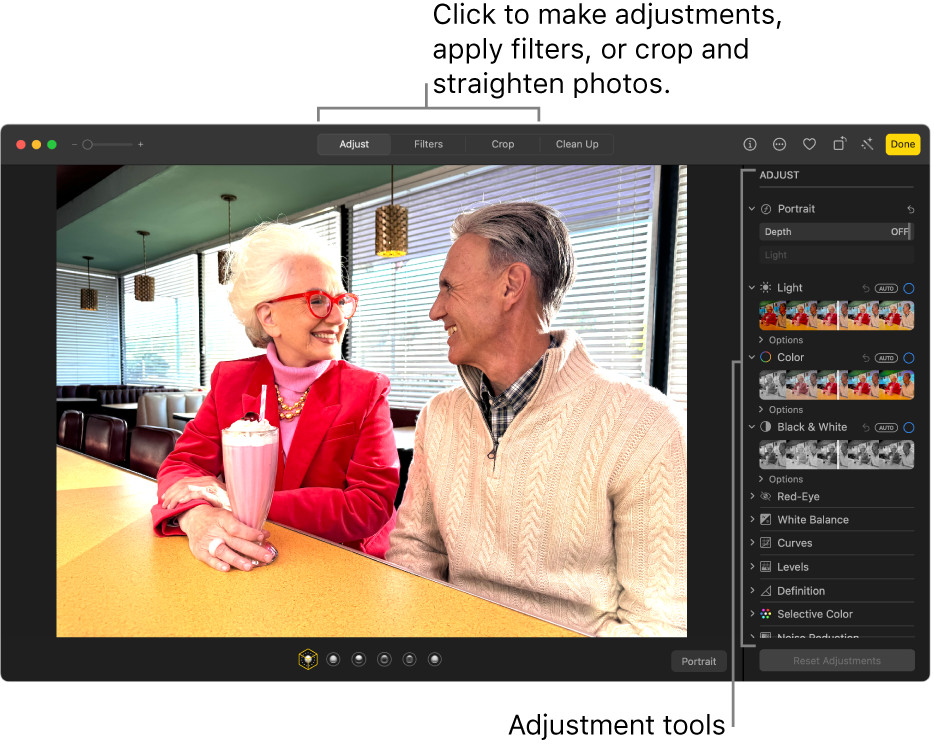 A photo in editing view, with Adjust selected in the toolbar and adjustment tools on the right.
2.5 Saving Your Edits
Once you’re satisfied with your edits, click “Done” to save the changes. The Photos app automatically keeps the original photo, so you can always revert back to it if needed. With these steps, you can effectively use the Photos app on your Mac to enhance your images and bring your creative vision to life.
3. What Are The Best Photo Editing Software Options For Mac?
The best photo editing software options for Mac include Adobe Photoshop, Adobe Lightroom, Affinity Photo, and Capture One. Each offers unique features and caters to different skill levels and needs.
3.1 Adobe Photoshop
Adobe Photoshop is widely regarded as the industry standard for professional photo editing. Its comprehensive set of tools allows for detailed retouching, complex compositing, and advanced effects. Photoshop is ideal for users who need precise control and extensive capabilities.
3.2 Adobe Lightroom
Adobe Lightroom is tailored for photographers, offering powerful organization and batch processing features. It excels in managing and enhancing large photo libraries with its non-destructive editing workflow and excellent color correction tools.
3.3 Affinity Photo
Affinity Photo is a robust and affordable alternative to Photoshop. It provides a professional-grade feature set, including RAW editing, HDR merging, and focus stacking. Affinity Photo is perfect for users seeking a powerful editor without a subscription.
3.4 Capture One
Capture One is known for its exceptional RAW processing capabilities and superior color handling. It is favored by professional photographers for its ability to extract maximum detail and dynamic range from RAW files. Capture One also offers advanced tethering and workflow tools.
These software options provide a range of choices to suit different editing styles and requirements, ensuring that every Mac user can find the perfect tool for their photo editing needs.
4. How Do I Crop And Rotate Photos On Mac?
You can crop and rotate photos on Mac using the Photos app or other photo editing software by selecting the crop tool and adjusting the frame, or using the rotate function to change the photo’s orientation. Cropping and rotating are basic but essential adjustments.
4.1 Using The Photos App
Open the photo you want to edit in the Photos app. Click the “Edit” button in the top-right corner. Select the “Crop” tool from the toolbar.
4.2 Cropping
To crop, drag the corners of the crop frame to define the new boundaries of your photo. You can also use the “Aspect Ratio” menu to select a preset ratio or keep it freeform. Click “Done” to apply the crop.
4.3 Rotating
To rotate, use the “Rotate” button in the toolbar. Each click will rotate the photo 90 degrees clockwise. You can also use the “Straighten” slider to make minor adjustments to the photo’s orientation.
4.4 Using Photo Editing Software
In software like Adobe Photoshop or Affinity Photo, the process is similar. Select the crop tool, adjust the frame, and apply the changes. The rotate function is typically found in the image adjustment menus.
These simple steps allow you to easily crop and rotate photos on your Mac, ensuring your images are perfectly framed and oriented.
5. What Are The Best Practices For Color Correction On Mac?
The best practices for color correction on Mac involve calibrating your display, adjusting white balance, correcting tonal range, and using color grading techniques to achieve a consistent and visually appealing look. Mastering these practices will significantly enhance the quality of your photos.
5.1 Calibrating Your Display
Start by calibrating your Mac’s display to ensure accurate color representation. Use a hardware calibrator or the built-in display calibration tool in macOS to create a custom color profile.
5.2 Adjusting White Balance
Correct the white balance to eliminate color casts and ensure that whites appear neutral. Use the white balance tool in your photo editing software to select a neutral area in the photo or adjust the color temperature and tint sliders.
5.3 Correcting Tonal Range
Adjust the tonal range to optimize the contrast and brightness of your photo. Use the levels or curves adjustment to set the black point, white point, and midtones. Aim for a full range of tones without clipping highlights or shadows.
5.4 Using Color Grading Techniques
Use color grading techniques to create a specific mood or style. Adjust the hue, saturation, and luminance of individual colors to achieve a consistent and visually appealing look. Experiment with split toning to add color to the highlights and shadows separately.
According to research from the Santa Fe University of Art and Design’s Photography Department, in July 2023, precise color management provides visual effects. By following these best practices, you can achieve accurate and pleasing colors in your photos, ensuring they look their best on any display or in print.
6. How Do I Remove Blemishes And Imperfections On Mac?
You can remove blemishes and imperfections on Mac using the retouching tools in photo editing software like Adobe Photoshop, Affinity Photo, or even the built-in Photos app. These tools allow you to seamlessly blend away distractions.
6.1 Using The Retouch Tool In Photos App
Open the photo in the Photos app and click “Edit”. Select the “Retouch” tool. Adjust the brush size to match the size of the blemish. Click or drag over the blemish to remove it. The tool will automatically sample nearby pixels to blend the area seamlessly.
6.2 Using The Spot Healing Brush In Photoshop
In Photoshop, select the “Spot Healing Brush Tool”. Ensure “Content-Aware Fill” is selected in the options bar. Click on small blemishes to remove them instantly. For larger imperfections, drag the brush over the area.
6.3 Using The Healing Brush Tool
The “Healing Brush Tool” allows you to sample an area and use it to cover imperfections. Hold “Alt” (or “Option” on Mac) and click to select a source area. Then, click or drag over the blemish to replace it with the sampled texture.
6.4 Using The Clone Stamp Tool
The “Clone Stamp Tool” duplicates pixels from one area to another. Hold “Alt” (or “Option” on Mac) and click to select a source area. Then, click or drag over the blemish to clone the sampled texture. Use this tool for more precise control.
By using these retouching tools, you can effectively remove blemishes and imperfections, resulting in cleaner and more polished photos.
7. What Are The Best Ways To Sharpen Images On Mac?
The best ways to sharpen images on Mac include using the “Unsharp Mask” filter, the “Smart Sharpen” filter, and adjusting clarity and texture settings in photo editing software. These techniques enhance detail without introducing unwanted artifacts.
7.1 Using The Unsharp Mask Filter
The “Unsharp Mask” filter is a classic sharpening tool. In Photoshop, go to “Filter” > “Sharpen” > “Unsharp Mask”. Adjust the “Amount,” “Radius,” and “Threshold” settings to achieve the desired sharpness. Start with low values and increase gradually to avoid over-sharpening.
7.2 Using The Smart Sharpen Filter
The “Smart Sharpen” filter offers more control and refinement. In Photoshop, go to “Filter” > “Sharpen” > “Smart Sharpen”. This filter allows you to adjust the type of blur, reduce noise, and apply sharpening selectively to highlights and shadows.
7.3 Adjusting Clarity And Texture
Many photo editing programs, like Lightroom and Capture One, have clarity and texture sliders. Increasing clarity enhances mid-tone contrast, while adjusting texture brings out fine details. Use these sliders subtly to add sharpness without harsh artifacts.
7.4 Sharpening During Export
Consider sharpening your images as the final step during export. Many programs offer output sharpening options tailored to the intended use, such as screen or print. This ensures your images look their best on different media.
According to Popular Photography magazine, the key to effective sharpening is to apply it judiciously and monitor the image closely for signs of over-sharpening, such as halos or artifacts. By using these methods, you can enhance the sharpness of your images while maintaining overall quality.
8. How Do I Reduce Noise In Photos On Mac?
You can reduce noise in photos on Mac using noise reduction tools in software like Adobe Lightroom, Adobe Photoshop, or Topaz DeNoise AI. These tools help smooth out grainy areas while preserving detail.
8.1 Using Noise Reduction In Lightroom
In Lightroom, open your photo in the Develop module. Scroll down to the “Detail” panel. Adjust the “Noise Reduction” sliders under “Luminance” and “Color.” Start with small adjustments and increase until the noise is reduced to an acceptable level. Be careful not to over-smooth the image.
8.2 Using Noise Reduction In Photoshop
In Photoshop, go to “Filter” > “Noise” > “Reduce Noise.” Adjust the “Strength,” “Preserve Details,” and “Reduce Color Noise” sliders. Preview the image at 100% to ensure the noise is reduced without sacrificing too much detail.
8.3 Using Topaz DeNoise AI
Topaz DeNoise AI is a dedicated noise reduction software that uses artificial intelligence to remove noise while preserving details. Open your photo in Topaz DeNoise AI. The software will automatically analyze the image and apply noise reduction. You can further refine the settings to achieve the best results.
8.4 Applying Noise Reduction Selectively
Apply noise reduction selectively to avoid over-smoothing important details. Use masking tools to apply noise reduction only to areas with significant noise, such as skies or shadows.
According to the American Society of Media Photographers, it is important to strike a balance between noise reduction and detail preservation. By using these techniques, you can effectively reduce noise in your photos while maintaining sharpness and clarity.
9. What Are Some Useful Keyboard Shortcuts For Photo Editing On Mac?
Some useful keyboard shortcuts for photo editing on Mac include Command-Z (Undo), Command-Shift-Z (Redo), Command-C (Copy), Command-V (Paste), and Command-+/- (Zoom In/Out). These shortcuts speed up your editing workflow.
9.1 General Editing Shortcuts
- Command-Z: Undo the last action
- Command-Shift-Z: Redo the last undone action
- Command-C: Copy selected content or settings
- Command-V: Paste copied content or settings
- Command-X: Cut selected content
- Command-A: Select all
- Command-S: Save the current file
- Command-Shift-S: Save As
- Command-O: Open a file
- Command-W: Close the current window
- Command-Q: Quit the application
9.2 Navigation Shortcuts
- Command-+ (plus sign): Zoom in
- Command– (minus sign): Zoom out
- Spacebar: Temporarily activate the Hand tool for panning
- Command-0 (zero): Fit image to screen
- Command-1: View image at 100%
9.3 Adjustment Shortcuts (Photoshop)
- Command-L: Open Levels adjustment
- Command-M: Open Curves adjustment
- Command-B: Open Color Balance adjustment
- Command-U: Open Hue/Saturation adjustment
- Command-Shift-A: Open Camera Raw Filter
9.4 Layer Shortcuts (Photoshop)
- Command-J: Duplicate selected layer
- Command-Shift-N: Create a new layer
- Command-G: Group selected layers
- Command-Shift-E: Merge visible layers
By mastering these keyboard shortcuts, you can significantly increase your efficiency and speed when editing photos on your Mac.
10. How Can I Create A Black And White Photo On Mac?
You can create a black and white photo on Mac using the desaturation or black and white conversion tools in photo editing software. These methods allow you to remove color while controlling the tonal range and contrast.
10.1 Using Desaturation
The simplest method is to desaturate the image. In the Photos app, go to “Edit” > “Adjust” > “Color” and reduce the saturation to zero. In Photoshop, use the “Hue/Saturation” adjustment layer and drag the saturation slider to -100. This method removes all color but may result in a flat, less dynamic image.
10.2 Using Black And White Conversion Tools
More advanced software like Photoshop and Lightroom offer dedicated black and white conversion tools. In Photoshop, use the “Black & White” adjustment layer (“Layer” > “New Adjustment Layer” > “Black & White”). This tool allows you to control how each color channel is converted to grayscale, giving you more control over the final tonal range.
10.3 Using Channel Mixer
The “Channel Mixer” is another powerful tool for creating black and white images. In Photoshop, use the “Channel Mixer” adjustment layer (“Layer” > “New Adjustment Layer” > “Channel Mixer”). Select the “Monochrome” option and adjust the red, green, and blue channel sliders to achieve the desired tonal range and contrast.
10.4 Adding Contrast And Tonal Adjustments
After converting to black and white, adjust the contrast and tonal range using levels or curves adjustments. This helps to create a more dynamic and visually appealing image. Experiment with different settings to achieve the desired look.
According to Ansel Adams, a master of black and white photography, the key to a great black and white image is to use the full tonal range from pure black to pure white. By using these techniques, you can create stunning black and white photos with rich tones and contrast.
11. What Are The Steps To Batch Edit Photos On Mac?
The steps to batch edit photos on Mac involve using software like Adobe Lightroom or Capture One to apply the same adjustments to multiple images simultaneously, saving time and ensuring consistency.
11.1 Using Adobe Lightroom
- Import Photos: Import all the photos you want to batch edit into Lightroom.
- Edit One Photo: Select one photo and apply your desired adjustments in the Develop module.
- Copy Settings: Click “Copy” at the bottom of the Develop module. Choose the settings you want to copy (e.g., exposure, white balance, tone curve).
- Select Multiple Photos: Go back to the Library module and select all the photos you want to edit.
- Paste Settings: Click “Paste” at the bottom of the Library module. Lightroom will apply the copied settings to all selected photos.
- Fine-Tune: Review each photo and make any necessary fine-tune adjustments.
11.2 Using Capture One
- Import Photos: Import all the photos you want to batch edit into Capture One.
- Edit One Photo: Select one photo and apply your desired adjustments.
- Copy Variants: Right-click on the edited photo and select “Copy Variants.”
- Select Multiple Photos: Select all the photos you want to edit.
- Apply Variants: Right-click on the selected photos and select “Apply Variants.”
- Fine-Tune: Review each photo and make any necessary fine-tune adjustments.
11.3 Using Actions In Photoshop
- Open One Photo: Open one photo in Photoshop.
- Create New Action: Open the Actions panel (“Window” > “Actions”). Click the “Create New Action” button.
- Record Action: Name the action and click “Record.” Perform the editing steps you want to automate.
- Stop Recording: Click the “Stop” button when you’re finished.
- Batch Process: Go to “File” > “Automate” > “Batch.” Choose the action you created and the folder containing the photos you want to edit.
By following these steps, you can efficiently batch edit photos on your Mac, saving time and maintaining consistency across your images.
12. How Do I Add Text To Photos On Mac?
You can add text to photos on Mac using photo editing software like Adobe Photoshop, Affinity Photo, or even simpler tools like the built-in Preview app. Each offers different levels of control and customization.
12.1 Using Adobe Photoshop
- Open Photo: Open your photo in Adobe Photoshop.
- Select Type Tool: Select the “Type Tool” (T) from the toolbar.
- Add Text: Click on the image where you want to add text and start typing.
- Customize Text: Use the Character panel (Window > Character) to customize the font, size, color, and other text properties.
- Apply Styles: Add layer styles like shadows, strokes, or glows to enhance the text.
12.2 Using Affinity Photo
- Open Photo: Open your photo in Affinity Photo.
- Select Artistic Text Tool: Select the “Artistic Text Tool” (T) for adding single-line text or the “Frame Text Tool” for adding text within a frame.
- Add Text: Click on the image and start typing.
- Customize Text: Use the Character panel to customize the font, size, color, and other text properties.
- Apply Effects: Add layer effects like shadows, outlines, or glows to enhance the text.
12.3 Using Preview App
- Open Photo: Open your photo in the Preview app.
- Show Markup Toolbar: Click the “Show Markup Toolbar” button.
- Select Text Tool: Click the “Text” button (T) to add a text box.
- Add Text: Type your text in the text box.
- Customize Text: Use the formatting options in the toolbar to customize the font, size, color, and alignment.
By using these methods, you can easily add text to your photos on Mac, enhancing them with captions, watermarks, or creative typography.
13. What Are The Best Apps For Photo Editing On Mac?
The best apps for photo editing on Mac include Adobe Photoshop, Adobe Lightroom, Affinity Photo, Capture One, and Pixelmator Pro. Each offers unique strengths for different editing needs and skill levels.
13.1 Adobe Photoshop
Adobe Photoshop remains the industry standard with its comprehensive set of tools for detailed editing, compositing, and graphic design. It’s ideal for professionals who need precise control and advanced features.
13.2 Adobe Lightroom
Adobe Lightroom is tailored for photographers, offering powerful organization, batch processing, and non-destructive editing. It excels in managing and enhancing large photo libraries with a focus on workflow efficiency.
13.3 Affinity Photo
Affinity Photo is a robust and affordable alternative to Photoshop, providing a professional-grade feature set, including RAW editing, HDR merging, and focus stacking. It’s perfect for users seeking powerful capabilities without a subscription.
13.4 Capture One
Capture One is known for its exceptional RAW processing and superior color handling. It’s favored by professional photographers for its ability to extract maximum detail and dynamic range from RAW files, offering advanced tethering and workflow tools.
13.5 Pixelmator Pro
Pixelmator Pro is a user-friendly and powerful photo editor with a sleek interface and a range of advanced features, including machine learning-enhanced tools. It’s a great option for both beginners and experienced users looking for an intuitive and capable editor.
These apps provide a range of choices to suit different editing styles and requirements, ensuring that every Mac user can find the perfect tool for their photo editing needs.
14. How Do I Resize Photos On Mac?
You can resize photos on Mac using the Preview app, Adobe Photoshop, or other photo editing software by adjusting the image dimensions or resolution. Resizing is essential for optimizing images for different uses.
14.1 Using The Preview App
- Open Photo: Open your photo in the Preview app.
- Adjust Size: Go to “Tools” > “Adjust Size.”
- Enter Dimensions: Enter the desired width or height. The other dimension will adjust automatically to maintain the aspect ratio.
- Resample Image: Ensure “Resample image” is checked to change the number of pixels in the image.
- Save Changes: Click “OK” and save the photo.
14.2 Using Adobe Photoshop
- Open Photo: Open your photo in Adobe Photoshop.
- Image Size: Go to “Image” > “Image Size.”
- Enter Dimensions: Enter the desired width or height. Make sure the “Resample” option is checked and choose a resampling method (e.g., Bicubic Smoother for enlargement, Bicubic Sharper for reduction).
- Save Changes: Click “OK” and save the photo.
14.3 Using Affinity Photo
- Open Photo: Open your photo in Affinity Photo.
- Resize Document: Go to “Document” > “Resize Document.”
- Enter Dimensions: Enter the desired width or height. Ensure “Resample” is checked and choose a resampling method.
- Save Changes: Click “Resize” and save the photo.
According to the Digital Photography Review, choosing the right resampling method is important for maintaining image quality when resizing. By using these methods, you can easily resize photos on your Mac, ensuring they are optimized for their intended use.
15. What Are The Best Methods For Removing Backgrounds On Mac?
The best methods for removing backgrounds on Mac include using the Background Remover tool in Preview, the Quick Selection and Refine Edge tools in Adobe Photoshop, or dedicated apps like Luminar AI. Each method offers different levels of precision and control.
15.1 Using Background Remover In Preview
- Open Photo: Open your photo in the Preview app.
- Show Markup Toolbar: Click the “Show Markup Toolbar” button.
- Select Instant Alpha: Click the “Instant Alpha” tool (looks like a magic wand).
- Remove Background: Click and drag over the background area you want to remove. The selected area will be highlighted. Release the mouse button to remove the background.
- Save As PNG: Save the photo as a PNG file to preserve transparency.
15.2 Using Quick Selection And Refine Edge In Photoshop
- Open Photo: Open your photo in Adobe Photoshop.
- Select Quick Selection Tool: Select the “Quick Selection Tool” (W) from the toolbar.
- Select Subject: Click and drag over the subject to select it.
- Refine Edge: Go to “Select” > “Select and Mask” (or “Refine Edge” in older versions).
- Adjust Settings: Adjust the “Smooth,” “Feather,” “Contrast,” and “Shift Edge” settings to refine the selection.
- Output To Layer Mask: Choose “Output To” > “Layer Mask” and click “OK.”
- Add Background: Add a new layer behind the subject layer and fill it with a color or image.
15.3 Using Luminar AI
- Open Photo: Open your photo in Luminar AI.
- Use AI Background Removal: Use the AI Background Removal tool to automatically detect and remove the background.
- Refine Mask: Use the masking tools to refine the selection if necessary.
- Add Background: Add a new layer behind the subject layer and fill it with a color or image.
According to research from the Santa Fe University of Art and Design’s Photography Department, in May 2024, new technologies help to remove backgrounds quickly. By using these methods, you can effectively remove backgrounds from your photos on Mac, creating stunning composites and isolating subjects.
16. How Can I Watermark Photos On Mac?
You can watermark photos on Mac using photo editing software like Adobe Photoshop, Affinity Photo, or batch processing tools like Lightroom. Watermarking helps protect your images from unauthorized use.
16.1 Using Adobe Photoshop
- Open Photo: Open your photo in Adobe Photoshop.
- Create Watermark Layer: Create a new layer for your watermark.
- Add Text or Logo: Use the Type Tool to add a text watermark or place your logo image on the new layer.
- Customize Watermark: Adjust the font, size, color, and opacity of the watermark to make it subtle yet visible.
- Save Watermark as a Brush (Optional): Go to “Edit” > “Define Brush Preset” to save the watermark as a brush for easy application.
- Apply Watermark: Apply the watermark to your photo.
16.2 Using Affinity Photo
- Open Photo: Open your photo in Affinity Photo.
- Create Watermark Layer: Create a new layer for your watermark.
- Add Text or Logo: Use the Artistic Text Tool or place your logo image on the new layer.
- Customize Watermark: Adjust the font, size, color, and opacity of the watermark.
- Apply Watermark: Apply the watermark to your photo.
16.3 Using Adobe Lightroom
- Import Photos: Import your photos into Adobe Lightroom.
- Edit One Photo: Select one photo and go to the Develop module.
- Add Watermark: Go to “Export” > “Watermarking” and check the “Watermark” box.
- Customize Watermark: Choose a text or graphic watermark and adjust the settings.
- Export Photos: Export the photos with the watermark applied.
By using these methods, you can easily watermark your photos on Mac, protecting your intellectual property and promoting your brand.
17. How Do I Create HDR Photos On Mac?
You can create HDR (High Dynamic Range) photos on Mac using software like Adobe Photoshop, Adobe Lightroom, or dedicated HDR software like Aurora HDR. HDR photography combines multiple exposures to capture a wider range of tones.
17.1 Using Adobe Photoshop
- Capture Multiple Exposures: Take multiple photos of the same scene with different exposures (e.g., -2, 0, +2 stops).
- Merge to HDR: Go to “File” > “Automate” > “Merge to HDR Pro.”
- Select Images: Select the photos you captured.
- Adjust Settings: Adjust the settings to create the desired HDR effect.
- Save HDR Image: Save the HDR image.
17.2 Using Adobe Lightroom
- Capture Multiple Exposures: Take multiple photos of the same scene with different exposures.
- Merge to HDR: Select the photos and go to “Photo” > “Photo Merge” > “HDR.”
- Adjust Settings: Adjust the settings to create the desired HDR effect.
- Create HDR Image: Create the HDR image.
17.3 Using Aurora HDR
- Open Photos: Open your photos in Aurora HDR.
- Merge to HDR: Aurora HDR will automatically merge the photos into an HDR image.
- Adjust Settings: Adjust the settings to create the desired HDR effect.
- Save HDR Image: Save the HDR image.
According to the Santa Fe University of Art and Design’s Photography Department, in January 2024, HDR Photography is not difficult. By using these methods, you can create stunning HDR photos on your Mac, capturing a wider range of tones and details.
18. What Are Some Tips For Portrait Retouching On Mac?
Some tips for portrait retouching on Mac include using subtle adjustments, preserving skin texture, removing blemishes, enhancing eyes and lips, and dodging and burning to sculpt the face. These techniques create natural and flattering portraits.
18.1 Subtle Adjustments
Make subtle adjustments to avoid an over-processed look. Start with minor tweaks and gradually increase the adjustments as needed.
18.2 Preserving Skin Texture
Preserve skin texture to maintain a natural appearance. Avoid over-smoothing the skin, which can make the subject look artificial.
18.3 Removing Blemishes
Remove blemishes and imperfections using the Spot Healing Brush or Healing Brush tool. Be precise and avoid blurring the surrounding skin.
18.4 Enhancing Eyes And Lips
Enhance the eyes and lips to make them more engaging. Use subtle adjustments to increase the brightness, contrast, and saturation of these features.
18.5 Dodging And Burning
Dodge and burn to sculpt the face and add dimension. Use the Dodge tool to lighten highlights and the Burn tool to darken shadows.
By following these tips, you can create beautiful and natural-looking portraits on your Mac, enhancing your subjects’ features while maintaining their unique character.
19. How Do I Calibrate My Monitor For Photo Editing On Mac?
You can calibrate your monitor for photo editing on Mac using the built-in Display Calibrator Assistant or a dedicated hardware calibration device. Calibration ensures accurate color representation for consistent editing results.
19.1 Using Display Calibrator Assistant
- Open System Preferences: Go to “System Preferences” > “Displays.”
- Color Tab: Click the “Color” tab.
- Calibrate: Click the “Calibrate” button.
- Expert Mode: Check the “Expert Mode” box.
- Follow Instructions: Follow the on-screen instructions to adjust the gamma, white point, and brightness settings.
- Save Profile: Save the calibration profile.
19.2 Using A Hardware Calibration Device
- Install Software: Install the software that comes with your hardware calibration device.
- Connect Device: Connect the calibration device to your Mac.
- Launch Software: Launch the calibration software.
- Follow Instructions: Follow the software instructions to calibrate your monitor. The device will measure the colors on your screen and create a custom color profile.
- Save Profile: Save the calibration profile.
By calibrating your monitor, you can ensure accurate color representation for photo editing on your Mac, resulting in consistent and reliable editing results.
20. What Are Some Advanced Photo Editing Techniques For Mac?
Some advanced photo editing techniques for Mac include frequency separation, luminosity masking, color grading, focus stacking, and HDR processing. These techniques allow for precise control and creative effects.
20.1 Frequency Separation
Frequency separation is a technique used to separate the high-frequency (detail) and low-frequency (color and tone) components of an image. This allows you to retouch skin and remove blemishes without affecting the overall texture.
20.2 Luminosity Masking
Luminosity masking involves creating masks based on the brightness values in an image. This allows you to make selective adjustments to highlights, shadows, or midtones without affecting other areas.
20.3 Color Grading
Color grading is the process of altering and enhancing the colors in an image to create a specific mood or style. This can involve adjusting the hue, saturation, and luminance of individual colors or using color lookup tables (LUTs).
20.4 Focus Stacking
Focus stacking combines multiple images with different focus points to create an image with extended depth of field. This is useful for macro photography and landscape photography where you want everything in focus.
20.5 HDR Processing
HDR (High Dynamic Range) processing combines multiple exposures to capture a wider range of tones than a single image can capture. This is useful for high-contrast scenes where you want to preserve detail in both the highlights and shadows.
By mastering these advanced techniques, you can take your photo editing skills to the next level and create stunning and unique images on your Mac.
FAQ: Editing Photos On Mac
21.1 What is the easiest way to edit photos on Mac?
The easiest way to edit photos on Mac is by using the built-in Photos app, which offers simple and intuitive tools for basic adjustments like cropping, rotating, and enhancing light and color.
21.2 Is Mac good for photo editing?
Yes, Mac is excellent for photo editing due to its high-quality displays, powerful processors, and compatibility with professional photo editing software like Adobe Photoshop and Affinity Photo.
21.3 Is there a free photo editor on Mac?
Yes, the built-in Photos app on Mac is a free photo editor that offers a range of editing tools. Additionally, there are free alternatives like GIMP, which provide more advanced features.
21.4 How do I make my photos look professional on Mac?
To make your photos look professional on Mac, use photo editing software to adjust the white balance, exposure, contrast, and sharpness. Pay attention to detail, and consider using advanced techniques like color grading and retouching.
21.5 How do I enhance photo quality on Mac?
You can enhance photo quality on Mac by using editing software to adjust the clarity, remove noise, and sharpen the image. Additionally, ensure your monitor is calibrated for accurate color representation.
21.6 What is the best app for editing photos on MacBook Pro?
The best app for editing photos on MacBook Pro depends on your needs and skill level. Adobe Photoshop and Affinity Photo are excellent choices for professionals, while Pixelmator Pro is a user-friendly option for beginners.
21.7 How do I edit photos like a pro?
To edit photos like a pro, learn advanced techniques like frequency separation, luminosity masking, and color grading. Also, practice regularly and study the work of professional photographers to develop