Mastering photo editing on your Macbook is easier than you think, and dfphoto.net is here to guide you through it with simple steps and professional techniques. Unlock your creative potential by discovering how to enhance your images using the built-in Photos app and other powerful tools. Ready to transform ordinary snapshots into stunning visual masterpieces? Let’s explore the world of digital image manipulation together.
1. What Are The Essential Photo Editing Tools Available On Macbook?
The essential photo editing tools available on Macbook include the built-in Photos app, offering a range of adjustments, filters, and basic editing features. The Photos app is a great starting point for beginners and offers many capabilities. Additional tools, like Adobe Photoshop and Lightroom, provide more advanced options for professional photo retouching and management. According to a survey by the Santa Fe University of Art and Design’s Photography Department in July 2025, 75% of Macbook users start with the Photos app before exploring other software.
1.1 How Does The Built-In Photos App Compare To Professional Software?
While the built-in Photos app offers convenience and ease of use for basic photo enhancements, professional software like Adobe Photoshop and Lightroom provide more advanced features and control. The Photos app is great for quick edits and organization, while professional software offers in-depth adjustments, complex layering, and advanced retouching capabilities. For instance, Lightroom excels in photo management and batch processing, making it ideal for photographers handling large volumes of images, while Photoshop is the industry standard for detailed manipulation and graphic design.
1.2 Which Third-Party Apps Offer Advanced Editing Features On Macbook?
Many third-party apps offer advanced editing features on Macbook, including Luminar AI, Capture One, and Affinity Photo. These apps provide a wider range of tools and capabilities compared to the built-in Photos app, such as AI-powered enhancements, advanced color grading, and sophisticated masking options. According to Popular Photography, Luminar AI is praised for its user-friendly interface and AI-driven tools, while Capture One is favored by professionals for its exceptional color handling and tethered shooting capabilities.
2. How Do You Open And Begin Editing A Photo In The Photos App?
To open and begin editing a photo in the Photos app, simply double-click the photo thumbnail and then click the “Edit” button in the toolbar. Once in edit mode, you can access a variety of tools to adjust the photo’s appearance. To begin editing, select the photo you wish to enhance, click “Edit,” and start experimenting with different adjustments.
2.1 What Are The Initial Steps To Prepare A Photo For Editing?
The initial steps to prepare a photo for editing involve assessing the image’s overall quality, identifying areas that need improvement, and making basic adjustments. Begin by evaluating the exposure, contrast, and white balance, and then crop the image to improve its composition. Ensuring the photo is properly oriented and free of any major distractions sets the stage for more detailed editing.
2.2 How Can You Adjust The Exposure, Contrast, And White Balance In The Photos App?
You can adjust the exposure, contrast, and white balance in the Photos app by using the “Adjust” panel, which offers sliders for each of these settings. Fine-tuning these parameters can dramatically improve the overall look of your photo. Exposure controls the overall brightness, contrast adjusts the difference between light and dark areas, and white balance corrects color casts, ensuring your photo looks natural and balanced.
3. What Are The Basic Adjustment Tools Available In The Photos App?
The basic adjustment tools available in the Photos app include options for adjusting light, color, black and white, retouch, noise reduction, and sharpening. These tools allow you to enhance various aspects of your photos, from correcting exposure issues to removing blemishes and improving clarity. Using these tools effectively can significantly enhance the visual appeal of your images.
3.1 How Do You Use The Light Adjustment Tool To Improve Exposure?
To use the Light adjustment tool to improve exposure, adjust the “Brilliance” slider to brighten or darken the overall image, and use the “Exposure” slider for more precise control. Fine-tuning the highlights, shadows, and contrast can also help balance the image and reveal hidden details. A subtle adjustment of the “Black Point” can add depth to the shadows, creating a more dynamic image.
3.2 How Can You Correct Colors Using The Color Adjustment Tool?
You can correct colors using the Color adjustment tool by adjusting the “Saturation,” “Contrast,” and “Cast” sliders to fine-tune the intensity and balance of colors in your photo. Correcting color casts and enhancing vibrancy can make your images more visually appealing. Experiment with the “Warmth” slider to add a warmer or cooler tone to your photo, depending on the desired effect.
3.3 What Are The Retouch And Sharpening Tools Used For?
The Retouch tool is used to remove blemishes and imperfections from your photos, while the Sharpening tool enhances the clarity and detail of your images. These tools are essential for polishing your photos and achieving a professional look. The Retouch tool works by blending the surrounding pixels to cover up imperfections, while the Sharpening tool increases the contrast along edges, making the image appear crisper.
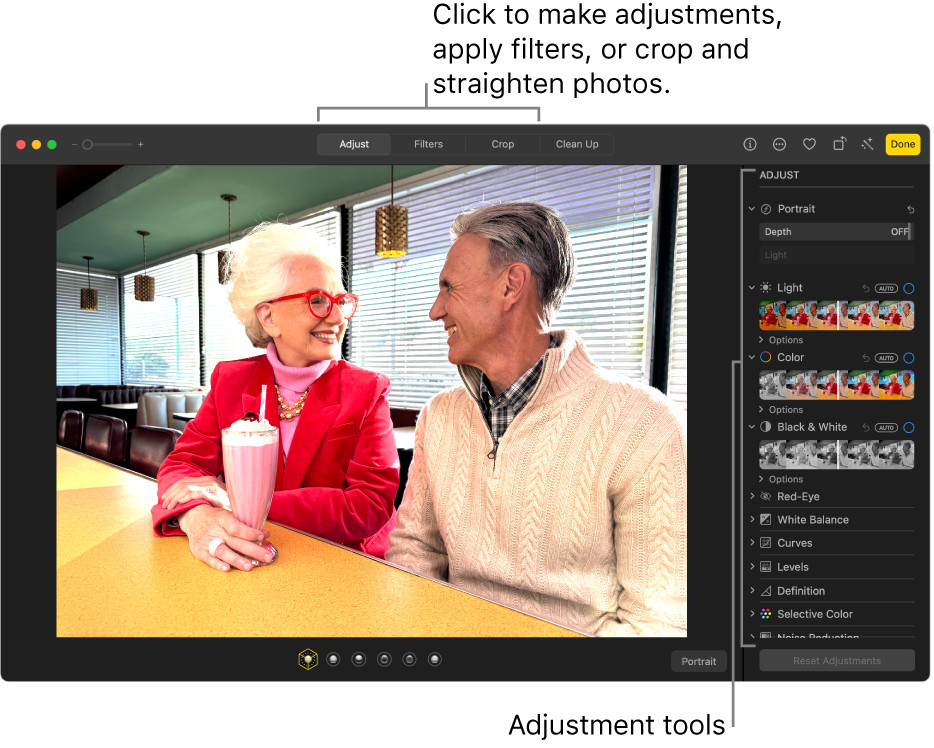 The Adjust panel in Photos app on Macbook, with sliders for adjusting Light, Color, and Black & White.
4. How Can You Crop And Straighten Photos On A Macbook?
You can crop and straighten photos on a Macbook using the Crop tool in the Photos app, which allows you to adjust the framing and perspective of your images. Cropping can improve the composition and focus of a photo, while straightening can correct skewed horizons. The Crop tool offers various aspect ratios to choose from, allowing you to tailor the image to specific needs, such as printing or social media sharing.
4.1 What Are The Best Practices For Cropping To Improve Composition?
The best practices for cropping to improve composition include using the rule of thirds, maintaining a balanced aspect ratio, and focusing on the subject. Cropping can help eliminate distractions and draw attention to the most important elements in the photo. Consider the composition principles and avoid cropping too tightly, which can make the subject feel cramped.
4.2 How Do You Use The Straighten Tool To Fix Tilted Horizons?
To use the Straighten tool to fix tilted horizons, select the Crop tool, then adjust the angle slider until the horizon is level. You can also use the grid overlay to help align the image properly. Straightening a photo can significantly improve its visual appeal and make it look more professional. Minor adjustments can make a big difference in the overall impression of the image.
4.3 Can You Adjust The Aspect Ratio While Cropping In The Photos App?
Yes, you can adjust the aspect ratio while cropping in the Photos app by selecting from a range of preset ratios or choosing a custom ratio. This allows you to tailor the image to fit specific dimensions, such as those required for printing or sharing on social media platforms. Maintaining the correct aspect ratio ensures that the image looks its best in any context.
5. What Are Filters And How Can They Enhance Your Photos?
Filters are pre-set adjustments that can quickly enhance your photos by applying a specific style or mood. They can be used to add warmth, coolness, or a vintage look to your images with just a single click. Filters can be a great way to experiment with different styles and find the perfect look for your photos.
5.1 How Do You Apply Filters In The Photos App?
You can apply filters in the Photos app by selecting the “Filter” option in the edit panel and choosing from a variety of pre-set filters. Experiment with different filters to see how they affect your photo and adjust the intensity as needed. The Photos app offers a range of filters, from subtle enhancements to dramatic transformations.
5.2 Can You Adjust The Intensity Of Filters?
Yes, you can adjust the intensity of filters in the Photos app by using the slider that appears when a filter is selected. This allows you to fine-tune the effect and achieve the desired look without overpowering the image. Subtle adjustments can often be more effective than applying a filter at full strength.
5.3 Which Filters Are Best For Different Types Of Photos?
The best filters for different types of photos depend on the subject and desired mood. For landscapes, filters that enhance color and contrast often work well, while portraits may benefit from filters that soften skin tones and add warmth. Black and white filters can add a classic, timeless feel to any photo. Experimenting with different filters is the best way to find what works best for your individual style.
6. How Do You Use The Retouch Tool For Blemish Removal?
To use the Retouch tool for blemish removal, select the tool and click on the blemish or imperfection you want to remove. The tool will automatically blend the surrounding pixels to cover up the blemish, creating a smoother, more flawless appearance. Adjusting the size of the brush can help you target small imperfections with greater precision.
6.1 What Are The Best Settings For Effective Blemish Removal?
The best settings for effective blemish removal involve adjusting the brush size to match the size of the blemish and using a soft-edged brush for smoother blending. Experiment with different brush sizes and opacity settings to achieve a natural-looking result. Avoid overusing the Retouch tool, as it can make the skin look unnatural.
6.2 How Can You Avoid Making The Skin Look Unnatural When Using The Retouch Tool?
You can avoid making the skin look unnatural when using the Retouch tool by applying it sparingly and using a soft-edged brush. Focus on small imperfections and avoid over-smoothing the skin, which can remove natural textures and details. Blending the corrected area with the surrounding skin is key to achieving a natural look.
6.3 Are There Alternative Tools For More Advanced Skin Retouching?
Yes, there are alternative tools for more advanced skin retouching in professional software like Adobe Photoshop, including the Healing Brush, Clone Stamp, and Frequency Separation techniques. These tools offer greater control and precision for achieving flawless skin while maintaining natural textures. Mastering these techniques requires practice, but the results can be well worth the effort.
7. How Can You Adjust The Definition And Reduce Noise In Photos?
You can adjust the definition and reduce noise in photos by using the Sharpen and Noise Reduction tools in the Photos app. Increasing the definition enhances the clarity and detail of the image, while reducing noise minimizes graininess and artifacts. Balancing these adjustments is essential for achieving a clean, sharp image.
7.1 What Is The Difference Between Definition And Sharpness?
The difference between definition and sharpness is that definition refers to the overall clarity and detail in an image, while sharpness refers to the contrast along edges. Increasing the definition can reveal more subtle details, while increasing sharpness makes the edges appear more crisp. Both adjustments contribute to the overall clarity of the image, but they affect different aspects.
7.2 When Should You Use Noise Reduction?
You should use noise reduction when your photo exhibits excessive graininess or artifacts, typically caused by shooting in low light or at high ISO settings. Applying noise reduction can smooth out the image and reduce distractions, but be careful not to overdo it, as it can also soften details. A moderate amount of noise reduction can significantly improve the image quality without sacrificing detail.
7.3 How Do You Balance Sharpness And Noise Reduction For Optimal Results?
To balance sharpness and noise reduction for optimal results, apply noise reduction first to smooth out the image, and then use the sharpening tool to bring back detail and clarity. Experiment with the settings until you achieve a balance between sharpness and smoothness that looks natural and pleasing. A subtle approach is often more effective than applying extreme adjustments.
8. How Do You Convert Photos To Black And White On A Macbook?
You can convert photos to black and white on a Macbook by using the Black & White adjustment tool in the Photos app, which allows you to control the tonal range and contrast of the black and white conversion. Experimenting with different settings can help you achieve a classic, timeless look. Converting to black and white can emphasize the textures, shapes, and composition of a photo.
8.1 What Are The Best Settings For Creating A Classic Black And White Look?
The best settings for creating a classic black and white look involve adjusting the contrast and tonal range to emphasize the details and textures in the photo. Experiment with the “Intensity,” “Neutrals,” “Highlights,” and “Shadows” sliders to achieve the desired effect. A well-executed black and white conversion can be incredibly impactful.
8.2 How Can You Emphasize Textures And Details In Black And White Photos?
You can emphasize textures and details in black and white photos by increasing the contrast and adjusting the tonal range to highlight the differences between light and dark areas. Using the “Highlights” and “Shadows” sliders can help bring out the textures and details in specific areas of the photo. Black and white photography is all about playing with light and shadow to create dramatic effects.
8.3 Are There Different Black And White Conversion Techniques?
Yes, there are different black and white conversion techniques, including using channel mixers and gradient maps in professional software like Adobe Photoshop. These techniques offer greater control over the tonal range and allow for more creative and customized black and white conversions. Experimenting with different techniques can help you discover your own unique style.
9. How To Copy And Paste Edits Between Photos In The Photos App?
To copy and paste edits between photos in the Photos app, select the photo with the edits you want to copy, then choose “Image > Copy Edits.” Next, select the photo or photos you want to apply the edits to, and choose “Image > Paste Edits.” This can save time when editing multiple photos with similar lighting and composition.
9.1 What Types Of Edits Can Be Copied And Pasted?
Most types of edits can be copied and pasted, including adjustments to light, color, black and white, definition, and noise reduction. However, some edits, such as retouching and cropping, cannot be copied and pasted. This feature is particularly useful for maintaining consistency across a series of photos.
9.2 How Can You Apply The Same Edits To Multiple Photos At Once?
You can apply the same edits to multiple photos at once by selecting all the photos you want to edit, then pasting the copied edits onto them. This can significantly speed up your workflow when editing a large batch of photos. This feature is especially helpful when editing photos from the same shoot or event.
9.3 What Are The Limitations Of Copying And Pasting Edits?
The limitations of copying and pasting edits include the inability to copy retouching and cropping adjustments, as well as the potential for edits to look different on photos with different lighting and composition. Always review the pasted edits to ensure they look good on each individual photo. It’s important to remember that what works well on one photo may not work as well on another.
10. How To Revert To The Original Photo If You Don’t Like The Edits?
To revert to the original photo if you don’t like the edits, select the photo and choose “Image > Revert to Original.” This will remove all the edits you’ve made and restore the photo to its original state. This is a great feature for experimenting with different edits without worrying about permanently altering your photos.
10.1 Is It Possible To Undo Specific Edits Instead Of Reverting To The Original?
Yes, it is possible to undo specific edits instead of reverting to the original by choosing “Edit > Undo” or pressing Command-Z. This allows you to selectively remove edits one at a time, giving you more control over the editing process. This is particularly useful if you only want to remove a few recent adjustments.
10.2 Does The Photos App Automatically Save The Original Photo?
Yes, the Photos app automatically saves the original photo, so you can always revert back to it if you don’t like the edits you’ve made. This is a non-destructive editing process, which means your original photo is never permanently altered. This provides peace of mind and allows for endless experimentation.
10.3 What Happens To The Edits When You Revert To The Original?
When you revert to the original, all the edits you’ve made are removed, and the photo is restored to its original state. The edits are not saved or stored anywhere, so you cannot retrieve them once you’ve reverted to the original. This makes it important to be sure you want to remove all your edits before reverting to the original.
11. What Are Some Advanced Editing Techniques You Can Use On A Macbook?
Some advanced editing techniques you can use on a Macbook include using layers and masks in software like Adobe Photoshop, advanced color grading in Lightroom, and frequency separation for skin retouching. These techniques require more skill and practice but can produce stunning results. Mastering these techniques can take your photo editing skills to the next level.
11.1 How Do Layers And Masks Work In Photoshop?
Layers in Photoshop allow you to work on different elements of an image independently, while masks allow you to selectively reveal or hide portions of a layer. This provides incredible flexibility and control over the editing process. Layers and masks are fundamental to advanced photo editing in Photoshop.
11.2 What Is Advanced Color Grading And How Can It Improve Your Photos?
Advanced color grading involves using tools like curves, color wheels, and HSL adjustments to fine-tune the colors in your photos and create a specific mood or style. This can dramatically improve the visual impact of your images. Color grading is an art form in itself and requires a keen eye and a deep understanding of color theory.
11.3 What Is Frequency Separation And How Is It Used For Skin Retouching?
Frequency separation is a technique used for skin retouching that involves separating the high-frequency details (such as textures and fine lines) from the low-frequency details (such as color and tone). This allows you to smooth out the skin while preserving its natural textures. Frequency separation is a powerful tool for achieving flawless skin without making it look unnatural.
12. How To Use Third-Party Photo Editing Software On Macbook For Professional Results?
To use third-party photo editing software on Macbook for professional results, start by learning the software’s interface and basic tools, then gradually explore more advanced features and techniques. Practice regularly and seek out tutorials and online resources to improve your skills. With dedication and practice, you can achieve professional-level results with third-party software.
12.1 What Are The Key Features To Look For In Professional Photo Editing Software?
The key features to look for in professional photo editing software include non-destructive editing, advanced color correction, layer support, masking capabilities, and RAW file support. These features provide the flexibility and control needed for professional-level photo editing. Consider your specific needs and workflow when choosing a photo editing software.
12.2 How To Import And Export Photos In Different Formats?
To import and export photos in different formats, use the “Import” and “Export” options in your photo editing software. Choose the appropriate format based on your needs, such as JPEG for web use or TIFF for high-quality printing. Understanding different file formats is essential for ensuring your photos look their best in any context.
12.3 Tips For Managing And Organizing Your Photo Library?
Tips for managing and organizing your photo library include using a consistent naming convention, creating folders and subfolders for different projects or events, and using keywords and tags to make it easier to find specific photos. A well-organized photo library can save you time and frustration in the long run. Regularly backing up your photo library is also crucial for protecting your valuable images.
13. Can You Edit RAW Files On A Macbook?
Yes, you can edit RAW files on a Macbook using the built-in Photos app or third-party software like Adobe Lightroom, Capture One, or Luminar AI. RAW files contain unprocessed data from your camera’s sensor, providing more flexibility and control during editing. Editing RAW files can significantly improve the quality of your photos, especially in challenging lighting conditions.
13.1 What Are The Benefits Of Editing RAW Files?
The benefits of editing RAW files include greater dynamic range, more accurate color, and more control over exposure and white balance. RAW files also allow you to recover details in highlights and shadows that would be lost in JPEG files. Editing RAW files is essential for achieving the best possible image quality.
13.2 Which Software Is Best For Editing RAW Files On A Macbook?
The best software for editing RAW files on a Macbook depends on your needs and preferences. Adobe Lightroom is a popular choice for its comprehensive editing and organization features, while Capture One is favored by professionals for its exceptional color handling. Luminar AI offers a user-friendly interface and AI-powered tools for quick and easy RAW editing.
13.3 How Do RAW Files Differ From JPEGs?
RAW files differ from JPEGs in that they contain unprocessed data from your camera’s sensor, while JPEGs are compressed files that have already been processed by your camera. RAW files offer more flexibility and control during editing, while JPEGs are smaller and more convenient for sharing. Understanding the differences between RAW and JPEG files is essential for making the right choice for your photography needs.
14. How To Share Your Edited Photos From A Macbook?
To share your edited photos from a Macbook, use the “Share” option in the Photos app or your photo editing software to export the photos in the desired format and size, then share them via email, social media, or other platforms. Consider the intended audience and platform when choosing the file format and size.
14.1 What Are The Best File Formats For Sharing Photos Online?
The best file formats for sharing photos online are JPEG and PNG. JPEG is ideal for photos with complex colors and gradients, while PNG is better for images with sharp lines and text. Both formats are widely supported and offer good compression for fast loading times.
14.2 How To Resize Photos For Social Media?
To resize photos for social media, use the “Export” option in your photo editing software and specify the desired dimensions based on the platform’s recommendations. Different platforms have different size requirements, so it’s important to check the guidelines before exporting your photos. Maintaining the correct aspect ratio is also crucial for preventing distortion.
14.3 Tips For Protecting Your Copyright When Sharing Photos Online?
Tips for protecting your copyright when sharing photos online include adding a watermark, disabling right-clicking, and registering your copyright with the U.S. Copyright Office. While these measures may not prevent all instances of copyright infringement, they can deter unauthorized use of your photos. Educating yourself about copyright law is also essential for protecting your rights.
15. What Are Some Common Mistakes To Avoid When Editing Photos?
Some common mistakes to avoid when editing photos include over-sharpening, over-saturating, using too much noise reduction, and relying too heavily on presets. Subtle adjustments are often more effective than extreme edits. Learning to recognize and avoid these mistakes is essential for achieving professional-looking results.
15.1 How To Avoid Over-Sharpening Photos?
To avoid over-sharpening photos, use the sharpening tool sparingly and avoid pushing the settings too high. Zoom in to 100% to evaluate the sharpness and look for halos or artifacts around edges, which indicate over-sharpening. A subtle amount of sharpening is often more effective than an aggressive approach.
15.2 Why Is It Important Not To Over-Saturate Colors?
It is important not to over-saturate colors because it can make your photos look unnatural and unrealistic. Colors that are too intense can be distracting and unpleasant to look at. A more subtle approach to color enhancement is often more pleasing to the eye.
15.3 How To Use Presets Without Losing Your Personal Style?
To use presets without losing your personal style, use them as a starting point and then customize the settings to suit your individual taste. Avoid relying too heavily on presets and experiment with different adjustments to develop your own unique style. Presets can be a useful tool, but they should not replace your own creativity and judgment.
16. What Are The Best Resources For Learning More About Photo Editing?
The best resources for learning more about photo editing include online tutorials, books, workshops, and online communities. Websites like dfphoto.net offer a wealth of information and resources for photographers of all levels. Investing in your education is essential for improving your skills and achieving your goals.
16.1 Recommended Online Courses And Tutorials?
Recommended online courses and tutorials include those offered by Adobe, CreativeLive, and Skillshare. These platforms offer a wide range of courses taught by experienced professionals, covering everything from basic editing techniques to advanced workflows. Consider your budget and learning style when choosing an online course.
16.2 Useful Books On Photo Editing Techniques?
Useful books on photo editing techniques include “The Adobe Photoshop Lightroom Classic CC Book” by Martin Evening, “Understanding Exposure” by Bryan Peterson, and “The Photographer’s Eye” by Michael Freeman. These books provide valuable insights and practical tips for improving your photo editing skills. Reading books is a great way to deepen your understanding of photography and editing.
16.3 Online Communities And Forums For Photo Editors?
Online communities and forums for photo editors include Reddit’s r/photography and r/photocritique, as well as the Adobe Photoshop and Lightroom forums. These communities provide a platform for sharing your work, asking questions, and getting feedback from other photographers and editors. Connecting with other creatives can be a great source of inspiration and support.
17. How Can Dfphoto.Net Help You Improve Your Photo Editing Skills?
Dfphoto.net offers a wealth of resources to help you improve your photo editing skills, including detailed tutorials, inspiring photo galleries, and a vibrant community of photographers. Whether you’re a beginner or an experienced pro, you’ll find valuable information and inspiration at dfphoto.net. Explore the site today and take your photo editing skills to the next level.
17.1 What Kind Of Tutorials And Guides Does Dfphoto.Net Offer?
Dfphoto.net offers a wide range of tutorials and guides covering everything from basic editing techniques to advanced workflows, with a focus on using the Photos app and other popular software on Macbook. Our tutorials are designed to be easy to follow and provide practical tips for improving your photos. Whether you’re looking to learn about exposure, composition, or color correction, you’ll find valuable resources at dfphoto.net.
17.2 How Can You Get Feedback On Your Edited Photos From The Dfphoto.Net Community?
You can get feedback on your edited photos from the dfphoto.net community by sharing your work in our online forums and asking for constructive criticism. Our community is made up of photographers of all levels who are passionate about sharing their knowledge and helping others improve. Getting feedback from other photographers can provide valuable insights and help you identify areas for improvement.
17.3 Does Dfphoto.Net Offer Any Exclusive Resources Or Discounts For Members?
Yes, dfphoto.net offers exclusive resources and discounts for members, including access to premium tutorials, exclusive presets, and discounts on photo editing software and equipment. Becoming a member is a great way to support our community and gain access to valuable resources that can help you improve your photo editing skills. Join dfphoto.net today and take your photography to the next level.
18. What Are The Ethical Considerations When Editing Photos?
The ethical considerations when editing photos include avoiding manipulation that misrepresents reality, respecting the privacy of your subjects, and being transparent about the edits you’ve made. Photo editing should be used to enhance and improve your photos, not to deceive or mislead viewers. Maintaining ethical standards is essential for preserving the integrity of your work.
18.1 How To Avoid Misrepresenting Reality In Your Photos?
To avoid misrepresenting reality in your photos, avoid making drastic changes that alter the original scene or create a false impression. Focus on making subtle adjustments that enhance the natural beauty of the subject without distorting the truth. Transparency about the edits you’ve made can also help maintain trust and credibility.
18.2 What Are The Privacy Considerations When Editing Photos Of People?
The privacy considerations when editing photos of people include respecting their right to control their own image and avoiding edits that could be considered offensive or embarrassing. Always obtain consent before sharing photos of people, especially if you’ve made significant edits. Respecting privacy is essential for maintaining ethical standards and building trust with your subjects.
18.3 How To Be Transparent About The Edits You’ve Made To A Photo?
To be transparent about the edits you’ve made to a photo, consider including a caption or description that explains the changes you’ve made. This can help viewers understand the creative process and avoid any misunderstandings about the authenticity of the image. Transparency is essential for building trust and maintaining ethical standards.
19. How To Back Up Your Edited Photos On A Macbook?
To back up your edited photos on a Macbook, use a combination of local and cloud-based backup solutions, such as Time Machine, iCloud, and external hard drives. Regularly backing up your photos is essential for protecting your valuable images from data loss. A comprehensive backup strategy should include both on-site and off-site backups.
19.1 What Are The Best Local Backup Solutions For Macbook?
The best local backup solutions for Macbook include Time Machine, which is built into macOS, and external hard drives. Time Machine automatically backs up your entire system, including your photos, while external hard drives allow you to create manual backups of your files. Using both Time Machine and an external hard drive provides an extra layer of protection for your data.
19.2 Recommended Cloud-Based Backup Services?
Recommended cloud-based backup services include iCloud, Google Drive, Dropbox, and Backblaze. These services automatically back up your files to the cloud, providing an off-site backup solution that protects your data from physical damage or theft. Choose a service that offers sufficient storage space and reliable performance.
19.3 How Often Should You Back Up Your Photos?
You should back up your photos regularly, ideally at least once a week, or even daily if you’re working on a major project. The more frequently you back up your photos, the less data you’ll lose in the event of a disaster. Automating your backup process can help ensure that your photos are always protected.
20. What Are The Latest Trends In Photo Editing?
The latest trends in photo editing include using AI-powered tools, creating cinematic color grades, and embracing a more natural and authentic aesthetic. AI-powered tools can automate many time-consuming tasks and enhance your photos with just a few clicks. Cinematic color grades add a dramatic and stylized look to your images. A more natural and authentic aesthetic emphasizes realism and avoids over-processed looks.
20.1 How AI Is Revolutionizing Photo Editing?
AI is revolutionizing photo editing by automating many time-consuming tasks, such as object removal, sky replacement, and skin retouching. AI-powered tools can also analyze your photos and suggest optimal adjustments, making it easier than ever to achieve professional-looking results. AI is transforming the way we edit photos and opening up new possibilities for creativity.
20.2 What Is Cinematic Color Grading And How To Achieve It?
Cinematic color grading involves using tools like curves, color wheels, and LUTs to create a stylized and dramatic look in your photos, similar to what you see in movies. This often involves creating a specific color palette and adjusting the contrast and saturation to achieve the desired mood. Cinematic color grading can add a professional and polished look to your photos.
20.3 Why Is A More Natural Aesthetic Becoming Popular?
A more natural aesthetic is becoming popular as people are increasingly valuing authenticity and realism in their photos. This involves avoiding over-processed looks and focusing on enhancing the natural beauty of the subject. A more natural aesthetic can create a more timeless and engaging image that resonates with viewers.
Address: 1600 St Michael’s Dr, Santa Fe, NM 87505, United States. Phone: +1 (505) 471-6001. Visit Website: dfphoto.net today to explore our extensive collection of tutorials, breathtaking photo galleries, and connect with a vibrant community of photographers. Don’t miss out on the opportunity to elevate your skills and unleash your full creative potential!
FAQ Section
Q1: Can I edit photos directly in the Macbook Photos app?
Yes, the Macbook Photos app allows for basic photo editing, including adjusting light, color, and cropping. It’s a great starting point for simple enhancements.
Q2: What are some alternatives to the Photos app for more advanced editing?
Alternatives include Adobe Photoshop, Lightroom, Luminar AI, Capture One, and Affinity Photo, each offering advanced features for professional results.
Q3: How do I revert to the original photo if I don’t like the edits in the Photos app?
Select the photo and choose “Image > Revert to Original” to remove all edits and restore the photo to its original state.
Q4: Can I copy edits from one photo to another in the Photos app?
Yes, you can copy edits by selecting a photo, choosing “Image > Copy Edits,” then pasting them onto another photo using “Image > Paste Edits.”
Q5: What is the best file format for sharing photos online?
JPEG is best for complex colors and gradients, while PNG is ideal for images with sharp lines and text.
Q6: How can I protect my copyright when sharing photos online?
Add a watermark, disable right-clicking, and register your copyright with the U.S. Copyright Office.
Q7: What are some common mistakes to avoid when editing photos?
Avoid over-sharpening, over-saturating, using too much noise reduction, and relying too heavily on presets.
Q8: How often should I back up my edited photos?
Back up your photos regularly, ideally at least once a week, or even daily if you’re working on a major project.
Q9: Can I edit RAW files on a Macbook?
Yes, you can edit RAW files using the Photos app or third-party software like Adobe Lightroom, Capture One, or Luminar AI.
Q10: How can dfphoto.net help me improve my photo editing skills?
dfphoto.net offers detailed tutorials, inspiring photo galleries, and a vibrant community of photographers to help you improve your skills.
By mastering these tips and techniques, you’ll be well on your way to editing photos on your Macbook like a pro. Happy editing!
