Resizing photos is a fundamental skill for anyone working with digital images. Whether you’re preparing photos for your website, social media, email, or print, knowing how to adjust image dimensions is crucial. Incorrectly sized photos can lead to slow loading times online, pixelation, or printing issues. This guide will walk you through various methods to effectively edit photo size, ensuring your images are always perfectly sized for any purpose.
Quick and Easy Photo Resizing Using Sizing Handles
The most intuitive way to change the size of a photo is by using sizing handles. This method offers a quick visual adjustment, perfect for when you need to resize an image directly within applications like Microsoft Office or Google Docs.
-
Select Your Image: Begin by clicking on the image you wish to resize. You’ll notice small circles or squares appearing at the corners and sides of the image – these are the sizing handles.
-
Drag the Sizing Handles: To resize, simply click and drag one of these handles.
-
Uniform Resizing (Maintain Aspect Ratio): For most situations, you’ll want to maintain the original proportions of your photo to prevent distortion. To do this, drag a corner handle. Dragging a corner handle ensures that both the height and width of the image change proportionally.
-
Non-uniform Resizing (Distorting Proportions): If you need to stretch or compress the image, you can drag a handle located on the sides (middle handles) of the image. Be cautious when using side handles as it can distort your image, making it appear stretched or squashed.
-
Resizing from the Center: To resize the image while keeping its center point in the same location, press and hold the Ctrl key (or Option key on Mac) while dragging a sizing handle. This is particularly useful when you’ve positioned the image precisely and want to resize it without moving its central location.
-
Proportional Resizing from the Center: For proportional resizing while maintaining the center, hold down both Ctrl + Shift keys (or Option + Shift on Mac) and drag a corner handle. This combines the benefits of proportional resizing and center-point stability.
-
Image: Demonstrating how to use a corner sizing handle to resize a photo proportionally.
Precise Photo Size Editing with Height and Width Dimensions
For situations requiring more accuracy, using the Height and Width settings provides precise control over your photo’s dimensions. This method is ideal when you need to resize images to specific pixel dimensions for web design, printing, or adhering to specific platform requirements.
-
Select the Image: Click on the photo you intend to resize. This will typically activate the ‘Picture Format’ or similar contextual tab in your software (e.g., Picture Tools Format in Microsoft Office).
-
Locate the Size Options: Look for the ‘Size’ group within the ‘Picture Format’ tab. Here, you’ll find fields labeled ‘Height’ and ‘Width’.
-
Enter Specific Dimensions: Directly input your desired height and width values into these boxes.
-
Maintaining Aspect Ratio: By default, most software maintains the aspect ratio. This means if you change either the height or width, the other dimension will automatically adjust to keep the image proportions the same, preventing distortion. You may see a ‘Lock aspect ratio’ option (usually checked by default) which ensures this behavior.
-
Independent Height and Width Adjustment (Unlocking Aspect Ratio): If you need to change the height and width independently, you’ll need to unlock the aspect ratio. This option is usually found within a more advanced ‘Size’ settings dialog box, often accessed by clicking a small dialog box launcher icon (a small arrow in a square) in the bottom-right corner of the ‘Size’ group. Once unlocked, you can freely adjust height and width without maintaining proportions, but be aware this can distort your image.
-
 Height and Width input boxes in the Picture Tools Format tab, used for precise photo size editing in Microsoft applications.
Image: Illustrating the Height and Width boxes within the Picture Tools Format tab for precise image resizing.
Scaling Photo Size by Percentage
Another method for resizing, particularly useful when you want to enlarge or reduce an image by a certain percentage, is scaling. This is often found in more detailed layout or format options.
-
Access Advanced Layout Options: Select your image and navigate to the ‘Picture Format’ tab. Look for options like ‘Position’ or ‘Arrange’, and within those, find ‘More Layout Options…’ This will open a detailed layout dialog box or pane.
-
Navigate to the Size Tab: In the layout dialog, find the ‘Size’ tab. Here, you’ll see ‘Scale’ options with percentage inputs for ‘Height’ and ‘Width’.
-
Enter Percentage Values: Input the percentage by which you want to scale your image.
-
Proportional Scaling: To maintain the aspect ratio while scaling, ensure the ‘Lock aspect ratio’ checkbox is selected (usually default). Then, entering a percentage in either the ‘Height’ or ‘Width’ scale box will automatically adjust the other to maintain proportions. For example, entering 50% will reduce the image to half its original size proportionally.
-
Non-proportional Scaling: To scale height and width independently, uncheck the ‘Lock aspect ratio’ box. You can then enter different percentages for height and width, allowing you to stretch or compress the image in specific directions.
-
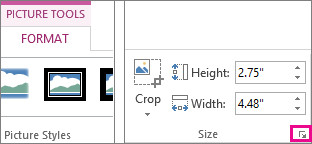 Dialog Box launcher in the Size group on the Picture Tools Format tab, leading to advanced size options including scaling.
Image: Showing the dialog box launcher in the Size group, which opens advanced size settings for scaling and aspect ratio control.
Resizing Photos Across Different Platforms
While the methods described above are demonstrated within the context of applications like Microsoft Office, the core principles of resizing images – using handles, specifying dimensions, and scaling – are universally applicable. Most photo editing software, from basic online tools to professional applications like Adobe Photoshop, will offer similar functionalities.
Whether you are using online photo resizers, mobile apps, or desktop software, understanding these fundamental techniques will empower you to effectively manage and edit photo sizes for any project. Always consider the intended use of your resized image and choose the method that provides the right balance of speed, precision, and quality for your needs.