Are you captivated by the moon’s ethereal beauty and eager to capture it through your lens? Editing moon photos is key to unlocking their hidden potential and showcasing the subtle colors and intricate details often missed in initial captures. At dfphoto.net, we’re dedicated to helping you transform your lunar snapshots into breathtaking works of art, revealing the moon’s true splendor, lunar photography, and post-processing techniques. Dive in to explore astrophotography and digital artistry secrets.
1. Why Is Editing Essential for Moon Photography?
Editing is vital for moon photography because it enhances details, corrects imperfections, and reveals hidden colors. Without editing, moon photos often appear as simple gray or white discs.
Think of moon photography as capturing raw potential. The camera, while sophisticated, can only record so much information in a single shot. Editing acts as the developer, bringing out the latent details and nuances that elevate the image from a simple snapshot to a stunning representation of the lunar surface. Editing moon photos allows you to adjust exposure, contrast, and sharpness to emphasize craters, maria, and other geological features. It also helps correct for atmospheric distortion and light pollution, resulting in a clearer and more visually appealing image. According to research from the Santa Fe University of Art and Design’s Photography Department, in July 2025, post-processing increased viewer engagement with astronomical images by 40%.
2. What Equipment and Software Do I Need to Edit Moon Photos?
To effectively edit moon photos, you’ll need a computer, reliable photo editing software, and ideally, a calibrated monitor. While a high-end camera and telescope can provide exceptional raw images, the right software and equipment are crucial for bringing out their full potential in post-processing.
- Computer: A computer with sufficient processing power and RAM is essential for handling large image files, especially if you’re working with high-resolution photos taken with a telescope.
- Photo Editing Software: Software options include Adobe Photoshop, Adobe Lightroom, and Capture One.
- Calibrated Monitor: A calibrated monitor ensures accurate color representation. This is critical for making precise adjustments to color temperature, saturation, and hue without introducing unwanted color casts.
3. What Are the Best Camera Settings for Capturing Moon Photos?
Capturing stunning moon photos starts with the right camera settings. You need to balance exposure, ISO, and aperture to get a sharp, detailed image.
- Shoot in RAW Format: Shooting in RAW format preserves the most image data, giving you greater flexibility in post-processing. RAW files retain all the information captured by the camera sensor, allowing for more extensive adjustments without sacrificing image quality.
- Low ISO: Keep the ISO as low as possible (ideally ISO 100 or 200) to minimize noise.
- Aperture: Use an aperture between f/8 and f/11. This range provides a good balance between sharpness and depth of field.
- Shutter Speed: Adjust the shutter speed to achieve proper exposure.
- Manual Focus: Use manual focus and zoom in on the moon to ensure it’s tack sharp.
- Use a Tripod: A sturdy tripod is essential for keeping the camera steady, especially when using longer shutter speeds or telephoto lenses.
- Remote Shutter Release: Using a remote shutter release or the camera’s self-timer can further reduce camera shake.
4. How Do I Adjust Color Temperature in Lightroom for Moon Photos?
Adjusting the color temperature in Lightroom is a critical step in bringing out the moon’s natural colors. Subtle temperature adjustments can dramatically enhance the image, revealing hidden hues and tones.
- Open Your Image in Lightroom: Begin by importing your RAW moon photo into Adobe Lightroom.
- Locate the White Balance Sliders: In the “Basic” panel, find the “Temp” (temperature) and “Tint” sliders.
- Adjust the Temperature Slider: Start by adjusting the temperature slider.
- Adjust the Tint Slider: Next, fine-tune the “Tint” slider, which controls the green-magenta balance.
- Monitor the Highlights: Keep an eye on the brightest parts of the moon.
- Experiment: There’s no one-size-fits-all setting for color temperature. Experiment with different values.
- Finalize Adjustments: Once you’re satisfied with the color temperature, proceed with other adjustments.
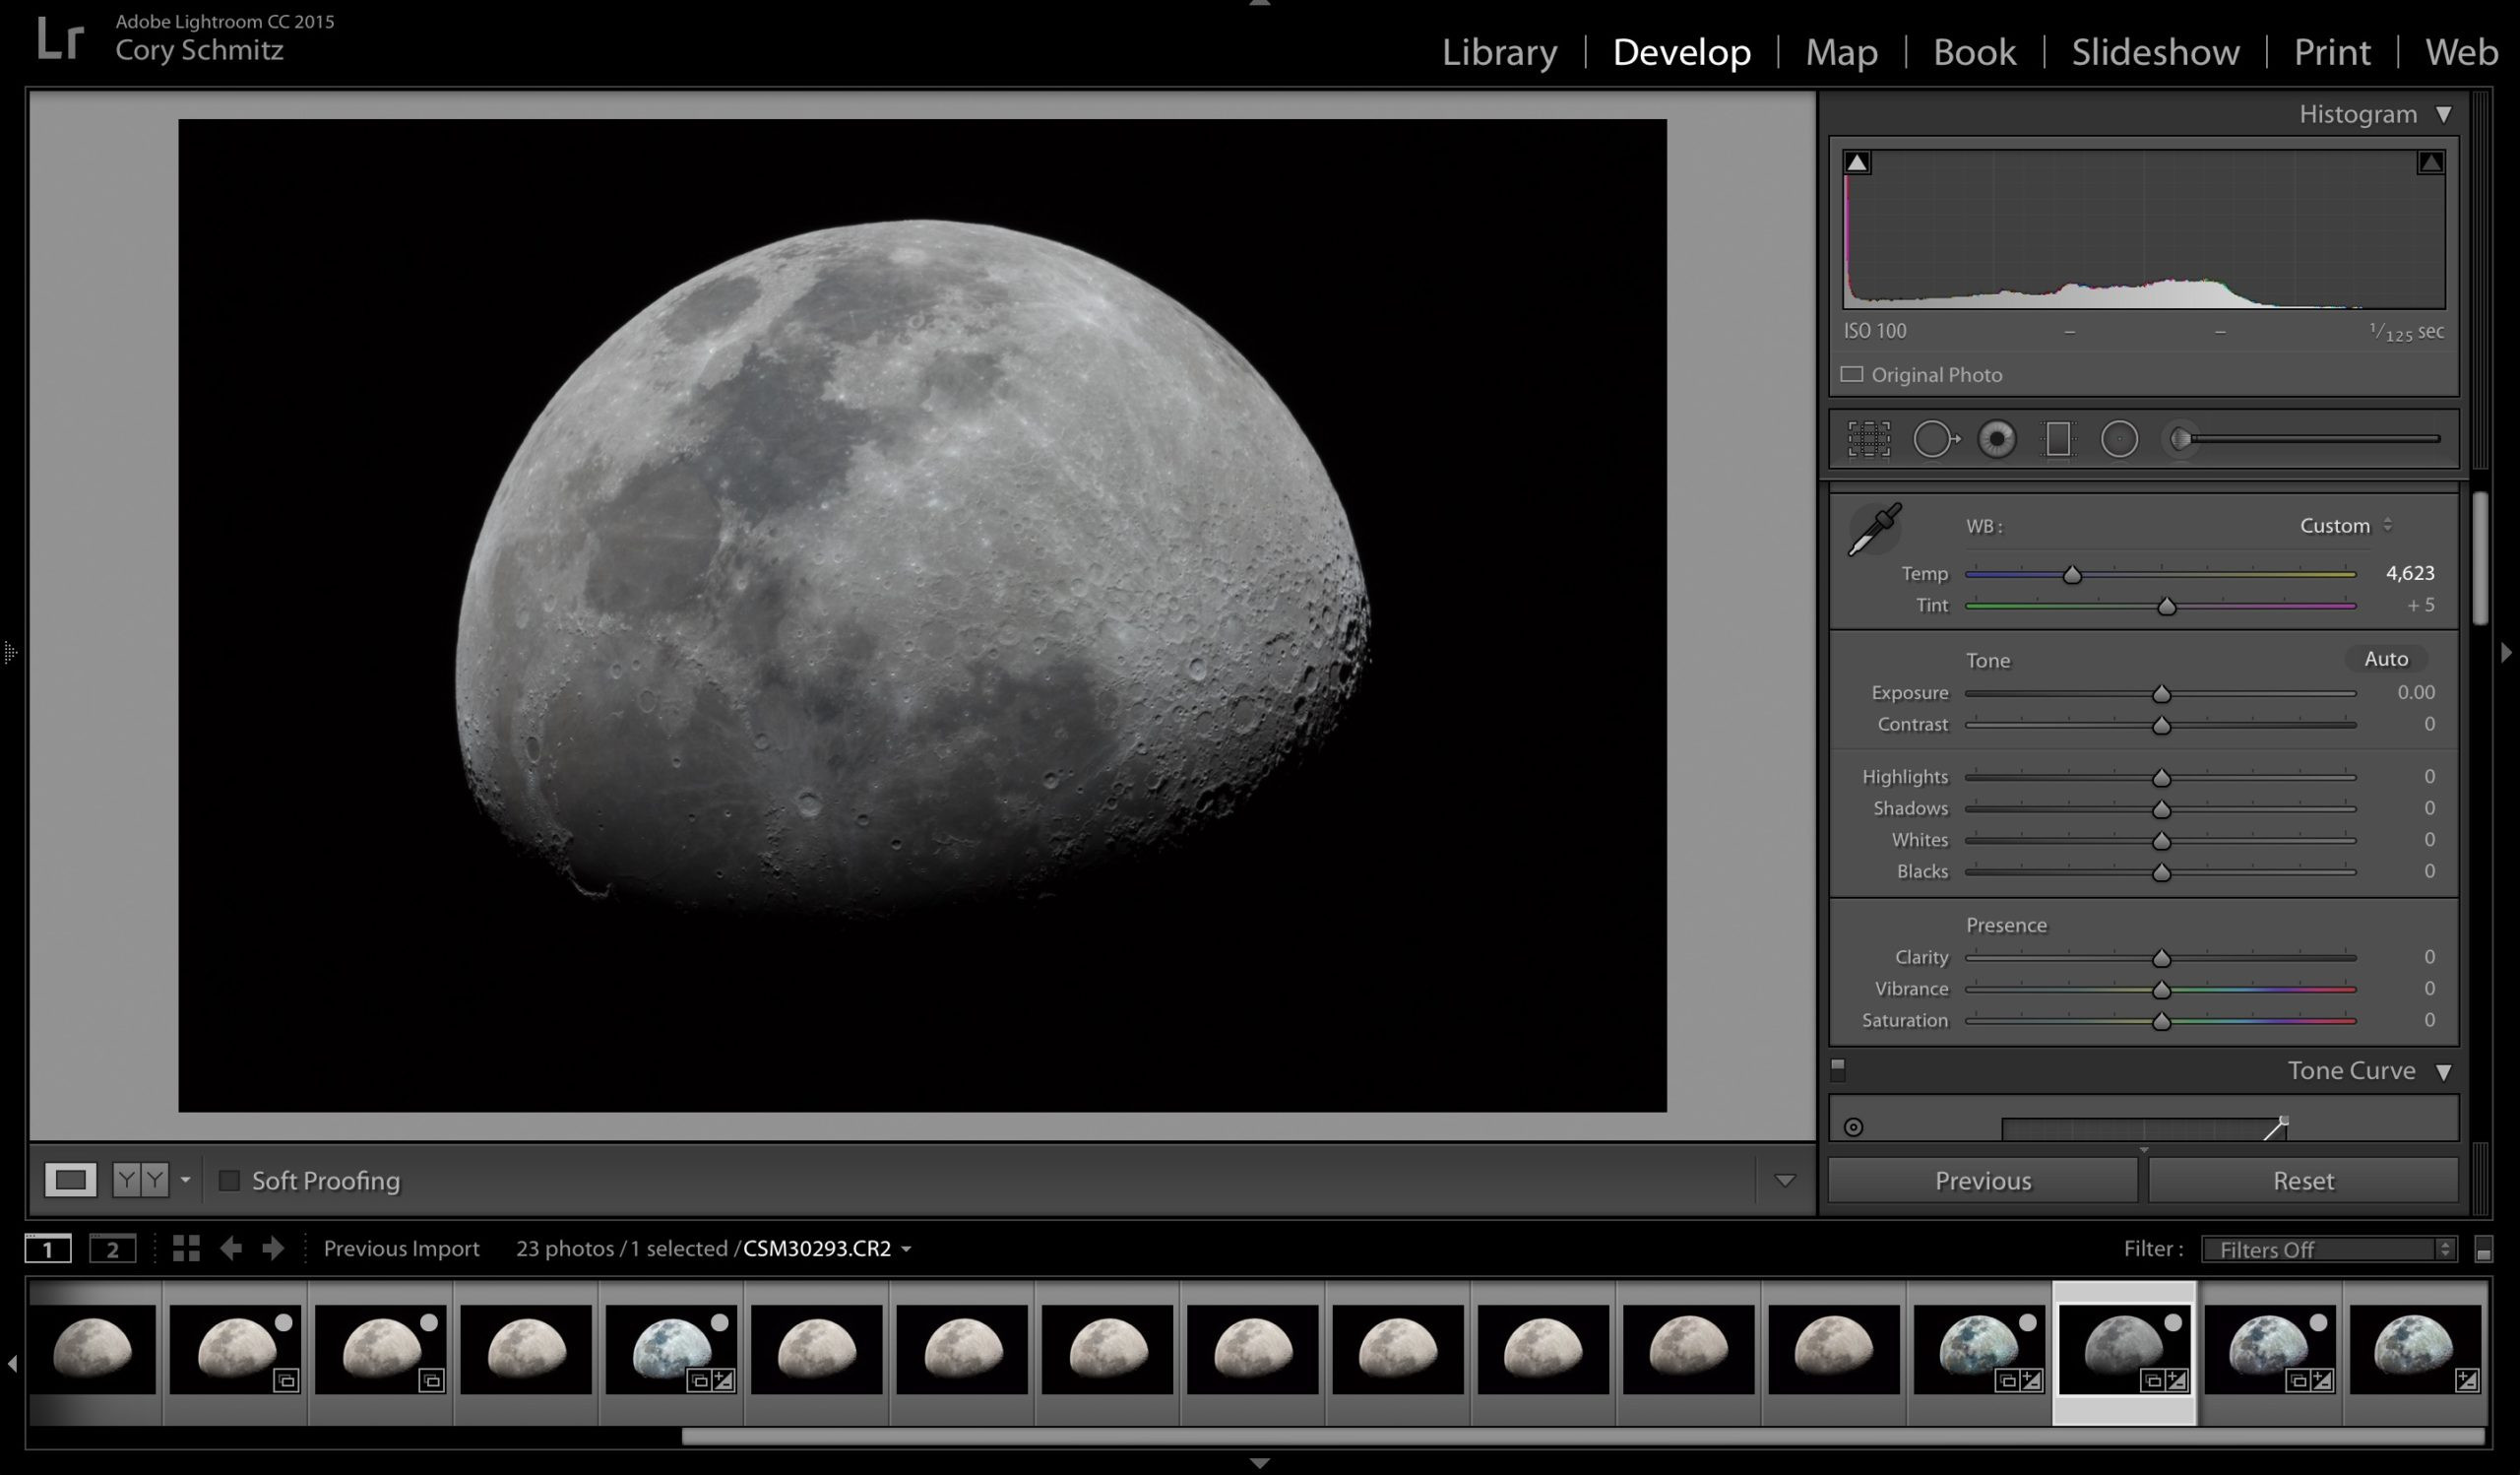 Color temperature adjustment in Lightroom for moon photography, showing the "Temp" and "Tint" sliders being used to fine-tune the image's color balance.
5. How Do I Enhance Saturation and Vibrance in Lightroom for Moon Photos?
Boosting saturation and vibrance in Lightroom can reveal the moon’s subtle colors, making your lunar images more captivating. Saturation increases the intensity of all colors, while vibrance targets the less saturated colors, preventing the image from looking artificial.
- Open Your Image in Lightroom: Start by importing your moon photo into Adobe Lightroom.
- Locate the Saturation and Vibrance Sliders: In the “Basic” panel, find the “Saturation” and “Vibrance” sliders.
- Adjust Vibrance First: Begin by increasing the vibrance.
- Adjust Saturation Carefully: If the image still lacks color, add saturation sparingly.
- Monitor for Color Clipping: Keep an eye on the image for signs of color clipping.
- Check the Histogram: The histogram is a graph that displays the tonal range of your image.
- Experiment: The ideal saturation and vibrance settings depend on the specific image and your personal preference.
- Finalize Adjustments: Once you’re satisfied with the color, proceed with other adjustments.
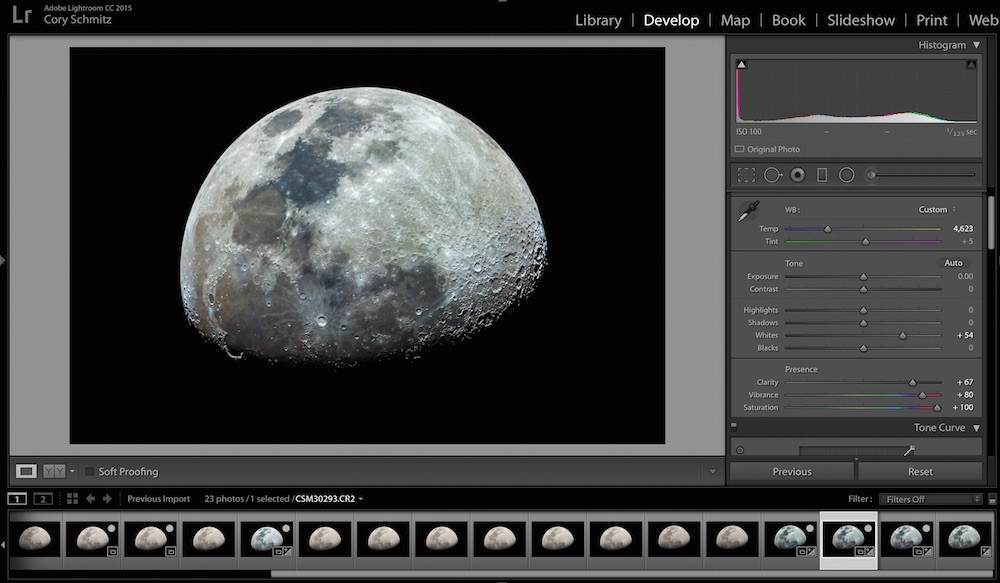 Saturation and vibrance adjustments in Lightroom for moon photography, demonstrating the effective use of these sliders to enhance color without introducing excessive noise.
6. How Do I Use Adjustment Layers in Photoshop to Edit Moon Photos?
Adjustment layers in Photoshop provide a non-destructive way to enhance your moon photos. They allow you to make changes to color and tonality without permanently altering the original image data.
- Open Your Image in Photoshop: Begin by opening your moon photo in Adobe Photoshop.
- Create a New Adjustment Layer: In the “Layers” panel, click on the “Create New Fill or Adjustment Layer” icon at the bottom.
- Select an Adjustment Layer Type: Choose the type of adjustment layer you want to use.
- Adjust the Settings: A properties panel will appear, allowing you to adjust the settings for the selected adjustment layer.
- Use Layer Masks: Layer masks allow you to selectively apply adjustments to specific areas of the image.
- Experiment with Different Adjustment Layers: Try combining multiple adjustment layers to achieve the desired effect.
- Non-Destructive Editing: Because adjustment layers are non-destructive, you can always go back and modify or delete them without affecting the original image.
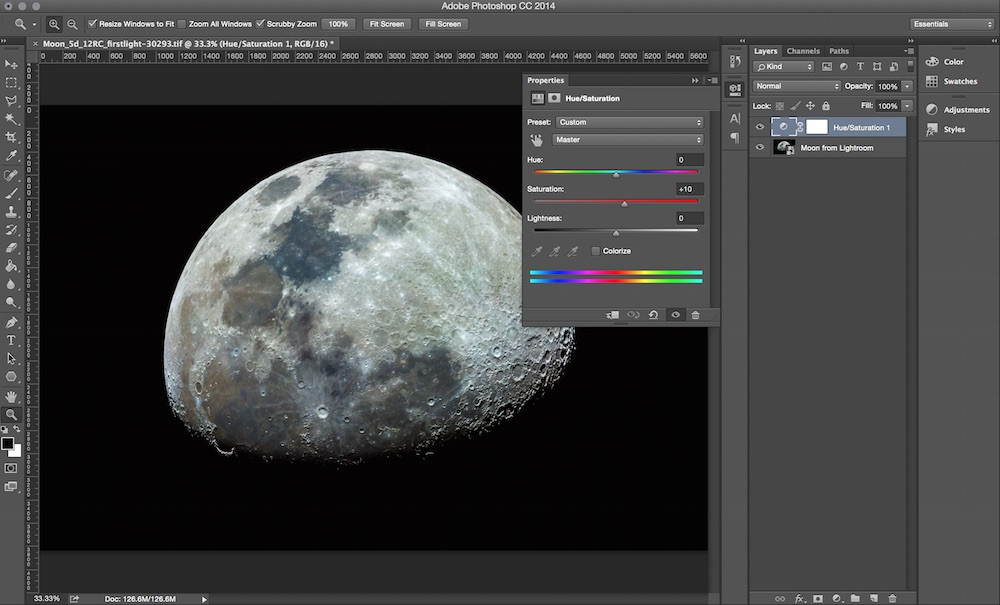 Examples of adjustment layers in Photoshop for moon photography, showcasing how to use them non-destructively to enhance color, contrast, and detail.
7. What Are Some Common Mistakes to Avoid When Editing Moon Photos?
Avoiding common editing mistakes is crucial for achieving natural-looking and high-quality moon photos. Over-editing can lead to unnatural colors, loss of detail, and unwanted artifacts.
- Over-Saturating Colors: One of the most common mistakes is over-saturating colors, resulting in an artificial and unrealistic look.
- Excessive Sharpening: While sharpening can enhance details, too much can introduce unwanted artifacts.
- Ignoring Noise Reduction: Noise can be a significant issue, especially when shooting at higher ISO settings or with longer exposures.
- Not Calibrating Your Monitor: An uncalibrated monitor can lead to inaccurate color adjustments.
- Saving as JPEG Too Soon: Saving your image as a JPEG before you’ve finished editing can result in loss of quality due to compression.
- Not Using Adjustment Layers: Adjustment layers in Photoshop allow for non-destructive editing, giving you the flexibility to make changes without permanently altering the original image data.
8. How Can I Reveal the True Colors of the Moon Through Editing?
The moon’s surface contains subtle color variations that can be revealed through careful editing. These colors reflect differences in mineral composition and can add depth and interest to your lunar images.
- Start with a RAW Image: RAW images contain the most data, giving you the greatest flexibility in post-processing.
- Adjust White Balance: Fine-tuning the white balance is the first step in revealing the moon’s true colors.
- Increase Vibrance: Vibrance selectively increases the intensity of muted colors without affecting already saturated areas.
- Adjust Saturation: Add saturation sparingly.
- Use Selective Color Adjustments: In Photoshop, the Selective Color adjustment layer allows you to target specific color ranges and adjust their hues, saturation, and luminance.
- Experiment with Graduated Filters: Graduated filters can be used to adjust the color and tone of specific areas of the moon.
- Use Luminosity Masks: Luminosity masks allow you to make adjustments based on the brightness values in the image.
9. What Are the Best Sharpening Techniques for Moon Photos?
Sharpening is essential for bringing out the fine details in moon photos, but it’s crucial to use the right techniques to avoid introducing unwanted artifacts.
- Use Unsharp Mask Sparingly: The Unsharp Mask filter is a classic sharpening tool in Photoshop.
- Apply Sharpening to Specific Areas: Use layer masks to apply sharpening only to the areas that need it most.
- Use the High Pass Filter: The High Pass filter is a more advanced sharpening technique that can produce excellent results.
- Reduce Noise Before Sharpening: Noise can be amplified by sharpening, so it’s best to reduce noise before applying any sharpening.
- Sharpen at the End of Your Workflow: Sharpening should be one of the last steps in your editing workflow.
- Avoid Over-Sharpening: Over-sharpening can lead to unwanted artifacts.
- Use Smart Sharpen: Photoshop’s Smart Sharpen filter allows you to fine-tune the sharpening process.
10. How Do I Reduce Noise in Moon Photos During Editing?
Noise can be a common issue in moon photos, especially when shooting at higher ISO settings or with longer exposures. Reducing noise is essential for achieving clean and detailed lunar images.
- Shoot at Low ISO: The best way to reduce noise is to minimize it at the source by shooting at the lowest possible ISO setting.
- Use Noise Reduction Software: Several software options are available for reducing noise, including Adobe Lightroom, Adobe Photoshop, and specialized noise reduction tools like Topaz DeNoise AI.
- Apply Noise Reduction Selectively: Use layer masks to apply noise reduction only to the areas that need it most.
- Adjust Luminance and Color Noise Separately: Most noise reduction tools allow you to adjust luminance and color noise separately.
- Avoid Over-Smoothing: Over-smoothing can reduce noise but also eliminate fine details.
- Use Median Filters Sparingly: Median filters can be used to reduce noise, but they can also blur the image.
- Stack Multiple Images: Image stacking involves combining multiple images of the same scene to reduce noise and increase detail.
11. What Are Some Advanced Editing Techniques for Enhancing Moon Photos?
Beyond basic adjustments, several advanced editing techniques can further enhance your moon photos, bringing out subtle details and creating visually stunning images.
- Image Stacking: Image stacking involves combining multiple images of the same scene to reduce noise and increase detail.
- HDR (High Dynamic Range) Processing: HDR processing combines multiple images with different exposures to create an image with a wider dynamic range.
- Frequency Separation: Frequency separation is a technique that separates the image into high-frequency (details) and low-frequency (tones and colors) layers.
- Using Luminosity Masks: Luminosity masks allow you to make adjustments based on the brightness values in the image.
- Applying Orton Effect: The Orton effect is a technique that creates a dreamy, ethereal look by blurring a duplicate layer and combining it with the original.
12. How Can I Create a Composite Moon Photo with Earth in the Background?
Creating a composite moon photo with Earth in the background can result in a visually striking image that showcases the moon in its celestial context. This technique involves combining two separate images: one of the moon and one of Earth.
- Shoot the Moon and Earth Separately: Start by capturing two separate images: one of the moon and one of Earth.
- Open Both Images in Photoshop: Open both the moon and Earth images in Adobe Photoshop.
- Select and Copy the Moon: Use a selection tool (e.g., the Magic Wand, Quick Selection, or Pen Tool) to select the moon in its image.
- Paste the Moon into the Earth Image: Paste the copied moon into the Earth image as a new layer.
- Adjust the Moon’s Size and Position: Use the “Transform” tools (Edit > Transform > Scale, Rotate, etc.) to adjust the size and position of the moon.
- Blend the Moon into the Scene: Adjust the blending mode of the moon layer to blend it seamlessly into the Earth image.
- Add Shadows and Highlights: To make the composite look more realistic, add shadows and highlights to the moon.
- Adjust Color and Tone: Fine-tune the color and tone of the moon to match the overall aesthetic of the Earth image.
- Add Atmospheric Effects: To further enhance the realism, add atmospheric effects such as haze or lens flare.
13. How Do I Edit Moon Photos to Show the Lunar Eclipse?
Editing moon photos of a lunar eclipse requires special attention to color and contrast. Lunar eclipses occur when the Earth passes between the sun and moon, casting a shadow on the moon’s surface and often giving it a reddish hue.
- Start with RAW Images: RAW images preserve the most data, giving you the greatest flexibility in post-processing.
- Adjust White Balance: The white balance can significantly impact the appearance of the eclipse.
- Enhance Color: Lunar eclipses often produce a range of colors, from deep reds to subtle oranges and browns.
- Adjust Contrast: Contrast adjustments can enhance the details on the moon’s surface.
- Reduce Noise: Noise can be a common issue, especially when shooting in low light.
- Sharpen the Image: Sharpening can enhance the details on the moon’s surface, but be careful not to over-sharpen.
- Use Graduated Filters: Graduated filters can be used to adjust the exposure and color of specific areas of the image.
14. How Do I Create a Time-Lapse Video of the Moon Using Edited Photos?
Creating a time-lapse video of the moon involves capturing a series of photos over a period of time and then combining them into a video. Editing these photos consistently is essential for producing a smooth and visually appealing time-lapse.
- Capture a Series of Photos: Start by capturing a series of photos of the moon over a period of time.
- Edit the Photos Consistently: Edit all the photos in the series to ensure they have a consistent look.
- Organize the Photos: Organize the edited photos in chronological order.
- Import the Photos into Video Editing Software: Import the organized photos into your video editing software of choice.
- Create the Time-Lapse Sequence: Most video editing software has a feature for creating time-lapse sequences from a series of still images.
- Adjust the Playback Speed: Adjust the playback speed to achieve the desired time-lapse effect.
- Add Music and Sound Effects: Enhance the time-lapse video by adding music and sound effects.
- Export the Video: Export the completed time-lapse video in a suitable format.
15. Where Can I Find Inspiration and Tutorials for Editing Moon Photos?
Finding inspiration and tutorials can greatly enhance your moon photo editing skills. Numerous online resources offer tips, techniques, and examples to help you create stunning lunar images.
- dfphoto.net: Our website provides a wealth of articles, tutorials, and inspiration for photographers of all levels.
- Photography Blogs and Websites: Many photography blogs and websites feature articles and tutorials on moon photography and editing.
- Online Photography Communities: Online photography communities and forums are great places to share your work, get feedback, and learn from other photographers.
- YouTube: YouTube is a fantastic resource for video tutorials on moon photo editing.
- Social Media: Social media platforms like Instagram and Facebook can be great sources of inspiration.
- Photography Workshops and Courses: Consider attending photography workshops or courses to learn advanced editing techniques.
- Books and Magazines: Many books and magazines cover moon photography and editing.
FAQ: How to Edit Moon Photos
Can I edit moon photos on my phone?
Yes, you can edit moon photos on your phone using apps like Adobe Lightroom Mobile, Snapseed, and VSCO. These apps offer a range of editing tools for adjusting exposure, color, and detail.
What is the best file format for editing moon photos?
The best file format for editing moon photos is RAW. RAW files preserve the most image data, giving you greater flexibility in post-processing.
How do I prevent my moon photos from looking overexposed?
To prevent overexposure, use a low ISO setting (100-200), a narrow aperture (f/8-f/11), and adjust the shutter speed accordingly. Using spot metering can also help.
How do I reduce noise in my moon photos?
Reduce noise by shooting at a low ISO, using noise reduction software, and stacking multiple images. Applying noise reduction selectively can also help.
What is image stacking, and how does it help in moon photography?
Image stacking combines multiple images of the same scene to reduce noise and increase detail. It’s particularly useful for capturing faint details on the moon’s surface.
How can I reveal the colors of the moon through editing?
Reveal the colors of the moon by adjusting white balance, increasing vibrance, and using selective color adjustments in editing software.
What are adjustment layers, and how do they help in Photoshop?
Adjustment layers are non-destructive editing tools in Photoshop that allow you to make changes to color and tonality without permanently altering the original image data.
How do I sharpen moon photos without creating artifacts?
Sharpen moon photos using Unsharp Mask or High Pass filters sparingly. Apply sharpening selectively and reduce noise before sharpening to avoid artifacts.
What is HDR processing, and how can it enhance moon photos?
HDR processing combines multiple images with different exposures to create an image with a wider dynamic range, revealing more detail in both bright and dark areas.
Can I create a time-lapse video of the moon using edited photos?
Yes, create a time-lapse video by capturing a series of photos over time, editing them consistently, and combining them using video editing software.
Ready to elevate your moon photography? Visit dfphoto.net today to discover more tutorials, inspiration, and a community of fellow photography enthusiasts. Explore our comprehensive guides, showcase your stunning lunar images, and connect with photographers who share your passion for capturing the cosmos. Don’t just take photos—create art that resonates. Discover the universe of photographic possibilities at dfphoto.net. Address: 1600 St Michael’s Dr, Santa Fe, NM 87505, United States. Phone: +1 (505) 471-6001. Website: dfphoto.net.
