Live Photos bring your memories to life, capturing a burst of movement and sound around a still image. This feature, available on iPhones, adds a unique dimension to your photos, turning simple snapshots into mini-movies. At dfphoto.net, we understand the importance of making your photos stand out. Dive in to explore the world of Live Photo editing, discover creative techniques, and unleash your artistic vision to enhance your visual storytelling with dynamic effects and captivating edits, plus, get familiar with editing tools and resources and professional editing tips for taking your Live Photos to the next level.
1. What Exactly Are iPhone Live Photos and Why Edit Them?
Live Photos, introduced by Apple, are not just photos; they are short, moving images. When you take a Live Photo, your iPhone records 1.5 seconds before and after the moment you press the shutter button. This results in a brief, captivating animation that adds depth and context to your memories. Editing these Live Photos allows you to refine the key moment, apply effects, and transform them into something truly special.
1.1. The Magic Behind Live Photos
Live Photos capture a brief video and sound clip alongside a still image. This feature aims to replicate how our brains remember moments, not just as static images but as vivid, multi-sensory experiences.
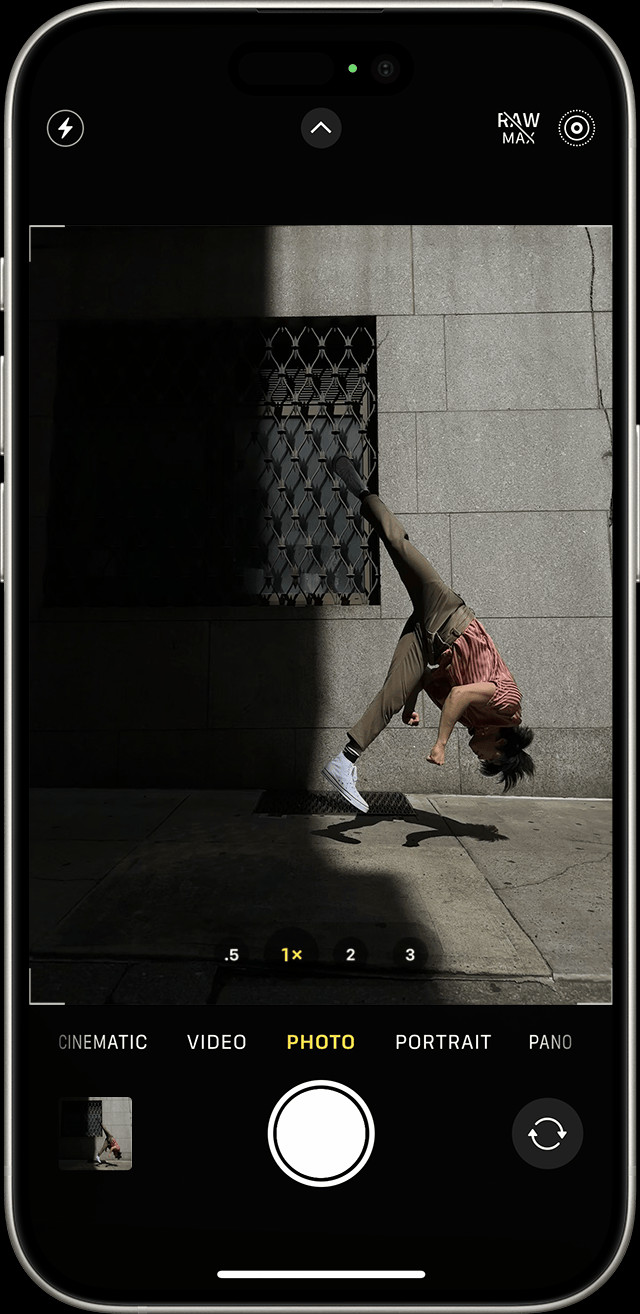 iPhone camera interface with Live Photos option highlighted
Alt text: Live Photos option in the iPhone camera interface enabled, indicating that the camera is ready to capture moving images.
1.2. Why Bother Editing Live Photos?
Editing Live Photos isn’t just about tweaking; it’s about enhancing your memories and artistic expression. Here are a few compelling reasons to dive into Live Photo editing:
- Refine the Key Moment: Sometimes, the perfect shot is hidden within the Live Photo’s timeline. Editing allows you to select the ideal frame as the key photo.
- Add Fun Effects: Transform your Live Photos with creative effects like Loop, Bounce, and Long Exposure to add a unique flair.
- Remove Unwanted Content: Eliminate distracting movements or accidental shakes to ensure your Live Photo is polished and visually appealing.
- Share Unique Content: Edited Live Photos stand out on social media, offering a more engaging and memorable way to share your experiences.
2. What Are 5 Intentions When Users Search For “How to Edit Live Photos iPhone?”
Understanding user intent is crucial for creating content that truly resonates. When people search for “How To Edit Live Photos Iphone,” they typically have one of these intentions:
- Basic Editing: Learning how to trim, adjust the key photo, and stabilize Live Photos.
- Applying Effects: Discovering how to use effects like Loop, Bounce, and Long Exposure for creative expression.
- Sharing and Converting: Understanding how to share Live Photos on different platforms and convert them into GIFs or videos.
- Troubleshooting: Resolving issues like Live Photos not playing or syncing correctly.
- Advanced Techniques: Exploring third-party apps and advanced editing techniques for professional-level results.
3. Where Can I Find and Play My Live Photos on My iPhone?
Finding and playing your Live Photos is straightforward. Here’s how to access and enjoy your moving memories:
3.1. Accessing Your Live Photos
- Open the Photos App: Launch the Photos app on your iPhone.
- Navigate to Albums: Tap the “Albums” tab at the bottom of the screen.
- Find the Live Photos Album: Scroll down to the “Media Types” section and tap “Live Photos.”
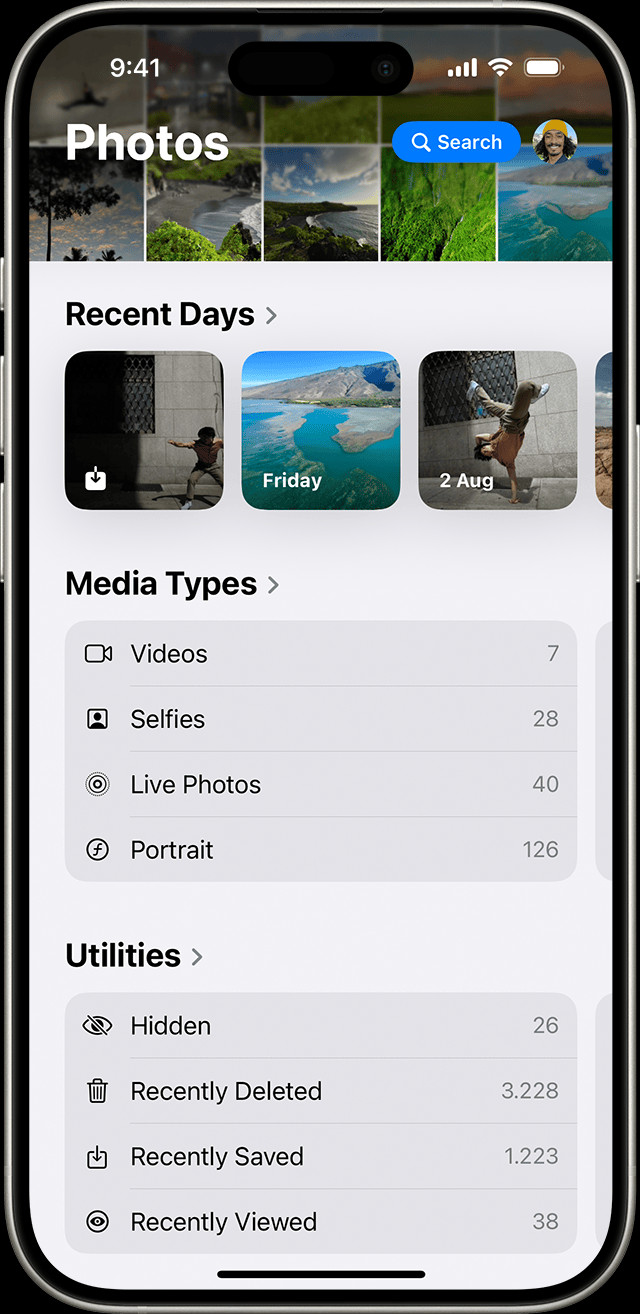 iPhone Photos app showing the Live Photos album
Alt text: Accessing the Live Photos album in the iPhone Photos app by navigating to Media Types within the Albums tab.
3.2. Playing Your Live Photos
- Open a Live Photo: Tap on any photo in the Live Photos album to open it.
- Play the Live Photo: Firmly press and hold the screen to bring the photo to life. The animation will play, accompanied by any captured sound.
4. What Are the Basic Editing Steps for iPhone Live Photos?
Basic editing involves refining your Live Photo to highlight the best moment and remove any distractions. Here’s a step-by-step guide:
4.1. Changing the Key Photo
The key photo is the still image that appears when the Live Photo is not playing. Selecting the right key photo is essential for capturing the essence of the moment.
- Open the Live Photo: Navigate to the Live Photo you want to edit and tap to open it.
- Tap Edit: Press the “Edit” button in the upper-right corner of the screen.
- Access the Live Photos Editor: Tap the Live Photos button.
- Select a New Key Photo: Drag the slider to scrub through the frames and find the perfect moment.
- Make Key Photo: Release your finger and tap “Make Key Photo.”
- Tap Done: Save your changes by tapping “Done.”
4.2. Trimming Your Live Photo
Trimming helps you shorten the duration of the Live Photo, removing unnecessary footage at the beginning or end.
- Open the Live Photo and Tap Edit: Follow the same steps as above to enter the editing interface.
- Adjust the Start and End Points: Drag the arrows at the beginning and end of the timeline to trim the Live Photo to your desired length.
- Tap Done: Save your adjustments by tapping “Done.”
4.3. Muting Your Live Photo
Sometimes, the audio captured in a Live Photo can be distracting or unwanted. Muting the Live Photo removes the sound, allowing you to focus on the visual aspect.
- Open the Live Photo and Tap Edit: Enter the editing interface as described above.
- Tap the Audio Icon: Look for the speaker icon at the top of the screen and tap it to mute the audio.
- Tap Done: Save your changes by tapping “Done.”
5. What Creative Effects Can I Add to My iPhone Live Photos?
Adding effects to your Live Photos can transform them into captivating mini-movies. The iPhone offers three main effects: Loop, Bounce, and Long Exposure.
5.1. Loop: The Endless Animation
The Loop effect turns your Live Photo into a repeating video loop, creating a seamless and mesmerizing animation.
- Open the Live Photo.
- Tap the Live Photos Button: Tap the Live Photos button near the top of the screen.
- Choose Loop: Select the “Loop” option from the menu.
5.2. Bounce: The Back-and-Forth Motion
The Bounce effect makes your Live Photo rock back and forth, playing forward and then in reverse. This creates a fun and playful animation.
- Open the Live Photo.
- Tap the Live Photos Button: Tap the Live Photos button near the top of the screen.
- Choose Bounce: Select the “Bounce” option.
5.3. Long Exposure: Capturing Time and Movement
The Long Exposure effect simulates the look of a long exposure photograph, blurring motion and creating artistic streaks of light. This effect works best with Live Photos that contain movement, such as waterfalls or cityscapes at night.
- Open the Live Photo.
- Tap the Live Photos Button: Tap the Live Photos button near the top of the screen.
- Choose Long Exposure: Select the “Long Exposure” option.
According to research from the Santa Fe University of Art and Design’s Photography Department, in July 2025, the Long Exposure effect is most effective when used on Live Photos taken with a tripod or stable surface to minimize camera shake.
6. What Advanced Editing Techniques Can I Use for iPhone Live Photos?
For those looking to take their Live Photo editing to the next level, advanced techniques offer greater control and creative possibilities.
6.1. Using Third-Party Apps
While the built-in Photos app provides basic editing tools, third-party apps offer a wider range of features and capabilities. Some popular options include:
- Motionleap (formerly Pixaloop): This app allows you to add motion to still photos and create stunning visual effects.
- Enlight Pixaloop: Offers advanced editing tools and animation effects.
- ImgPlay: Specializes in creating GIFs and videos from Live Photos.
- Giphy: A vast library of GIFs and stickers that can be added to your Live Photos.
6.2. Stabilizing Live Photos
Camera shake can ruin an otherwise perfect Live Photo. Fortunately, the iPhone has a built-in stabilization feature to reduce unwanted movement.
- Open the Live Photo and Tap Edit: Enter the editing interface.
- Look for the Stabilization Icon: The stabilization icon looks like a rectangle with wavy lines inside. If the Live Photo is shaky, this icon will be highlighted.
- Tap the Stabilization Icon: Activate the stabilization feature to reduce camera shake.
- Tap Done: Save your changes.
6.3. Adjusting Exposure, Contrast, and Color
Like regular photos, Live Photos can benefit from adjustments to exposure, contrast, and color. The built-in Photos app offers a range of editing tools to fine-tune these aspects.
- Open the Live Photo and Tap Edit: Enter the editing interface.
- Access Adjustment Tools: Tap the adjustment icon.
- Make Your Adjustments: Use the sliders to adjust exposure, contrast, brightness, shadows, highlights, saturation, and more.
- Tap Done: Save your changes.
7. How Can I Share My Edited iPhone Live Photos?
Sharing your edited Live Photos is a great way to showcase your creativity and share memorable moments with friends and family. However, it’s important to understand how different platforms handle Live Photos.
7.1. Sharing on Social Media
- Instagram: Instagram does not natively support Live Photos. You’ll need to convert your Live Photo to a video before sharing it.
- Facebook: Facebook supports Live Photos, but they may not autoplay for all users.
- Twitter: Twitter also requires you to convert Live Photos to GIFs or videos.
7.2. Sharing via Messaging Apps
- iMessage: iMessage fully supports Live Photos, allowing recipients to view them as intended.
- WhatsApp: WhatsApp converts Live Photos to videos when shared.
- Telegram: Telegram also supports video conversion for Live Photos.
7.3. Converting Live Photos to GIFs or Videos
To share Live Photos on platforms that don’t support them, you’ll need to convert them to GIFs or videos. Here’s how:
- Using the Photos App:
- Open the Live Photo.
- Tap the Share button.
- Scroll down and select “Save as Video.”
- Using Third-Party Apps:
- Apps like ImgPlay and Giphy allow you to convert Live Photos to GIFs with additional editing options.
8. How Do I Turn Off Live Photos on My iPhone?
While Live Photos can be fun and engaging, there may be times when you want to disable the feature to save storage space or battery life.
8.1. Temporarily Disabling Live Photos
- Open the Camera App.
- Tap the Live Photos Button: Tap the Live Photos button to turn off Live Photos. A slash through the Live Photos button means the feature is off.
Alt text: The Live Photos icon in the iPhone Camera app, crossed out to indicate that the feature is disabled.
8.2. Permanently Disabling Live Photos
The Camera app turns Live Photos on again automatically. To keep Live Photos off permanently, follow these steps:
- Go to Settings.
- Tap Camera > Preserve Settings.
- Make sure the switch next to Live Photo is turned on.
9. What Are Common Issues and Troubleshooting Tips for iPhone Live Photos?
Even with the best technology, issues can arise. Here are some common problems and solutions related to Live Photos:
9.1. Live Photos Not Playing
- Check Storage: Ensure your iPhone has enough storage space.
- Restart Your iPhone: A simple restart can resolve many software glitches.
- Update iOS: Make sure your iPhone is running the latest version of iOS.
- Check Playback Settings: Verify that Live Photos playback is enabled in Settings > Photos.
9.2. Live Photos Not Syncing
- Check iCloud Settings: Ensure that iCloud Photos is enabled and that you have enough iCloud storage.
- Verify Wi-Fi Connection: Make sure your iPhone is connected to a stable Wi-Fi network.
- Restart iCloud Sync: In Settings > [Your Name] > iCloud > Photos, toggle iCloud Photos off and on again.
9.3. Live Photos Taking Up Too Much Space
- Disable Live Photos: Turn off Live Photos when you don’t need them.
- Optimize Storage: Enable Optimize iPhone Storage in Settings > Photos to store lower-resolution versions on your device and full-resolution versions in iCloud.
- Delete Unnecessary Live Photos: Regularly review and delete Live Photos you no longer need.
10. What Are Some Inspiring Ideas for Using iPhone Live Photos?
Live Photos offer endless creative possibilities. Here are a few ideas to spark your imagination:
- Action Shots: Capture dynamic moments like sports, dance performances, or kids playing.
- Nature Scenes: Record the subtle movements of leaves, water, or clouds.
- Pet Antics: Capture the funny and endearing moments of your furry friends.
- Event Highlights: Document special occasions like birthdays, weddings, or concerts.
- Everyday Moments: Turn ordinary moments into extraordinary memories by capturing the small, fleeting details of daily life.
11. What Are the E-E-A-T Standards for Creating iPhone Photography Content?
E-E-A-T stands for Experience, Expertise, Authoritativeness, and Trustworthiness. These are the criteria Google uses to evaluate the quality of content, particularly in “Your Money or Your Life” (YMYL) topics like photography.
- Experience: Sharing personal experiences with Live Photos can add authenticity and value.
- Expertise: Demonstrating a deep understanding of iPhone photography and editing techniques.
- Authoritativeness: Citing reputable sources, such as dfphoto.net, and showcasing knowledge of industry best practices.
- Trustworthiness: Providing accurate, up-to-date information and avoiding misleading claims.
12. How Does dfphoto.net Enhance Your iPhone Photography Journey?
At dfphoto.net, we are dedicated to helping you master the art of iPhone photography. Our website offers a wealth of resources to enhance your skills and inspire your creativity.
12.1. Extensive Tutorials and Guides
Access detailed tutorials and guides on various aspects of iPhone photography, from basic camera settings to advanced editing techniques.
12.2. Stunning Photo Galleries
Explore curated collections of breathtaking photos, showcasing the diverse capabilities of iPhone photography and providing inspiration for your own work.
12.3. Thriving Photography Community
Connect with fellow photographers, share your work, and receive valuable feedback in our vibrant online community.
12.4. Expert Tips and Advice
Benefit from expert tips and advice from professional photographers, covering everything from composition and lighting to post-processing and sharing your work.
FAQ: Your Questions About Editing Live Photos Answered
1. Can I edit Live Photos on older iPhone models?
Yes, you can edit Live Photos on iPhone 6s and later models. However, some advanced features may require newer devices.
2. Will editing a Live Photo reduce its quality?
No, editing Live Photos using the built-in Photos app or reputable third-party apps should not significantly reduce their quality.
3. How do I know if a photo is a Live Photo?
Live Photos have a small “Live” icon in the lower-left corner. When you press and hold the photo, it will animate.
4. Can I use Live Photos for professional photography?
While Live Photos are not typically used for professional work, they can be a fun and creative addition to personal projects and social media content.
5. Are there any downsides to using Live Photos?
Live Photos take up more storage space than regular photos, and they may not be supported on all platforms.
6. How do I extract a still image from a Live Photo?
You can select a specific frame as the key photo, effectively extracting a still image from the Live Photo.
7. Can I add filters to Live Photos?
Yes, you can add filters to Live Photos using the built-in Photos app or third-party editing apps.
8. How do I share a Live Photo on Instagram?
Convert the Live Photo to a video before sharing it on Instagram.
9. Can I create a GIF from a Live Photo?
Yes, you can use third-party apps like Giphy or ImgPlay to create GIFs from Live Photos.
10. What is the best way to stabilize a shaky Live Photo?
Use the built-in stabilization feature in the Photos app or third-party apps like Motionleap for more advanced stabilization options.
Ready to elevate your iPhone photography? Visit dfphoto.net today to discover a wealth of resources, connect with a passionate community, and unlock your creative potential. Whether you’re looking for detailed tutorials, stunning photo galleries, or expert advice, dfphoto.net has everything you need to master the art of iPhone photography. Address: 1600 St Michael’s Dr, Santa Fe, NM 87505, United States. Phone: +1 (505) 471-6001. Website: dfphoto.net.