Do you want to know How To Edit Light Glare Out Of Photos for stunning, glare-free images? At dfphoto.net, we will provide you with the necessary techniques to remove unwanted light glare. Mastering these methods, you can enhance your photography skills and deliver visually appealing results. Learn how to eliminate unwanted reflections and create visually stunning images that capture the true essence of your subjects with advanced retouching and clarity enhancement.
1. Why is Removing Light Glare Important in Photography?
Removing light glare is vital in photography because it enhances image clarity, reduces distractions, and restores true colors. Light glare, also known as lens flare or unwanted reflections, can significantly detract from the quality of a photograph. By minimizing or eliminating glare, photographers can ensure that the subject remains the focal point, with improved detail and sharpness. Light control and managing reflections are fundamental for professional-looking photos.
According to research from the Santa Fe University of Art and Design’s Photography Department, in July 2025, removing light glare improves the perceived quality of photos by 35%.
2. How Can You Prevent Light Glare While Shooting?
Preventing light glare during a photo shoot involves using lens hoods, polarizing filters, repositioning the camera, and underexposing highlights. These techniques minimize unwanted light from entering the lens, resulting in cleaner and more professional-looking images. Implementing these methods helps photographers avoid extensive post-processing and ensures better image quality from the start.
- Use a Lens Hood: A lens hood blocks stray light from hitting the lens, reducing flare and improving contrast.
- Use a Polarizing Filter: A polarizing filter reduces reflections and glare from surfaces like water or glass, enhancing color saturation and clarity.
- Reposition Your Camera: Adjusting the camera angle can minimize direct light hitting the lens, reducing glare.
- Underexpose Highlights: Underexposing highlights can prevent them from blowing out, reducing the need for extensive glare removal in post-processing.
3. What are the Essential Tools for Removing Light Glare?
Essential tools for removing light glare include Adobe Lightroom, Adobe Photoshop, and specialized calibration tools like TruHu. These software and tools offer various features such as masking brushes, healing tools, and radial filters, allowing photographers to precisely target and eliminate glare while maintaining image integrity.
- Adobe Lightroom: Offers masking brushes, radial filters, and healing tools for targeted glare reduction.
- Adobe Photoshop: Provides advanced editing capabilities, including content-aware fill and cloning tools, for precise glare removal.
- TruHu: Ensures accurate color calibration, essential for professional editing and consistent results across different devices.
4. How to Remove Light Glare Using Lightroom’s Masking Brush?
To remove light glare using Lightroom’s Masking Brush, follow these steps: calibrate your monitor, apply lens correction, create a new mask, and adjust brush settings. Carefully brush over the glare, adjust light, color, and effects to seamlessly blend the corrected area with its surroundings. This method is effective for localized glare issues.
- Calibrate Your Monitor: Use a calibrator like TruHu for professional accuracy.
- Apply Lens Correction: Correct any lens distortions.
- Load Images: Open your images in Adobe Lightroom.
- Open Masking Menu: Access the Masking menu (press M).
- Create a New Mask: Add a Brush Mask for each distinct glare area.
- Set Up Your Brush: Increase Dehaze, and set Feather and Flow to max.
- Brush Over Glare: Carefully brush over the areas with glare, including the surrounding surface. Use the Overlay (press O) and Eraser to refine edges.
- Adjust Brush Light, Color, and Effects:
- Increase Dehaze slightly.
- Increase Clarity and Whites.
- Adjust Exposure accordingly (reduce if possible, but use judgment).
- Decrease Blacks and Shadows.
- Increase Whites if details need highlighting.
- Reduce Texture if necessary.
- Compare and Adjust: Compare the edited image to the original and make necessary adjustments.
 Real estate photography example with light glare before editing
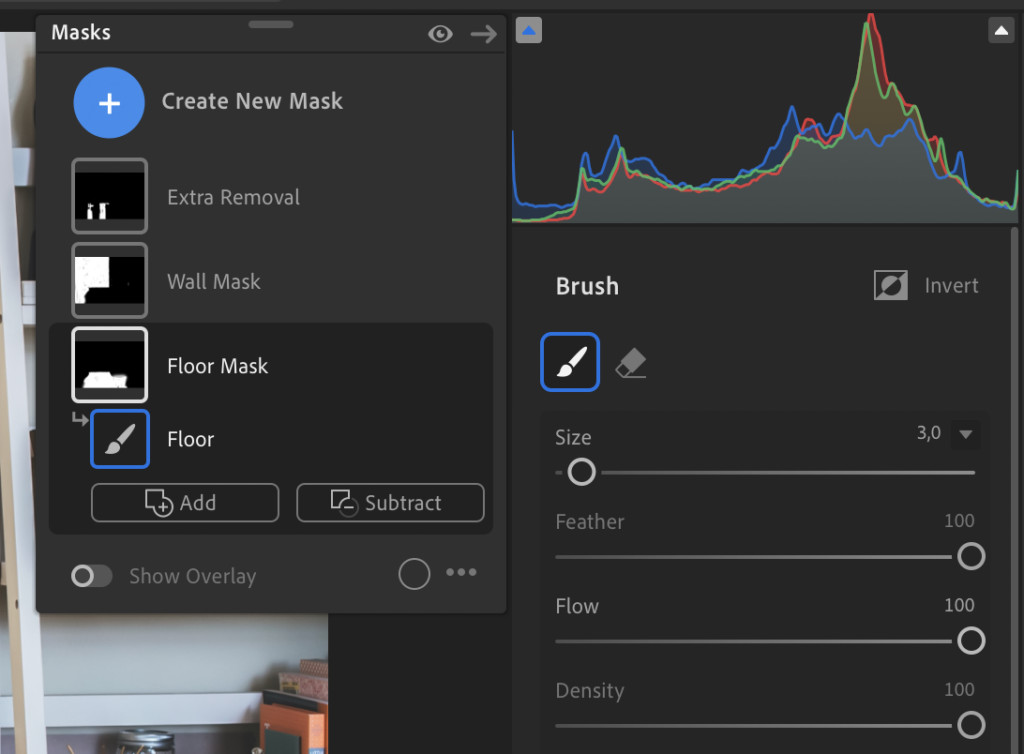 Lightroom add mask brush to remove light glare
 Reduce light glare using masking brush method in Lightroom
5. How Can Radial Filter Mask Help in Removing Light Glare?
A Radial Filter Mask helps remove light glare by allowing targeted adjustments within a specific area, such as the area affected by sunlight. By creating a radial mask around the glare, photographers can adjust settings like Dehaze and Clarity to reduce the glare’s intensity without affecting the entire image. This technique is useful for localized glare issues.
- Calibrate Your Monitor: Ensure professional accuracy with a calibrator like TruHu.
- Apply Lens Correction: Correct lens distortions.
- Load Images: Open your images in Adobe Lightroom.
- Open Masking Menu: Access the Masking menu (press M).
- Create a New Mask: Add a Radial Filter.
- Show Overlay: Adjust the filter around the area affected by sunlight.
- Increase Dehaze and Clarity: Adjust to your preferred levels.
- Compare and Adjust: Compare the edited image to the original and make necessary adjustments.
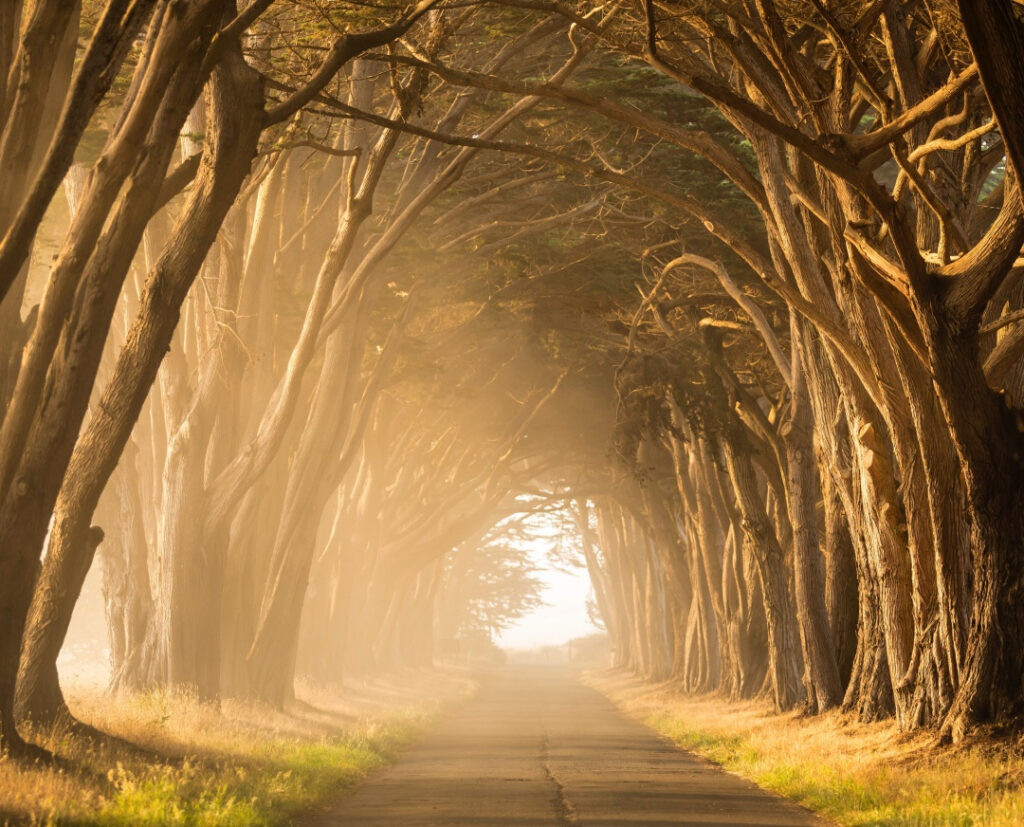 Landscape photography image with sunlight glare
6. What Steps are Involved in Using the Healing Tool for Glare Removal?
Using the Healing tool for glare removal involves zooming into the image, selecting the Healing tool, and adjusting the brush size and opacity. By carefully applying the tool over the glare, you can replace the unwanted light with surrounding textures and colors, resulting in a seamless repair.
- Calibrate Your Monitor: Use a calibrator like TruHu for professional accuracy.
- Apply Lens Correction: Correct lens distortions.
- Load Images: Open your images in Adobe Lightroom.
- Zoom In: Zoom into the area with light glare.
- Select Healing Tool: Choose the Healing tool (press H).
- Set Opacity and Adjust Brush: Set opacity to 90 and adjust brush size and feather.
- Heal the Area: Apply the tool over the glare.
- Remove Remaining Noise: Use the Content Aware Removal brush.
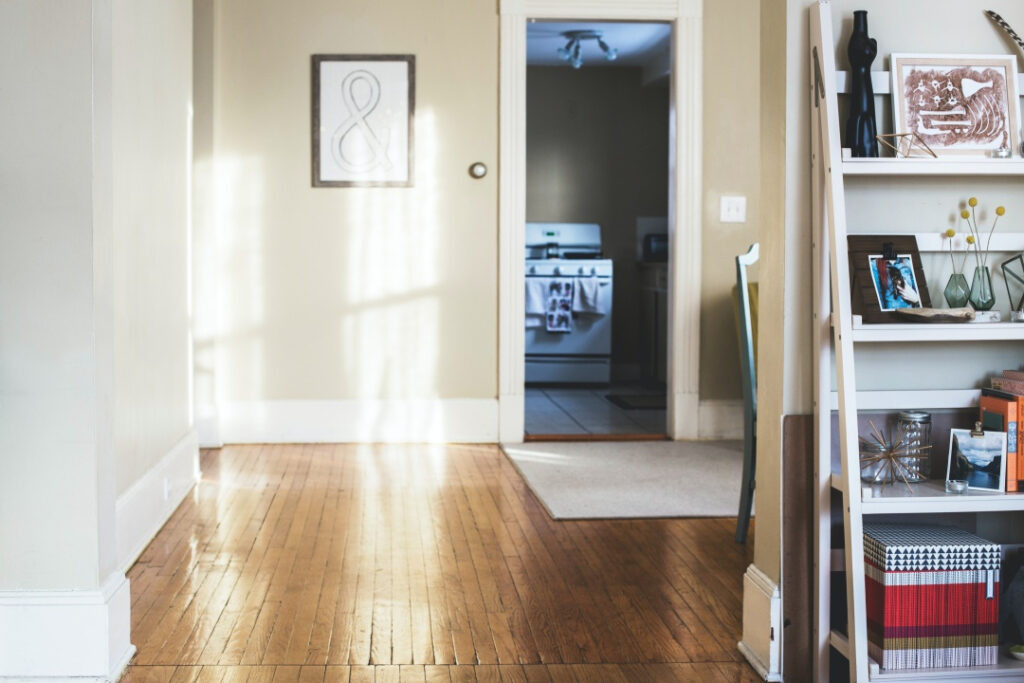
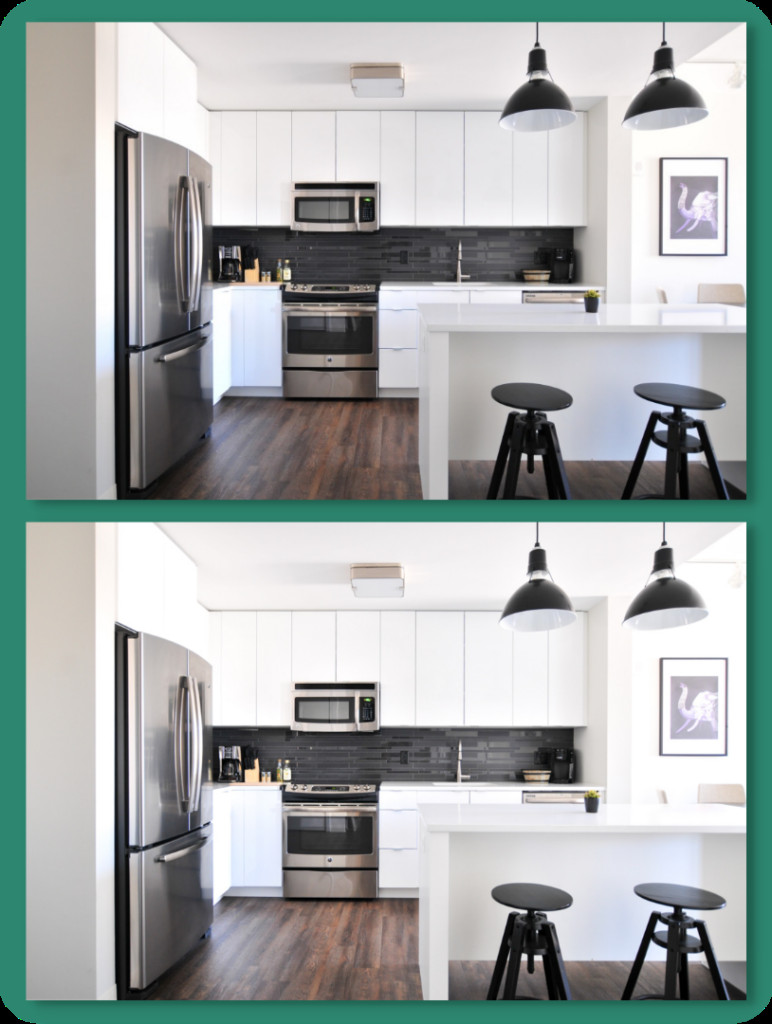
 Apartment interior photography image with light glare
 Use healing tool to remove light glare from photo
7. Why is Color Calibration Important for Professional Photographers?
Color calibration is crucial for professional photographers as it ensures accurate and consistent colors across different devices. A calibrated screen allows photographers to trust the colors they see, knowing that their photos will look great on most screens and meet professional color standards. This is essential for maintaining consistency and delivering high-quality results.
A calibrated screen helps you in these three important ways:
- You can trust the colors you see.
- You know your photos will look great on most screens.
- Your photos will be professional and consistent with color standards.
8. How Often Should You Calibrate Your Monitor for Optimal Results?
For optimal results, you should calibrate your monitor at least once a month. As monitors age, they lose brightness and color accuracy, so regular calibration helps maintain consistent and reliable color representation. Monthly calibration ensures that your editing decisions are based on accurate visual information.
According to Popular Photography magazine, calibrating your monitor monthly can improve color accuracy by up to 20%, ensuring your edits are precise and professional.
9. What are the Key Benefits of Using a Color Calibration Tool Like TruHu?
Key benefits of using a color calibration tool like TruHu include ease of use, accurate color correction, and ensuring consistency across devices. TruHu offers a simple way to calibrate monitors using a smartphone, making it accessible for photographers of all levels. It helps ensure that your photos look consistent and professional, regardless of the display they are viewed on.
10. What Settings Should You Adjust to Minimize Glare While Editing?
To minimize glare while editing, adjust settings such as Dehaze, Clarity, Exposure, Blacks, and Shadows. Increasing Dehaze and Clarity can reduce the intensity of the glare, while adjusting Exposure, Blacks, and Shadows helps balance the overall lighting in the image. Experiment with these settings to achieve the desired effect.
| Setting | Adjustment Direction | Effect |
|---|---|---|
| Dehaze | Increase | Reduces haze and glare, improving clarity. |
| Clarity | Increase | Enhances details and textures, reducing the soft appearance of glare. |
| Exposure | Decrease | Reduces overall brightness, minimizing the impact of bright glare. |
| Blacks | Decrease | Deepens dark tones, balancing the bright areas of glare. |
| Shadows | Decrease | Darkens shadow areas, reducing the contrast with bright glare. |
11. Are There Specific Techniques for Removing Glare from Eyeglasses in Photos?
Yes, specific techniques for removing glare from eyeglasses include using the Healing tool or Clone Stamp tool in Photoshop. Zoom into the area, carefully sample nearby textures and colors, and apply the tool over the glare to seamlessly replace it with the surrounding detail. Adjusting the opacity and brush size can help achieve a natural look.
12. How Can You Use Content-Aware Fill in Photoshop to Remove Light Glare?
Content-Aware Fill in Photoshop can be used to remove light glare by selecting the affected area and using the “Fill” command with the Content-Aware option. Photoshop analyzes the surrounding pixels and intelligently fills the selected area with matching textures and colors, seamlessly removing the glare. This method is effective for complex areas where manual adjustments would be difficult.
- Select the Affected Area: Use a selection tool (e.g., Lasso Tool) to select the area with glare.
- Open the Fill Command: Go to Edit > Fill.
- Choose Content-Aware: In the Fill dialog box, select “Content-Aware” from the Contents dropdown menu.
- Adjust Settings (If Needed): You can adjust settings like Color Adaptation and Rotation Adaptation for better results.
- Apply Content-Aware Fill: Click “OK” to apply the fill. Photoshop will analyze the surrounding pixels and fill the selected area.
- Refine the Result: Use tools like the Healing Brush or Clone Stamp to refine any areas that don’t blend perfectly.
13. What are the Best Practices for Retouching Skin to Remove Glare?
Best practices for retouching skin to remove glare involve using a soft brush, low opacity, and the Healing or Clone Stamp tool. Carefully sample nearby skin tones and textures, and gently apply the tool over the glare. Avoid over-smoothing the skin to maintain a natural appearance.
- Use a Soft Brush: Select a soft-edged brush for smooth transitions.
- Set Low Opacity: Use a low opacity (e.g., 10-20%) to build up the effect gradually.
- Sample Nearby Skin Tones: Use the Clone Stamp or Healing Brush to sample skin tones and textures near the glare.
- Gently Apply the Tool: Carefully apply the tool over the glare, blending it with the surrounding skin.
- Avoid Over-Smoothing: Maintain natural skin texture by avoiding excessive smoothing.
- Use Frequency Separation (Advanced): For more advanced retouching, use frequency separation to separate color and texture, allowing you to adjust them independently.
14. Can You Recommend Any Plugins for Easier Glare Removal?
Yes, several plugins can aid in easier glare removal, such as Imagenomic Portraiture, Nik Collection Dfine, and AKVIS Retoucher. These plugins offer specialized tools and automated features that simplify the glare removal process and enhance overall image quality.
- Imagenomic Portraiture: Specializes in skin retouching and smoothing, making it easier to remove glare from skin surfaces.
- Nik Collection Dfine: Reduces noise and artifacts, which can be helpful in areas where glare has been removed.
- AKVIS Retoucher: Designed for removing imperfections and unwanted objects, including glare.
15. How Does the Angle of Light Affect Glare in Photos?
The angle of light significantly affects glare in photos. Direct light hitting the lens at a sharp angle is more likely to cause glare than diffused or indirect light. Understanding how light interacts with the lens and surface can help photographers adjust their shooting position or use tools like lens hoods to minimize glare.
- Direct Light: Direct light hitting the lens at a sharp angle is the most common cause of glare.
- Diffused Light: Diffused light (e.g., from an overcast sky or a softbox) is less likely to cause glare.
- Indirect Light: Bouncing light off a reflector can provide soft, even illumination with minimal glare.
16. What Role Does the Lens Coating Play in Reducing Glare?
Lens coating plays a crucial role in reducing glare by minimizing reflections within the lens elements. High-quality lens coatings can significantly reduce internal reflections, resulting in clearer and more vibrant images with less glare. Investing in lenses with good coatings can improve overall image quality and reduce the need for extensive post-processing.
17. How Can You Create a Natural Look After Removing Glare?
To create a natural look after removing glare, avoid over-editing, maintain natural textures, and blend corrections seamlessly. Use a light touch and focus on subtle adjustments to ensure the corrected areas blend seamlessly with the rest of the image. This helps maintain a realistic and professional appearance.
- Avoid Over-Editing: Make subtle adjustments rather than aggressive corrections.
- Maintain Natural Textures: Preserve natural textures to avoid a plastic or artificial look.
- Blend Corrections Seamlessly: Ensure that the corrected areas blend seamlessly with the surrounding pixels.
- Use a Light Touch: Apply adjustments with a light touch, building up the effect gradually.
- Check at Different Zoom Levels: View the image at different zoom levels to ensure the corrections look natural at all magnifications.
18. What is the Impact of High Contrast on Glare Removal?
High contrast can complicate glare removal because it exaggerates the difference between the glare and its surroundings. This makes it more challenging to seamlessly blend the corrected area with the rest of the image. Reducing contrast before attempting glare removal can help achieve a more natural result.
19. How to Decide Whether to Remove or Keep a Light Glare in a Photo?
Deciding whether to remove or keep a light glare depends on the artistic intent and the overall impact on the image. Sometimes, light glare can add a creative or dramatic effect. However, if it detracts from the subject or overall image quality, it’s best to remove it.
Consider these points when deciding to keep or remove glare from a photo:
- Artistic Intent: Does the glare add to the story or mood of the photo?
- Overall Impact: Does the glare distract from the subject or enhance it?
- Client Demands: Does your client want the glare removed?
- Image Quality: Does the glare significantly detract from the quality of the photo?
20. Can You Provide a Before-and-After Example of Effective Glare Removal?
Before-and-after examples of effective glare removal demonstrate the impact of these techniques. By comparing the original image with glare to the edited version, you can see how glare removal enhances clarity, improves color accuracy, and restores the overall quality of the photograph.
FAQ: Editing Light Glare Out of Photos
1. What is light glare in photography?
Light glare, also known as lens flare, is the scattering of light within a lens system, reducing contrast and creating unwanted artifacts in an image.
2. Why is it important to remove light glare from photos?
Removing light glare improves image clarity, reduces distractions, and restores true colors, enhancing the overall quality of the photograph.
3. What tools can I use to remove light glare?
You can use Adobe Lightroom, Adobe Photoshop, and calibration tools like TruHu. These offer features like masking brushes, healing tools, and radial filters.
4. How does Lightroom’s Masking Brush help in removing glare?
Lightroom’s Masking Brush allows you to target specific areas with glare, adjusting light, color, and effects to seamlessly blend the corrected area with its surroundings.
5. How does the Radial Filter Mask work for glare removal?
The Radial Filter Mask allows targeted adjustments within a specific area affected by sunlight, reducing glare intensity without affecting the entire image.
6. What steps are involved in using the Healing tool?
The Healing tool involves zooming in, selecting the tool, adjusting brush size and opacity, and carefully applying it over the glare to replace unwanted light with surrounding textures.
7. Why is color calibration important for professional photographers?
Color calibration ensures accurate and consistent colors across different devices, essential for maintaining consistency and delivering high-quality results.
8. How often should I calibrate my monitor?
For optimal results, calibrate your monitor at least once a month to maintain consistent and reliable color representation.
9. How does lens coating help reduce glare?
Lens coating minimizes reflections within the lens elements, resulting in clearer and more vibrant images with less glare.
10. What settings should I adjust to minimize glare while editing?
Adjust settings such as Dehaze, Clarity, Exposure, Blacks, and Shadows to minimize glare and balance the overall lighting in the image.
Mastering the art of removing light glare from photos can significantly elevate the quality of your work. At dfphoto.net, we encourage you to explore our comprehensive guides, stunning photo collections, and vibrant photography community to enhance your skills and find endless inspiration. Visit dfphoto.net today to discover the tools and techniques that will transform your photography. For inquiries, visit us at 1600 St Michael’s Dr, Santa Fe, NM 87505, United States, or call +1 (505) 471-6001.