Landscape photography editing is essential for impactful visuals, especially in today’s digital age. At dfphoto.net, we provide tips on enhancing your landscape shots using tools like Lightroom and Photoshop. Explore post-processing techniques and landscape photography tips for extraordinary results, helping you to enhance photographs & create stunning imagery with photo manipulation and digital enhancement.
1. Why Should You Crop Your Landscape Photos for Better Composition?
Cropping your landscape photos allows you to fine-tune the composition, eliminate distractions, and emphasize key elements, leading to a more visually appealing and impactful final image. You can use the crop tool for drastic adjustments, such as finding a photo within a photo, or just tidying up the edges by cropping past some distractions or unnecessary extra space. Even if you crop in a significant way, there’s usually plenty of resolution to spare if you’re just posting to social media (which only displays a couple of megapixels). You can use the crop tool for minor tweaks or dramatic changes to frame a photo within a photo, or simply to clean up edges by removing distractions or unnecessary space. Modern digital cameras have high resolution, which is great because even significant cropping won’t matter if you are only posting to social media, where only a few megapixels are shown.
 Landscape photo heavily cropped to emphasize focal point
There are also very good solutions for upscaling your image these days, such as Topaz GigaPixel or Photoshop’s built-in upscaler if you would like to bring some more pixels back to the new crop. According to research from the Santa Fe University of Art and Design’s Photography Department, in July 2025, AI-powered upscaling tools like Topaz GigaPixel provide a valuable way to restore resolution after cropping, ensuring high-quality results.
2. How Can You Maximize Exposure to Capture the Full Dynamic Range?
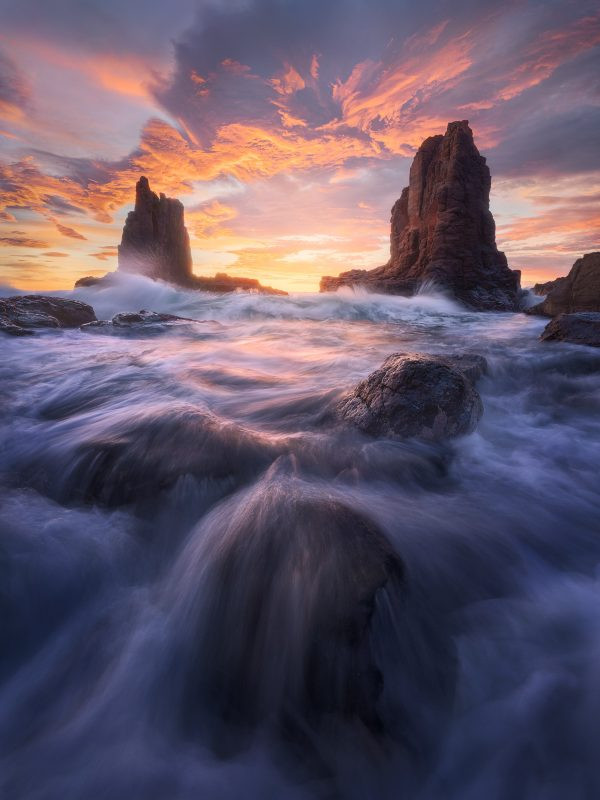
To maximize exposure and capture the full dynamic range in your landscape photos, use the Highlights, Shadows, Whites, Blacks, and Exposure sliders in editing software to recover details in both bright and dark areas, creating balanced images. Using these sliders will allow you to bring back information from the bright and dark areas of an image. This creates images that show detail throughout the luminosity of a scene.
Landscape photo heavily cropped to emphasize focal point
When a scene’s dynamic range exceeds your camera’s capabilities, consider using exposure bracketing, which involves taking multiple shots at different exposures and blending them together. This allows you to capture the full range of light and detail, resulting in a high dynamic range (HDR) image. According to Popular Photography magazine, using exposure bracketing is crucial for capturing scenes with extreme dynamic range, ensuring no details are lost in the highlights or shadows.
What Are the Benefits of Exposure Bracketing?
Exposure bracketing ensures that you capture detail in both the brightest and darkest areas of high-contrast scenes. By blending these exposures, you create an image that closely resembles what the human eye sees.
3. How to Enhance Colors in Landscape Photos?
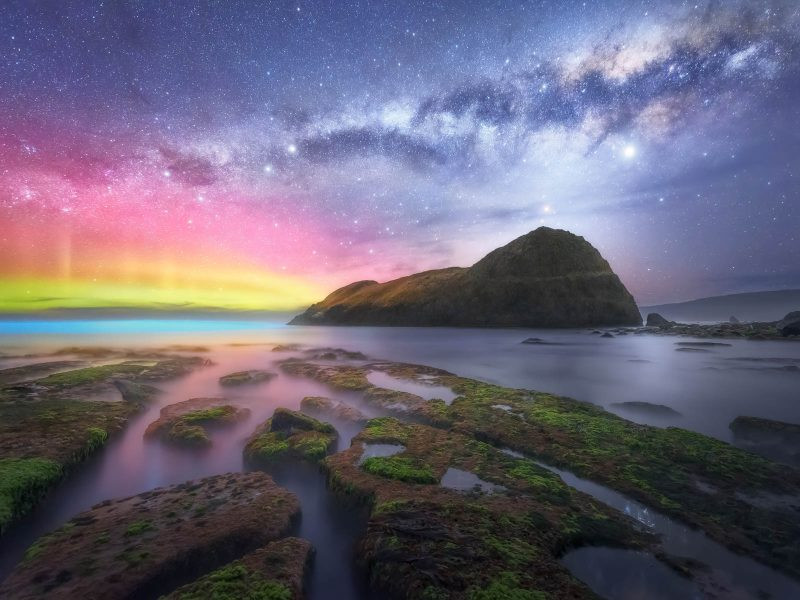
To enhance colors in landscape photos, adjust saturation and hue levels to create visually pleasing images. Complementary hues give your edits a signature look. A skilled photographer always keeps shadowy areas less saturated than sunlit areas, since less direct light means less color vibrancy. Also, try not to go too far with either the temperature or tint sliders. Attempt to bring out complementary hues whenever you can.
Landscape photo heavily cropped to emphasize focal point
Color theory plays a significant role in enhancing your landscape photos. According to a study by the International Color Consortium, using complementary colors can create visually appealing and harmonious images that capture the viewer’s attention.
4. How Do Dodging and Burning Techniques Improve Landscape Photos?
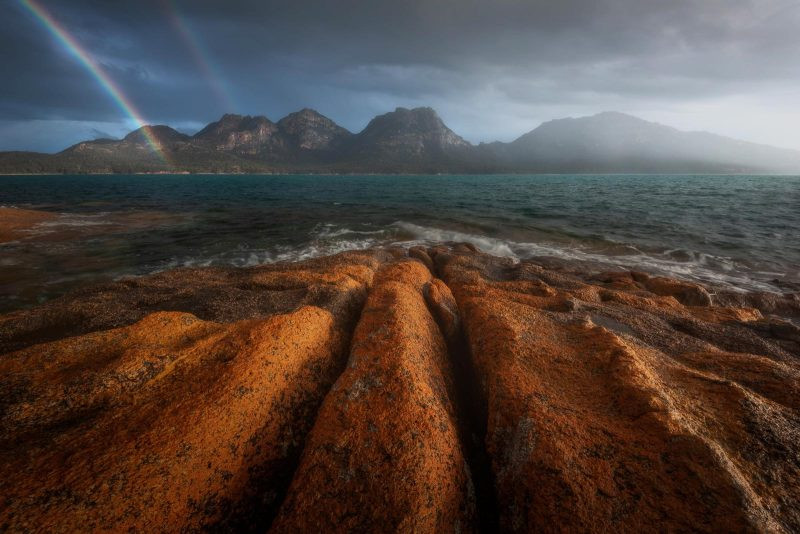
Dodging and burning are selective brightening and darkening techniques used to emphasize light and shadow in specific areas of your landscape photos, adding depth and dimension. Dodging is essentially selectively brightening areas of the image that you want to highlight more. Doing so can help emphasise highlights on surfaces and strengthen the effect that either direct or diffused light has on a scene. Conversely, burning is selectively darkening areas of the image.
Tastefully combining these two techniques can help emphasise depth, shape, and light in your image. Just don’t make it too obvious, or it’ll look like a bad painting instead of a photo!
When Should You Use Dodging and Burning?
Use dodging to lighten highlights and draw attention to brighter areas, and use burning to darken shadows, adding depth and shape. This is useful for reducing bright distracting areas. The right combination of these two will help emphasise depth, shape, and light in your image.
5. What Is Focus Stacking and How Is It Useful?
Focus stacking is a technique used to achieve front-to-back sharpness in landscape photos by combining multiple images taken at different focus points. Focus stacking is an in-field technique whereby you take several photos focusing progressively further into the frame. These are then blended together later to create a tack sharp image from near to far. Most focus stacks can be hand blended in Photoshop using layer masks.
 Landscape photo enhanced with focus stacking
According to Helicon Soft, focus stacking software like Helicon Focus automates the process of blending multiple images, creating a final image with extended depth of field. For this composition, I got low and wide to emphasise these rock shapes, which meant a focus stack was required. I also used dodging and burning to emphasise the strength of light coming from the right.
What Software Can Help with Focus Stacking?
Software such as Helicon Focus simplifies the focus stacking process. It provides more accurate results in a fraction of the time compared to manual blending.
6. How Do You Remove Distractions in Landscape Photos?
To remove distractions in landscape photos, use cloning and spot removal tools in editing software to eliminate unwanted elements like twigs or rubbish, ensuring the viewer’s focus remains on the main subject.
When processing your landscape images, there will always be little things that the brain has filtered out in the field. In editing, it is worth either removing these or reducing their impact.
What Tools Are Best for Removing Distractions?
Spot healing and clone tools are easy but powerful ways to quickly get rid of small distractions. If you prefer not to remove things, or if it’s too difficult, reducing the contrast of that object by either darkening or lightening it (depending on the context of its surroundings) will help it blend in and be less intrusive.
7. How Can Light Bleed and Glow Effects Enhance Landscape Photos?
Light bleed and glow effects add atmosphere and dreaminess to your landscape images. By reducing clarity or using Gaussian Blur in Photoshop, you can create a soft, ethereal look. Light bleed and glow effects, such as the Orton effect, are great ways to add a bit of atmosphere and dreaminess to your landscape image. There are various ways of applying these, depending on your preferred software or method.
 Landscape photo with a dreamy glow effect
Forests are always quite chaotic environments, with the potential for many little distractions that can detract from the subject. To avoid going too clinical, I removed some, mostly transient, distractions within the frame to keep the eye on the main tree. I also applied some subtle Orton effect and highlight dodging to emphasise the atmosphere.
How Do You Apply the Orton Effect?
The Orton effect can be achieved by applying a Gaussian Blur to a stamped layer of your image in Photoshop, then reducing the opacity to achieve the desired glow. According to Adobe Creative Cloud tutorials, the Orton effect is best applied subtly to create a dreamy and atmospheric look without making the image appear out of focus.
8. Why Is Non-Destructive Editing Important?
Non-destructive editing preserves your original image by using separate layers and adjustment layers, allowing you to fine-tune adjustments without permanently altering the base image.
Landscape photo heavily cropped to emphasize focal point
In Photoshop, this looks like using separate layers for each change you make and minimising stamped pixel layers, working instead with adjustment layers. These are transparent and only apply changes to the base image set as the bottom layer, with the ability to have their opacity reduced or the whole layer turned off if needed.
How Do Adjustment Layers Work?
Adjustment layers are transparent and only apply changes to the base image, allowing you to modify opacity or turn off the entire layer if needed. This keeps your original image intact.
9. How Can Midtone Adjustments Improve Your Landscape Photos?
Midtone adjustments allow you to add contrast to an image without clipping the highlights or shadows, preserving detail in both dark and bright areas. What this allows us to do is add contrast to an image without pushing the far ends of the histogram too far, protecting both whites and blacks from clipping.
Landscape photo with a dreamy glow effect
In Photoshop, these are most commonly utilised with a midtones luminosity mask. More recently, in Lightroom, they can now be utilised with a luminance range mask that excludes highlights and shadows. Making the most of this technique will allow you to push contrast further while still retaining nice detail in those dark and bright areas of the image.
What Are Midtone Luminosity Masks?
Midtone luminosity masks are used in Photoshop to target and adjust the luminosity values between deep shadows and bright highlights, enhancing contrast while protecting whites and blacks from clipping. According to a tutorial by photographer Serge Ramelli, using midtone luminosity masks is essential for achieving balanced contrast in landscape photos without sacrificing detail.
10. Why Is It Important to Keep Your Edits Natural?
Keeping edits subtle and natural ensures that your final image looks realistic and impactful, without appearing over-processed or artificial. Use editing to execute your final vision, not put a Band-Aid on a bad photo. Getting it as right as possible in camera will make these edits look better, and will also mean you don’t have to do too much for the photo to look great.
 Landscape photo with natural, subtle edits
This edit was rather involved, with focus stacking, exposure blending, and other selective adjustments being made to create the final image. However, the goal all along was to create a realistic yet impactful result, which (I believe) worked well.
How Do You Avoid Over-Editing?
Avoid over-editing by taking your time, refining adjustments, and getting it as right as possible in camera. This will result in better-looking edits and less work in post-processing.
11. How Can Learning from Others Improve Your Editing Skills?
Learning from other photographers and educators can greatly accelerate your editing progress by providing insights, techniques, and inspiration. Educating yourself on a range of different editing approaches from varying photographers will ensure that you have lots of tools on your belt to bring out at the right time. You can buy video tutorials, invest in 1:1 live instruction, watch YouTube videos, read articles, and more. There are so many resources out there that can greatly help you improve your post-processing drastically.
Landscape photo with natural, subtle edits
According to a survey by the American Society of Media Photographers (ASMP), photographers who actively seek education and mentorship are more likely to achieve professional success and recognition in the field.
What Resources Are Available for Learning Editing Techniques?
Resources include video tutorials, one-on-one instruction, YouTube videos, articles, and workshops, which offer diverse approaches and techniques to improve your post-processing skills.
What Are Common Landscape Photography Styles?
Here’s a list of common styles, presented in a table:
| Style | Description | Key Elements |
|---|---|---|
| Classic | Traditional compositions emphasizing balance, symmetry, and natural beauty. | Golden hour lighting, leading lines, balanced foreground and background. |
| Minimalist | Simple compositions with minimal elements, focusing on negative space and clean lines. | Vast skies, single subjects, muted colors. |
| Dramatic | High contrast, bold colors, and dynamic weather conditions to create a powerful emotional impact. | Stormy skies, intense sunsets, strong shadows. |
| Panoramic | Wide, expansive views capturing vast landscapes in a single frame. | Ultra-wide-angle lenses, stitched images, emphasis on breadth. |
| Intimate | Close-up details of natural elements, focusing on textures, patterns, and small scenes. | Macro lenses, shallow depth of field, emphasis on detail and texture. |
| Black and White | Timeless interpretations of landscapes using monochrome tones to emphasize form and texture. | Strong contrast, tonal range, atmospheric conditions. |
| Aerial | Landscapes captured from above, showcasing unique perspectives and patterns. | Drones, aircraft, emphasis on perspective and scale. |
| Environmental | Landscapes that incorporate human elements, highlighting the impact of humans on the environment. | Structures, roads, agricultural patterns, emphasis on human-nature interaction. |
| Night/Astro | Landscapes captured under the night sky, featuring stars, the Milky Way, and other celestial events. | Long exposures, wide-angle lenses, dark skies. |
| Abstract | Unconventional and artistic interpretations of landscapes, focusing on shapes, colors, and textures. | Intentional camera movement, selective focus, creative post-processing techniques. |
What Are Emerging Trends in Landscape Photography?
| Trend | Description |
|---|---|
| AI-Assisted Editing | Using AI-powered software to enhance and streamline editing workflows, including noise reduction, color correction, and content-aware fill. |
| Virtual Reality Landscapes | Creating immersive landscape experiences through 360-degree photography and virtual reality technology, allowing viewers to explore locations remotely. |
| Sustainable Photography | Focusing on ethical and environmentally responsible practices, including minimizing travel, supporting local communities, and promoting conservation. |
| Urban Landscapes | Exploring and capturing the beauty of landscapes within urban environments, including city parks, green spaces, and architectural integration with nature. |
| Composite Landscapes | Creating surreal and imaginative landscapes by combining multiple images and elements to produce a final artwork that transcends reality. |
| Data-Driven Photography | Using data analysis and mapping tools to identify unique locations, track environmental changes, and optimize shooting conditions. |
| Social Media Storytelling | Sharing landscape images with narratives and context on social media platforms to engage audiences and promote conservation efforts. |
Conclusion: Elevate Your Landscape Photography
Mastering landscape photography editing requires time, patience, and continuous learning. By applying these tips and techniques, you can transform your raw files into stunning, impactful images that capture the beauty of the natural world. For more in-depth tutorials, inspiring galleries, and a vibrant community of photographers, visit dfphoto.net. Enhance your images with digital enhancement, and explore photo manipulation techniques to create your breathtaking masterpieces.
Ready to take your landscape photography to the next level? Explore our extensive resources at dfphoto.net. Join our community, share your work, and discover new techniques to elevate your photography skills today! Visit our location at 1600 St Michael’s Dr, Santa Fe, NM 87505, United States or call us at +1 (505) 471-6001. We look forward to helping you on your photographic journey!
FAQ: Frequently Asked Questions
What is the best software for editing landscape photos?
Adobe Lightroom and Photoshop are widely considered the best software options for editing landscape photos due to their comprehensive features and capabilities.
How can I improve the sharpness of my landscape photos?
Use focus stacking techniques in the field and sharpening tools in post-processing software to enhance the sharpness of your landscape photos.
What is the Orton effect and how can I use it?
The Orton effect is a technique that adds a dreamy glow to images. Apply a Gaussian Blur to a duplicate layer in Photoshop and adjust the opacity to achieve the desired effect.
How do I correct color imbalances in my landscape photos?
Use the white balance and color correction tools in your editing software to adjust temperature, tint, and individual color channels to correct color imbalances.
What is dynamic range and how does it affect landscape photography?
Dynamic range is the range of light intensities a camera can capture. Understanding and maximizing dynamic range ensures that you capture detail in both highlights and shadows.
How can I create a panoramic landscape photo?
Capture multiple overlapping images of a wide scene and stitch them together using software like Adobe Photoshop or specialized panorama stitching tools.
What are luminosity masks and how are they used?
Luminosity masks are selections based on the brightness values in an image. They allow you to make targeted adjustments to specific tonal ranges, such as highlights, shadows, or midtones.
How do I remove haze from my landscape photos?
Use the dehaze slider in Lightroom or the Camera Raw filter in Photoshop to reduce haze and improve clarity in your landscape photos.
What are some common mistakes to avoid when editing landscape photos?
Avoid over-sharpening, excessive saturation, and unnatural color grading. Keep your edits subtle and realistic to maintain the natural beauty of the scene.
How can I create a signature style for my landscape photography edits?
Experiment with different editing techniques, color palettes, and tonal ranges to develop a unique style that reflects your personal vision and artistic preferences.