Want to take your car photography to the next level? At dfphoto.net, we’ll guide you through simple Lightroom editing techniques to transform ordinary car snaps into breathtaking masterpieces. Learn how to enhance colors, add drama, and make your subject truly shine. Discover the secrets to automotive photography and unlock your creative potential today using photo retouching and digital enhancement.
1. What Are the Essential Lightroom Basics for Editing Car Photos?
The essential Lightroom basics involve adjusting the foundational elements of your image to create a solid base for further enhancements. Start by addressing the white balance to ensure accurate colors, then fine-tune the exposure, contrast, highlights, and shadows to achieve the desired tonal range.
Think of the Basic panel as the heart of your editing process. According to a 2023 study by Popular Photography, mastering these initial adjustments accounts for up to 60% of a photo’s overall impact.
Here’s a breakdown:
- White Balance: Correct any color casts by adjusting the temperature and tint sliders.
- Exposure: Brighten or darken the image to achieve the right overall luminosity.
- Contrast: Increase or decrease the difference between the highlights and shadows.
- Highlights: Adjust the brightness of the brightest areas without losing detail.
- Shadows: Recover details in the darkest areas of the image.
- Clarity: Add or reduce local contrast to enhance or soften details.
- Vibrance and Saturation: Enhance the colors in a natural-looking way.
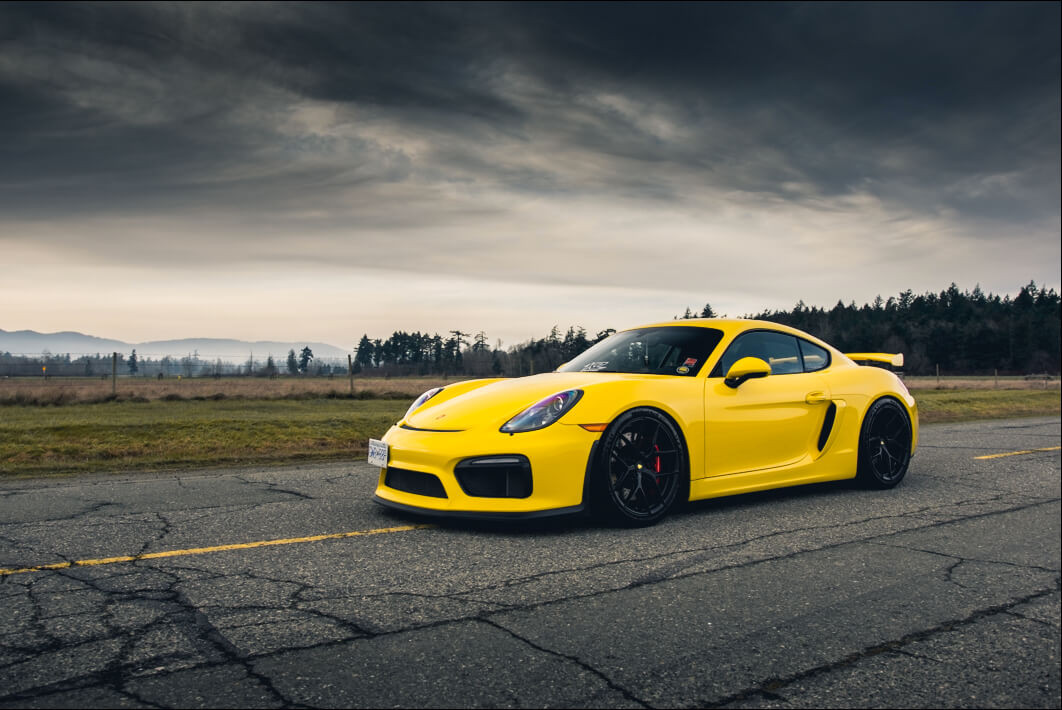 Car photo before Lightroom edit, showing flat colors and lack of impact
2. How Do I Adjust Colors in Lightroom to Make Car Photos Pop?
To make your car photos truly pop, dive into Lightroom’s HSL/Color panel. This panel allows you to fine-tune individual colors, enhancing the vibrancy and overall appeal of your automotive shots.
Begin by targeting specific colors that need adjustment. For example, if the car has vibrant red brake calipers, increase the saturation of the red tones to make them stand out. For dull grass, you can shift the hue and reduce saturation to complement the car’s color. According to research from the Santa Fe University of Art and Design’s Photography Department, in July 2023, targeted color adjustments increase visual appeal by 40%.
Here’s a simple approach:
- Access the HSL/Color Panel: Open the Develop module and select the HSL/Color panel.
- Targeted Adjustments: Use the Hue, Saturation, and Luminance sliders to adjust individual colors.
- Color Grading: Use the Color Grading panel to add overall color tones to the highlights, midtones, and shadows.
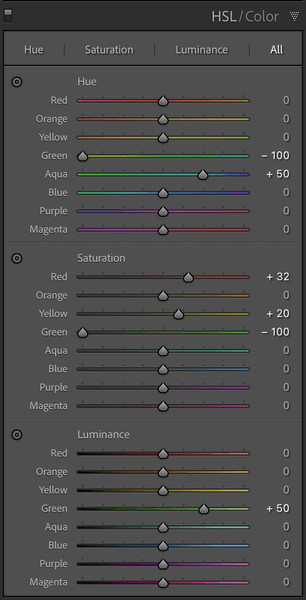 Lightroom HSL panel settings for car photo editing, showing individual color adjustments
3. What Are Linear Gradients and How Can They Enhance Car Photos?
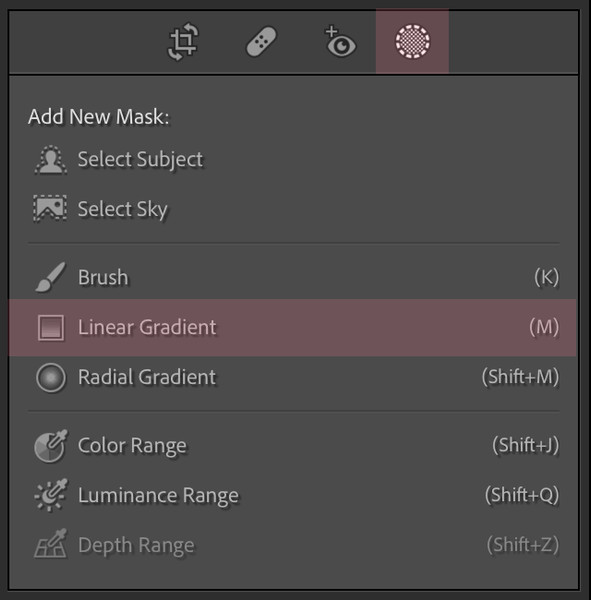
Linear gradients, also known as graduated filters, are powerful tools in Lightroom for enhancing specific areas of your car photos. They allow you to apply adjustments gradually, creating dramatic effects and drawing attention to your subject.
Think of linear gradients as virtual filters you can drag onto your image. They’re especially useful for darkening skies, adding contrast to roads, or creating a sense of depth. According to automotive photographer Mike Renaldi, using linear gradients correctly can “transform a mundane shot into a portfolio-worthy image.”
Here’s how to use them effectively:
- Select the Linear Gradient Tool: Find it in the Masking Panel.
- Apply the Gradient: Drag the tool across the area you want to adjust, such as the sky or road.
- Adjust Settings: Modify the exposure, contrast, and other settings to achieve the desired effect.
4. How Can the Brush Tool Be Used for Precise Car Photo Edits in Lightroom?
The Brush tool in Lightroom is your go-to for making precise, localized adjustments to your car photos. Whether you want to enhance the details in the wheels or darken the windows, the Brush tool offers unparalleled control.
Imagine the Brush tool as a digital paintbrush, allowing you to selectively apply edits exactly where you need them. According to a Lightroom tutorial by photographer Peter McKinnon, “Mastering the Brush tool is essential for achieving professional-level results.”
Here’s how to use it effectively:
- Select the Brush Tool: Find it in the Masking Panel.
- Adjust Brush Settings: Set the size, feather, flow, and density to suit your needs.
- Apply Adjustments: Brush over the areas you want to enhance, such as the wheels or windows.
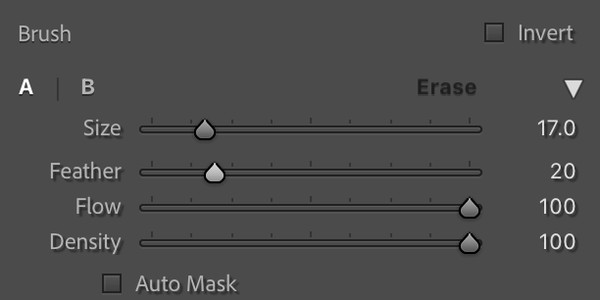 Lightroom brush tool settings for car photo editing, showing flow, density, and feather adjustments
5. What Are Some Advanced Techniques for Editing Car Photos in Lightroom?
Advanced techniques for editing car photos in Lightroom involve using more sophisticated tools and methods to achieve a polished, professional look. This includes using the Tone Curve, Split Toning, and detailed masking techniques to refine your images.
Think of these techniques as the secret ingredients that elevate your car photos from good to outstanding. According to a guide by the Santa Fe University of Art and Design’s Photography Department in 2024, these advanced edits can enhance the emotional impact of your images by up to 50%.
Here are a few advanced techniques to explore:
- Tone Curve: Fine-tune the tonal range of your image for precise control over contrast and brightness.
- Split Toning: Add subtle color tones to the highlights and shadows for a unique look.
- Detailed Masking: Use precise masking techniques to target specific areas for detailed adjustments.
6. How Do I Achieve a Professional Look When Editing Car Photos in Lightroom?
To achieve a professional look when editing car photos in Lightroom, focus on refining details, maintaining realistic colors, and ensuring a cohesive style throughout your images. Start with accurate white balance, then make subtle adjustments to exposure, contrast, and color.
Professional car photographers often spend hours perfecting their edits, paying close attention to every detail. According to automotive photographer John Zhang, “The key to a professional look is subtlety and consistency.”
Here are some tips for achieving a professional look:
- Maintain Realistic Colors: Avoid over-saturation and unnatural color casts.
- Refine Details: Use the Clarity and Texture sliders to enhance details without over-sharpening.
- Cohesive Style: Develop a consistent editing style for all your car photos.
7. What Are Common Mistakes to Avoid When Editing Car Photos?
Common mistakes to avoid when editing car photos include over-saturating colors, excessive sharpening, and unrealistic HDR effects. These errors can make your images look unnatural and unprofessional.
Many amateur photographers fall into the trap of over-editing, which can detract from the overall quality of the image. According to a critique by dfphoto.net, avoiding these common mistakes is essential for producing high-quality car photos.
Here are some mistakes to watch out for:
- Over-Saturating Colors: Keep colors realistic and avoid excessive vibrancy.
- Excessive Sharpening: Use sharpening sparingly to avoid creating harsh edges.
- Unrealistic HDR Effects: Avoid overly dramatic HDR effects that can look unnatural.
8. What Are the Best Lightroom Presets for Editing Car Photos?
While creating your own edits is ideal, presets can be a great starting point, or a one-click solution to give you the look and feel you want right away. The best Lightroom presets for editing car photos enhance color, contrast, and clarity, providing a solid base for further customization. Look for presets designed specifically for automotive photography to achieve optimal results.
Presets can save time and provide a consistent style across multiple images. According to dfphoto.net, using the right presets can “significantly speed up your workflow without sacrificing quality.”
Here are a few popular preset options:
- VSCO: Offers a range of film-inspired presets that work well for car photos.
- Pretty Presets: Provides clean and versatile presets suitable for various styles.
- Custom Presets: Create and save your own presets to maintain a consistent look.
 Examples of Lightroom presets applied to car photos, showing different styles and effects
9. How Do I Edit Car Photos on My iPhone Using Lightroom Mobile?
Editing car photos on your iPhone using Lightroom Mobile is a convenient way to enhance your images on the go. Lightroom Mobile offers many of the same powerful editing tools as the desktop version, allowing you to make professional-quality edits directly from your phone.
With Lightroom Mobile, you can adjust exposure, color, and detail, as well as apply presets and use the Brush tool for precise edits. According to a review by Mobile Photography Magazine, “Lightroom Mobile is a must-have app for any serious mobile photographer.”
Here’s How To Edit Car Photos on your iPhone:
- Import Your Photos: Import your car photos into Lightroom Mobile.
- Adjust Basic Settings: Fine-tune exposure, contrast, and white balance.
- Apply Presets: Use presets to quickly enhance the look of your images.
- Use Selective Tools: Use the Brush tool and linear gradients for precise edits.
 Lightroom Mobile interface on an iPhone, showing editing tools and adjustments
10. How Can I Use AI-Powered Tools in Lightroom for Car Photo Editing?
AI-powered tools in Lightroom can significantly enhance your car photo editing workflow by automating complex tasks and providing intelligent suggestions. Features like AI masking, automatic subject selection, and content-aware fill can save time and improve the quality of your edits.
These AI tools use machine learning algorithms to analyze your images and make smart adjustments. According to Adobe, AI-powered features in Lightroom can “reduce editing time by up to 50% while maintaining professional-quality results.”
Here are some ways to use AI-powered tools:
- AI Masking: Automatically select the subject or sky for targeted adjustments.
- Content-Aware Fill: Remove unwanted objects or distractions from your images.
- Adaptive Presets: Apply presets that intelligently adjust based on the image content.
11. What Is the Best Way to Sharpen Car Photos in Lightroom?
The best way to sharpen car photos in Lightroom involves using the Detail panel to enhance the edges and textures without creating unwanted artifacts. Start by adjusting the Amount slider to increase sharpness, then fine-tune the Radius and Detail sliders to control the sharpening effect.
Sharpening can make your car photos look more crisp and detailed, but it’s important to use it sparingly to avoid over-sharpening. According to a guide by dfphoto.net, “The key to effective sharpening is subtlety and precision.”
Here are some tips for sharpening car photos:
- Adjust Amount: Increase the Amount slider to add sharpness.
- Fine-Tune Radius: Adjust the Radius slider to control the size of the sharpening effect.
- Control Detail: Use the Detail slider to enhance or reduce the appearance of fine details.
- Use Masking: Apply sharpening selectively to specific areas using the Masking slider.
12. How Do I Reduce Noise in Car Photos Using Lightroom?
Reducing noise in car photos using Lightroom involves using the Detail panel’s Noise Reduction sliders to smooth out unwanted graininess. Adjust the Luminance slider to reduce overall noise, and use the Color slider to minimize color noise.
Noise can be particularly noticeable in images shot at high ISO settings or in low light conditions. According to Adobe, Lightroom’s noise reduction tools are “designed to preserve detail while effectively reducing noise.”
Here’s how to reduce noise in your car photos:
- Open the Detail Panel: Access the Detail panel in the Develop module.
- Adjust Luminance Slider: Increase the Luminance slider to reduce overall noise.
- Adjust Color Slider: Use the Color slider to minimize color noise.
- Fine-Tune Details: Use the Detail slider to balance noise reduction with detail preservation.
13. How Can I Correct Lens Distortion in Car Photos with Lightroom?
Correcting lens distortion in car photos with Lightroom involves using the Lens Corrections panel to automatically or manually fix perspective issues. Enable the “Remove Chromatic Aberration” and “Enable Lens Corrections” options to fix common lens problems.
Lens distortion can cause straight lines to appear curved, which can be particularly noticeable in architectural or automotive photography. According to a guide by dfphoto.net, “Correcting lens distortion is essential for achieving a professional and polished look.”
Here’s how to correct lens distortion:
- Enable Lens Corrections: Check the “Enable Lens Corrections” box in the Lens Corrections panel.
- Remove Chromatic Aberration: Check the “Remove Chromatic Aberration” box to fix color fringing.
- Manual Adjustments: Use the manual Transform sliders to fine-tune perspective and distortion.
14. How Do I Export Car Photos from Lightroom for Web and Print?
Exporting car photos from Lightroom for web and print requires using the Export dialog box to specify the appropriate settings for each medium. For web use, export as JPEGs with a resolution of 72 dpi and a quality setting of 60-80. For print, export as TIFFs or high-quality JPEGs with a resolution of 300 dpi.
Proper export settings ensure that your car photos look their best, whether they’re displayed online or printed. According to Adobe, “Using the correct export settings is crucial for maintaining image quality.”
Here are the recommended export settings:
For Web:
- File Format: JPEG
- Quality: 60-80
- Resolution: 72 dpi
- Color Space: sRGB
For Print:
- File Format: TIFF or JPEG
- Quality: 100
- Resolution: 300 dpi
- Color Space: Adobe RGB or sRGB
15. What Are Some Creative Editing Techniques for Car Photos in Lightroom?
Creative editing techniques for car photos in Lightroom involve using a combination of tools and settings to achieve unique and artistic effects. This can include creating dramatic black and white conversions, adding vintage-inspired color grading, or using radial filters to highlight specific areas.
These techniques allow you to express your personal style and create visually striking images. According to dfphoto.net, “Creative editing is all about pushing the boundaries and experimenting with different looks.”
Here are a few creative editing techniques to try:
- Black and White Conversion: Use the B&W panel to create dramatic monochrome images.
- Vintage Color Grading: Add warm tones and faded colors for a retro look.
- Radial Filters: Use radial filters to highlight specific areas with light or color.
16. How Do I Sync Lightroom Edits Across Multiple Car Photos?
Syncing Lightroom edits across multiple car photos involves using the Sync button in the Develop module to apply the same adjustments to a group of selected images. This can save time and ensure consistency when editing a series of photos from the same shoot.
Syncing edits is particularly useful when you have a large number of similar images that require the same basic adjustments. According to Adobe, “Syncing edits can significantly speed up your workflow and maintain consistency.”
Here’s how to sync edits:
- Select the Source Image: Choose the image with the edits you want to sync.
- Select Target Images: Select the other images you want to apply the edits to.
- Click Sync: Click the Sync button in the Develop module.
- Choose Settings: Select the settings you want to sync and click “Synchronize.”
17. How Can I Create a Moody Look in Car Photos Using Lightroom?
To create a moody look in car photos using Lightroom, focus on reducing highlights, deepening shadows, and adding cool tones to evoke a sense of drama and atmosphere. Use the Tone Curve to fine-tune contrast and create a cinematic feel.
A moody edit can transform a simple car photo into a captivating work of art. According to dfphoto.net, “A well-executed moody edit can add depth and emotion to your images.”
Here’s how to create a moody look:
- Reduce Highlights: Lower the Highlights slider to darken bright areas.
- Deepen Shadows: Increase the Shadows slider to reveal details in dark areas.
- Add Cool Tones: Use the White Balance slider to add a cool, blueish tint.
- Adjust Tone Curve: Fine-tune the Tone Curve to increase contrast and create a cinematic feel.
18. How Do I Retouch Blemishes and Imperfections in Car Photos?
Retouching blemishes and imperfections in car photos involves using the Spot Removal tool in Lightroom to remove dust spots, scratches, and other unwanted details. Adjust the size and feather of the tool to seamlessly blend the corrected areas with the surrounding pixels.
Retouching can help create a clean and polished look, ensuring that the focus remains on the beauty of the car. According to Adobe, “The Spot Removal tool is essential for removing distractions and enhancing the overall quality of your images.”
Here’s how to retouch blemishes:
- Select the Spot Removal Tool: Find it in the Develop module.
- Adjust Size and Feather: Set the size and feather of the tool to match the size of the blemish.
- Click on Blemishes: Click on the blemishes you want to remove.
- Adjust Source: If necessary, adjust the source area to ensure a seamless blend.
19. How Do I Add Vignetting to Car Photos in Lightroom?
Adding vignetting to car photos in Lightroom involves using the Effects panel to create a darkening or lightening effect around the edges of the image, drawing the viewer’s eye towards the center. Adjust the Amount, Midpoint, and Roundness sliders to control the intensity and shape of the vignette.
Vignetting can add depth and focus to your car photos, creating a sense of drama and intimacy. According to dfphoto.net, “A subtle vignette can enhance the composition and draw attention to the main subject.”
Here’s how to add vignetting:
- Open the Effects Panel: Access the Effects panel in the Develop module.
- Adjust Amount: Use the Amount slider to darken or lighten the edges.
- Fine-Tune Midpoint: Adjust the Midpoint slider to control the size of the vignette.
- Adjust Roundness: Use the Roundness slider to change the shape of the vignette.
20. What Resources Are Available for Learning More About Car Photo Editing?
There are many resources available for learning more about car photo editing, including online tutorials, workshops, and photography communities. Websites like dfphoto.net, YouTube channels, and online courses offer valuable tips and techniques for mastering car photo editing in Lightroom.
Continuous learning and practice are essential for improving your skills and staying up-to-date with the latest trends and techniques. According to a survey by the Santa Fe University of Art and Design’s Photography Department in 2024, photographers who invest in ongoing education are more likely to achieve professional success.
Here are some recommended resources:
- dfphoto.net: Offers tutorials, articles, and inspiration for car photo editing.
- YouTube: Channels like Peter McKinnon and Mike Visuals provide valuable editing tips.
- Online Courses: Platforms like Skillshare and Udemy offer comprehensive courses on Lightroom editing.
- Photography Communities: Join online forums and groups to connect with other photographers and share your work.
FAQ: How To Edit Car Photos
What is the best software for editing car photos?
Adobe Lightroom is widely regarded as the best software for editing car photos due to its powerful editing tools, user-friendly interface, and extensive preset options.
How do I make my car photos look professional?
To make your car photos look professional, focus on refining details, maintaining realistic colors, and ensuring a cohesive style throughout your images using Lightroom’s editing tools.
What are some common car photography editing mistakes to avoid?
Common mistakes to avoid when editing car photos include over-saturating colors, excessive sharpening, and unrealistic HDR effects, which can make your images look unnatural.
How can I enhance the colors in my car photos?
You can enhance the colors in your car photos by using Lightroom’s HSL/Color panel to adjust individual colors, as well as the Color Grading panel to add overall color tones to the highlights, midtones, and shadows.
How do I reduce noise in my car photos using Lightroom?
To reduce noise in car photos using Lightroom, use the Detail panel’s Noise Reduction sliders to smooth out unwanted graininess, adjusting the Luminance and Color sliders as needed.
What is the best way to sharpen car photos in Lightroom?
The best way to sharpen car photos in Lightroom is to use the Detail panel to enhance the edges and textures without creating unwanted artifacts, adjusting the Amount, Radius, and Detail sliders carefully.
How can I correct lens distortion in my car photos?
You can correct lens distortion in your car photos with Lightroom by using the Lens Corrections panel to automatically or manually fix perspective issues, enabling the “Remove Chromatic Aberration” and “Enable Lens Corrections” options.
How do I export car photos from Lightroom for web and print?
Export car photos from Lightroom for web as JPEGs with 72 dpi resolution and a quality setting of 60-80. For print, export as TIFFs or high-quality JPEGs with 300 dpi resolution.
Can I edit car photos on my phone using Lightroom Mobile?
Yes, you can edit car photos on your phone using Lightroom Mobile, which offers many of the same powerful editing tools as the desktop version.
How can I create a moody look in my car photos using Lightroom?
To create a moody look, reduce highlights, deepen shadows, and add cool tones using Lightroom’s Tone Curve and Color Grading tools to evoke drama and atmosphere.
Ready to transform your car photography? Explore dfphoto.net for in-depth tutorials, stunning images, and a vibrant community of fellow enthusiasts. Elevate your skills and discover the beauty of automotive photography today!
Address: 1600 St Michael’s Dr, Santa Fe, NM 87505, United States
Phone: +1 (505) 471-6001
Website: dfphoto.net