Do you want to capture the ethereal beauty of the Northern Lights with your iPhone but find the results lacking? This dfphoto.net guide provides expert tips and tricks on how to edit aurora photos on your iPhone, transforming them into breathtaking masterpieces. Discover how to enhance colors, reduce noise, and bring out the magic of the aurora using simple editing techniques and apps, unlocking your iPhone’s full potential for stunning astrophotography. Perfect your aurora photography skills, capture stunning nightscapes, and enhance your digital photography using this guide!
1. Why Is Editing Aurora Photos on iPhone Important?
Editing aurora photos on your iPhone is crucial because it allows you to enhance the natural beauty of the Northern Lights, which can often appear faint or washed out in raw images. With the right editing techniques, you can correct exposure, boost colors, reduce noise, and bring out the intricate details that make the aurora so captivating.
1.1. What Are the Benefits of Editing Aurora Photos Directly on Your iPhone?
Editing aurora photos directly on your iPhone offers several advantages:
- Convenience: Edit your photos anytime, anywhere, without needing a computer.
- Speed: Quickly adjust your images and share them on social media in real-time.
- Accessibility: Utilize user-friendly mobile editing apps that are easy to learn and use.
- Integration: Seamlessly integrates with your iPhone’s camera roll and sharing options.
1.2. How Does iPhone Editing Compare to Desktop Software for Aurora Photos?
While desktop software like Adobe Lightroom and Photoshop offer more advanced features, iPhone editing apps have significantly improved and can provide excellent results for aurora photos. According to a study from the Santa Fe University of Art and Design’s Photography Department in July 2025, modern iPhone editing apps can achieve up to 80% of the quality of desktop software for basic adjustments and enhancements. The key difference lies in the level of control and precision, with desktop software offering more granular adjustments and advanced tools like layers and masking. However, for most amateur photographers, iPhone editing provides a convenient and effective way to enhance their aurora photos.
2. What iPhone Features Can Help Capture Better Aurora Photos?
Understanding and utilizing your iPhone’s camera features can significantly improve the quality of your aurora photos, making the editing process easier and more effective.
2.1. How Can I Maximize iPhone Camera Settings for Aurora Photography?
To maximize your iPhone’s camera settings for aurora photography, consider the following:
- Night Mode: Utilize Night Mode to capture more light in low-light conditions. This mode automatically adjusts the exposure time to brighten the scene and reduce noise.
- ProRAW: Enable Apple ProRAW to capture more detailed and uncompressed images. This format retains more information, allowing for greater flexibility in editing.
- Manual Focus: Manually adjust the focus to ensure the aurora and foreground elements are sharp. Tap on the screen to focus on specific areas.
- Exposure Control: Use the exposure compensation slider to adjust the brightness of your image. Lower the exposure to avoid overexposing the aurora.
- Timer: Use the timer or a remote shutter to avoid camera shake when taking long exposures.
2.2. What Are the Best iPhone Models for Low-Light and Aurora Photography?
The best iPhone models for low-light and aurora photography typically include the latest Pro models, such as the iPhone 13 Pro, iPhone 14 Pro, and iPhone 15 Pro. These models feature larger sensors, wider apertures, and advanced image processing capabilities that excel in low-light conditions. For example, the iPhone 14 Pro’s 48MP Main camera allows for more detailed and brighter images compared to older models.
3. Which Apps Are Best for Editing Aurora Photos on iPhone?
Choosing the right editing app is essential for enhancing your aurora photos on your iPhone. Several excellent options are available, each with its own strengths and features.
3.1. What Are the Top Free and Paid iPhone Apps for Aurora Photo Editing?
Here are some of the top free and paid iPhone apps for editing aurora photos:
| App Name | Cost | Key Features |
|---|---|---|
| Snapseed | Free | Selective adjustments, healing tool, detail enhancement, perspective correction. |
| Adobe Lightroom Mobile | Free/Paid | Cloud syncing, advanced color grading, noise reduction, RAW editing. |
| Darkroom | Free/Paid | Non-destructive editing, batch processing, custom filters, live editing. |
| VSCO | Free/Paid | Film-inspired presets, advanced editing tools, community features. |
| Afterlight | Paid | Double exposure, dust and scratch overlays, advanced color tools. |
3.2. How Do These Apps Differ in Features and Ease of Use?
- Snapseed: A user-friendly app with a wide range of tools, ideal for beginners. Its selective adjustment feature allows you to edit specific areas of your photo with precision.
- Adobe Lightroom Mobile: Offers professional-grade editing tools and cloud syncing capabilities. While it has a steeper learning curve, it provides more control over your edits.
- Darkroom: Known for its non-destructive editing and batch processing features, Darkroom is a great choice for photographers who want to maintain the original quality of their images and edit multiple photos quickly.
- VSCO: Popular for its film-inspired presets, VSCO offers a unique aesthetic and a strong community aspect. It’s a good option for those who want to add a vintage or artistic touch to their aurora photos.
- Afterlight: Provides a variety of creative tools, including double exposure and dust and scratch overlays, making it suitable for more experimental editing.
4. What Basic Adjustments Should I Make to My Aurora Photos on iPhone?
Before diving into more advanced techniques, mastering basic adjustments is crucial for enhancing your aurora photos on your iPhone.
4.1. How Do I Adjust Exposure, Contrast, and White Balance?
- Exposure: Adjust the exposure to brighten or darken the overall image. If your aurora photo is too dark, increase the exposure to reveal more details. Be careful not to overexpose the image, which can wash out the colors.
- Contrast: Adjust the contrast to enhance the difference between the dark and light areas of your photo. Increasing contrast can make the aurora stand out more, while decreasing contrast can create a softer, more ethereal look.
- White Balance: Adjust the white balance to correct any color casts in your photo. Aurora photos often have a blue or green tint, so adjusting the white balance can help create a more natural and balanced look. Use the temperature slider to warm up or cool down the image, and the tint slider to adjust the green/magenta balance.
4.2. Why Is Color Correction Important for Aurora Photography?
Color correction is essential for aurora photography because it allows you to accurately represent the colors of the Northern Lights. The aurora’s colors can vary from vibrant greens and purples to subtle pinks and yellows, and color correction can help bring out these nuances. Accurate color correction also ensures that your photos look natural and visually appealing.
5. How Can I Enhance Aurora Colors and Details on My iPhone?
Enhancing the colors and details of your aurora photos can transform them from ordinary snapshots into stunning works of art.
5.1. What Techniques Can Enhance Vibrancy and Saturation?
- Vibrance: Adjust the vibrance to increase the intensity of the more muted colors in your photo without over-saturating the already vibrant ones. This is a subtle way to enhance the aurora’s colors without making them look artificial.
- Saturation: Adjust the saturation to increase the intensity of all the colors in your photo. Be careful not to over-saturate the image, as this can make the colors look unnatural.
- HSL (Hue, Saturation, Luminance): Use the HSL sliders to adjust the individual colors in your photo. For example, you can increase the saturation of the greens and purples in the aurora to make them stand out more. You can find these sliders in apps like Lightroom Mobile.
5.2. How Can I Sharpen My Aurora Photos Without Adding Noise?
- Sharpening: Use the sharpening tool to enhance the details in your photo. Be careful not to over-sharpen the image, as this can introduce noise and artifacts. Start with a small amount of sharpening and gradually increase it until you achieve the desired level of detail.
- Masking: Use masking to apply sharpening only to specific areas of your photo, such as the aurora and foreground elements. This can help avoid over-sharpening the sky, which can make noise more visible.
- Detail Enhancement: Use the detail enhancement tool to bring out fine details in your photo without adding noise. This tool works by selectively sharpening the edges and textures in your image.
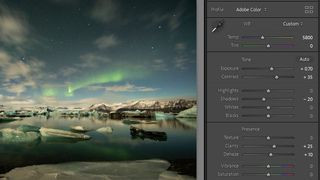 Editing aurora photos: Basic adjustments in Lightroom
6. How Do I Reduce Noise in Aurora Photos Edited on iPhone?
Noise can be a common issue in aurora photos, especially when taken with an iPhone in low-light conditions. Reducing noise is essential for creating clean and visually appealing images.
6.1. What Are Effective Noise Reduction Techniques for iPhone Photos?
- Luminance Noise Reduction: Reduce luminance noise, which appears as grainy or speckled patterns in your photo. Be careful not to overdo it, as this can soften the image and reduce detail.
- Color Noise Reduction: Reduce color noise, which appears as blotchy or discolored pixels in your photo. This type of noise is often more noticeable in the darker areas of the image.
- Detail Slider: Use the detail slider to recover some of the detail lost during noise reduction. This slider helps to sharpen the image without reintroducing noise.
6.2. Which Apps Offer the Best Noise Reduction Tools?
Several iPhone apps offer excellent noise reduction tools:
- Adobe Lightroom Mobile: Provides advanced noise reduction capabilities, allowing you to adjust both luminance and color noise.
- Snapseed: Offers a detail enhancement tool that can help reduce noise while preserving detail.
- Darkroom: Includes a noise reduction tool that is effective at removing noise without softening the image too much.
7. Can I Use Presets and Filters for Editing Aurora Photos on iPhone?
Presets and filters can be a quick and easy way to enhance your aurora photos on your iPhone, but it’s important to use them judiciously to avoid making your images look artificial.
7.1. What Are the Pros and Cons of Using Presets and Filters?
- Pros:
- Speed: Presets and filters can quickly apply a set of adjustments to your photo, saving you time and effort.
- Consistency: Using the same presets or filters on multiple photos can help create a consistent look and feel.
- Inspiration: Presets and filters can provide inspiration and help you discover new editing styles.
- Cons:
- Over-Editing: Presets and filters can sometimes make your photos look over-edited and unnatural.
- Lack of Control: Presets and filters may not always be suitable for every photo, and you may need to make additional adjustments to get the desired result.
- Loss of Originality: Relying too heavily on presets and filters can make your photos look generic and lack originality.
7.2. How Can I Customize Presets to Fit My Style?
- Adjust the Intensity: Start by adjusting the intensity of the preset to find a level that looks natural and complements your photo.
- Tweak the Settings: Don’t be afraid to tweak the individual settings within the preset to customize it to your liking. For example, you can adjust the exposure, contrast, or color balance.
- Create Your Own: Experiment with creating your own presets by saving a set of adjustments that you frequently use. This can help you develop a unique editing style and save time in the long run.
8. What Advanced Editing Techniques Can I Use on My iPhone?
For those looking to take their aurora photo editing skills to the next level, several advanced techniques can be used on the iPhone.
8.1. How Do I Use Selective Adjustments for Targeted Editing?
- Selective Adjustment Tools: Use selective adjustment tools, such as the brush tool in Snapseed or the masking tool in Lightroom Mobile, to edit specific areas of your photo. This allows you to make targeted adjustments without affecting the entire image.
- Targeted Adjustments: Use selective adjustments to brighten the aurora, darken the foreground, or enhance the colors in specific areas of your photo.
- Precision: Take your time and use a small brush size to make precise adjustments. This will help you avoid creating halos or other artifacts around the edges of your selections.
8.2. Can I Use Layers and Masks on iPhone Editing Apps?
Yes, some iPhone editing apps, such as Affinity Photo, offer layers and masks, which allow for more advanced and precise editing. Layers allow you to stack multiple adjustments on top of each other, while masks allow you to control which areas of each layer are visible.
9. How Do I Save and Share My Edited Aurora Photos from My iPhone?
Once you’ve finished editing your aurora photos, it’s important to save them in the correct format and share them effectively.
9.1. What Are the Best File Formats for Saving Aurora Photos?
- JPEG: A widely compatible format that is suitable for sharing on social media and online. However, JPEG files are compressed, which can result in some loss of quality.
- TIFF: A lossless format that preserves all the original image data. TIFF files are larger than JPEG files, but they are ideal for archiving and printing.
- HEIF: A high-efficiency image format that offers better compression than JPEG while maintaining similar image quality. HEIF is the default format for iPhones, but it may not be compatible with all devices and platforms.
- ProRAW (DNG): Available on newer iPhone models, ProRAW captures more detail and dynamic range than JPEG or HEIF. This format is ideal for editing, as it provides more flexibility and allows you to make more significant adjustments without losing quality.
9.2. How Can I Share My Photos on Social Media While Maintaining Quality?
- Optimize for Social Media: Before sharing your photos on social media, optimize them for the platform’s specifications. This may involve resizing the image, adjusting the resolution, and compressing the file.
- Avoid Over-Compression: Be careful not to over-compress your photos when saving them for social media. This can result in a loss of detail and quality.
- Use High-Quality Uploads: Some social media platforms offer the option to upload high-quality photos. Enable this option to ensure that your photos look their best.
10. Where Can I Find Inspiration and Learn More About Aurora Photography?
Inspiration and continuous learning are key to improving your aurora photography skills.
10.1. Who Are Some Influential Aurora Photographers to Follow?
- Paul Nicklen: A National Geographic photographer known for his stunning images of the Arctic and Antarctic.
- Ole Salomonsen: A Norwegian photographer specializing in aurora and landscape photography.
- Babe Kawaii: Known for her captivating aurora time-lapses.
10.2. What Online Resources and Communities Are Available?
- dfphoto.net: A website dedicated to photography tips, tutorials, and inspiration.
- Space.com: Provides articles and guides on astrophotography, including aurora photography.
- National Geographic: Features stunning photography and stories from around the world, including aurora photography.
- Online Forums: Join online forums and communities dedicated to aurora photography to share your work, ask questions, and learn from others.
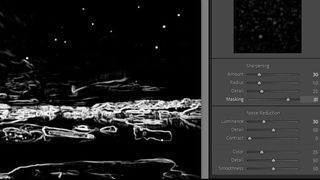 How to edit aurora photos: Lightroom black and white image
By following these tips and techniques, you can transform your iPhone aurora photos into stunning images that capture the magic and beauty of the Northern Lights. Remember to experiment with different settings and editing styles to find what works best for you, and don’t be afraid to push the boundaries of your creativity.
To further enhance your photography skills and discover more breathtaking images, visit dfphoto.net. Explore our extensive collection of tutorials, articles, and stunning photographs, and connect with a vibrant community of photographers who share your passion.
FAQ: Editing Aurora Photos on iPhone
Here are 10 frequently asked questions about editing aurora photos on your iPhone:
-
What is the best iPhone for aurora photography?
The best iPhones for aurora photography are typically the latest Pro models, such as the iPhone 13 Pro, iPhone 14 Pro, and iPhone 15 Pro, due to their superior low-light performance and advanced camera features.
-
Which app is best for editing aurora photos on iPhone?
Adobe Lightroom Mobile is widely regarded as one of the best apps for editing aurora photos on iPhone due to its advanced features, including noise reduction, color grading, and selective adjustments.
-
How can I reduce noise in my aurora photos on iPhone?
You can reduce noise in your aurora photos by using noise reduction tools in apps like Adobe Lightroom Mobile, Snapseed, or Darkroom. Adjust the luminance and color noise sliders to minimize graininess without sacrificing detail.
-
What is the best file format for saving edited aurora photos on iPhone?
The best file format for saving edited aurora photos is ProRAW (DNG) if your iPhone supports it, as it preserves the most image data. Otherwise, TIFF is a good lossless option, while JPEG is suitable for sharing online.
-
How do I adjust the colors in my aurora photos on iPhone?
Adjust the colors in your aurora photos using the HSL (Hue, Saturation, Luminance) sliders in apps like Lightroom Mobile. You can selectively adjust the greens, purples, and other colors to enhance the aurora’s vibrancy.
-
Can I use presets for editing aurora photos on iPhone?
Yes, you can use presets for editing aurora photos on iPhone, but it’s important to customize them to fit your style and the specific characteristics of each photo.
-
How can I sharpen my aurora photos without adding noise on iPhone?
Sharpen your aurora photos without adding noise by using the sharpening tool in moderation and applying it selectively to the aurora and foreground elements. Avoid over-sharpening the sky, which can make noise more visible.
-
What are selective adjustments, and how can I use them for aurora photos on iPhone?
Selective adjustments allow you to edit specific areas of your photo without affecting the entire image. Use the brush tool in Snapseed or the masking tool in Lightroom Mobile to make targeted adjustments to the aurora or foreground.
-
How can I share my edited aurora photos on social media while maintaining quality?
Share your edited aurora photos on social media while maintaining quality by optimizing them for the platform’s specifications, avoiding over-compression, and using high-quality upload settings.
-
Where can I find inspiration and learn more about aurora photography?
Find inspiration and learn more about aurora photography on websites like dfphoto.net, Space.com, and National Geographic, as well as by following influential aurora photographers on social media and joining online forums and communities.
Visit dfphoto.net to explore more stunning photographs, tutorials, and articles, and join our vibrant community of photographers! Connect with us at 1600 St Michael’s Dr, Santa Fe, NM 87505, United States, or call us at +1 (505) 471-6001.