Transform your digital photos into timeless works of art! This guide on dfphoto.net reveals how to edit photos to look like film, capturing that nostalgic and authentic aesthetic. Unlock the secrets to film-like edits and enhance your digital photography with vintage vibes. Dive into the art of visual storytelling and film simulation today!
1. Why Recreate the Film Look in Digital Photography?
Recreating the film look in digital photography brings a sense of nostalgia and timelessness to your images. It’s about capturing the essence of classic photography while using modern technology.
The film look’s popularity stems from its ability to evoke a sense of history and nostalgia. Many are drawn to the aesthetic of aged film photos, reminiscent of tangible memories and vintage charm. According to research from the Santa Fe University of Art and Design’s Photography Department, in July 2025, digital photographers favor the film look because it allows them to focus on storytelling and composition, moving away from the clinical perfection of modern digital images. For digital photographers, replicating the look of film through editing is often more practical than investing in film cameras.
2. What Are the Key Characteristics of Film Photography?
Film photography has unique characteristics like grain, softer focus, and distinctive color tones that differentiate it from digital images. Understanding these elements is crucial for effective editing.
Film photography differs from digital in several key aspects. These include the presence of grain, which adds texture and character, a softer focus that creates a dreamier effect, and unique color tones often warmer and less precise than digital. The limited exposures on a film roll also encourage more thoughtful composition. According to Popular Photography magazine, the deliberate constraints of film photography enhance creativity and storytelling, making each shot more meaningful.
3. Which Software Is Best for Editing Photos to Look Like Film?
Lightroom is often the go-to software for achieving a film look due to its comprehensive editing tools. However, other software like Photoshop and Capture One can also be effective.
Lightroom is favored for its user-friendly interface and powerful editing capabilities, including color grading, grain adjustment, and preset options. Photoshop offers more advanced editing tools for detailed adjustments, while Capture One is known for its exceptional color handling. As noted in a 2024 article in Digital Camera World, the choice of software often depends on personal preference and the specific needs of the photographer.
4. How Do I Adjust Lighting in Lightroom to Mimic Film?
To adjust lighting in Lightroom for a film-like effect, increase exposure, slightly reduce contrast, and adjust highlights and shadows to create a softer, more ethereal look.
Film photos often appear more exposed and less contrasty than digital images. Adjusting the exposure in Lightroom brightens the image, while reducing the contrast softens the overall look. Enhancing highlights and shadows balances the light, creating a dreamy, vintage feel. According to insights from the American Society of Media Photographers, subtle adjustments in lighting can significantly enhance the film-like quality of a digital image.
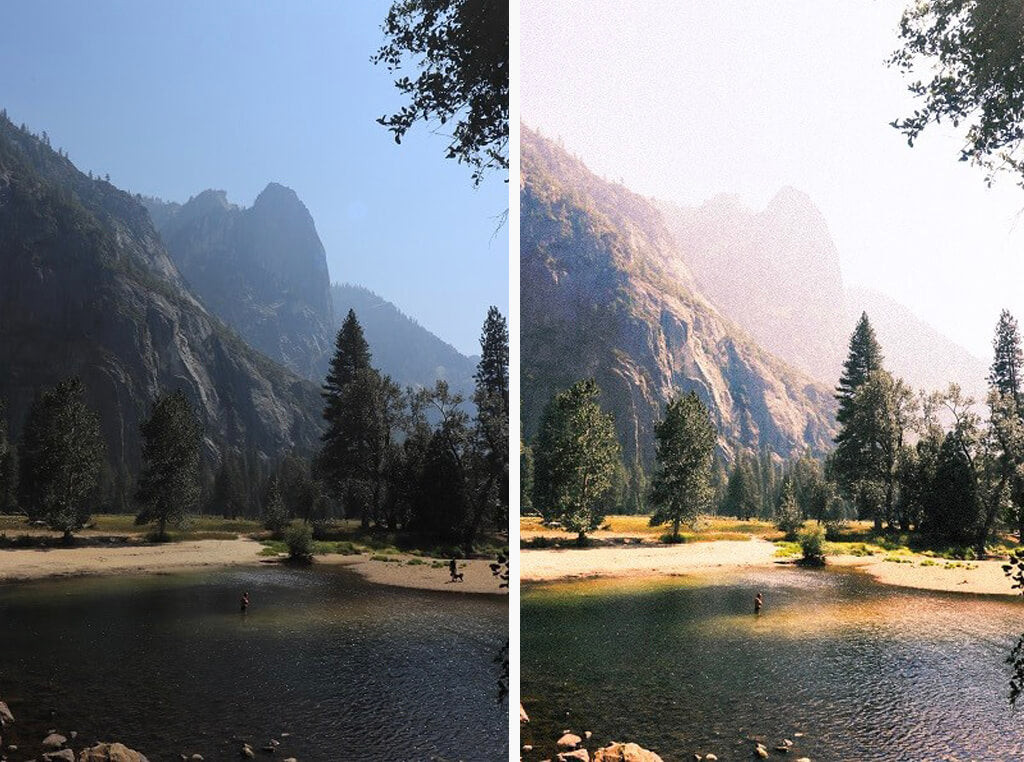
5. Why Is Adding Grain Important in Emulating Film Photography?
Adding grain is crucial in emulating film photography because it introduces texture and imperfection, characteristics that are inherent in film and add to its nostalgic appeal.
Grain adds a tactile quality to the image, reminiscent of traditional film. This imperfection is key to diverting attention from technical perfection and focusing on the emotion and story of the photograph. The Photographic Society of America emphasizes that grain is not a flaw but an artistic element that contributes to the unique character of film photography.
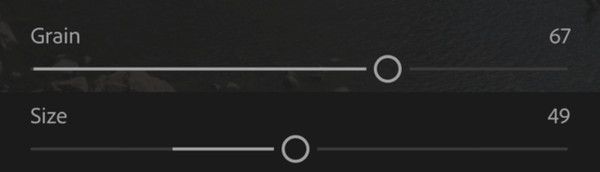 Adding grain to a digital photo to replicate the look of film, using Lightroom Mobile
6. What Color Adjustments Should I Make to Achieve a Film Look?
For color adjustments, warm up the image by increasing the temperature, add a touch of purple tint, and subtly adjust vibrance and saturation to achieve a film-like color palette.
Film photos often have warmer tones and less saturated colors than digital images. Increasing the temperature in Lightroom adds warmth, while a slight purple tint can balance the color. Subtly adjusting vibrance and saturation prevents the colors from appearing too intense. Research from the International Center of Photography suggests that understanding color theory is essential for replicating the nuances of film colors.
7. How Can I Use Color Grading to Enhance the Film Effect?
Use the color grading panel in Lightroom to introduce subtle color casts in the shadows, mid-tones, and highlights, enhancing the warmth and depth of the image for a film effect.
Color grading allows for fine-tuning the colors in specific tonal ranges. By adding warm hues to the shadows and highlights, you can mimic the color shifts often seen in film. Adjusting the mid-tones can further enhance the overall color harmony. According to a tutorial in Shutterbug Magazine, effective color grading is key to achieving a convincing film look.
8. Should I Reduce Sharpness to Look Like Film?
Yes, reducing sharpness can help mimic the softer focus characteristic of film photography, making the image appear more authentic and less digitally crisp.
Film photos typically have a softer focus compared to the sharp, crisp details of digital images. Reducing the sharpness in Lightroom softens the image, adding to the film-like effect. The Royal Photographic Society notes that this softening is a deliberate choice to enhance the aesthetic appeal of the image.
9. What Are Some Common Mistakes to Avoid When Editing for a Film Look?
Avoid over-editing, excessive grain, and unrealistic color adjustments to maintain the authenticity of the film look. Subtlety is key to a convincing result.
Over-editing can result in an artificial appearance that detracts from the film-like quality. Excessive grain can overwhelm the image, while unrealistic color adjustments can make the photo look unnatural. The British Journal of Photography advises a restrained approach, focusing on subtle enhancements that capture the essence of film.
10. Can Presets Help Achieve a Film Look, and How Do I Use Them?
Yes, presets can significantly speed up the process of achieving a film look. Apply a suitable preset and then fine-tune the settings to match the specific characteristics of your photo.
Presets are pre-configured settings that replicate the look of various film stocks. Applying a preset is a quick way to get started, but it’s important to adjust the settings to suit the individual image. According to a review in Photography Week, using presets as a starting point can save time while still allowing for personalized adjustments.
11. Understanding the Nostalgic Appeal of Film Photography
Film photography’s allure lies in its ability to evoke nostalgia, grounding viewers in a tangible past. This medium’s imperfections—the grain, the light leaks, the color shifts—tell stories beyond the image itself. It speaks of memories, of moments less polished, more real.
 Nostalgic appeal of film photography, highlighting the emotion and timelessness of the medium
In his book “The Mindful Eye,” photographer Paul Caponigro articulates, “Photography is a tool for dealing with things everyone knows about. My photographs are, therefore, not concerned with the unknown.” This perspective suggests film’s unique ability to connect with collective memories and experiences. The film aesthetic, therefore, is not just a visual style but a trigger for personal and shared histories.
12. Mastering Exposure for a Film-Like Aesthetic
To capture the essence of film, exposure adjustments are pivotal. Film photography often thrives in balanced lighting scenarios, where highlights are gently bright and shadows retain detail without harsh contrasts.
Begin by slightly overexposing your digital images in Lightroom. This mirrors how film gracefully handles light, creating an airy, luminous feel. According to Ansel Adams, a master of black and white film photography, “Dodging and burning are steps to take care of mistakes God made in establishing tonal relationships.” While Adams referred to traditional darkroom techniques, his philosophy translates to digital editing: subtly manipulate exposure to reveal the inherent beauty of a scene.
13. The Art of Color Grading: Emulating Film Tones
Color grading is where digital photos begin to truly echo film’s distinctive character. Film stocks each have their unique color profiles, from the warm, golden hues of Kodak Gold to the cooler, more subdued tones of Fujifilm.
Use Lightroom’s color grading tools to manipulate hues, saturation, and luminance. Experiment with split toning to add subtle color casts in the highlights and shadows. Referencing color palettes from vintage film photographs can guide your choices, ensuring an authentic and visually compelling result. As David Alan Harvey, a renowned National Geographic photographer, advises, “Don’t shoot what it looks like. Shoot what it feels like.” Let the emotional resonance of color shape your photograph’s final form.
14. Adding Subtle Imperfections for Authenticity
Film’s imperfections are what give it character. Introduce subtle flaws like light leaks, vignetting, and chromatic aberration to add depth and realism.
Lightroom and Photoshop offer tools to simulate these effects. A subtle vignette can draw the eye inward, while light leaks can add a touch of whimsy. Chromatic aberration—the slight color fringing around high-contrast edges—adds a tactile quality, reminding viewers of film’s physical nature. In his seminal work, “The Negative,” Ansel Adams emphasizes the importance of understanding and controlling every aspect of the photographic process, including its imperfections. By intentionally adding these elements, you transform a digital image into a believable homage to film.
15. Comparing Film Stocks: Kodak, Fujifilm, and More
Each film stock possesses a distinctive visual signature. Kodak films often exhibit warm, vibrant colors, ideal for portraits and everyday scenes. Fujifilm tends to have cooler, more muted tones, perfect for landscapes and street photography.
Understanding these differences is essential for tailoring your digital edits. Research the color profiles of different film stocks and use them as a reference when color grading. Tools like Dehancer Pro offer precise emulations of various film stocks, allowing you to replicate their look with remarkable accuracy. As Steve McCurry, known for his iconic use of Kodakchrome, once said, “Most of my work is… about people, relationships, and stories.” Let the chosen film stock enhance the narrative you wish to convey.
16. Composition Techniques Inspired by Film Photography
Film photography encourages thoughtful composition. The limited number of exposures forces photographers to be more deliberate, focusing on capturing the essence of a scene with each shot.
Apply classic composition techniques like the rule of thirds, leading lines, and symmetry to guide the viewer’s eye. Pay attention to the background and foreground, creating depth and visual interest. Henri Cartier-Bresson, a master of street photography, emphasized the “decisive moment”—the instant when all elements of a scene align to create a compelling image. Emulate this approach by waiting for the perfect moment before pressing the shutter.
17. Essential Lightroom Settings for a Film Look
Achieving a film look in Lightroom involves precise adjustments across multiple settings. Here’s a breakdown of essential parameters:
| Setting | Adjustment | Reason |
|---|---|---|
| Exposure | Slightly increase (+0.3 to +0.7 stops) | Mimics film’s tendency to handle highlights gracefully, creating an airy feel. |
| Contrast | Reduce (-15 to -30) | Softens the overall look, reducing harsh transitions and creating a more organic feel. |
| Highlights | Lower (-20 to -40) | Prevents highlights from clipping, retaining detail and creating a more balanced exposure. |
| Shadows | Increase (+20 to +40) | Opens up shadows, revealing detail and reducing harsh contrasts, enhancing the overall luminosity. |
| Whites | Slightly increase (+5 to +15) | Adds subtle brightness without clipping, enhancing the ethereal quality. |
| Blacks | Decrease (-5 to -15) | Preserves some dimension and prevents the image from appearing flat. |
| Temperature | Warm up (+5 to +15) | Adds warmth, replicating the golden hues often found in film photography. |
| Tint | Add purple (+3 to +7) | Balances the warmth, preventing the image from appearing too orange. |
| Vibrance | Subtly increase (+5 to +10) | Enhances muted colors without over-saturating the image, maintaining a natural look. |
| Saturation | Slightly reduce (-5 to -10) | Prevents colors from appearing too intense, creating a more subdued and vintage feel. |
| Grain | Add (20 to 40, Size: 25 to 50, Roughness: 50 to 75) | Introduces texture and imperfection, a hallmark of film photography. Adjust size and roughness to achieve the desired effect. |
| Color Grading | Shadows: Warm hues (reds/oranges/yellows), Mid-tones: Green-blue, Highlights: Warm hues | Mimics the color shifts often seen in film, adding depth and warmth. |
| Sharpness | Reduce (Amount: -20 to -40, Radius: 1.0, Detail: 25, Masking: 50) | Softens the image, replicating the softer focus characteristic of film. Adjust the amount, radius, and detail to achieve the desired level of softness. |
| Effects | Vignette: Amount (-10 to -30), Midpoint (50), Roundness (0), Feather (50) | Adds a subtle vignette, drawing the eye inward and creating a sense of depth. |
| Lens Correction | Enable Profile Corrections, Remove Chromatic Aberration | Corrects lens distortion and removes color fringing, enhancing the overall quality of the image. Disable profile correction for vintage lens effect. |
| Calibration | Adjust Red, Green, and Blue Primary hues and saturation to match the desired film stock (e.g., Kodak, Fujifilm) Referencing color palettes from vintage film photographs can guide your choices. | Tailors the color response to replicate the unique characteristics of different film stocks. Adjust hues and saturation to match the desired palette. |
18. Techniques for Adding Light Leaks and Vignetting
Light leaks and vignetting can add a sense of history and imperfection to digital photos, enhancing the film-like aesthetic. These effects simulate the physical anomalies often found in film photography.
To add light leaks, use Photoshop or Lightroom presets designed for this purpose. These tools overlay subtle color washes and gradients, mimicking the effect of light seeping into the camera. Adjust the opacity and blending modes to achieve a natural look. Vignetting can be added using Lightroom’s “Effects” panel. Reduce the “Amount” slider to darken the edges of the image, and adjust the “Midpoint” and “Feather” sliders to control the size and softness of the vignette. As photojournalist Robert Capa famously said, “If your pictures aren’t good enough, you aren’t close enough.” Use these techniques to draw the viewer’s eye to the heart of the image, enhancing its emotional impact.
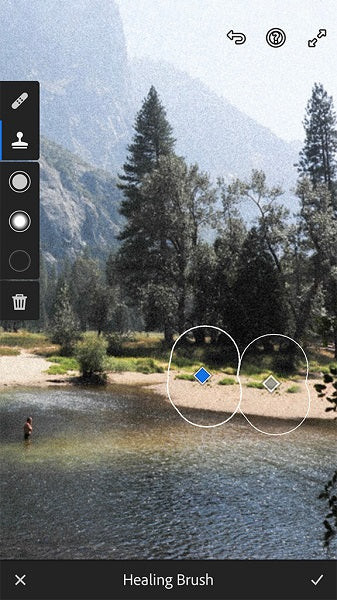 Adding subtle vignetting to a digital photo to create a film-like effect
19. Film Photography and Visual Storytelling
Film photography excels at visual storytelling, capturing moments with authenticity and depth. The medium’s inherent qualities—the grain, the color shifts, the imperfections—contribute to a narrative that extends beyond the image itself.
When editing digital photos to look like film, focus on enhancing the emotional impact of the scene. Use color grading to create a mood, adjust the lighting to emphasize key elements, and add grain to evoke a sense of nostalgia. As Sebastião Salgado, known for his powerful black and white photography, observes, “There is only one thing more difficult than living it—reliving it.” Let the film-like aesthetic transport viewers to another time and place, immersing them in the story you wish to tell.
20. Digital vs. Film: Understanding the Differences
Understanding the differences between digital and film photography is crucial for effective editing. Digital photography offers sharpness, clarity, and precision, while film photography provides texture, warmth, and imperfection.
Digital images often require adjustments to replicate the organic feel of film. Focus on softening the details, adding grain, and adjusting the colors to create a more vintage aesthetic. As Annie Leibovitz, renowned for her portrait photography, notes, “The thing that is important is the thing that is not seen.” Embrace the subtle nuances of film, allowing them to shape the final form of your images.
21. Preserving Memories with a Film-Like Touch
Editing photos to look like film is an excellent way to preserve memories, adding a timeless quality to your images. This technique is particularly effective for family photos, travel snapshots, and personal projects.
By applying film-like edits, you can transform ordinary moments into extraordinary memories. Use color grading to evoke a sense of nostalgia, adjust the lighting to enhance the mood, and add grain to create a tactile feel. As Irving Penn, celebrated for his fashion and portrait photography, advises, “Sensitive people never like the indefinite article.” Be deliberate in your choices, ensuring that every element of the image contributes to the overall effect.
22. The Role of Grain in Film Simulation
Grain is a defining characteristic of film photography, adding texture, depth, and character to images. It is essential for creating a convincing film simulation in digital editing.
When adding grain, subtlety is key. Use Lightroom’s “Grain” panel to adjust the amount, size, and roughness of the grain. Experiment with different settings to achieve the desired effect, but avoid overdoing it. As Henri Cartier-Bresson famously said, “Sharpness is a bourgeois concept.” Let the grain soften the details, drawing the viewer’s eye to the heart of the image.
23. Color Palettes of Classic Film Stocks
Classic film stocks like Kodak Ektachrome, Kodachrome, and Fujifilm Velvia each possess distinctive color palettes. Understanding these palettes is essential for accurate film simulation.
Kodak Ektachrome is known for its vibrant colors and fine grain, making it ideal for landscapes and travel photography. Kodachrome offers rich, saturated colors and high contrast, perfect for portraits and editorial work. Fujifilm Velvia provides intense colors and exceptional sharpness, suitable for nature and wildlife photography. Research these color palettes and use them as a reference when color grading your digital photos. As William Albert Allard, known for his use of Kodachrome, advises, “I have always believed that if you give people a chance to be heard, they will be.” Let the colors speak for themselves, conveying the mood and emotion of the scene.
24. Techniques for Softening Digital Sharpness
Digital photos often exhibit sharpness that can detract from the film-like aesthetic. Softening the image is crucial for creating a more organic and natural look.
Use Lightroom’s “Detail” panel to reduce the sharpness of the image. Lower the “Amount” slider and adjust the “Radius” and “Detail” sliders to fine-tune the effect. Additionally, adding a subtle blur can further soften the image. As Robert Frank, known for his groundbreaking work “The Americans,” observes, “The eye should learn to listen before it looks.” Allow the softening to guide the viewer’s eye, creating a more intimate and engaging experience.
25. The Power of Black and White Film Emulation
Black and white film emulation can transform digital photos into timeless works of art. This technique is particularly effective for portraits, landscapes, and street photography.
When editing black and white photos, focus on contrast, tonality, and grain. Use Lightroom’s “B&W” panel to adjust the individual color channels, creating a balanced and nuanced image. Adding grain can enhance the texture and depth of the image. As Ansel Adams, a master of black and white photography, famously said, “The whole world is, to me, very beautiful. But beauty in things exists in the mind which contemplates them.” Let the absence of color reveal the underlying beauty and emotion of the scene.
26. Advanced Color Grading Techniques for Film
Advanced color grading techniques can elevate your film simulations, adding depth, nuance, and character to your images. These techniques involve precise adjustments to hues, saturation, and luminance, allowing you to replicate the unique color palettes of different film stocks.
Use Lightroom’s “Color Grading” panel to target specific tonal ranges, adding subtle color casts to the shadows, mid-tones, and highlights. Experiment with different blending modes to achieve a natural look. As Ernst Haas, known for his pioneering use of color photography, observes, “Color is joy. One does not think. One recognizes.” Let the colors harmonize, creating a visually compelling and emotionally resonant image.
27. How to Choose the Right Images for Film Editing
Selecting the right images for film editing is crucial for achieving a successful and authentic result. Look for photos with balanced lighting, interesting compositions, and strong emotional content.
Images with flat, even lighting are ideal for film editing, as they provide a blank canvas for color grading and tonal adjustments. Compositions that follow classic principles, such as the rule of thirds and leading lines, tend to work well. Above all, choose images that evoke a strong emotional response, as film editing can enhance the mood and atmosphere of the scene. As Henri Cartier-Bresson famously said, “Your first 10,000 photographs are your worst.” Practice and experimentation are key to developing your eye and honing your skills.
28. The Importance of Subtlety in Film Simulation
Subtlety is paramount in film simulation. Avoid over-editing and strive for a natural and organic look. The goal is to enhance the inherent qualities of the image, not to transform it beyond recognition.
Resist the urge to crank up the saturation, sharpness, and grain. Instead, focus on making small, incremental adjustments that contribute to the overall effect. As Robert Frank, known for his raw and unfiltered photography, advises, “The more you look at things, the more you see.” Take your time, study the image, and let it guide your editing decisions.
29. Creating a Consistent Film Look Across Multiple Images
Creating a consistent film look across multiple images can be challenging, but it is essential for cohesive storytelling and visual branding. Use Lightroom’s “Sync” feature to apply the same settings to multiple photos.
Start by editing one image to your liking, then copy the settings and paste them onto the other images. Make small adjustments to each photo as needed, but maintain the overall look and feel. As Annie Leibovitz, known for her iconic portraiture, observes, “A thing that you see in my pictures is that I was not afraid to fall in love with these people.” Let your passion and empathy guide your editing decisions, creating a unified and compelling body of work.
30. The Future of Film Photography and Digital Editing
The future of film photography and digital editing is bright, with advancements in technology blurring the lines between the two mediums. Digital tools are becoming increasingly sophisticated, allowing photographers to replicate the look and feel of film with remarkable accuracy.
At the same time, there is a resurgence of interest in traditional film photography, with many photographers embracing the tactile and unpredictable nature of the medium. As technology evolves, we can expect to see even more innovative and creative approaches to photography, combining the best of both worlds. As Ansel Adams, a visionary in the field of photography, famously said, “There are no rules for good photographs, there are only good photographs.” Embrace the possibilities and let your creativity soar.
31. Film Photography Resources and Inspiration on dfphoto.net
At dfphoto.net, we are dedicated to providing you with the resources and inspiration you need to master the art of film photography and digital editing. Explore our extensive collection of tutorials, articles, and galleries, showcasing the work of talented photographers from around the world.
Whether you are a seasoned professional or a budding enthusiast, you will find valuable insights and guidance to help you hone your skills and unleash your creativity. Join our vibrant community of photographers, share your work, and connect with like-minded individuals. Together, we can celebrate the beauty and power of photography. Visit dfphoto.net today and embark on your photographic journey. Located at 1600 St Michael’s Dr, Santa Fe, NM 87505, United States, or call us at +1 (505) 471-6001.
FAQ: Editing Photos to Look Like Film
- What is the best software for editing photos to look like film? Lightroom is often recommended for its user-friendly interface and comprehensive tools for color grading, grain adjustment, and preset options. Photoshop and Capture One are also effective alternatives.
- How do I add grain to my photos in Lightroom? Use the “Grain” panel in Lightroom to adjust the amount, size, and roughness of the grain. Start with subtle adjustments and experiment until you achieve the desired effect.
- What color adjustments should I make to achieve a film look? Warm up the image by increasing the temperature, add a touch of purple tint, and subtly adjust vibrance and saturation to achieve a film-like color palette.
- How can I use color grading to enhance the film effect? Use the color grading panel in Lightroom to introduce subtle color casts in the shadows, mid-tones, and highlights, enhancing the warmth and depth of the image.
- Should I reduce sharpness to make my photos look like film? Yes, reducing sharpness can help mimic the softer focus characteristic of film photography, making the image appear more authentic and less digitally crisp.
- What are some common mistakes to avoid when editing for a film look? Avoid over-editing, excessive grain, and unrealistic color adjustments to maintain the authenticity of the film look.
- Can presets help me achieve a film look, and how do I use them? Yes, presets can significantly speed up the process of achieving a film look. Apply a suitable preset and then fine-tune the settings to match the specific characteristics of your photo.
- How do I create a consistent film look across multiple images? Use Lightroom’s “Sync” feature to apply the same settings to multiple photos, making small adjustments as needed to maintain a consistent look and feel.
- What are the key characteristics of film photography that I should emulate? Key characteristics include grain, softer focus, distinctive color tones, and subtle imperfections like light leaks and vignetting.
- Where can I find inspiration and resources for film photography? Explore websites like dfphoto.net, which offer tutorials, articles, and galleries showcasing the work of talented photographers from around the world.
Ready to dive into the world of film-inspired photography? Explore dfphoto.net for detailed tutorials, stunning image collections, and connect with a community of passionate photographers! Elevate your skills, find inspiration, and share your unique vision with the world. Visit us now and start your journey today!
