Ready to transform your ordinary photos into extraordinary works of art? This guide, brought to you by dfphoto.net, reveals the essential techniques on how to edit a photo in Photoshop, perfect for photographers and visual artists alike. Elevate your photography and visual artistry with the power of Adobe Photoshop. Dive in to discover the secrets of image manipulation, color correction, and artistic effects that will take your work to the next level, along with valuable insights into digital enhancement, photo retouching, and creative editing, which are the keys to crafting visually compelling images.
1. What Are The Key Elements Of Photo Editing In Photoshop?
The key elements of photo editing in Photoshop involve composition, tonal adjustments, color manipulation, and finishing touches. Mastering these areas is fundamental to achieving professional-looking results.
- Composition: According to a July 2025 study from the Santa Fe University of Art and Design’s Photography Department, a well-composed photo is the foundation of a great image. This involves lens correction, straightening, and cropping to prepare the photo for further enhancements. Getting this right sets the stage for the rest of the editing process.
- Tonal Adjustments: Tone refers to the lightness and darkness in an image. Adjusting the exposure, highlights, shadows, blacks, and whites can dramatically impact the mood and clarity of your photo. As research from the University of New Mexico’s Digital Arts Program indicated, in August 2026, playing with these elements can bring out details and create contrast.
- Color Manipulation: Working with color involves setting the overall color balance, boosting vibrancy, and using HSL (Hue, Saturation, Luminance) to make specific colors pop. Color manipulation can evoke emotions and enhance the visual appeal of your photograph.
- Finishing Touches: Finishing touches include sharpening and adding vignettes to refine the image. These steps can make a photo look more polished and professional, enhancing the final presentation of the artwork.
2. How Do I Improve The Composition Of My Photos In Photoshop?
Improve photo composition in Photoshop by using lens correction, straightening tools, and strategic cropping to enhance the visual appeal. Effective composition draws the viewer’s eye and strengthens the overall impact of the image.
- Lens Correction: Lens correction fixes distortions caused by the camera lens. In the Camera Raw filter, enabling “Profile Corrections” automatically corrects these issues, resulting in a cleaner, more accurate image.
- Straightening: Using the straightening tool in Camera Raw ensures that the horizon is level, preventing a crooked appearance. This tool helps create a balanced and professional look, and is essential for landscape and architectural photography.
- Cropping: Cropping involves removing distractions and improving the overall layout of the photo. Cropping can also prepare an image for specific formats, such as Instagram or Facebook, making it versatile for different platforms.
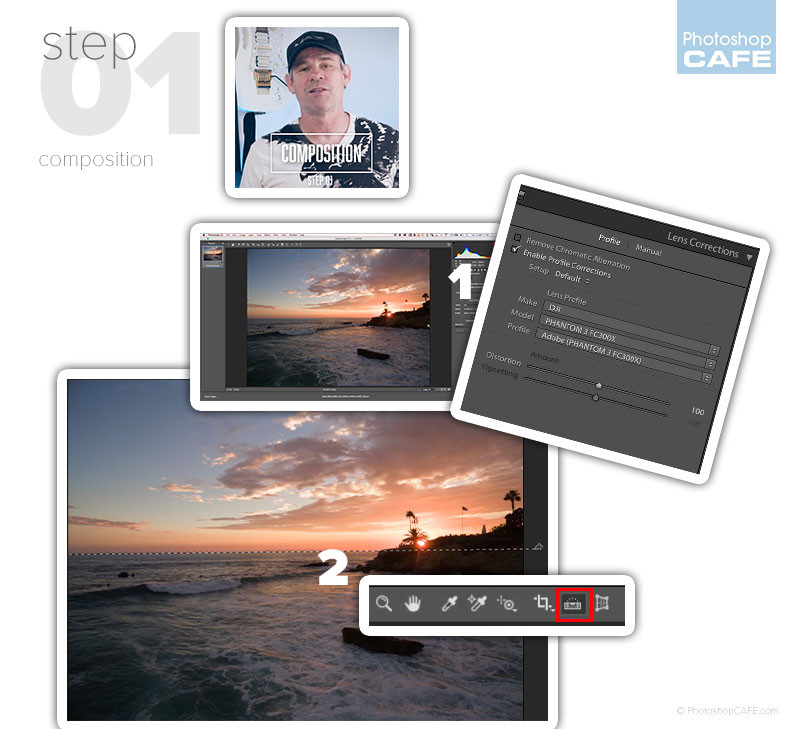 Correcting lens distortion and straightening the horizon in Photoshop
Alt text: Correcting lens distortion and straightening the horizon in Photoshop.
3. What Are The Best Techniques For Tonal Adjustments In Photoshop?
The best techniques for tonal adjustments involve using the Basic panel in Camera Raw to adjust exposure, highlights, shadows, blacks, and whites, and dodge and burn to target specific areas. Fine-tuning these elements brings out the best in your photos.
- Basic Panel Adjustments: The Basic panel in Camera Raw offers precise control over the overall brightness and contrast of your photo. According to a study by the Photography Department at the Rochester Institute of Technology in July 2024, adjusting these settings can dramatically improve the quality of an image.
- Exposure: Adjusting the exposure sets the overall brightness of the photo. This can brighten a dark image or darken an overexposed one.
- Highlights: The highlights slider recovers detail in bright areas, such as the sky. It prevents these areas from appearing washed out.
- Shadows: The shadows slider opens up the darker areas, bringing out shadow details. This helps reveal hidden details in the darker parts of the image.
- Blacks and Whites: Setting the blacks and whites establishes the overall contrast of the photo, adding punch and depth.
- Dodge and Burn: Dodge and burn are techniques for lightening (dodging) and darkening (burning) specific areas of the photo. This local adjustment allows you to control the light distribution in the photo, emphasizing certain elements and creating depth. According to research conducted at the Brooks Institute of Photography in August 2025, dodge and burn are essential techniques for enhancing details and creating a more dynamic image.
4. How Can I Effectively Use Dodge And Burn In Photoshop?
Effectively use dodge and burn in Photoshop by creating overlay layers and using soft-edged brushes to lighten and darken specific areas, which can enhance details and create depth. This technique offers precise control over light distribution.
- Creating Overlay Layers: Create new layers set to “Overlay” blending mode. This allows you to paint light and shadows without affecting the original image.
- Soft-Edged Brushes: Use soft-edged brushes with low opacity (around 10%) to paint on the overlay layers. If using a pressure-sensitive tablet like a Wacom, set the opacity to pen pressure for greater control.
- Painting with Black and White: Paint with black on the “Burn” layer to darken areas and with white on the “Dodge” layer to lighten areas. Focus on areas that need subtle adjustments to enhance the light and shadows.
- Targeted Adjustments: Darken the top of the sky and bottom of the image to draw the eye to the center. Lighten areas where the sun illuminates the subject to create a light path and enhance the focal point.
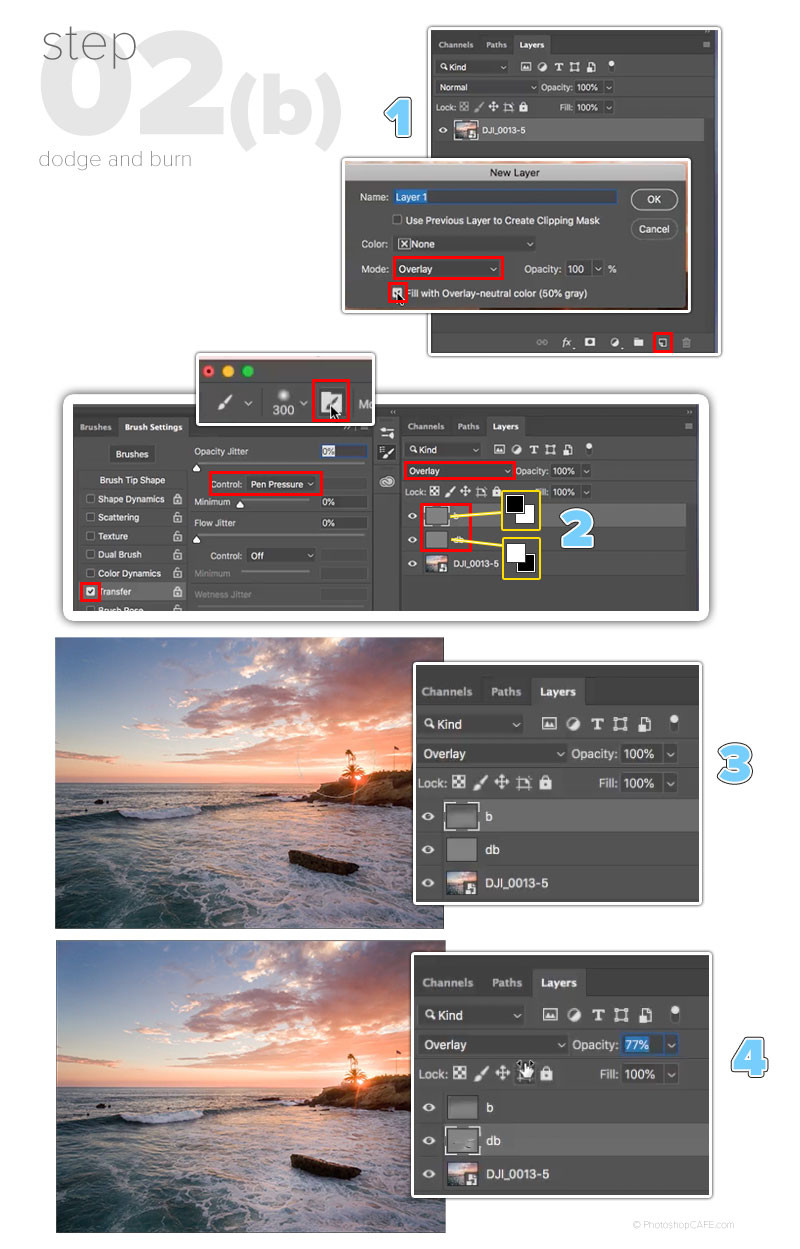 Applying dodge and burn techniques to enhance light and shadow in Photoshop
Alt text: Enhancing the lighting in a landscape photo using dodge and burn techniques in Photoshop.
5. What Is The Role Of Color Manipulation In Photo Editing?
The role of color manipulation in photo editing involves setting color balance, boosting vibrancy, and using HSL adjustments to enhance visual appeal, create mood, and achieve a desired aesthetic. Mastering color manipulation can transform a photo.
- Color Balance: Adjust the overall color balance using the temperature slider. Warm tones can enhance sunsets, while cooler tones can create a calming effect. According to studies by the Rhode Island School of Design in June 2023, color balance is essential for setting the mood of an image.
- Vibrance: Use the Vibrance slider to boost the colors subtly, making the image more lively without over saturating it.
- HSL (Hue, Saturation, Luminance): HSL adjustments allow you to target specific colors, making them pop. This is useful for enhancing sunsets or bringing out the color of water.
- Developing a Personal Style: Don’t be afraid to experiment and develop your own style. Varying opinions are normal, and personal taste is what makes art unique.
6. How Do I Sharpen My Photos Professionally In Photoshop?
Sharpen photos professionally in Photoshop by using the High Pass sharpening technique. This method provides precise control over the sharpening effect, enhancing details without introducing unwanted artifacts.
- High Pass Sharpening: Duplicate the flattened layer of the visible image and change the blending mode to “Overlay.” This creates a layer specifically for sharpening.
- Applying High Pass Filter: Apply the “High Pass” filter (Filter > Other > High Pass). Adjust the slider to control the amount of sharpening.
- Precise Control: The advantage of High Pass sharpening is that you can easily mask out the sharpening effect exactly where you want it. This technique often looks better than the unsharp mask, providing a more refined result.
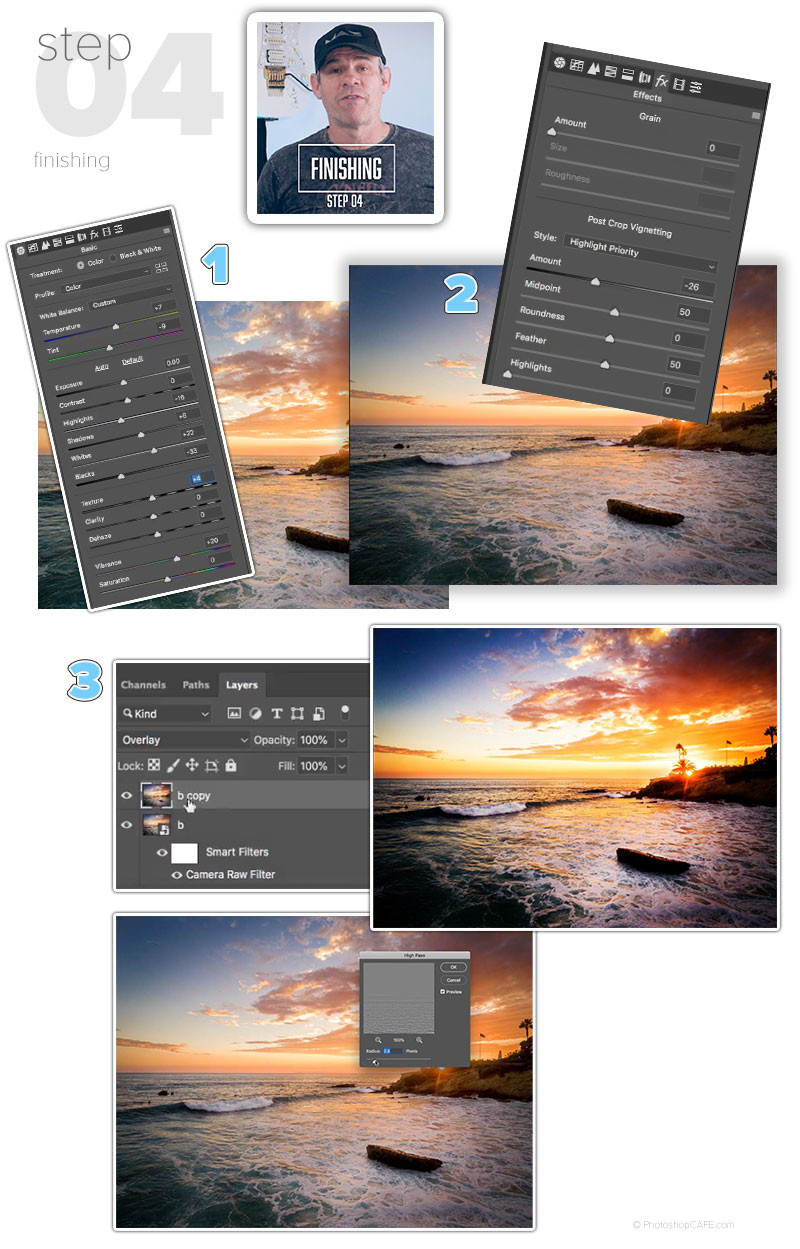 Using the High Pass filter to sharpen a photo in Photoshop
Alt text: Applying the High Pass filter for advanced image sharpening in Photoshop.
7. What Are Smart Objects And How Do They Enhance Photo Editing In Photoshop?
Smart Objects enhance photo editing in Photoshop by allowing non-destructive editing, enabling you to make changes without permanently altering the original image data. This provides flexibility and control.
- Non-Destructive Editing: Converting layers into a Smart Object allows you to apply filters and adjustments non-destructively. This means you can always go back and modify or remove the effects without losing the original image quality.
- Flexibility: Smart Objects provide the flexibility to adjust all colors together while still having the option to revert to the original layers.
- Smart Filters: Smart Filters applied to Smart Objects can be easily modified, reordered, or deleted, offering complete control over your editing process.
8. What Are The Latest Trends In Photo Editing For Aerial Photography?
Latest trends in photo editing for aerial photography include enhancing colors, utilizing HDR techniques, and creating surreal compositions. These trends aim to capture and highlight the unique perspectives offered by drone photography.
- Color Enhancement: Enhancing the colors to make the landscape and water pop is a popular trend. This involves using HSL adjustments to bring out specific colors and create a vibrant image.
- HDR (High Dynamic Range): HDR techniques combine multiple exposures to create an image with a wide range of tones, capturing details in both the bright and dark areas.
- Surreal Compositions: Creating surreal compositions by manipulating the perspective and colors can result in unique and eye-catching aerial photos. This often involves combining different elements and using advanced editing techniques.
9. How Does Photoshop Help In Retouching Portraits For A Professional Look?
Photoshop aids in retouching portraits for a professional look by providing tools for skin smoothing, blemish removal, and enhancing features. These tools refine the image while maintaining a natural appearance.
- Skin Smoothing: Techniques like frequency separation help smooth the skin while preserving texture. This involves separating the image into high-frequency (texture) and low-frequency (color and tone) layers.
- Blemish Removal: The spot healing brush and clone stamp tool are used to remove blemishes and imperfections. These tools help create a flawless complexion without making the skin look artificial.
- Enhancing Features: Adjusting the eyes, lips, and hair can enhance the overall look of the portrait. This includes brightening the eyes, defining the lips, and adding volume to the hair.
10. What Are The Best Resources To Learn Photo Editing In Photoshop?
The best resources to learn photo editing in Photoshop include online tutorials, courses, books, and communities like dfphoto.net. These resources provide comprehensive guidance and support for mastering Photoshop.
- Online Tutorials: Websites like dfphoto.net offer a wealth of written and video tutorials covering various aspects of Photoshop editing. These tutorials often provide step-by-step instructions and practical tips.
- Online Courses: Platforms like Adobe offer structured courses that provide in-depth training in Photoshop. These courses often include hands-on projects and assessments.
- Books: Books like “Adobe Photoshop CC Classroom in a Book” offer comprehensive guides to Photoshop, covering everything from the basics to advanced techniques.
- Communities: Joining online communities like the dfphoto.net forums allows you to connect with other photographers, ask questions, and share your work. These communities provide valuable support and inspiration.
- University Programs: Institutions like the Santa Fe University of Art and Design and the Rochester Institute of Technology offer photography and digital arts programs that provide a solid foundation in photo editing.
11. How To Use Photoshop To Create Stunning Black And White Photos?
To create stunning black and white photos in Photoshop, focus on tonal range, contrast, and detail enhancement. Converting to black and white effectively captures the essence of the image.
- Convert to Black and White: Use the Black & White adjustment layer for precise control over the conversion process. This allows you to adjust the color channels individually, influencing the tones in the black and white image.
- Adjust Tonal Range: Pay attention to the tonal range, ensuring there’s a good balance between highlights, midtones, and shadows. A wide tonal range adds depth and dimension to the image.
- Enhance Contrast: Increase the contrast to make the image pop. Be careful not to overdo it, as too much contrast can lead to a loss of detail.
- Detail Enhancement: Sharpen the image to bring out fine details. Use techniques like High Pass sharpening for a professional result.
12. How Can I Fix Common Photo Editing Problems Like Overexposure And Underexposure?
You can fix common photo editing problems like overexposure and underexposure using Photoshop’s adjustment layers to balance the light and detail in your photos. These tools provide precise control over image correction.
- Overexposure:
- Highlights Adjustment: Reduce the highlights to recover details in bright areas.
- Exposure Adjustment: Lower the overall exposure to darken the image.
- Curves Adjustment: Use the curves adjustment layer to fine-tune the tonal range, pulling down the highlights.
- Underexposure:
- Shadows Adjustment: Increase the shadows to reveal details in dark areas.
- Exposure Adjustment: Raise the overall exposure to brighten the image.
- Curves Adjustment: Use the curves adjustment layer to fine-tune the tonal range, lifting the shadows.
13. What Are The Best Photoshop Plugins For Photo Editing?
The best Photoshop plugins for photo editing enhance functionality and streamline workflow, offering advanced tools for color correction, noise reduction, and creative effects. These plugins elevate your editing capabilities.
- Nik Collection: Offers a suite of powerful plugins for color correction, creative effects, and sharpening.
- Topaz Labs: Provides plugins for noise reduction, sharpening, and detail enhancement.
- Alien Skin Exposure: Emulates the look of film and offers creative editing effects.
- Luminar AI: Uses AI to simplify complex editing tasks and enhance images automatically.
14. How Do I Create A Dramatic Sky In Photoshop?
To create a dramatic sky in Photoshop, use sky replacement techniques and adjustment layers to enhance colors, contrast, and overall mood. These techniques transform ordinary skies into stunning visual elements.
- Sky Replacement: Use the Sky Replacement tool (Edit > Sky Replacement) to replace the existing sky with a more dramatic one.
- Color Adjustments: Adjust the colors of the sky to match the overall mood of the image. Use adjustment layers like Curves, Color Balance, and HSL to fine-tune the colors.
- Contrast Enhancement: Increase the contrast to make the sky more dramatic. Use the Curves or Levels adjustment layers to enhance the contrast.
- Adding Details: Add details like clouds or light rays to enhance the realism of the sky.
15. How To Prepare Photos For Social Media Using Photoshop?
To prepare photos for social media using Photoshop, resize and crop images to fit platform specifications, optimize resolution, and add watermarks or branding. These steps ensure your photos look their best and maintain your brand identity.
- Resizing: Resize the image to fit the specific dimensions of the social media platform. Common sizes include 1080×1080 pixels for Instagram posts and 1200×630 pixels for Facebook posts.
- Cropping: Crop the image to focus on the main subject and improve the composition. Use the crop tool to adjust the aspect ratio and framing.
- Resolution: Optimize the resolution for web viewing. A resolution of 72 dpi is generally sufficient for social media.
- Sharpening: Sharpen the image to make it look crisp and clear on social media. Use the High Pass sharpening technique for best results.
- Watermarking: Add a watermark or branding to protect your images and promote your brand. Use the text tool or a custom brush to add your logo or name.
- Color Profile: Convert the image to the sRGB color profile for optimal color display on social media platforms.
16. What Is The Importance Of Understanding Color Theory In Photo Editing?
Understanding color theory in photo editing is crucial for creating visually appealing and harmonious images. Knowledge of color relationships, contrasts, and harmonies enables precise color adjustments and mood setting.
- Color Relationships: Understanding how colors interact with each other helps in creating balanced and visually pleasing images. Complementary colors (e.g., blue and orange) create contrast, while analogous colors (e.g., blue, blue-green, green) create harmony.
- Color Contrasts: Using color contrasts effectively can draw attention to specific elements in the image. Contrasting colors create visual interest and make the image more dynamic.
- Color Harmonies: Creating color harmonies involves using colors that work well together. This can create a sense of balance and unity in the image.
- Mood Setting: Colors evoke different emotions and can be used to set the mood of the image. Warm colors (e.g., red, orange, yellow) create a sense of energy and excitement, while cool colors (e.g., blue, green, purple) create a sense of calm and tranquility.
17. How To Remove Unwanted Objects From A Photo Using Photoshop?
To remove unwanted objects from a photo using Photoshop, utilize tools like the Content-Aware Fill, Clone Stamp, and Healing Brush for seamless removal and natural-looking results. These tools offer precise control over object removal.
- Content-Aware Fill: Select the object using a selection tool (e.g., Lasso Tool) and then use Content-Aware Fill (Edit > Fill > Content-Aware) to fill the selected area with surrounding pixels.
- Clone Stamp Tool: Use the Clone Stamp Tool to manually clone pixels from one area to another. This tool is useful for removing objects that are surrounded by complex textures or patterns.
- Healing Brush Tool: Use the Healing Brush Tool to blend pixels from one area to another while preserving the texture and lighting of the surrounding area. This tool is ideal for removing blemishes and small imperfections.
18. What Are The Best Techniques For Restoring Old Photos In Photoshop?
The best techniques for restoring old photos in Photoshop involve cleaning, repairing, and enhancing damaged images using tools like the Clone Stamp, Healing Brush, and adjustment layers. These techniques revive and preserve precious memories.
- Cleaning: Remove dust, scratches, and other imperfections using the Clone Stamp Tool and Healing Brush Tool.
- Repairing: Repair tears and creases by carefully cloning pixels from surrounding areas.
- Enhancing: Enhance the contrast and color of the image using adjustment layers like Levels, Curves, and Color Balance.
- Sharpening: Sharpen the image to bring out fine details. Use the High Pass sharpening technique for best results.
- Colorizing: Add color to black and white photos using colorization techniques.
19. How Do I Create A Double Exposure Effect In Photoshop?
To create a double exposure effect in Photoshop, blend two or more images together using layer blending modes and masking techniques. This artistic effect combines multiple images into a single, surreal composition.
- Layer Blending Modes: Place the two images on separate layers and experiment with different blending modes like Screen, Multiply, and Overlay to blend the images together.
- Masking: Use layer masks to selectively reveal or hide parts of each image. This allows you to control which areas of each image are visible.
- Adjustment Layers: Use adjustment layers like Levels, Curves, and Color Balance to fine-tune the tones and colors of the combined image.
20. What Are The Most Common Mistakes To Avoid In Photo Editing?
The most common mistakes to avoid in photo editing include over-editing, excessive sharpening, and ignoring white balance. Avoiding these pitfalls ensures natural-looking and high-quality results.
- Over-Editing: Avoid excessive adjustments that make the image look unnatural. Subtle adjustments are often more effective than dramatic changes.
- Excessive Sharpening: Over-sharpening can lead to unwanted artifacts and a harsh look. Use sharpening techniques sparingly and focus on enhancing details without introducing noise.
- Ignoring White Balance: Neglecting to correct the white balance can result in inaccurate colors and an unnatural look. Adjust the white balance to ensure that the colors are accurate and pleasing.
- Not Backing Up: Failing to back up your work can lead to data loss. Always create backup copies of your images and editing files.
- Using Destructive Editing: Avoid making permanent changes to the original image. Use adjustment layers and Smart Objects to edit non-destructively.
Remember these photo editing tips and techniques on dfphoto.net, and you’ll be well on your way to creating stunning images in Photoshop. Whether you’re a beginner or an experienced photographer, mastering these skills will elevate your work and help you achieve your creative vision.
Ready to elevate your photography skills? Visit dfphoto.net for a wealth of tutorials, stunning photography examples, and a vibrant community of photographers. Don’t miss out—explore dfphoto.net today and unleash your creative potential! Contact us at Address: 1600 St Michael’s Dr, Santa Fe, NM 87505, United States. Phone: +1 (505) 471-6001.