Editing a photo on MacBook Air can transform your snapshots into stunning visuals. At dfphoto.net, we provide a detailed guide on utilizing the built-in Photos app and other professional tools to enhance your images, from simple adjustments to advanced techniques. Elevate your photography skills by learning about image enhancement, photo retouching, and digital photography, all while creating captivating visual content.
1. What Are The Basic Steps To Edit A Photo In Photos App On MacBook Air?
Yes, the basic steps to edit a photo in the Photos app on MacBook Air are straightforward: Open the photo, click “Edit,” make adjustments, and click “Done”. The Photos app on MacBook Air offers simple yet effective tools to enhance your photos.
1.1. Step-by-Step Guide to Basic Photo Editing
-
Open Photos: Launch the Photos app from your Dock or Applications folder.
-
Select Photo: Double-click the photo you want to edit.
-
Enter Edit Mode: Click the “Edit” button in the top-right corner.
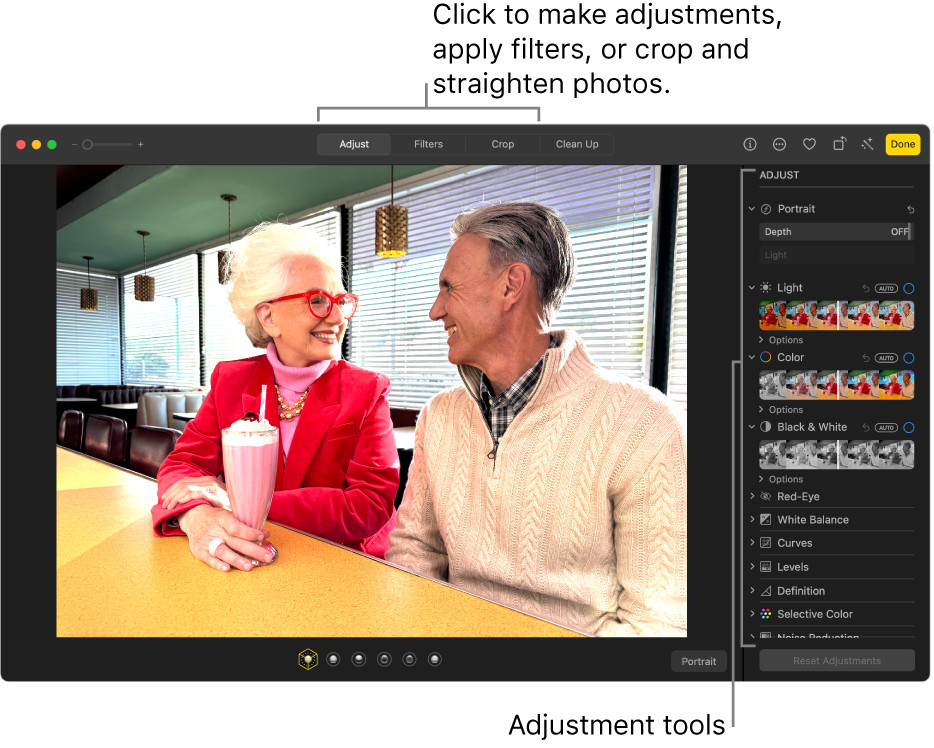 Photo editing interface in the Photos app on a MacBook Air, showing the Adjust panel selected and various adjustment tools available on the right.
 -
Make Adjustments:
- Adjust: This section allows you to modify light, color, and black & white settings.
- Filters: Apply pre-set filters for quick stylistic changes.
- Crop: Crop, straighten, or adjust the perspective of your photo.
-
Save Changes: Click “Done” to save your edits.
1.2. Essential Editing Tools
- Light: Adjust exposure, highlights, shadows, brightness, contrast, and black point.
- Color: Modify saturation, contrast, and cast.
- Black & White: Control intensity, neutrals, tone, and grain.
- Retouch: Remove blemishes or unwanted spots.
- Red-Eye Reduction: Correct red-eye caused by flash photography.
1.3. Non-Destructive Editing
The Photos app employs non-destructive editing, meaning your original photo remains untouched. You can always revert to the original by clicking “Revert to Original” under the “Image” menu.
1.4. Keyboard Shortcuts
Using keyboard shortcuts can speed up your editing process:
- Command-Z: Undo the last change.
- M Key: Press and hold to see the original image while editing.
- Command-D: Duplicate a photo to experiment with different edits.
1.5. Tips for Effective Basic Editing
- Start with Light: Adjusting the light settings often makes the most significant impact.
- Subtle Adjustments: Avoid over-editing; subtle changes usually look more natural.
- Use Histograms: Refer to the histogram to ensure balanced exposure.
- Duplicate Before Major Changes: Duplicate your photo before making significant alterations to preserve the original.
2. How Can I Duplicate A Photo On My MacBook Air?
To duplicate a photo on your MacBook Air, select the photo in the Photos app and press Command-D or choose “Duplicate” from the “Image” menu, which is useful for trying different edits without altering the original. Duplicating a photo is a great way to experiment with different editing styles without the risk of ruining your original image.
2.1. Step-by-Step Guide to Duplicating Photos
- Open Photos App: Launch the Photos app on your MacBook Air.
- Select Photo: Click on the photo you want to duplicate.
- Duplicate:
- Using Keyboard Shortcut: Press
Command + D. - Using Menu: Go to the “Image” menu in the top menu bar and select “Duplicate 1 Photo”.
- Using Keyboard Shortcut: Press
- Live Photo Options: If duplicating a Live Photo, you’ll have two options:
- Duplicate: Includes the video portion of the Live Photo.
- Duplicate as Still Photo: Creates a still image copy.
- Verify Duplication: A new copy of the photo will appear next to the original in your library.
2.2. Why Duplicate Photos?
- Experimentation: Safely try out different editing styles and adjustments.
- Preservation: Keep the original untouched while making significant changes.
- Multiple Versions: Create different versions of the same photo for various purposes (e.g., one for print, one for social media).
2.3. Tips for Managing Duplicates
- Rename Duplicates: Rename the duplicated photo to easily distinguish it from the original. For example, add “_edited” or “_version2” to the filename.
- Use Albums: Organize your duplicates in separate albums to keep your library tidy.
- Add Keywords: Use keywords to tag and quickly find specific versions of your photos.
2.4. Alternative Methods to Duplicate Photos
- Drag and Drop: Drag the photo to your desktop, then drag it back into the Photos app. This will create a copy.
- Export and Import: Export the photo, then import it back into the Photos app.
2.5. Practical Examples
- Scenario 1: Trying Different Filters: Duplicate a photo and apply different filters to each copy to see which one looks best.
- Scenario 2: Before and After Comparison: Edit one version of a photo extensively and keep the original to easily compare the before and after effects.
- Scenario 3: Creating Multiple Aspect Ratios: Duplicate a photo and crop each version to different aspect ratios for various social media platforms.
3. How Do I Compare Photos Before And After Editing On A MacBook Air?
Comparing photos before and after editing on a MacBook Air is simple: While in edit mode in the Photos app, press and hold the “M” key to toggle between the original and edited versions, allowing you to evaluate the changes. This feature is essential for ensuring your edits enhance rather than detract from the original image.
3.1. Step-by-Step Guide to Comparing Photos
- Open Photos App: Launch the Photos app on your MacBook Air.
- Select Photo: Double-click on the photo you want to edit.
- Enter Edit Mode: Click the “Edit” button in the top-right corner.
- Toggle Between Versions: Press and hold the “M” key to see the original, unedited photo. Release the “M” key to view the edited version.
3.2. Why Compare Before and After?
- Assess Impact: Evaluate the effectiveness of your edits.
- Avoid Over-Editing: Ensure adjustments enhance rather than degrade the image.
- Make Informed Decisions: Determine if further adjustments are needed.
3.3. Tips for Effective Comparison
- Take Breaks: Step away from your screen periodically to refresh your eyes and gain a fresh perspective.
- Zoom In: Inspect details closely by zooming in to 100% to assess sharpness and clarity.
- Use a Reference Point: Focus on a specific element in the photo to compare how it has changed.
- Check Histograms: Compare the histograms of the original and edited versions to ensure balanced exposure.
3.4. Alternative Comparison Methods
- Duplicate and Compare Side-by-Side: Duplicate the photo and edit one version. Open both versions side-by-side to directly compare them.
- Export and Review: Export both the original and edited versions and view them outside the Photos app for a different perspective.
3.5. Practical Examples
- Scenario 1: Evaluating Color Correction: Check if your color adjustments have made the image look more natural and vibrant.
- Scenario 2: Assessing Sharpness Adjustments: Determine if sharpening has improved detail without introducing artifacts.
- Scenario 3: Checking Exposure Adjustments: Ensure that highlights are not blown out and shadows retain detail.
3.6. Using Third-Party Software for Comparison
While the Photos app provides a simple comparison tool, third-party software like Adobe Lightroom or Capture One offer more advanced comparison features, such as split-screen views and synchronized zooming.
4. Can I Copy And Paste Edits Between Photos On My MacBook Air?
Yes, you can copy and paste edits between photos on your MacBook Air using the Photos app, streamlining your workflow by applying the same adjustments to multiple images quickly. Copying and pasting edits is a significant time-saver when you need to apply the same adjustments to a series of photos, such as those taken in similar lighting conditions.
4.1. Step-by-Step Guide to Copying and Pasting Edits
- Open Photos App: Launch the Photos app on your MacBook Air.
- Select Edited Photo: Choose the photo with the edits you want to copy.
- Copy Edits:
- Go to the “Image” menu in the top menu bar and select “Copy Edits.”
- Alternatively, Control-click the photo and choose “Copy Edits.”
- Select Target Photos: Choose the photo(s) you want to apply the edits to.
- To select multiple photos, Command-click each one.
- Paste Edits:
- Go to the “Image” menu and select “Paste Edits.”
- Alternatively, Control-click the selected photos and choose “Paste Edits.”
4.2. Limitations
Note that certain adjustments cannot be copied and pasted:
- Retouch tool adjustments
- Red-eye tool adjustments
- Crop tool adjustments
- Third-party extension settings
4.3. Why Copy and Paste Edits?
- Consistency: Ensure a uniform look across multiple photos.
- Efficiency: Save time by applying the same adjustments quickly.
- Batch Processing: Edit a large number of photos with similar needs efficiently.
4.4. Tips for Effective Copying and Pasting
- Selective Pasting: Understand which edits will be applied and which won’t.
- Adjust as Needed: After pasting, fine-tune individual photos to account for slight differences.
- Use Smartly: This feature works best when photos have similar lighting and composition.
4.5. Practical Examples
- Scenario 1: Batch Editing a Photoshoot: Apply the same basic adjustments to all photos from a photoshoot.
- Scenario 2: Creating a Consistent Look: Ensure all photos in a series have the same color grading.
- Scenario 3: Applying Standard Corrections: Quickly correct exposure and white balance across a set of images.
4.6. Advanced Techniques
- Using Adjustment Layers (Third-Party Software): In software like Photoshop, use adjustment layers to make non-destructive edits that can be easily copied and applied to multiple images.
- Creating Presets: In Lightroom, create presets from your edits and apply them to multiple photos with a single click.
5. How Can I Undo Changes Made While Editing A Photo On MacBook Air?
You can undo changes made while editing a photo on your MacBook Air by using the “Undo” command (Command-Z) to revert the last action or by choosing “Revert to Original” to restore the photo to its original state. This flexibility ensures you can experiment freely without permanently altering your images.
5.1. Step-by-Step Guide to Undoing Changes
- Open Photos App: Launch the Photos app on your MacBook Air.
- Select Photo: Choose the photo you are currently editing.
- Undo Last Action:
- Go to the “Edit” menu in the top menu bar and select “Undo.”
- Alternatively, press
Command + Z.
- Revert to Original:
- Go to the “Image” menu and select “Revert to Original.”
- This will undo all changes made since you started editing.
5.2. Understanding the Undo System
- Multiple Undos: You can undo multiple actions by repeatedly pressing
Command + Z. - Limited History: The Photos app has a limited undo history, so very old changes may not be recoverable.
5.3. When to Use Undo vs. Revert to Original
- Undo: Use “Undo” for small, recent changes you want to remove.
- Revert to Original: Use “Revert to Original” when you want to start over completely.
5.4. Tips for Managing Edits
- Save Frequently: Although Photos autosaves edits, saving frequently can prevent data loss in case of a crash.
- Duplicate Before Editing: Duplicate photos before making significant changes to ensure you always have the original.
- Take Notes: Keep a record of the adjustments you make, especially if you plan to apply similar edits to other photos.
5.5. Practical Examples
- Scenario 1: Overly Aggressive Adjustments: If you’ve made too many adjustments and the photo looks unnatural, revert to the original and start over.
- Scenario 2: Accidental Changes: If you accidentally moved a slider or applied a filter, use “Undo” to revert the change.
- Scenario 3: Experimenting with Different Styles: Try a completely different editing style on a duplicated photo, knowing you can always revert to the original.
5.6. Alternative Methods in Third-Party Software
- History Panel (Photoshop): Use the History panel in Photoshop to step back to any previous state of your editing session.
- Snapshots (Lightroom): Take snapshots of your progress in Lightroom to create milestones you can easily return to.
6. What Are Some Advanced Photo Editing Techniques I Can Use On My MacBook Air?
Several advanced photo editing techniques can be used on a MacBook Air, including using third-party software like Adobe Photoshop or Affinity Photo for tasks like layer-based editing, complex masking, and advanced color correction. These tools extend the capabilities beyond the built-in Photos app, allowing for professional-level image manipulation.
6.1. Layer-Based Editing
Layer-based editing allows you to work on different aspects of your photo separately, making it easier to make precise adjustments without affecting other parts of the image.
- Software: Adobe Photoshop, Affinity Photo
- Techniques:
- Adjustment Layers: Non-destructive layers for adjusting brightness, contrast, color balance, etc.
- Masking: Hiding or revealing parts of a layer to blend different elements seamlessly.
- Blending Modes: Combining layers in various ways to create unique effects.
6.2. Complex Masking
Masking is essential for isolating specific areas of your photo for targeted editing.
- Techniques:
- Luminosity Masks: Selecting areas based on brightness values.
- Color Range Masks: Selecting areas based on color.
- Refine Edge: Improving the accuracy of mask edges for realistic blending.
6.3. Advanced Color Correction
Achieving perfect color balance requires more than just basic adjustments.
- Techniques:
- Curves: Fine-tuning tonal ranges with precise control.
- Color Balance: Adjusting the balance of colors in shadows, midtones, and highlights.
- Selective Color: Adjusting individual color channels without affecting others.
6.4. Frequency Separation
Frequency separation allows you to separate the texture and tone of your image into different layers, making it easier to retouch skin and remove blemishes without blurring details.
- Software: Adobe Photoshop
- Steps:
- Duplicate the base layer twice.
- Apply a Gaussian Blur to the lower layer (radius of 4-8 pixels) to smooth out the tones.
- Apply a High Pass filter to the upper layer (radius of 2-4 pixels) to isolate the texture.
- Change the blending mode of the upper layer to “Linear Light.”
- Edit the lower layer to adjust tones and the upper layer to adjust texture.
6.5. Content-Aware Fill
Content-Aware Fill allows you to remove unwanted objects from your photo by intelligently filling the area with surrounding content.
- Software: Adobe Photoshop
- Steps:
- Select the object you want to remove using a selection tool.
- Go to “Edit” > “Fill” and choose “Content-Aware” from the “Contents” dropdown.
- Adjust the settings as needed and click “OK.”
6.6. HDR (High Dynamic Range) Imaging
HDR imaging combines multiple photos taken at different exposures to create a single image with a wider dynamic range, capturing more detail in both highlights and shadows.
- Software: Adobe Photoshop, Aurora HDR
- Steps:
- Take multiple photos of the same scene at different exposures (e.g., -2, 0, +2 stops).
- Merge the photos using HDR software.
- Adjust the settings to achieve the desired look.
6.7. Panorama Stitching
Panorama stitching combines multiple photos to create a wide, seamless panoramic image.
- Software: Adobe Photoshop, PTGui
- Steps:
- Take multiple overlapping photos of the scene.
- Use panorama stitching software to align and blend the photos.
- Crop and adjust the final image.
7. What Are The Best Third-Party Photo Editing Apps For MacBook Air?
The best third-party photo editing apps for MacBook Air include Adobe Photoshop, Adobe Lightroom, Affinity Photo, and Capture One, each offering unique features and capabilities for professional photo editing. Selecting the right app depends on your specific needs and skill level.
7.1. Adobe Photoshop
- Overview: The industry-standard for professional photo editing, offering extensive tools for retouching, compositing, and graphic design.
- Pros:
- Comprehensive feature set
- Advanced layer-based editing
- Extensive plugin support
- Cons:
- Subscription-based pricing
- Steep learning curve
7.2. Adobe Lightroom
- Overview: Designed for photo organization and post-processing, with a focus on non-destructive editing and batch processing.
- Pros:
- Excellent photo management tools
- Non-destructive editing workflow
- Preset system for quick adjustments
- Cons:
- Subscription-based pricing
- Less powerful than Photoshop for complex manipulations
7.3. Affinity Photo
- Overview: A powerful and affordable alternative to Photoshop, offering a comprehensive set of tools for photo editing, retouching, and digital painting.
- Pros:
- One-time purchase
- Professional-grade features
- Non-destructive editing
- Cons:
- Fewer plugins compared to Photoshop
- Less mature ecosystem
7.4. Capture One
- Overview: Known for its exceptional color handling and tethered shooting capabilities, Capture One is a favorite among professional photographers.
- Pros:
- Superior color processing
- Excellent tethered shooting
- Advanced editing tools
- Cons:
- Higher price point
- Steeper learning curve
7.5. Other Notable Apps
- Pixelmator Pro: A user-friendly photo editor with a clean interface and a good balance of features.
- GIMP (GNU Image Manipulation Program): A free and open-source photo editor with a wide range of tools and capabilities.
7.6. Comparison Table
| Feature | Adobe Photoshop | Adobe Lightroom | Affinity Photo | Capture One |
|---|---|---|---|---|
| Price | Subscription | Subscription | One-time | Subscription/One-time |
| Layer Editing | Excellent | Basic | Excellent | Basic |
| Photo Management | Limited | Excellent | Basic | Excellent |
| Color Processing | Good | Good | Good | Excellent |
| Retouching | Excellent | Good | Excellent | Good |
| Plugin Support | Extensive | Limited | Limited | Limited |
| Ease of Use | Complex | Moderate | Moderate | Complex |
8. How Do I Optimize My Photos For Social Media After Editing On My MacBook Air?
To optimize your photos for social media after editing on your MacBook Air, resize your images to the platform’s recommended dimensions, compress them to reduce file size without losing quality, and export them in the correct color profile (sRGB). These steps ensure your photos look their best and load quickly on social media platforms.
8.1. Resizing Images
- Why: Social media platforms have specific size recommendations. Resizing ensures your photos fit properly and load quickly.
- How:
- Determine the correct dimensions: Consult the platform’s guidelines for the recommended image sizes (e.g., Instagram, Facebook, Twitter).
- Resize in your photo editor:
- Photoshop: Go to “Image” > “Image Size” and enter the new dimensions.
- Lightroom: Use the “Export” settings to resize the image.
- Affinity Photo: Go to “Document” > “Resize” and enter the new dimensions.
- Maintain aspect ratio: Ensure the aspect ratio is maintained to avoid distortion.
8.2. Compressing Images
- Why: Large image files take longer to load, which can negatively impact user experience. Compression reduces file size without significant loss of quality.
- How:
- Use the “Save for Web” option:
- Photoshop: Go to “File” > “Export” > “Save for Web (Legacy)”.
- Adjust the quality settings to find a balance between file size and image quality.
- Adjust JPEG quality:
- A quality setting of 60-80% is usually sufficient for social media.
- Use compression tools:
- Online tools like TinyPNG or ImageOptim can further compress images.
- Use the “Save for Web” option:
8.3. Color Profile
- Why: Different color profiles can affect how colors appear on different devices. sRGB is the standard color profile for the web and ensures consistent color reproduction.
- How:
- Convert to sRGB:
- Photoshop: Go to “Edit” > “Convert to Profile” and choose “sRGB IEC61966-2.1”.
- Lightroom: Set the color space to “sRGB” in the “Export” settings.
- Affinity Photo: Go to “Document” > “Convert Format / ICC Profile” and choose “sRGB IEC61966-2.1”.
- Convert to sRGB:
8.4. Sharpening
- Why: Sharpening can help counteract the softening that occurs during resizing and compression.
- How:
- Apply sharpening as the last step: After resizing and compressing.
- Use the “Unsharp Mask” filter:
- Photoshop: Go to “Filter” > “Sharpen” > “Unsharp Mask”.
- Adjust the amount, radius, and threshold settings to achieve the desired sharpness.
8.5. File Format
- Why: JPEG is the most common file format for social media due to its small file size and wide compatibility.
- How:
- Save as JPEG:
- Ensure you are saving your images in JPEG format.
- Save as JPEG:
8.6. Platform-Specific Tips
- Instagram:
- Recommended size: 1080 pixels wide.
- Use a square aspect ratio for profile photos.
- Facebook:
- Recommended size: 1200 x 630 pixels for link images.
- Use high-resolution images for cover photos.
- Twitter:
- Recommended size: 1200 x 675 pixels for in-stream photos.
8.7. Practical Examples
- Scenario 1: Optimizing a Photo for Instagram: Resize the photo to 1080 pixels wide, compress it to under 500KB, convert it to sRGB, and apply a subtle sharpening effect.
- Scenario 2: Optimizing a Photo for Facebook: Resize the photo to 1200 x 630 pixels, compress it to under 1MB, and convert it to sRGB.
9. How Do I Back Up My Edited Photos On My MacBook Air?
Backing up your edited photos on your MacBook Air is crucial and can be done using Time Machine, iCloud Photos, or external hard drives to prevent data loss. Regular backups ensure that your precious memories and hard work are protected.
9.1. Time Machine
- Overview: Time Machine is Apple’s built-in backup solution that automatically backs up your entire system, including your photos.
- How:
- Connect an external hard drive: Connect an external hard drive to your MacBook Air.
- Enable Time Machine:
- Go to “System Preferences” > “Time Machine”.
- Select your external hard drive as the backup disk.
- Enable “Back Up Automatically”.
- Automatic Backups: Time Machine will automatically back up your files on a regular basis.
9.2. iCloud Photos
- Overview: iCloud Photos syncs your photo library across all your Apple devices and stores them securely in the cloud.
- How:
- Enable iCloud Photos:
- Go to “System Preferences” > “Apple ID” > “iCloud”.
- Enable “Photos”.
- Choose storage option:
- “Optimize Mac Storage”: Stores smaller versions of your photos on your Mac and downloads the full-resolution versions as needed.
- “Download Originals to this Mac”: Stores full-resolution versions of your photos on your Mac.
- Automatic Sync: Your photos will automatically sync to iCloud.
- Enable iCloud Photos:
9.3. External Hard Drives
- Overview: Manually backing up your photos to an external hard drive provides an additional layer of security.
- How:
- Connect an external hard drive: Connect an external hard drive to your MacBook Air.
- Copy your photo library:
- Locate your Photos library (usually in the “Pictures” folder).
- Drag and drop the Photos library to your external hard drive.
- Regular Backups: Make regular backups to keep your files up to date.
9.4. Cloud Storage Services
- Overview: Services like Google Photos, Dropbox, and OneDrive offer cloud storage for your photos.
- How:
- Install the app: Download and install the app for your chosen service.
- Upload your photos:
- Configure the app to automatically upload your photos.
- Manually upload your photos to the cloud.
9.5. NAS (Network Attached Storage)
- Overview: A NAS device is a dedicated storage device connected to your network, providing centralized storage for all your devices.
- How:
- Set up the NAS: Follow the manufacturer’s instructions to set up your NAS device.
- Copy your photo library:
- Copy your Photos library to the NAS device.
- Configure automatic backups: Use software like Carbon Copy Cloner to automate the backup process.
9.6. Backup Strategy
- 3-2-1 Rule: Follow the 3-2-1 rule for optimal data protection:
- 3 copies of your data: The original and two backups.
- 2 different storage media: Such as an external hard drive and cloud storage.
- 1 offsite copy: Stored in a different location to protect against physical disasters.
9.7. Practical Examples
- Scenario 1: Home User: Use Time Machine for daily backups, iCloud Photos for syncing across devices, and an external hard drive for an additional backup.
- Scenario 2: Professional Photographer: Use a NAS device for centralized storage, cloud storage for offsite backups, and Time Machine for system-level backups.
10. Where Can I Find More Resources And Tutorials For Photo Editing On MacBook Air?
You can find more resources and tutorials for photo editing on MacBook Air at dfphoto.net, which offers detailed guides, tips, and community support, as well as on Apple’s support pages, YouTube channels, and online learning platforms like Skillshare and Udemy. These resources cater to various skill levels and interests.
10.1. dfphoto.net
- Overview: A dedicated website offering articles, tutorials, and community support for photographers and photo editing enthusiasts.
- Content:
- Detailed Guides: Step-by-step tutorials on various photo editing techniques.
- Tips and Tricks: Practical advice for improving your editing skills.
- Community Forum: A platform for asking questions, sharing your work, and connecting with other photographers.
- Benefits:
- Expert advice tailored to different skill levels.
- A supportive community for sharing and learning.
- Regularly updated content to keep you informed about the latest trends and techniques.
10.2. Apple Support
- Overview: Apple’s official support website provides comprehensive documentation and tutorials for using the Photos app on MacBook Air.
- Content:
- User Guides: Detailed manuals explaining how to use all the features of the Photos app.
- Troubleshooting Articles: Solutions to common problems and issues.
- Video Tutorials: Step-by-step instructions for performing specific tasks.
- Benefits:
- Reliable and accurate information from the source.
- Easy-to-follow instructions with clear visuals.
- Free access to a wealth of knowledge.
10.3. YouTube Channels
- Overview: Numerous YouTube channels offer photo editing tutorials for MacBook Air, catering to different skill levels and interests.
- Channels:
- PiXimperfect: Advanced Photoshop tutorials and techniques.
- Phlearn: Comprehensive tutorials on Photoshop and Lightroom.
- Anthony Morganti: Lightroom tutorials and workflow tips.
- Peter McKinnon: Photography and editing tips with a focus on visual storytelling.
- Benefits:
- Visual learning with step-by-step demonstrations.
- A wide range of topics and skill levels covered.
- Free access to high-quality content.
10.4. Online Learning Platforms
- Overview: Platforms like Skillshare, Udemy, and Coursera offer structured courses on photo editing for MacBook Air.
- Courses:
- Skillshare: Offers a variety of photo editing classes, from beginner to advanced.
- Udemy: Provides a wide range of courses on Photoshop, Lightroom, and other photo editing software.
- Coursera: Offers university-level courses on digital photography and image editing.
- Benefits:
- Structured learning with clear objectives and assignments.
- Expert instructors with years of experience.
- Certification upon completion of courses.
10.5. Photography Communities and Forums
- Overview: Online communities and forums provide a platform for asking questions, sharing your work, and connecting with other photographers.
- Platforms:
- DPReview: A popular photography forum with discussions on equipment, techniques, and software.
- Photography Stack Exchange: A question-and-answer site for photographers.
- Reddit (r/photography): A community for sharing photos, asking questions, and discussing all things photography.
- Benefits:
- Access to a wealth of knowledge from experienced photographers.
- A supportive community for sharing your work and getting feedback.
- Opportunities to learn from others and improve your skills.
10.6. Books and Magazines
- Overview: Books and magazines offer in-depth knowledge and inspiration for photo editing on MacBook Air.
- Examples:
- “The Adobe Photoshop CC Book for Digital Photographers” by Scott Kelby: A comprehensive guide to using Photoshop for photo editing.
- “The Lightroom Book for Digital Photographers” by Scott Kelby: A detailed guide to using Lightroom for photo management and post-processing.
- “Popular Photography” magazine: A monthly magazine with articles on equipment, techniques, and inspiration.
- Benefits:
- In-depth knowledge and expert advice.
- Visual inspiration from stunning photography.
- A tangible resource for learning and reference.
Elevate your photo editing skills and create stunning visuals on your MacBook Air by exploring the resources at dfphoto.net. Discover detailed guides, connect with a vibrant community, and find the inspiration you need to unleash your creativity. Visit dfphoto.net today and transform your photography journey.