Editing a photo on MacBook can significantly enhance your images, transforming them into stunning visual narratives. At dfphoto.net, we provide you with the tools and knowledge to master photo editing, whether you’re an amateur enthusiast or a seasoned professional looking for advanced tips. Discover how to leverage the power of your MacBook to unlock your creative potential and bring your vision to life with professional photo manipulation and digital image enhancement techniques.
1. What Are The Basic Photo Editing Steps On A MacBook?
The basic steps for photo editing on a MacBook involve opening your photo in the Photos app, selecting the “Edit” button, and using the adjustment tools to modify aspects like exposure, contrast, and color. These initial steps allow you to quickly enhance the overall quality and feel of your images, making your photos visually appealing on the go.
Once you’ve opened your photo in the Photos app on your MacBook, you’ll find a suite of tools designed to make basic adjustments simple and intuitive. Here’s a breakdown of the steps:
-
Opening Your Photo: Double-click the photo in the Photos app or select it and press the Return key to open it in editing mode.
-
Selecting the Edit Button: In the upper-right corner, you’ll see the “Edit” button. Click this to access the editing tools.
-
Using the Adjustment Tools: The Photos app offers a range of adjustment tools, including:
- Light: Adjusts the overall exposure, brightness, contrast, highlights, and shadows.
- Color: Modifies saturation, vibrance, and color cast to enhance or correct colors.
- Black & White: Converts the photo to black and white with customizable intensity and tone.
- Retouch: Removes blemishes or imperfections in the photo.
- Filters: Applies preset filter effects to quickly change the look and feel of the photo.
- Crop: Allows you to crop, straighten, and adjust the perspective of the photo.
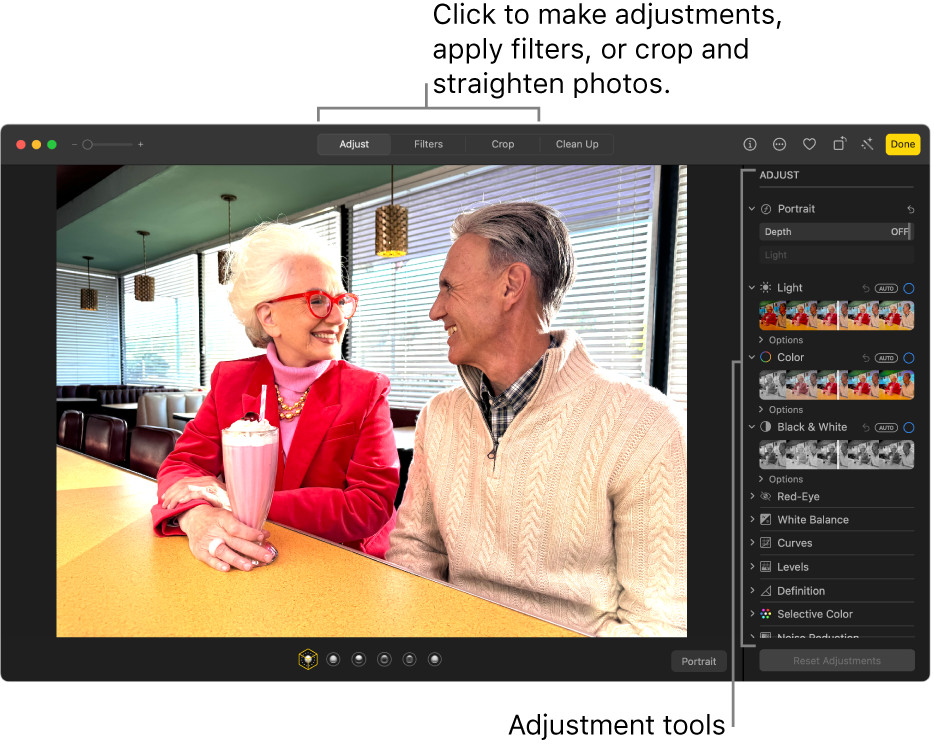 The Photos app interface on a Macbook, showcasing the adjustment tools like Light, Color, and Black & White
Remember, the Photos app on your MacBook keeps the original image intact, so you can always revert to the original if you’re not happy with your changes. According to the Santa Fe University of Art and Design’s Photography Department, beginners often find it helpful to experiment with small adjustments and observe how each tool affects the photo. This hands-on approach can significantly improve your editing skills over time.
2. Which Photo Editing Software Is Best For MacBooks?
The best photo editing software for MacBooks include Adobe Photoshop, Adobe Lightroom, and Capture One for professional use, as well as Affinity Photo and Pixelmator Pro for excellent alternatives that balance power and affordability. For those seeking user-friendly and free options, GIMP and the built-in Photos app are great starting points.
Each software offers a unique set of features and caters to different skill levels and needs. Here’s a more detailed look:
-
Adobe Photoshop: Photoshop is the industry standard for professional photo editing, offering a comprehensive suite of tools for retouching, compositing, and graphic design. It supports layers, masks, and a wide range of filters and effects. However, it comes with a subscription fee.
- Pros: Extensive features, industry-standard, powerful retouching capabilities.
- Cons: Expensive subscription, steep learning curve.
-
Adobe Lightroom: Lightroom is designed specifically for photographers, focusing on photo management and non-destructive editing. It excels in color correction, batch processing, and organization. Like Photoshop, it also requires a subscription.
- Pros: Excellent for photo organization, non-destructive editing, powerful color correction tools.
- Cons: Subscription-based, less versatile than Photoshop for graphic design.
-
Capture One: Capture One is another professional-grade photo editor known for its exceptional color handling and tethered shooting capabilities. It’s a favorite among studio photographers.
- Pros: Superior color handling, tethered shooting, advanced editing tools.
- Cons: High cost, complex interface.
-
Affinity Photo: Affinity Photo is a powerful and affordable alternative to Photoshop, offering a similar range of features for a one-time purchase. It supports layers, masks, and advanced editing techniques.
- Pros: One-time purchase, professional-grade features, excellent value for money.
- Cons: Lacks some of the advanced features of Photoshop.
-
Pixelmator Pro: Pixelmator Pro is a Mac-exclusive photo editor that combines ease of use with powerful features. It uses machine learning to enhance editing tasks and offers a sleek, intuitive interface.
- Pros: User-friendly interface, machine learning enhancements, Mac-exclusive.
- Cons: Limited compatibility with other platforms.
-
GIMP (GNU Image Manipulation Program): GIMP is a free, open-source photo editor that offers a wide range of features comparable to Photoshop. It’s a great option for those who don’t want to pay for software.
- Pros: Free and open-source, extensive features, customizable.
- Cons: Steeper learning curve than some other options, interface can be clunky.
-
Photos App (Built-in): The Photos app that comes with macOS provides basic editing tools for quick and simple adjustments. It’s perfect for beginners and everyday photo enhancements.
- Pros: Free, easy to use, integrated with macOS.
- Cons: Limited features compared to professional software.
Choosing the right software depends on your specific needs and budget. If you’re a professional photographer, Adobe Photoshop, Adobe Lightroom, or Capture One might be the best choice. If you’re looking for an affordable alternative, Affinity Photo or Pixelmator Pro could be a great fit. And if you’re just starting out or need a free option, GIMP or the built-in Photos app are excellent choices. According to Popular Photography, investing time in learning the ins and outs of your chosen software can significantly improve your editing efficiency and the quality of your final images.
3. How Do You Adjust Exposure On A MacBook Photo?
To adjust exposure on a MacBook photo, open the image in the Photos app, click “Edit,” select the “Light” adjustment, and then use the “Exposure” slider to brighten or darken the image. Fine-tune further with “Highlights,” “Shadows,” “Brightness,” and “Contrast” sliders for optimal results.
Adjusting exposure is one of the fundamental steps in photo editing, and the Photos app on your MacBook provides several tools to help you achieve the perfect balance. Here’s a more detailed guide:
-
Open the Image: Double-click the photo in the Photos app or select it and press Return to open it in editing mode.
-
Click “Edit”: In the upper-right corner, click the “Edit” button to access the editing tools.
-
Select the “Light” Adjustment: In the Adjust section, click on “Light.” This will open a panel with several sliders related to exposure and lighting.
-
Use the “Exposure” Slider: The “Exposure” slider is the primary tool for adjusting the overall brightness of the image. Drag the slider to the right to brighten the image and to the left to darken it.
-
Fine-Tune with Other Sliders:
- Highlights: Adjusts the brightness of the brightest parts of the image. Use this to recover detail in blown-out highlights or to add more brightness to bright areas.
- Shadows: Adjusts the brightness of the darkest parts of the image. Use this to reveal detail in dark shadows or to darken shadowy areas.
- Brightness: Affects the overall brightness of the image, similar to the “Exposure” slider but with a slightly different algorithm.
- Contrast: Adjusts the difference between the bright and dark areas of the image. Increasing contrast can make the image appear more dynamic, while decreasing it can soften the image.
Remember to make small adjustments and observe how each slider affects the overall image. Overdoing it with any of these sliders can result in an unnatural-looking photo. According to professional photographers at dfphoto.net, it’s often better to make subtle adjustments across multiple sliders to achieve a balanced and natural result. For example, if you increase the exposure, you might also need to reduce the highlights to prevent them from being overexposed.
4. Can I Edit RAW Files On A MacBook?
Yes, you can edit RAW files on a MacBook using various software options like Adobe Photoshop, Adobe Lightroom, Capture One, Affinity Photo, and Pixelmator Pro. These programs offer the necessary tools to process and enhance RAW files, preserving the maximum amount of detail and dynamic range.
RAW files are unprocessed data captured directly from your camera’s sensor. They contain significantly more information than JPEG files, allowing for greater flexibility and control during editing. Here’s how different software options handle RAW files on a MacBook:
-
Adobe Photoshop: Photoshop’s Camera Raw plugin allows you to open and edit RAW files. It provides a wide range of adjustments, including exposure, white balance, contrast, and color correction.
- Pros: Industry-standard, extensive features for RAW processing.
- Cons: Requires a subscription, can be complex for beginners.
-
Adobe Lightroom: Lightroom is specifically designed for photographers and excels at RAW processing. It offers non-destructive editing, batch processing, and powerful color correction tools.
- Pros: Excellent for photo organization, non-destructive editing, powerful color correction tools.
- Cons: Subscription-based, less versatile than Photoshop for graphic design.
-
Capture One: Capture One is renowned for its exceptional RAW processing capabilities, especially its color handling. It’s a favorite among professional photographers for its precise control over RAW files.
- Pros: Superior color handling, advanced editing tools, precise control over RAW files.
- Cons: High cost, complex interface.
-
Affinity Photo: Affinity Photo provides robust RAW processing tools as part of its comprehensive feature set. It supports layers, masks, and advanced editing techniques for RAW files.
- Pros: One-time purchase, professional-grade features, excellent value for money.
- Cons: Lacks some of the advanced features of Photoshop and Lightroom.
-
Pixelmator Pro: Pixelmator Pro offers RAW support with its sleek and intuitive interface. It uses machine learning to enhance RAW processing and provides a user-friendly experience.
- Pros: User-friendly interface, machine learning enhancements, Mac-exclusive.
- Cons: Limited compatibility with other platforms.
When editing RAW files, it’s important to take advantage of the additional information they contain. Here are some tips for RAW editing on a MacBook:
- Adjust White Balance: Use the white balance tools to correct any color casts and ensure accurate colors.
- Correct Exposure: Adjust the exposure to bring out details in the highlights and shadows.
- Reduce Noise: RAW files can sometimes contain noise, especially at high ISO settings. Use noise reduction tools to minimize noise without sacrificing detail.
- Sharpening: Apply sharpening to enhance the details and make the image appear crisper.
- Color Correction: Use color correction tools to adjust the saturation, vibrance, and hue of individual colors.
According to experts at dfphoto.net, editing RAW files can significantly improve the quality of your photos, allowing you to achieve results that are simply not possible with JPEG files. By using the right software and techniques, you can unlock the full potential of your RAW images and create stunning photographs.
5. How Can I Crop And Straighten Photos On A MacBook?
You can crop and straighten photos on a MacBook using the Photos app by opening the image, clicking “Edit,” selecting the “Crop” tool, and then adjusting the crop area and using the angle slider to straighten the photo. This ensures better composition and alignment.
Cropping and straightening are essential editing techniques for improving the composition and visual appeal of your photos. Here’s a detailed guide on how to do it using the Photos app on your MacBook:
-
Open the Image: Double-click the photo in the Photos app or select it and press Return to open it in editing mode.
-
Click “Edit”: In the upper-right corner, click the “Edit” button to access the editing tools.
-
Select the “Crop” Tool: In the Adjust section, click on “Crop.” This will open the crop tool interface.
-
Adjust the Crop Area:
- Drag the Corners: Click and drag the corners of the crop area to adjust the size and position of the crop.
- Use Preset Aspect Ratios: The Photos app offers several preset aspect ratios, such as 1:1, 4:3, 3:2, and 16:9. You can select these from the Aspect Ratio menu to crop your photo to a specific shape.
- Freeform Crop: If you want to crop without any constraints, choose the “Original” aspect ratio or select “Custom” to enter your own dimensions.
-
Straighten the Photo:
- Use the Angle Slider: In the Crop tool interface, you’ll find an angle slider. Click and drag this slider to rotate the photo and straighten it.
- Automatic Straightening: The Photos app also offers an automatic straightening feature. Click the “Auto” button to have the app automatically detect and correct the horizon.
-
Adjust Perspective (Optional):
- Vertical and Horizontal Adjustments: Some versions of the Photos app may also offer perspective adjustment tools. These allow you to correct converging lines and adjust the vertical and horizontal perspective of the photo.
When cropping and straightening photos, keep the following tips in mind:
- Composition: Use the rule of thirds to create a more balanced and visually appealing composition.
- Horizon: Make sure the horizon is level to avoid a tilted look.
- Perspective: Correct any converging lines to make buildings and other structures appear straight.
According to photography experts at dfphoto.net, cropping and straightening can transform a mediocre photo into a great one. By paying attention to composition, alignment, and perspective, you can significantly improve the visual impact of your images.
6. What Are The Best Ways To Adjust Color In Photos On MacBooks?
The best ways to adjust color in photos on MacBooks involve using the “Color” adjustment tool in the Photos app to modify saturation, contrast, and color cast, or utilizing more advanced software like Adobe Lightroom or Capture One for precise color grading and calibration.
Adjusting color is a crucial aspect of photo editing, allowing you to enhance the mood, correct inaccuracies, and create a consistent look across your images. Here’s a breakdown of the best ways to adjust color in photos on MacBooks:
-
Using the Photos App: The Photos app on your MacBook provides basic color adjustment tools that are easy to use and perfect for quick enhancements.
- Open the Image: Double-click the photo in the Photos app or select it and press Return to open it in editing mode.
- Click “Edit”: In the upper-right corner, click the “Edit” button to access the editing tools.
- Select the “Color” Adjustment: In the Adjust section, click on “Color.” This will open a panel with several sliders related to color.
- Adjust Saturation: The Saturation slider controls the intensity of the colors in the image. Drag it to the right to increase saturation and make the colors more vibrant, or to the left to decrease saturation and make the colors more muted.
- Adjust Contrast: The Contrast slider adjusts the difference between the bright and dark areas of the colors in the image. Increasing contrast can make the colors appear more distinct, while decreasing it can soften the colors.
- Adjust Color Cast: The Color Cast adjustment allows you to correct any overall color tint in the image. Use the eyedropper tool to select a neutral area in the photo, and the app will automatically adjust the colors to remove the tint.
-
Using Adobe Lightroom: Lightroom offers more advanced color adjustment tools, including color grading, HSL (Hue, Saturation, Luminance) adjustments, and camera calibration.
- Color Grading: The Color Grading panel allows you to adjust the colors in the shadows, midtones, and highlights separately, giving you precise control over the overall color palette of the image.
- HSL Adjustments: The HSL panel allows you to adjust the hue, saturation, and luminance of individual colors. This is useful for fine-tuning specific colors and creating a consistent look across your images.
- Camera Calibration: The Camera Calibration panel allows you to calibrate the colors of your camera to ensure accurate color reproduction. This is especially important for professional photographers who need to maintain consistent colors across different shoots.
-
Using Capture One: Capture One is renowned for its exceptional color handling capabilities. It offers advanced color editing tools, including color balance, color editor, and film grain.
- Color Balance: The Color Balance tool allows you to adjust the colors in the shadows, midtones, and highlights separately, similar to Lightroom’s Color Grading panel.
- Color Editor: The Color Editor allows you to adjust the hue, saturation, and lightness of individual colors with even greater precision than Lightroom’s HSL panel.
- Film Grain: The Film Grain tool allows you to add a subtle film grain effect to your images, giving them a more organic and vintage look.
According to color correction specialists at dfphoto.net, understanding color theory and how different colors interact with each other is essential for effective color editing. By mastering the color adjustment tools in your chosen software, you can transform your photos and create stunning visual effects.
7. How Do I Remove Blemishes And Imperfections On A MacBook?
To remove blemishes and imperfections on a MacBook, use the “Retouch” tool in the Photos app or the “Healing Brush” tool in Adobe Photoshop. These tools allow you to seamlessly blend the surrounding pixels over the blemish, creating a smoother and more natural appearance.
Removing blemishes and imperfections is a common task in photo editing, especially for portraits and product photography. Here’s a detailed guide on how to do it using the Photos app and Adobe Photoshop on a MacBook:
-
Using the Photos App: The Photos app on your MacBook provides a simple and effective “Retouch” tool for removing blemishes.
- Open the Image: Double-click the photo in the Photos app or select it and press Return to open it in editing mode.
- Click “Edit”: In the upper-right corner, click the “Edit” button to access the editing tools.
- Select the “Retouch” Tool: In the Adjust section, click on “Retouch.” This will open the retouch tool interface.
- Adjust the Brush Size: Use the slider to adjust the size of the retouch brush. Make sure the brush is slightly larger than the blemish you want to remove.
- Click on the Blemish: Click on the blemish to remove it. The Photos app will automatically blend the surrounding pixels over the blemish, creating a smoother appearance.
- Repeat as Needed: Repeat the process for any other blemishes or imperfections you want to remove.
-
Using Adobe Photoshop: Photoshop offers more advanced tools for removing blemishes, including the “Healing Brush” tool and the “Clone Stamp” tool.
- Healing Brush Tool: The Healing Brush tool is similar to the retouch tool in the Photos app, but it offers more control over the blending process.
- Select the Healing Brush Tool: In the toolbar, select the Healing Brush tool (it looks like a bandage).
- Adjust the Brush Size: In the options bar at the top of the screen, adjust the size of the healing brush.
- Set the Source: Hold down the Option key (Alt key on Windows) and click on a clean area of the image near the blemish. This sets the source point for the healing brush.
- Click on the Blemish: Click on the blemish to remove it. Photoshop will blend the pixels from the source point over the blemish, creating a seamless repair.
- Clone Stamp Tool: The Clone Stamp tool allows you to manually copy pixels from one area of the image to another. This is useful for removing larger blemishes or imperfections.
- Select the Clone Stamp Tool: In the toolbar, select the Clone Stamp tool (it looks like a rubber stamp).
- Adjust the Brush Size and Hardness: In the options bar at the top of the screen, adjust the size and hardness of the clone stamp brush.
- Set the Source: Hold down the Option key (Alt key on Windows) and click on a clean area of the image near the blemish. This sets the source point for the clone stamp.
- Paint Over the Blemish: Click and drag over the blemish to paint over it with the pixels from the source point.
- Healing Brush Tool: The Healing Brush tool is similar to the retouch tool in the Photos app, but it offers more control over the blending process.
According to retouching experts at dfphoto.net, the key to successful blemish removal is to use a light touch and avoid over-editing. It’s often better to leave a few minor imperfections than to create a plastic or unnatural-looking result.
8. What Are The Best Photo Editing Apps For MacBook For Beginners?
The best photo editing apps for MacBooks for beginners include the built-in Photos app, Pixelmator Pro, and Luminar AI. These apps offer intuitive interfaces, essential editing tools, and user-friendly features that make it easy for beginners to enhance their photos.
Choosing the right photo editing app can be overwhelming, especially for beginners. Here’s a detailed look at some of the best options for MacBooks, focusing on their ease of use and beginner-friendly features:
-
Photos App (Built-in): The Photos app that comes with macOS is an excellent starting point for beginners. It provides a simple and intuitive interface with essential editing tools for quick and easy enhancements.
- Pros: Free, easy to use, integrated with macOS, non-destructive editing.
- Cons: Limited features compared to professional software.
- Key Features for Beginners:
- Auto Enhance: Automatically improves the overall look of the photo with a single click.
- Basic Adjustments: Sliders for adjusting light, color, and sharpness.
- Crop and Straighten: Tools for cropping and straightening photos.
- Filters: A selection of preset filters for quickly changing the look and feel of the photo.
-
Pixelmator Pro: Pixelmator Pro is a Mac-exclusive photo editor that combines ease of use with powerful features. It uses machine learning to enhance editing tasks and offers a sleek, intuitive interface.
- Pros: User-friendly interface, machine learning enhancements, Mac-exclusive, one-time purchase.
- Cons: Limited compatibility with other platforms.
- Key Features for Beginners:
- Intuitive Interface: A clean and modern interface that’s easy to navigate.
- Machine Learning Enhancements: AI-powered tools for automatically improving photos.
- Color Adjustments: Easy-to-use color adjustment tools with real-time previews.
- Templates and Effects: A wide range of templates and effects for quickly creating stunning images.
-
Luminar AI: Luminar AI is designed to make photo editing easy and accessible for everyone. It uses artificial intelligence to analyze photos and suggest the best edits, making it perfect for beginners.
- Pros: AI-powered editing, easy to use, one-time purchase option.
- Cons: Relies heavily on AI, which may not always produce the desired results.
- Key Features for Beginners:
- AI-Powered Tools: Automatically analyzes photos and suggests the best edits.
- Templates: A variety of preset templates for quickly changing the look of the photo.
- Sky Replacement: Easily replace the sky in your photos with a more dramatic one.
- Portrait Enhancements: AI-powered tools for enhancing portraits, such as skin smoothing and eye brightening.
When choosing a photo editing app for beginners, consider the following factors:
- Ease of Use: Look for an app with an intuitive interface and easy-to-understand tools.
- Essential Features: Make sure the app includes essential editing tools such as exposure adjustment, color correction, cropping, and sharpening.
- Tutorials and Support: Check if the app offers tutorials, documentation, or customer support to help you learn how to use it.
According to photography educators at dfphoto.net, starting with a beginner-friendly app can help you build a solid foundation in photo editing. As you gain experience, you can then move on to more advanced software like Adobe Photoshop or Lightroom.
9. How Can I Batch Edit Photos On A MacBook?
You can batch edit photos on a MacBook using Adobe Lightroom or the Automator app. Lightroom allows you to apply the same adjustments to multiple photos simultaneously, while Automator lets you create custom workflows for batch processing tasks like resizing or renaming.
Batch editing is a time-saving technique that allows you to apply the same adjustments to multiple photos at once. This is especially useful when you have a large number of photos from the same shoot that need similar edits. Here’s how to batch edit photos on a MacBook using Adobe Lightroom and the Automator app:
-
Using Adobe Lightroom: Lightroom is specifically designed for photographers and offers powerful batch editing capabilities.
- Import Photos: Import the photos you want to batch edit into Lightroom.
- Edit One Photo: Select one photo and apply the desired adjustments, such as exposure, color correction, and sharpening.
- Copy Edits: Select the edited photo and choose “Edit” > “Copy” or press Command+C.
- Select Multiple Photos: Select the other photos you want to apply the edits to. You can select multiple photos by clicking on the first photo, holding down the Shift key, and clicking on the last photo.
- Paste Edits: Choose “Edit” > “Paste” or press Command+V. Lightroom will apply the same adjustments to all the selected photos.
- Sync Settings (Alternative): Alternatively, you can use the “Sync” feature to synchronize the settings from one photo to multiple photos.
- Select the edited photo and the other photos you want to apply the edits to.
- Click the “Sync” button in the Develop module.
- Choose the settings you want to synchronize and click “Synchronize.”
-
Using Automator App: The Automator app that comes with macOS allows you to create custom workflows for batch processing tasks such as resizing, renaming, and converting files.
- Open Automator: Open the Automator app from the Applications folder.
- Create a New Workflow: Choose “Workflow” as the type of document.
- Add Actions: Drag and drop actions from the Library pane into the workflow pane.
- Get Specified Finder Items: Add the “Get Specified Finder Items” action and add the photos you want to batch edit.
- Copy Finder Items: Add the “Copy Finder Items” action to create a backup of the original photos.
- Rename Finder Items: Add the “Rename Finder Items” action to rename the photos.
- Change Type of Images: Add the “Change Type of Images” action to convert the photos to a different file format.
- Scale Images: Add the “Scale Images” action to resize the photos.
- Run the Workflow: Click the “Run” button to start the batch processing.
According to workflow automation experts at dfphoto.net, batch editing can save you a significant amount of time and effort, especially when dealing with large numbers of photos. By using the right software and techniques, you can streamline your photo editing workflow and focus on the creative aspects of photography.
10. How Do I Sharpen Images On A MacBook?
To sharpen images on a MacBook, use the “Sharpness” slider in the Photos app or the “Sharpening” tools in Adobe Photoshop. Adjust the settings carefully to enhance details without introducing unwanted artifacts or noise.
Sharpening is an essential step in photo editing that enhances the details and makes the image appear crisper. However, it’s important to use sharpening judiciously, as over-sharpening can introduce unwanted artifacts and noise. Here’s how to sharpen images on a MacBook using the Photos app and Adobe Photoshop:
-
Using the Photos App: The Photos app on your MacBook provides a simple “Sharpness” slider for basic sharpening.
- Open the Image: Double-click the photo in the Photos app or select it and press Return to open it in editing mode.
- Click “Edit”: In the upper-right corner, click the “Edit” button to access the editing tools.
- Select the “Sharpness” Slider: In the Adjust section, find the “Sharpness” slider.
- Adjust the Sharpness: Drag the slider to the right to increase sharpness. Start with small adjustments and gradually increase the sharpness until you achieve the desired result. Be careful not to over-sharpen the image.
-
Using Adobe Photoshop: Photoshop offers more advanced sharpening tools, including the “Unsharp Mask” filter and the “Smart Sharpen” filter.
- Unsharp Mask Filter: The Unsharp Mask filter is a classic sharpening tool that enhances the edges in the image.
- Select the Layer: Select the layer you want to sharpen.
- Apply the Unsharp Mask Filter: Choose “Filter” > “Sharpen” > “Unsharp Mask.”
- Adjust the Settings: In the Unsharp Mask dialog box, adjust the following settings:
- Amount: Controls the amount of sharpening. Start with a low value (e.g., 50%) and gradually increase it until you achieve the desired result.
- Radius: Controls the size of the edges that are sharpened. A smaller radius (e.g., 1 pixel) is suitable for fine details, while a larger radius (e.g., 2-3 pixels) is better for larger areas.
- Threshold: Controls the minimum amount of contrast that is required for sharpening to occur. A lower threshold (e.g., 0) will sharpen all edges, while a higher threshold (e.g., 4-5) will only sharpen the most prominent edges.
- Smart Sharpen Filter: The Smart Sharpen filter is a more advanced sharpening tool that offers more control over the sharpening process.
- Select the Layer: Select the layer you want to sharpen.
- Apply the Smart Sharpen Filter: Choose “Filter” > “Sharpen” > “Smart Sharpen.”
- Adjust the Settings: In the Smart Sharpen dialog box, adjust the following settings:
- Amount: Controls the amount of sharpening.
- Radius: Controls the size of the edges that are sharpened.
- Reduce Noise: Reduces noise in the sharpened image.
- Remove: Choose the type of blur you want to remove (e.g., Gaussian Blur, Lens Blur, Motion Blur).
- Unsharp Mask Filter: The Unsharp Mask filter is a classic sharpening tool that enhances the edges in the image.
According to image sharpening experts at dfphoto.net, the key to successful sharpening is to use the right tool for the job and to adjust the settings carefully. It’s often better to apply multiple small sharpening adjustments than to apply one large adjustment. Also, remember to view the image at 100% zoom to accurately assess the sharpness.
FAQ: Editing Photo on Macbook
1. How Do I Revert To The Original Photo After Editing On My Macbook?
To revert to the original photo after editing on your MacBook, open the image in the Photos app, click “Edit,” and then select “Revert to Original.” This will discard all your edits and restore the photo to its original state.
2. Can I Use Keyboard Shortcuts For Photo Editing On A Macbook?
Yes, you can use keyboard shortcuts for photo editing on a MacBook. In the Photos app, Command-Z undoes the last change, Command-Shift-Z redoes a change, and holding M shows the original image. Adobe Photoshop and Lightroom have extensive customizable shortcuts.
3. How Do I Adjust The White Balance Of A Photo On My Macbook?
To adjust the white balance of a photo on your MacBook, open the image in the Photos app, click “Edit,” select “White Balance,” and use the eyedropper tool to click on a neutral area in the photo. Alternatively, use the sliders to manually adjust the white balance.
4. What Is The Best Way To Backup My Edited Photos On A Macbook?
The best ways to back up your edited photos on a MacBook include using Time Machine, iCloud Photos, or external hard drives. Time Machine automatically backs up your entire system, including your photos, while iCloud Photos syncs your photos across all your Apple devices.
5. How Do I Reduce Noise In My Photos When Editing On A Macbook?
To reduce noise in your photos when editing on a MacBook, use the noise reduction tools in Adobe Photoshop, Lightroom, or other photo editing software. These tools help minimize noise without sacrificing too much detail.
6. Can I Use Third-Party Photo Editing Extensions With The Photos App On My Macbook?
Yes, you can use third-party photo editing extensions with the Photos app on your MacBook. Download and install the extensions from the Mac App Store, then enable them in the Photos app by clicking “Edit” and selecting “Extensions.”
7. How Do I Export My Edited Photos From The Photos App On My Macbook?
To export your edited photos from the Photos app on your MacBook, select the photos, click “File,” choose “Export,” and then select “Export [Number] Photos.” Choose your desired file format, quality, and size, and then click “Export.”
8. What File Format Should I Use When Saving Edited Photos On My Macbook?
When saving edited photos on your MacBook, use JPEG for general use and sharing, TIFF for high-quality printing and archiving, and PNG for images with transparency.
9. How Can I Calibrate My Macbook’s Display For Accurate Photo Editing?
To calibrate your MacBook’s display for accurate photo editing, use the built-in Display Calibrator Assistant in System Preferences > Displays > Color. For more precise calibration, consider using a dedicated display calibration tool.
10. How Do I Add Watermarks To My Photos On A Macbook?
To add watermarks to your photos on a MacBook, use Adobe Photoshop, Lightroom, or other photo editing software that supports watermarking. Create a watermark image or text, and then add it to your photos during the export process.
Discover a world of photographic possibilities at dfphoto.net! Dive into our extensive guides, learn from stunning photo collections, and become part of a vibrant photography community. Ready to take your photography skills to the next level? Visit dfphoto.net today and start your journey toward photographic excellence. Address: 1600 St Michael’s Dr, Santa Fe, NM 87505, United States. Phone: +1 (505) 471-6001. Website: dfphoto.net.