Are you looking for information on How To Edit A Photo On Instagram After Posting, exploring photo editing techniques and visual storytelling? At dfphoto.net, we’ll guide you through what you can change and offer tips to prevent errors, helping you present your photos in the best possible light. Discover creative inspiration and image enhancement strategies to create compelling visual content. Learn more about photo enhancements, image alterations and digital retouching.
1. Editing Captions, Locations, and Tags on Instagram: A Step-by-Step Guide
Need to fix a typo, update your location, or add missing tags? Here’s how to edit your Instagram caption, location, and tags with ease.
 Edit Instagram caption by tapping the three dots on the right
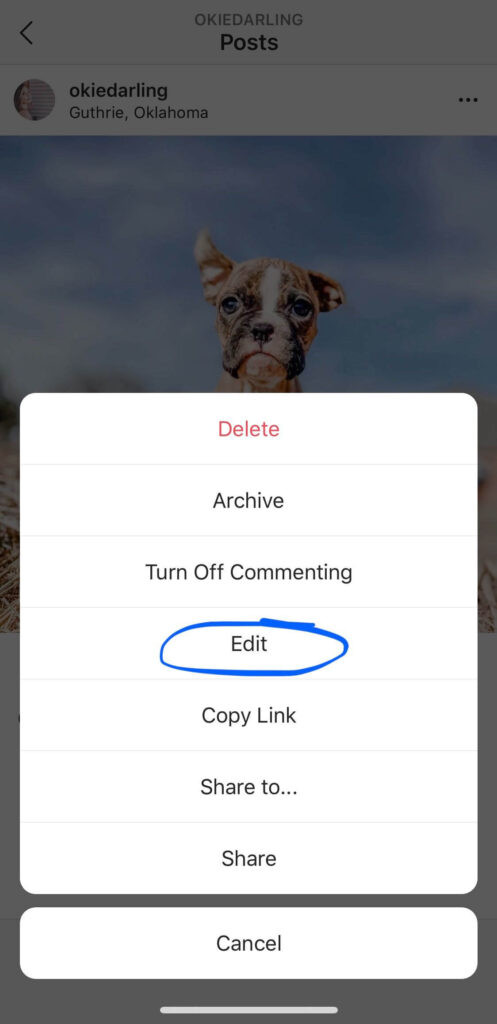
- Navigate to the Photo: Find the Instagram photo you wish to modify.
- Access the Edit Menu: Tap the three dots located at the top right corner of the photo.
- Select Edit: From the drop-down menu that appears, tap Edit.
 Select edit option from the drop-down menu to change the Instagram caption
- Modify Details: You can now alter various details:
- Instagram Photo Tags: Located at the bottom left.
- Instagram Alt Text: Positioned at the bottom right.
- Location: Found at the top left.
- Caption: Edit the text below your image.
- Finalize Changes: Once you’re satisfied, press Done (iOS) or the checkmark (Android) to save your edits.
 Edit your Instagram post information, including caption, tags, location and Alt Text, then click done
1.1. Caption Formatting Tips and Tricks
Have you ever posted a caption only to find it’s a solid block of text? Here’s how to add spaces and line breaks effectively.
To add spaces to your caption, hit the return key after each paragraph. Ensure that you remove any hidden spaces after punctuation at the end of your sentences, or Instagram may ignore your line break. You might even need to remove an emoji at the end of your sentence for it to work properly.
According to a study by the Santa Fe University of Art and Design’s Photography Department, effective caption formatting significantly increases audience engagement by making the content more readable and visually appealing.
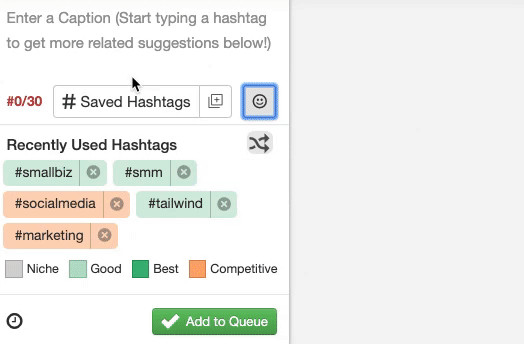
Tailwind for Instagram includes a caption tool that allows you to add captions and choose emojis effortlessly from the Emoji Picker keyboard. It also automatically removes the extra space that often appears after an emoji, preserving your line breaks unless you intentionally add a space at the end of the line. Consider trying a free trial of Tailwind for Instagram to see how it simplifies your caption formatting.
2. Photo Editing Limitations on Instagram After Posting
Can you change the filter, crop, or make other adjustments to your photo once it’s live? Unfortunately, Instagram does not support editing photos after they have been posted. You must get it right the first time.
2.1. The Best Course of Action: Delete and Re-Upload
If you find a mistake in your favorite photo after posting, the best solution is to delete the post and re-upload it. Before you do, copy and paste your caption to save your work and hashtags.
According to Popular Photography magazine, consistently editing your photos to maintain a high standard can significantly enhance your online presence and attract more followers.
2.2. Prevention is Key: Edit Thoroughly Before Posting
To minimize errors, thoroughly edit your Instagram photos before posting. Use apps like Adobe Lightroom or VSCO to perfect your images before they go live.
3. Adding Photos to Existing Instagram Posts: What’s Possible?
Can you add more photos to a carousel post after it’s already published? No, Instagram does not allow you to add photos to an existing post after it has been posted, a feature that is also unavailable in Facebook Creator Studio.
3.1. Handling Missed Photos: Re-uploading Carousels
If you missed a photo or video in your carousel post, delete or archive the post as quickly as possible and re-upload the complete, correct series. Double-check each frame before posting to avoid future errors.
3.2. The Importance of Reviewing Before Posting
Take the time to review each image and video before you post. Swipe through a few times to double-check your work and catch any mistakes before they go live.
4. Planning and Scheduling: Your Strategy for Error-Free Posts
One effective way to minimize mistakes is to plan and schedule your Instagram content in advance. This approach gives you more control and time to review your posts before they’re published.
4.1. Utilizing Tailwind for Instagram
Tailwind’s Instagram publishing tool lets you tag images, set locations, and format captions perfectly the first time. Plus, you can crop your photos and check how they’ll look in your feed with the 9-Grid preview tool.
 Animated image of Tailwind editing process
4.2. Ensuring Perfect Posts: From Locations to Hashtags
To create the perfect post, from locations to hashtags, consider signing up for a free trial of Tailwind for Instagram. You’ll have access to all pro features for 30 posts, with no credit card required.
5. Enhancing Your Instagram Presence: Advanced Editing Techniques
While Instagram’s built-in tools are useful, third-party apps offer more advanced capabilities for enhancing your photos before you post. These tools can help you fine-tune your images to meet your creative vision.
5.1. Adobe Lightroom Mobile
Adobe Lightroom Mobile is a powerful tool that allows you to make detailed adjustments to your photos. You can adjust the exposure, contrast, highlights, shadows, and colors to achieve the perfect look. Lightroom also offers preset filters that can be customized to suit your style.
5.2. VSCO
VSCO is another popular app for editing Instagram photos. It offers a wide range of filters and editing tools that can help you create unique and visually appealing images. VSCO also has a community where you can share your photos and get inspired by other photographers.
5.3. Snapseed
Snapseed, developed by Google, is a free photo editing app that offers a variety of powerful tools. It includes features like healing, brush, structure, HDR, and perspective correction. Snapseed is great for making precise edits and fixing imperfections in your photos.
6. Understanding Instagram’s Algorithm and How It Affects Your Edits
Instagram’s algorithm plays a significant role in how your posts are seen by your followers. Understanding how the algorithm works can help you optimize your content and increase your reach.
6.1. Factors Influencing the Algorithm
The Instagram algorithm considers several factors when determining which posts to show users, including:
- Interest: How interested the user is in the content.
- Recency: How recently the post was published.
- Relationship: The user’s relationship with the person posting.
- Frequency: How often the user opens Instagram.
- Following: How many people the user follows.
- Usage: How long the user spends on Instagram.
6.2. Optimizing Your Posts for the Algorithm
To optimize your posts for the Instagram algorithm, consider the following tips:
- Post Consistently: Regular posting keeps your audience engaged.
- Use Relevant Hashtags: Hashtags increase the visibility of your posts.
- Engage with Your Audience: Respond to comments and messages to build relationships.
- Post High-Quality Content: Visually appealing content is more likely to be shared.
- Use Instagram Stories: Stories can increase your overall engagement.
7. Visual Storytelling: Crafting Engaging Narratives Through Your Photos
Visual storytelling involves using your photos to create a narrative that resonates with your audience. This can be achieved through careful composition, editing, and captioning.
7.1. Composition Techniques
Effective composition is essential for creating visually compelling photos. Some common composition techniques include:
- Rule of Thirds: Dividing the image into thirds and placing key elements along these lines.
- Leading Lines: Using lines to guide the viewer’s eye through the image.
- Symmetry: Creating a sense of balance and harmony in the image.
- Framing: Using elements within the scene to frame the subject.
7.2. Color and Tone
Color and tone can significantly impact the mood and emotion of your photos. Experiment with different color palettes and tonal adjustments to create the desired effect.
- Warm Colors: Evoke feelings of happiness and energy.
- Cool Colors: Create a sense of calm and serenity.
- Contrast: Enhances the drama and impact of your images.
- Saturation: Controls the intensity of the colors in your photos.
8. Mastering Instagram Features for Enhanced Engagement
Instagram offers a variety of features that can help you enhance engagement with your audience. Mastering these features can significantly improve your overall Instagram presence.
8.1. Instagram Stories
Instagram Stories are a great way to share behind-the-scenes content and engage with your followers in real-time. Use features like polls, quizzes, and question stickers to encourage interaction.
8.2. Instagram Reels
Instagram Reels are short, engaging videos that can help you reach a wider audience. Use trending audio and creative editing techniques to create Reels that stand out.
8.3. Instagram Live
Instagram Live allows you to connect with your followers in real-time. Use Live to host Q&A sessions, share updates, or collaborate with other creators.
9. Photography Equipment: Choosing the Right Gear
Selecting the right photography equipment can significantly enhance the quality of your images. Whether you’re using a smartphone or a professional camera, understanding the capabilities of your gear is essential.
9.1. Smartphones
Modern smartphones offer impressive camera capabilities, making them a great option for casual photography. Look for smartphones with features like high resolution, optical image stabilization, and advanced processing capabilities.
9.2. DSLR and Mirrorless Cameras
DSLR and mirrorless cameras offer more control and flexibility than smartphones. These cameras allow you to change lenses, adjust settings manually, and capture higher-quality images.
9.3. Lenses
The lens you use can significantly impact the look and feel of your photos. Different lenses are designed for different purposes, such as wide-angle, telephoto, and macro photography.
- Wide-Angle Lenses: Capture a broad field of view, ideal for landscapes and architecture.
- Telephoto Lenses: Allow you to zoom in on distant subjects, great for wildlife and sports photography.
- Macro Lenses: Designed for close-up photography, perfect for capturing intricate details.
10. Protecting Your Photography: Copyright and Usage Rights
Protecting your photography is crucial to ensuring that your work is not used without your permission. Understanding copyright and usage rights can help you safeguard your images.
10.1. Copyright Basics
Copyright protects your original works of authorship, including photographs. As the creator of a photograph, you automatically own the copyright to that image.
10.2. Watermarking
Watermarking your photos can help prevent unauthorized use. A watermark is a visible overlay on your image that identifies you as the copyright holder.
10.3. Licensing
Licensing allows you to grant others permission to use your photos in exchange for compensation. Different types of licenses offer varying levels of usage rights.
11. Inspiring Photographers and Their Impact on Visual Culture
Throughout history, many photographers have significantly influenced visual culture. Studying their work can provide inspiration and insights into different photographic styles and techniques.
11.1. Ansel Adams
Ansel Adams was an American photographer known for his black-and-white landscape photographs of the American West. His work emphasized the beauty and grandeur of nature.
11.2. Annie Leibovitz
Annie Leibovitz is an American portrait photographer known for her iconic images of celebrities. Her work has appeared in magazines like Rolling Stone and Vanity Fair.
11.3. Steve McCurry
Steve McCurry is an American photojournalist known for his color photographs of people and cultures around the world. His most famous image is “Afghan Girl,” which appeared on the cover of National Geographic.
12. Photo Printing and Display: Bringing Your Images to Life
Printing and displaying your photos can bring your digital images to life. Different printing methods and display options can enhance the visual impact of your work.
12.1. Printing Methods
Various printing methods are available, each offering unique characteristics. Common printing methods include:
- Inkjet Printing: Uses liquid ink to create high-quality prints with vibrant colors.
- Laser Printing: Uses toner to create durable prints, ideal for black-and-white images.
- Dye-Sublimation Printing: Uses heat to transfer dye onto the paper, resulting in long-lasting prints.
12.2. Display Options
Different display options can complement your photos and enhance their visual appeal. Common display options include:
- Framed Prints: Provide a classic and elegant way to display your photos.
- Canvas Prints: Offer a modern and textured look, ideal for large-format images.
- Metal Prints: Create a sleek and contemporary display with vibrant colors and a glossy finish.
13. Exploring Photographic Genres: Finding Your Niche
Photography encompasses a wide range of genres, each with its unique characteristics and techniques. Exploring different genres can help you discover your niche and develop your photographic style.
13.1. Landscape Photography
Landscape photography captures the beauty of the natural world. Techniques include using wide-angle lenses, capturing golden hour light, and creating a sense of depth.
13.2. Portrait Photography
Portrait photography focuses on capturing the personality and essence of individuals. Techniques include using shallow depth of field, posing techniques, and capturing natural expressions.
13.3. Street Photography
Street photography captures candid moments in public places. Techniques include being discreet, observing human behavior, and capturing decisive moments.
14. The Future of Photography: Emerging Trends and Technologies
The field of photography is constantly evolving with new trends and technologies. Staying informed about these developments can help you stay ahead of the curve and enhance your photographic skills.
14.1. Artificial Intelligence
Artificial intelligence (AI) is increasingly being used in photography for tasks such as image recognition, automatic editing, and enhancing image quality.
14.2. Virtual Reality
Virtual reality (VR) is creating new opportunities for immersive photography experiences. VR photography allows viewers to explore scenes in a three-dimensional environment.
14.3. Computational Photography
Computational photography involves using software algorithms to enhance the capabilities of cameras. This includes techniques like HDR, panorama stitching, and depth mapping.
15. Photo Editing Software: Choosing the Right Tools
Selecting the right photo editing software can significantly impact the quality and efficiency of your editing workflow. Various software options are available, each with its unique features and capabilities.
15.1. Adobe Photoshop
Adobe Photoshop is a powerful and versatile photo editing software used by professionals and enthusiasts alike. It offers a wide range of tools for retouching, compositing, and enhancing images.
15.2. Adobe Lightroom
Adobe Lightroom is a popular photo editing software designed for managing and processing large volumes of images. It offers non-destructive editing, allowing you to make adjustments without altering the original file.
15.3. Capture One
Capture One is a professional photo editing software known for its advanced color editing capabilities and tethered shooting features. It’s a favorite among portrait and fashion photographers.
**FAQ: Editing Photos on Instagram
1. Can you edit an Instagram post after posting?
Yes, you can edit the caption, tags, and location of an Instagram post after it has been posted. However, you cannot edit the photo or video itself.
2. How do I edit the caption of an Instagram post?
To edit the caption, tap the three dots in the upper right corner of the post, select “Edit,” and then modify the caption as needed.
3. Can I add or remove tags from an Instagram post after posting?
Yes, you can add or remove tags by editing the post and tapping on the tag icon.
4. How do I change the location of an Instagram post?
You can change the location by editing the post and tapping on the current location. Then, search for the new location you want to add.
5. What if I want to change the filter on my Instagram post?
Unfortunately, Instagram does not allow you to change the filter on a post after it has been published. You would need to delete the post and re-upload it with the correct filter.
6. Can I add a photo to an existing carousel post on Instagram?
No, Instagram does not support adding photos to a carousel post after it has been posted.
7. Is there a way to edit the Alt Text on an Instagram photo after posting?
Yes, you can edit the Alt Text by editing the post and tapping on the Alt Text option.
8. What should I do if I notice a mistake in my Instagram post after it’s live?
If the mistake is in the caption, tags, or location, edit the post to correct it. If the mistake is in the photo itself, consider deleting and re-uploading the post.
9. How can I ensure my Instagram posts are error-free before publishing?
Plan and schedule your posts in advance, using tools like Tailwind to preview and perfect your content before it goes live.
10. Are there any third-party apps that allow me to edit Instagram photos after posting?
No, third-party apps cannot directly edit photos on Instagram after they have been posted due to Instagram’s API restrictions.
Ready to elevate your Instagram game? Visit dfphoto.net for more tips, tutorials, and inspiration to master the art of photography!
Address: 1600 St Michael’s Dr, Santa Fe, NM 87505, United States.
Phone: +1 (505) 471-6001
Website: dfphoto.net