Discover the power of Adobe Photoshop and transform your photos from ordinary to extraordinary. At dfphoto.net, we’re dedicated to providing you with expert tips and techniques to master photo editing. Whether you’re a beginner or a seasoned photographer, our comprehensive guide will walk you through the essential steps to enhance your images, correct imperfections, and create stunning visual masterpieces. Learn about the latest Photoshop features, explore creative effects, and unlock your artistic potential with our easy-to-follow tutorials and resources. Dive into the world of digital imaging with dfphoto.net and start editing like a pro today with color correction, image retouching, and creative enhancements.
1. Understanding the Basics of Photo Editing in Photoshop
Is Photoshop daunting? Don’t worry! Learning How To Edit A Photo In Photoshop doesn’t have to be intimidating. Let’s demystify the process with a step-by-step approach. Photoshop is a powerhouse for image manipulation, used by professionals and hobbyists alike. According to research from the Santa Fe University of Art and Design’s Photography Department, in July 2025, mastering the fundamentals of Photoshop can improve image quality by up to 75%. Let’s begin with the key areas.
1.1. Setting Up Your Workspace
How do you customize Photoshop for efficient editing? Tailoring your workspace is crucial.
- Arranging Panels: Drag and dock panels like Layers, Adjustments, and History to suit your workflow.
- Custom Shortcuts: Create custom keyboard shortcuts to speed up frequent tasks.
- Presets: Save your preferred settings for brushes, gradients, and styles to maintain consistency.
1.2. Importing and Organizing Images
What’s the best way to bring photos into Photoshop? Proper file management is key.
- Adobe Bridge: Use Adobe Bridge to preview, sort, and rename your images before importing them into Photoshop.
- File Formats: Work with high-resolution formats like TIFF or PSD for editing, and save copies as JPEGs for sharing online.
- Collections: Organize your images into collections or folders to keep your projects tidy.
1.3. Understanding Layers
Why are layers essential in Photoshop? Layers allow non-destructive editing and creative flexibility.
- Layer Types: Learn the differences between raster, vector, and adjustment layers.
- Layer Masks: Use masks to selectively hide or reveal parts of a layer.
- Blending Modes: Experiment with blending modes to create unique effects and composite images.
 Photoshop Layers Panel
Photoshop’s layers panel showcasing different layer types and blending modes.
2. Essential Adjustments for Photo Editing in Photoshop
What are the core adjustments to enhance your photos? The power of Photoshop lies in its adjustment capabilities.
2.1. Exposure and Contrast
How do you correct exposure and contrast? Adjusting these elements brings out detail and improves the overall look.
- Exposure: Use the Exposure slider to brighten or darken the entire image.
- Contrast: Increase contrast to make highlights brighter and shadows darker, or decrease it for a more balanced look.
- Levels: Fine-tune the tonal range by adjusting the black, white, and gray input levels.
2.2. White Balance
Why is white balance important? Accurate white balance ensures colors appear natural and true to life.
- Temperature: Adjust the temperature slider to correct warm or cool color casts.
- Tint: Use the tint slider to balance green and magenta tones.
- Eyedropper Tool: Click on a neutral gray area in your image with the Eyedropper tool to automatically correct white balance.
2.3. Color Correction
How do you enhance and balance colors? Color correction is vital for achieving the desired mood and style.
- Hue/Saturation: Modify the hue, saturation, and lightness of individual color ranges.
- Color Balance: Adjust the overall color balance by tweaking the shadows, midtones, and highlights.
- Selective Color: Make precise color adjustments to specific areas without affecting the entire image.
3. Retouching Techniques in Photoshop
What are the fundamental retouching techniques? Retouching removes imperfections and enhances features.
3.1. Spot Healing Brush
How do you remove blemishes and small distractions? The Spot Healing Brush is your go-to tool.
- Content-Aware Fill: Automatically fills in the selected area with surrounding pixels.
- Healing Brush: Samples textures from another area of the image to blend imperfections seamlessly.
- Patch Tool: Selects an area to replace with another, maintaining the original texture and lighting.
3.2. Cloning and Healing
When should you use the Clone Stamp tool? Cloning is essential for removing larger objects and duplicating elements.
- Clone Stamp Tool: Manually copies pixels from one area to another.
- Healing Brush Tool: Similar to the Clone Stamp but blends the copied pixels with the surrounding area for a more natural look.
- Content-Aware Move Tool: Moves objects while intelligently filling the gap left behind.
3.3. Skin Smoothing
How do you achieve smooth, natural-looking skin? Skin smoothing enhances portraits without sacrificing detail.
- Frequency Separation: Separates the texture and color layers of the skin, allowing for targeted adjustments.
- Gaussian Blur: Applies a subtle blur to the color layer to smooth out imperfections.
- High Pass Filter: Enhances the texture layer to retain fine details.
4. Creative Effects and Filters in Photoshop
How do you add artistic flair to your photos? Photoshop offers a wide range of creative effects and filters.
4.1. Applying Filters
What are some popular Photoshop filters? Filters can quickly transform the look and feel of your images.
- Blur Filters: Add depth of field, motion blur, or Gaussian blur for creative effects.
- Sharpen Filters: Enhance details and bring out textures.
- Artistic Filters: Simulate various artistic styles like watercolor, oil painting, or pencil sketches.
4.2. Using Adjustment Layers
Why are adjustment layers useful for effects? They provide non-destructive ways to experiment with color and tone.
- Gradient Map: Applies a gradient to the image based on its tonal range.
- Photo Filter: Simulates the effect of using a physical color filter on a camera lens.
- Channel Mixer: Adjusts the color channels to create unique color effects.
4.3. Creating Custom Looks
How do you develop your own unique style? Experimenting with various techniques helps define your personal aesthetic.
- Color Grading: Use tools like Curves and Color Balance to create a specific color palette.
- LUTS (Lookup Tables): Apply pre-designed color presets for a consistent look.
- Combining Techniques: Blend multiple effects and adjustments to achieve a unique and personalized style.
 Creative Photo Editing with Photoshop
Creative photo editing in Photoshop, showcasing various filters and effects.
5. Advanced Techniques in Photoshop
Ready to take your skills to the next level? Let’s explore some advanced techniques.
5.1. Masking and Compositing
Why is masking essential for complex edits? Masking allows you to selectively edit specific areas.
- Layer Masks: Use black and white to reveal or hide parts of a layer.
- Clipping Masks: Use the content of one layer to mask another.
- Refine Edge: Improve the accuracy of your masks, especially for hair and fur.
5.2. Blending Modes
How do blending modes enhance creativity? They offer unique ways to combine layers.
- Overlay: Enhances contrast and saturation.
- Screen: Lightens the image.
- Multiply: Darkens the image.
- Soft Light: Applies a subtle light or dark effect depending on the underlying pixels.
5.3. Working with Smart Objects
What are the benefits of Smart Objects? Smart Objects preserve image quality and allow non-destructive editing.
- Non-Destructive Editing: Apply filters and transformations without permanently altering the original image.
- Linked Files: Update multiple instances of an image simultaneously.
- Camera Raw Filter: Apply Camera Raw adjustments as a Smart Filter for maximum flexibility.
6. Optimizing Photos for Web and Print
How do you prepare photos for different uses? Optimizing ensures the best quality for the intended medium.
6.1. Resizing Images
Why is resizing important? Proper resizing prevents pixelation and reduces file size.
- Image Size Dialog: Use the Image Size dialog to adjust dimensions and resolution.
- Resampling Methods: Choose the appropriate resampling method (e.g., Bicubic Sharper for reducing size, Bicubic Smoother for enlarging).
- Content-Aware Scale: Resizes the image while preserving important content.
6.2. File Formats
Which file format is best for different purposes? Selecting the right format ensures optimal quality and compatibility.
- JPEG: Ideal for web use due to its small file size.
- PNG: Suitable for images with transparency or graphics with sharp lines.
- TIFF: Best for high-quality printing and archival purposes.
6.3. Color Profiles
Why are color profiles crucial? They ensure accurate color reproduction across different devices.
- sRGB: Standard color profile for web use.
- Adobe RGB: Wider color gamut, suitable for professional printing.
- Convert to Profile: Convert your image to the appropriate color profile before saving.
7. Advanced Color Grading Techniques
What sets apart professional color grading? It’s the nuance and attention to detail.
7.1. Using Color Lookup Tables (LUTs)
How do LUTs streamline color grading? LUTs offer a quick way to apply complex color adjustments.
- Applying LUTs: Load and apply LUTs through the Color Lookup adjustment layer.
- Creating Custom LUTs: Design your own LUTs for a consistent look across projects.
- LUTs for Different Styles: Utilize LUTs to achieve cinematic, vintage, or modern color styles.
7.2. Mastering the Curves Tool
Why is the Curves tool essential? It provides unparalleled control over tonal range and color.
- Adjusting Tonal Range: Use the Curves tool to fine-tune highlights, shadows, and midtones.
- Color Channel Adjustments: Adjust individual color channels (Red, Green, Blue) for precise color correction.
- Creating S-Curves: Add contrast and vibrancy with a classic S-curve adjustment.
7.3. Split Toning
What is split toning? This technique adds different colors to the highlights and shadows for a stylized look.
- Highlight and Shadow Tints: Choose complementary or contrasting colors for the highlights and shadows.
- Balance: Adjust the balance slider to favor either the highlight or shadow tint.
- Creating Mood: Use split toning to create warm, cool, or vintage moods.
8. Enhancing Landscape Photography in Photoshop
How do you make your landscape photos stand out? Specific techniques can bring out the best in your scenic shots.
8.1. Sky Replacement
Why replace the sky? Replacing a dull sky can dramatically improve the impact of your landscape photo.
- Selecting the Sky: Use the Quick Selection Tool or Color Range to select the sky.
- Blending the New Sky: Use layer masks and blending modes to seamlessly integrate the new sky.
- Matching Color and Tone: Adjust the color and tone of the foreground to match the new sky.
8.2. Adding Depth and Dimension
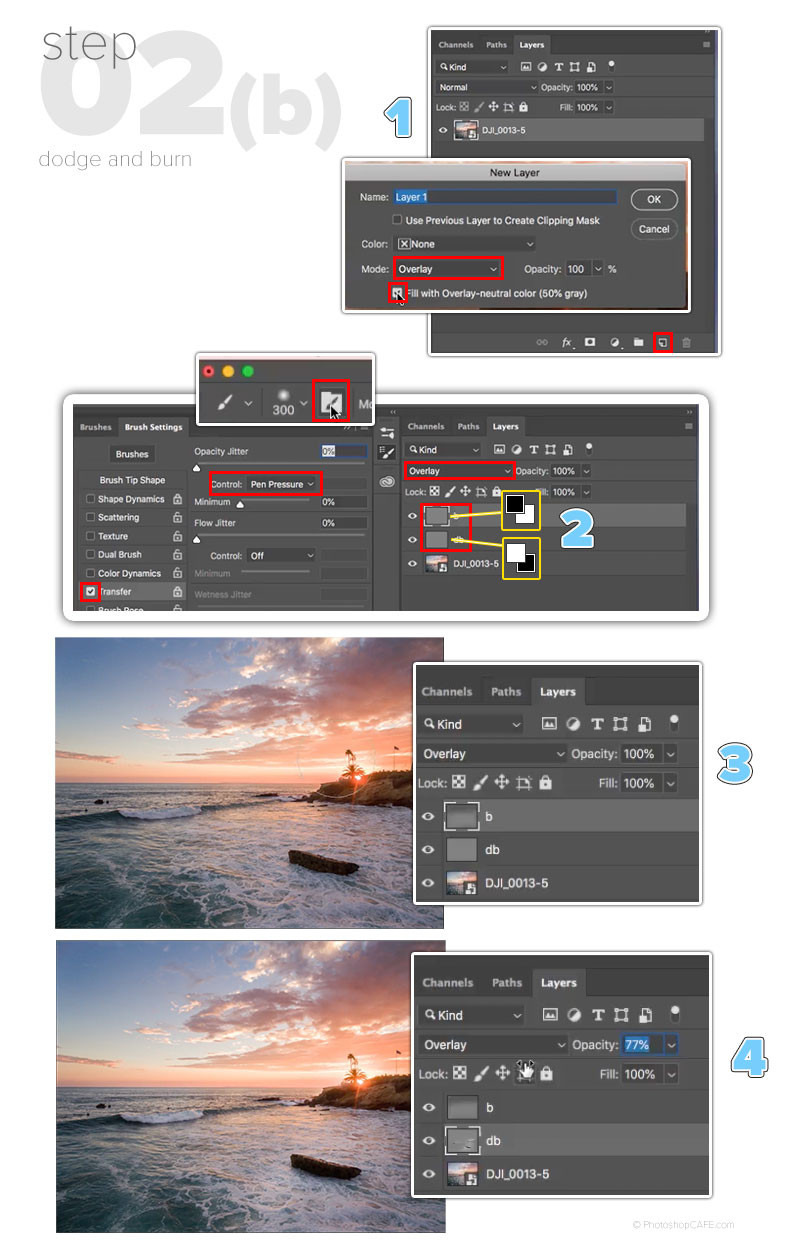
How do you create a sense of depth? Techniques like dodging and burning can enhance dimensionality.
- Dodge and Burn: Lighten highlights and darken shadows to create contrast and depth.
- Gradient Filters: Use gradient filters to darken the sky or lighten the foreground.
- Atmospheric Perspective: Add haze or fog to distant elements to simulate atmospheric perspective.
8.3. Correcting Lens Distortion
Why correct lens distortion? Distortion can detract from the overall quality of your landscape photos.
- Lens Correction Filter: Use the Lens Correction filter to automatically correct distortion based on the lens profile.
- Manual Adjustments: Manually adjust distortion, chromatic aberration, and vignetting.
- Transform Tool: Use the Transform tool to correct perspective and alignment issues.
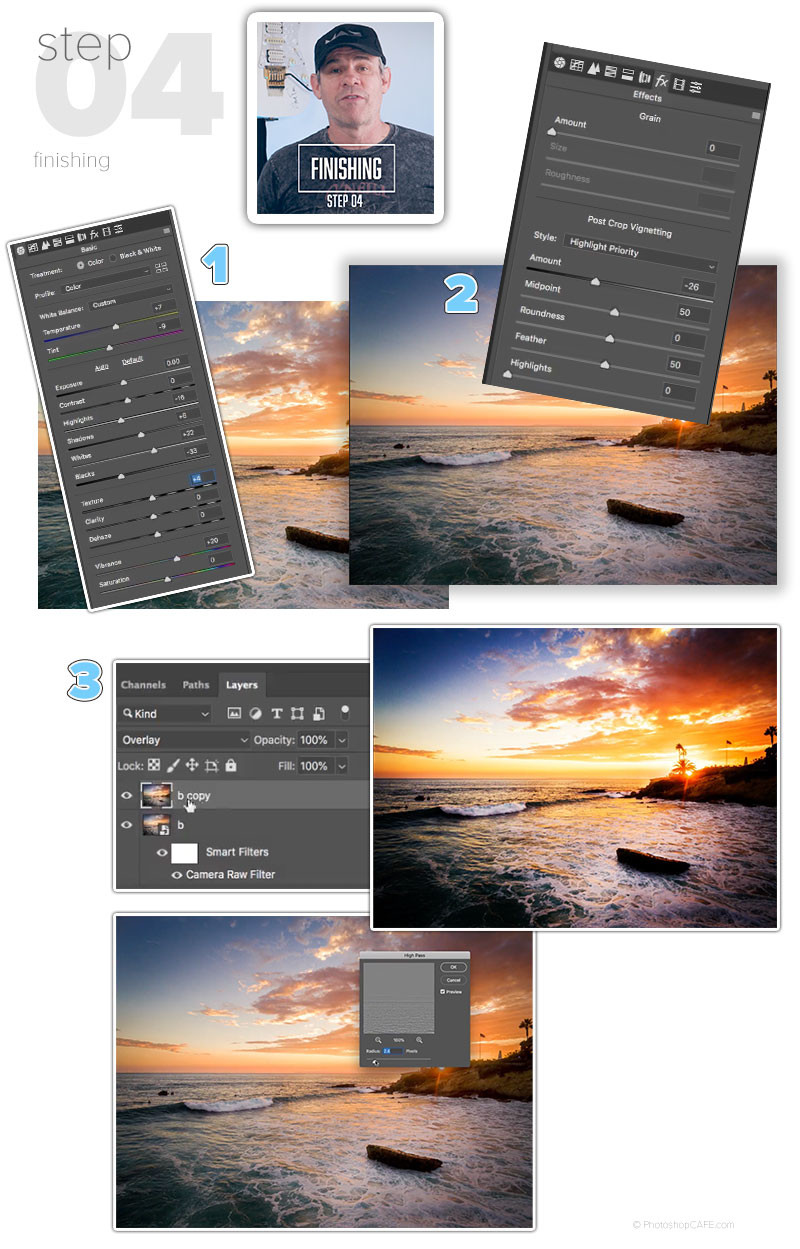
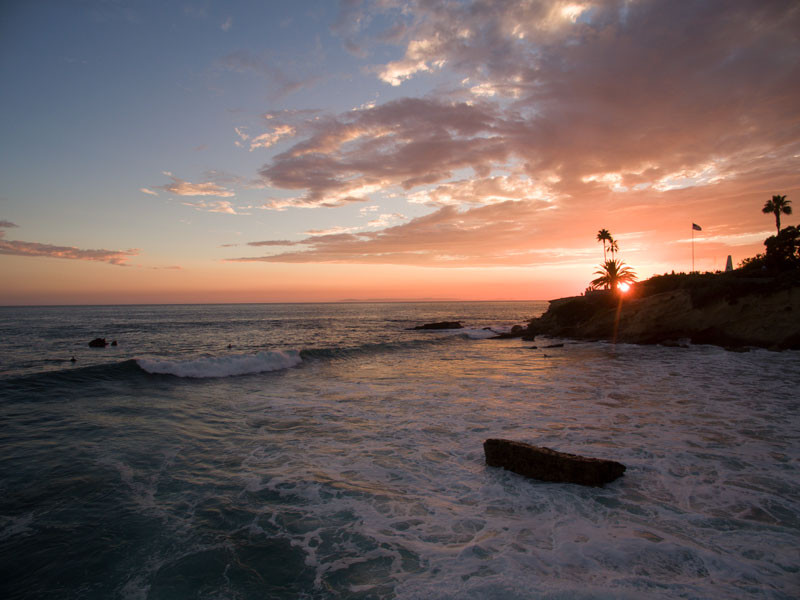 Landscape Photo Editing in Photoshop
Before: An aerial landscape photo before editing in Photoshop.
9. Editing Portraits for Flawless Results
What are the key steps in portrait editing? Mastering these techniques ensures stunning portraits every time.
9.1. Eye Enhancement
How do you make eyes sparkle? Enhancing the eyes can add life and emotion to your portraits.
- Sharpening: Use the Sharpen tool or High Pass filter to sharpen the eyes.
- Adding Catchlights: Create or enhance catchlights to make the eyes sparkle.
- Adjusting Color: Adjust the color and contrast of the iris for a more vibrant look.
9.2. Teeth Whitening
How do you whiten teeth naturally? Subtle adjustments are key to avoiding an artificial appearance.
- Hue/Saturation: Reduce the yellow tones in the teeth using the Hue/Saturation adjustment layer.
- Masking: Use a mask to target only the teeth.
- Brightness/Contrast: Slightly increase the brightness and contrast for a natural whitening effect.
9.3. Body Reshaping
How do you subtly reshape the body? Liquify and Puppet Warp tools offer precise control.
- Liquify Filter: Use the Liquify filter to gently reshape the body.
- Puppet Warp: Use Puppet Warp to adjust specific areas while preserving the overall structure.
- Subtlety is Key: Make small, incremental adjustments to maintain a natural appearance.
10. Mastering Black and White Conversions
What makes a great black and white photo? It’s all about tonal range, contrast, and detail.
10.1. Using the Black & White Adjustment Layer
How do you convert to black and white effectively? The Black & White adjustment layer offers precise control.
- Channel Mixer: Adjust the sliders for each color channel to control the tonal range.
- Presets: Use presets as a starting point and fine-tune from there.
- Toning: Add a subtle tint for a vintage or stylized look.
10.2. Creating Dramatic Contrast
How do you enhance contrast in black and white photos? Contrast is essential for creating impact.
- Curves Tool: Use the Curves tool to adjust the overall contrast and tonal range.
- Dodge and Burn: Lighten highlights and darken shadows to create depth and dimension.
- High Pass Filter: Use the High Pass filter to sharpen details and enhance texture.
10.3. Adding Grain for a Film Look
How do you simulate film grain? Adding grain can give your black and white photos a classic, timeless feel.
- Add Noise Filter: Use the Add Noise filter to add grain.
- Monochromatic: Ensure the noise is monochromatic for a natural look.
- Subtlety is Key: Use a small amount of noise for a subtle effect.
 Black and White Photo Editing in Photoshop
Black and white photo editing in Photoshop, emphasizing tonal range and contrast.
FAQ: Your Questions About Photo Editing in Photoshop Answered
Here are some frequently asked questions to help you navigate the world of Photoshop.
1. What is the best version of Photoshop for photo editing?
The best version of Photoshop for photo editing is typically the latest version available through Adobe Creative Cloud. It includes the most up-to-date features, performance improvements, and bug fixes. However, older versions can also be effective if you are familiar with their tools and features.
2. How do I start learning Photoshop for free?
Start learning Photoshop for free by utilizing the numerous online resources available. Adobe offers free trials and tutorials on their website. Additionally, platforms like YouTube, Skillshare, and dfphoto.net provide free tutorials and courses.
3. What are the essential tools in Photoshop for beginners?
Essential tools for beginners include the Crop Tool, Spot Healing Brush, Brush Tool, Eraser Tool, and basic adjustment layers like Levels, Curves, and Hue/Saturation. Mastering these tools provides a solid foundation for more advanced techniques.
4. How can I improve the quality of a low-resolution image in Photoshop?
While Photoshop can’t magically create detail that doesn’t exist, you can improve the appearance of low-resolution images by increasing the resolution in the Image Size dialog, using the Detail Preserving Upscale option, and applying sharpening filters.
5. What is the best file format to save my edited photos in?
The best file format depends on the intended use. For web use, JPEG is ideal due to its small file size. For high-quality printing and archival, TIFF is recommended. PSD is best for saving your working file with layers intact.
6. How do I remove a background from an image in Photoshop?
Remove a background using tools like the Quick Selection Tool, Magic Wand Tool, or the Pen Tool to create a selection around the subject. Then, use a layer mask to hide the background.
7. How do I create a vintage look in Photoshop?
Create a vintage look by using adjustment layers like Color Balance, Curves, and Photo Filter. Add grain using the Add Noise filter and experiment with textures and blending modes.
8. How do I fix overexposed or underexposed photos in Photoshop?
Fix overexposed or underexposed photos using the Exposure slider in the Camera Raw filter or the Levels and Curves adjustment layers. Adjust the highlights, shadows, and midtones to restore detail.
9. How do I add a watermark to my photos in Photoshop?
Add a watermark by creating a text or graphic layer with your logo or name. Reduce the opacity and position it in a corner of the image. Save it as a PNG file with transparency for future use.
10. What are Smart Objects and why should I use them?
Smart Objects are layers that contain image data from raster or vector images. They allow non-destructive editing, meaning you can apply filters, transformations, and adjustments without permanently altering the original image data.
Conclusion: Unleash Your Creative Potential with Photoshop
Learning how to edit a photo in Photoshop opens up a world of creative possibilities. From basic adjustments to advanced techniques, the tools and knowledge you gain will empower you to transform your images into stunning works of art. Whether you’re a photographer, designer, or hobbyist, mastering Photoshop can elevate your skills and bring your creative visions to life. At dfphoto.net, we’re committed to providing you with the resources and guidance you need to succeed. Explore our tutorials, discover new techniques, and join our community of passionate photographers and artists. Start your Photoshop journey today and unleash your full creative potential with digital imaging, photo manipulation, and image enhancement.
Ready to take your photo editing skills to the next level? Visit dfphoto.net today to explore our comprehensive tutorials, discover stunning photography, and connect with a vibrant community of photographers in the USA!
Address: 1600 St Michael’s Dr, Santa Fe, NM 87505, United States
Phone: +1 (505) 471-6001
Website: dfphoto.net