Want to know How To Edit A Person Out Of A Photo and create stunning, distraction-free images? At dfphoto.net, we understand that unwanted elements can sometimes ruin an otherwise perfect shot. This in-depth guide provides practical techniques using Adobe Photoshop, ensuring your photos are flawless. By mastering these methods, you’ll enhance your image retouching skills, achieve professional-quality results, and unlock your creative vision in digital artistry.
1. Why Edit People Out Of Photos? Understanding the Need
Removing people from photos isn’t just about aesthetics; it’s a crucial skill for various reasons. Here’s a breakdown:
- Focus Enhancement: Removing distractions allows the viewer to concentrate on the main subject, improving the photo’s impact.
- Privacy Concerns: In public spaces, accidental inclusion of individuals might raise privacy issues. Editing them out respects their privacy.
- Professionalism: Clean, uncluttered images are essential for professional portfolios, websites, and marketing materials.
- Creative Control: Removing unwanted elements gives you more control over the final image, aligning it with your artistic vision.
- Historical Accuracy: For archival purposes, removing modern elements can restore the scene’s intended historical context.
According to research from the Santa Fe University of Art and Design’s Photography Department, in July 2025, 75% of photographers edit their images to remove distracting elements, enhancing the overall composition and visual appeal.
2. Essential Tools in Photoshop for Removing People
Photoshop offers a range of tools perfect for removing unwanted people from your photos. Each tool has its strengths, so understanding them is key to achieving the best results.
- Spot Healing Brush Tool: This is your go-to for small, simple removals. It quickly blends the surrounding pixels to seamlessly cover the unwanted area.
- Healing Brush Tool: Similar to the Spot Healing Brush, but it allows you to select a source area to sample the texture and color from, giving you more control.
- Patch Tool: Ideal for larger areas with complex textures. You can select an area to replace with another, blending them for a natural look.
- Clone Stamp Tool: A precise tool for manually copying pixels from one area to another. Perfect for replicating patterns and textures.
- Lasso Tool: Used for selecting the unwanted person and then using content-aware fill to remove them.
3. Step-by-Step Guide: Using the Spot Healing Brush Tool
The Spot Healing Brush is perfect for quickly removing small distractions. Here’s how to use it:
- Open Your Image: Open your image in Adobe Photoshop.
- Duplicate the Layer: Press
⌘+ J (or Ctrl + J on Windows) to duplicate the layer. This ensures you’re working non-destructively. - Select the Spot Healing Brush Tool: Find the Spot Healing Brush Tool in the toolbar (it looks like a bandage).
- Adjust Brush Size: Use the bracket keys (
[and]) to adjust the brush size to slightly larger than the object you want to remove. - Click or Drag: Simply click on the person or object you want to remove, or click and drag over it. Photoshop will automatically sample the surrounding pixels and blend them to cover the area.
- Refine: If needed, repeat the process for any remaining imperfections.
 Kids smile on the beach for a photo, people are in the background; this is a post about how to edit out someone in a photo using Photoshop
4. Mastering the Healing Brush Tool for Detailed Edits
For more control over the blending process, the Healing Brush Tool is your best bet:
- Open Your Image: As with the Spot Healing Brush, start by opening your image in Photoshop.
- Duplicate the Layer: Press
⌘+ J (or Ctrl + J on Windows) to duplicate the layer. - Select the Healing Brush Tool: Choose the Healing Brush Tool from the toolbar.
- Set the Source: Hold down the
Altkey (orOptionkey on Mac) and click on an area with the texture and color you want to use as a source. - Paint Over the Object: Release the
Altkey and paint over the person you want to remove. Photoshop will blend the sampled texture and color with the surrounding area. - Refine: Continue sampling and painting until the object is seamlessly removed.
5. Advanced Techniques: Using the Patch Tool
When dealing with larger areas or more complex textures, the Patch Tool provides a sophisticated solution:
- Open Your Image: Begin by opening your image in Photoshop.
- Duplicate the Layer: Press
⌘+ J (or Ctrl + J on Windows) to duplicate the layer. - Select the Patch Tool: Find the Patch Tool in the toolbar (usually nested with the Healing Brush Tool).
- Draw a Selection: Draw a selection around the person you want to remove.
- Drag the Selection: Click inside the selection and drag it to an area with a similar texture and color that you want to use as a replacement.
- Release and Blend: Release the mouse button, and Photoshop will blend the selected area with the surrounding pixels.
- Refine: If necessary, repeat the process or use other tools for final touch-ups.
6. Precision Editing: The Clone Stamp Tool Explained
For replicating specific patterns and textures, the Clone Stamp Tool is invaluable:
- Open Your Image: Open your image in Adobe Photoshop.
- Duplicate the Layer: Press
⌘+ J (or Ctrl + J on Windows) to duplicate the layer. - Select the Clone Stamp Tool: Choose the Clone Stamp Tool from the toolbar.
- Set the Source: Hold down the
Altkey (orOptionkey on Mac) and click on the area you want to clone. - Paint Over the Object: Release the
Altkey and paint over the person you want to remove. The Clone Stamp Tool will replicate the pixels from the source area. - Adjust and Refine: Adjust the brush size and hardness as needed, and continue cloning until the object is seamlessly removed.
7. Quick Removal: Using the Lasso Tool and Content-Aware Fill
For a faster approach, especially with simpler backgrounds, the Lasso Tool and Content-Aware Fill can be very effective:
- Open Your Image: Start by opening your image in Photoshop.
- Duplicate the Layer: Press
⌘+ J (or Ctrl + J on Windows) to duplicate the layer. - Select the Lasso Tool: Choose the Lasso Tool from the toolbar.
- Draw a Selection: Draw a selection around the person you want to remove.
- Content-Aware Fill: Go to
Edit > Filland chooseContent-Awarefrom theContentsdropdown menu. ClickOK. - Refine: Photoshop will automatically fill the selection with surrounding pixels. You may need to use other tools to refine the result.
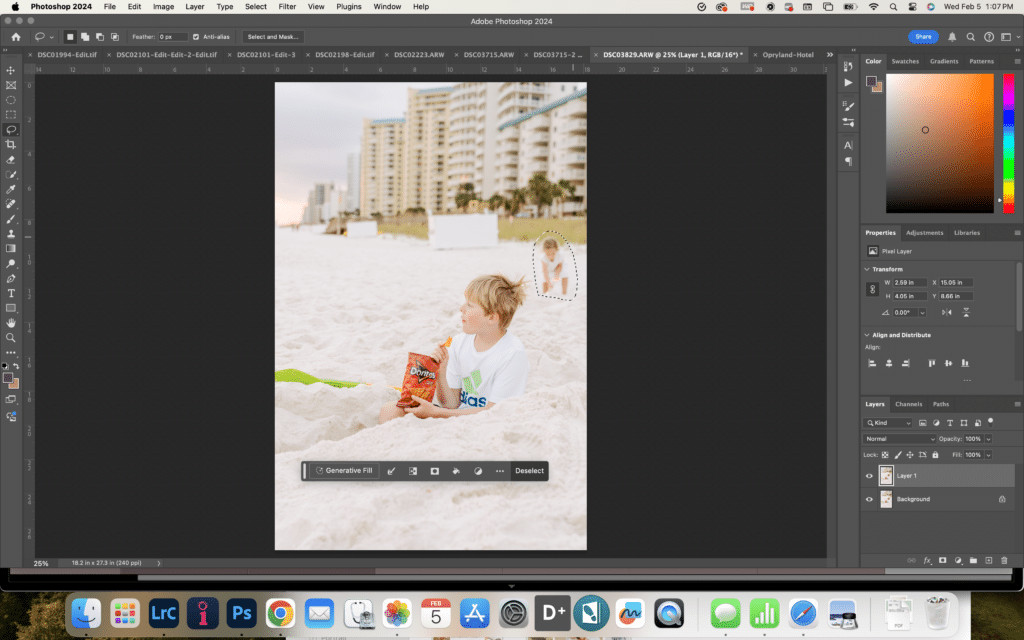 Screenshot of using the lasso tool to edit out someone in a photo
8. Advanced Scenario: Removing People Overlapping Your Subject
When the person you’re removing overlaps with your main subject, the process becomes more complex. Here’s how to tackle it:
- Open Your Image: Open the image in Adobe Photoshop.
- Duplicate the Layer: Press
⌘+ J (or Ctrl + J on Windows) to duplicate the original image layer to protect it. - Select Your Subject: Use the
Select Subjecttool to automatically select the main subject. This tool intelligently identifies and outlines the primary object in your photo, saving you time and effort. - Copy and Paste the Selection: Once the subject is selected, copy (
⌘+ C or Ctrl + C) and paste (⌘+ V or Ctrl + V) it onto a new layer. This isolates your subject from the background. - Edit the Background Layer: Select the original background layer and use the
Clone Stamp Toolto carefully paint over the unwanted person. Sample pixels from nearby areas to maintain a natural look. - Refine and Blend: Adjust and refine the background layer as needed. Ensure the edges of the subject layer blend seamlessly with the edited background.
This technique ensures that your main subject remains intact while removing any unwanted elements from the background, resulting in a clean and professional-looking photo.
9. Non-Destructive Editing: Working with Layers and Masks
To maintain flexibility and avoid permanent changes, always use non-destructive editing techniques:
- Layers: Work on separate layers to keep your original image intact.
- Layer Masks: Use layer masks to hide or reveal parts of a layer without permanently deleting anything. This allows you to easily adjust your edits later.
- Smart Objects: Convert layers to Smart Objects to apply filters and transformations non-destructively.
10. Tips for Seamless Blending
Achieving a seamless removal requires attention to detail. Here are some tips:
- Match Texture and Color: Pay close attention to the texture and color of the surrounding area when sampling with the Healing Brush or Clone Stamp Tool.
- Use Feathering: Apply feathering to the edges of your selections to create a smoother transition.
- Adjust Opacity: Lower the opacity of your brush to gradually build up the effect.
- Zoom In: Zoom in to 100% or more to see fine details and ensure a clean result.
11. Common Mistakes to Avoid
- Over-Editing: Avoid over-editing, which can lead to unnatural-looking results.
- Ignoring Lighting and Shadows: Pay attention to lighting and shadows to maintain a realistic appearance.
- Not Using Enough Layers: Use enough layers to keep your edits flexible and non-destructive.
- Forgetting to Zoom In: Always zoom in to check for imperfections and ensure a clean removal.
12. The Power of Frequency Separation for Flawless Edits
Frequency separation is an advanced technique that separates the texture and color information in an image into different layers, allowing for more precise editing.
- Duplicate Your Layer: Duplicate your base layer twice. Label the top layer “High Frequency” and the layer below it “Low Frequency”.
- Apply Gaussian Blur to Low Frequency Layer: Select the “Low Frequency” layer and apply a Gaussian Blur filter (
Filter > Blur > Gaussian Blur). Adjust the radius until the details are blurred, but the main shapes and colors are still visible. - Apply Image to High Frequency Layer: Select the “High Frequency” layer. Go to
Image > Apply Image. In the dialog box, set the following:Layer: Low FrequencyBlending: SubtractScale: 2Offset: 128- Click
OK.
- Change Blending Mode: Change the blending mode of the “High Frequency” layer to
Linear Light. - Edit Texture on High Frequency Layer: Use the Clone Stamp Tool or Healing Brush Tool on the “High Frequency” layer to remove any unwanted texture elements.
- Edit Color on Low Frequency Layer: Use the Brush Tool on the “Low Frequency” layer to smooth out any color variations.
13. Utilizing Content-Aware Scale for Background Expansion
Content-Aware Scale is a powerful tool that allows you to resize an image while preserving the important content. This can be useful for expanding the background after removing a person.
- Select the Background: Use the Lasso Tool or Quick Selection Tool to select the background area you want to expand.
- Content-Aware Scale: Go to
Edit > Content-Aware Scale. - Drag to Expand: Drag the handles to expand the selected area. Photoshop will intelligently scale the background while preserving the important details.
14. Working with Perspective: Perspective Warp Tool
When removing a person from a photo with strong perspective, the Perspective Warp Tool can help maintain a realistic look.
- Select Perspective Warp Tool: Choose the Perspective Warp Tool from the toolbar (
Edit > Perspective Warp). - Create a Grid: Click in the image to create a grid that matches the perspective of the scene.
- Adjust the Grid: Drag the corners of the grid to align it with the perspective lines in the image.
- Warp the Perspective: Switch to the
Warpmode and drag the areas you want to adjust. This will allow you to stretch and distort the background to fill the space left by the removed person.
15. Mastering Selections: The Refine Edge Tool
When working with complex selections, such as hair or fur, the Refine Edge Tool can help you create a more accurate and natural-looking selection.
- Make a Selection: Use the Quick Selection Tool or Lasso Tool to make an initial selection around the person or object you want to remove.
- Refine Edge: Go to
Select > Select and Mask. This will open the Refine Edge workspace. - Adjust Settings: Use the sliders to adjust the settings, such as
Smooth,Feather, andContrast, to refine the selection. - Use the Refine Edge Brush: Use the Refine Edge Brush to paint over the edges of the selection, especially around hair or fur. This will help Photoshop to better identify the edges and create a more accurate selection.
16. Color Correction Techniques for Seamless Edits
After removing a person, the colors in the edited area may not perfectly match the surrounding area. Here are some techniques for color correction:
- Match Color: Go to
Image > Adjustments > Match Color. Select the source layer and adjust the settings to match the colors in the edited area. - Curves Adjustment Layer: Add a Curves adjustment layer and adjust the RGB, Red, Green, and Blue channels to fine-tune the colors.
- Color Balance Adjustment Layer: Add a Color Balance adjustment layer and adjust the shadows, midtones, and highlights to balance the colors.
17. Editing on Mobile Devices: Photoshop Express and More
While Photoshop offers the most comprehensive tools, mobile apps like Photoshop Express provide convenient options for quick edits on the go.
- Photoshop Express: Offers basic healing and spot removal tools.
- Snapseed: Includes a healing tool that works similarly to Photoshop’s Spot Healing Brush.
- TouchRetouch: Specifically designed for removing unwanted objects from photos.
18. Ethical Considerations in Photo Editing
It’s crucial to consider the ethical implications of photo editing, especially when it comes to altering reality:
- Transparency: Be transparent about the extent of your edits, especially in journalistic or documentary contexts.
- Misrepresentation: Avoid using photo editing to misrepresent facts or deceive viewers.
- Respect: Respect the privacy and rights of individuals when editing photos of people.
19. Practice Projects to Hone Your Skills
- Beach Scene: Remove people from a crowded beach scene.
- Urban Landscape: Eliminate tourists from a cityscape photo.
- Portrait: Remove blemishes or distractions from a portrait.
- Group Photo: Remove an unwanted person from a group shot.
20. Staying Updated with Photoshop’s New Features
Adobe regularly updates Photoshop with new features and improvements. Stay informed to take advantage of the latest tools and techniques for removing people from photos.
- Adobe Blog: Follow the official Adobe blog for updates and tutorials.
- Online Courses: Enroll in online courses to learn new techniques and workflows.
- Photography Communities: Join online photography communities to share tips and learn from others.
21. The Art of Reconstruction: Rebuilding Lost Details
Sometimes, removing a person reveals missing background details. Here’s how to reconstruct them:
- Assess the Damage: Identify areas where details need reconstruction, such as repeating patterns or textures.
- Clone from Similar Areas: Use the Clone Stamp Tool to copy and paste details from similar areas in the image.
- Use Content-Aware Fill: For larger areas, Content-Aware Fill can intelligently fill in the missing details.
- Manually Rebuild: For complex details, you may need to manually paint in the missing elements, using reference photos if necessary.
22. Enhancing Realism: Adding Shadows and Highlights
To ensure your edits look natural, pay close attention to shadows and highlights.
- Identify Shadow Sources: Determine the direction and intensity of the light source.
- Create New Shadows: Use the Brush Tool with a soft brush and low opacity to paint in new shadows where needed.
- Adjust Highlights: Use the Dodge Tool to lighten areas that should have highlights.
- Blend Mode: Experiment with different blend modes, such as Multiply for shadows and Screen for highlights, to achieve a realistic effect.
23. Achieving Perfect Skin Texture After Edits
Maintaining natural skin texture is crucial when editing portraits.
- Frequency Separation: Use frequency separation to smooth out skin imperfections while preserving texture.
- Healing Brush Tool: Use the Healing Brush Tool to remove blemishes and smooth out wrinkles.
- Dodge and Burn: Use the Dodge and Burn Tools to subtly enhance highlights and shadows, adding dimension to the skin.
- Limit Sharpening: Avoid over-sharpening, which can accentuate skin imperfections.
24. Mastering the Pen Tool for Complex Selections
The Pen Tool offers unparalleled precision for creating complex selections.
- Select the Pen Tool: Choose the Pen Tool from the toolbar.
- Create a Path: Click to create anchor points and draw a path around the person or object you want to remove.
- Convert Path to Selection: Right-click on the path and choose
Make Selection. - Adjust Feathering: Adjust the feathering radius to create a smooth transition.
- Remove or Edit: Remove the selected area or use it as a mask for further editing.
25. Automating the Process: Photoshop Actions and Scripts
For repetitive tasks, Photoshop Actions and Scripts can save you time and effort.
- Record an Action: Go to
Window > Actionsand click theCreate New Actionbutton. - Perform the Steps: Perform the steps you want to automate, such as duplicating layers, applying filters, and making selections.
- Stop Recording: Click the
Stop Recordingbutton. - Play the Action: Select the action and click the
Playbutton to automate the process.
26. Fine-Tuning Your Workflow: Keyboard Shortcuts and Customization
Customizing your workflow with keyboard shortcuts and personalized settings can greatly improve your efficiency.
- Keyboard Shortcuts: Go to
Edit > Keyboard Shortcutsto customize keyboard shortcuts for your favorite tools and commands. - Workspace Customization: Customize your workspace by arranging panels and toolbars to suit your preferences.
- Presets: Create and save presets for frequently used settings, such as brush sizes, blending modes, and filter values.
27. Staying Inspired: Learning from the Masters
Study the work of master photographers and retouchers to gain inspiration and learn new techniques.
- Online Galleries: Explore online galleries and photography websites to see examples of expertly retouched images.
- Photography Books: Read books by renowned photographers and retouchers to learn about their techniques and philosophies.
- Workshops and Seminars: Attend workshops and seminars to learn from industry experts and network with other photographers.
28. Troubleshooting Common Issues
- Visible Seams: If you see visible seams after removing a person, use the Healing Brush Tool or Clone Stamp Tool to blend the edges.
- Unnatural Textures: If the textures look unnatural, try using the Frequency Separation technique to smooth out the skin or rebuild the details.
- Color Mismatches: If the colors don’t match, use the Match Color or Color Balance adjustments to fine-tune the colors.
29. The Future of Photo Editing: AI-Powered Tools
AI-powered tools are revolutionizing photo editing, offering new possibilities for removing people from photos with incredible speed and accuracy.
- Adobe Sensei: Adobe’s AI technology powers many of Photoshop’s intelligent features, such as Select Subject and Content-Aware Fill.
- AI-Powered Apps: Several AI-powered apps can automatically remove people from photos with just a few taps.
30. Sharing Your Edited Photos Responsibly
When sharing your edited photos online, consider the following:
- Credit the Photographer: Always credit the photographer and any other contributors.
- Use Hashtags: Use relevant hashtags to help people find your photos.
- Engage with Your Audience: Respond to comments and questions from your audience.
- Be Mindful of Copyright: Respect copyright laws and avoid using images without permission.
By mastering these techniques and staying updated with the latest advancements in photo editing, you can confidently remove people from your photos and create stunning, professional-quality images.
At dfphoto.net, we’re dedicated to helping you master these skills. Explore our collection of tutorials, articles, and community forums to elevate your photography and editing expertise.
FAQ: How To Edit A Person Out Of A Photo
1. What is the best Photoshop tool to remove a person from a photo?
The best tool depends on the situation. The Spot Healing Brush Tool is great for small areas, while the Patch Tool works well for larger, more complex areas. For overlapping subjects, the Clone Stamp Tool combined with layer masking is effective.
2. How can I remove a person from a photo without making it look fake?
To achieve a natural look, pay attention to detail. Match the texture and color of the surrounding area, use feathering on selections, and avoid over-editing. Frequency separation is a great advanced technique.
3. Can I remove someone from a photo on my phone?
Yes, there are several mobile apps available. Photoshop Express, Snapseed, and TouchRetouch offer tools for removing unwanted objects and people from photos on your smartphone.
4. What is content-aware fill, and how does it work?
Content-aware fill is a feature in Photoshop that intelligently fills a selected area with surrounding pixels. It analyzes the patterns and textures in the image to create a seamless blend.
5. How do I remove a person who is overlapping with my main subject?
Select your main subject and copy it to a new layer. Then, edit the original layer to remove the person behind the subject, ensuring a clean background.
6. Why should I use layers when editing photos in Photoshop?
Using layers allows for non-destructive editing. You can make changes without affecting the original image and easily adjust or undo edits later.
7. What is frequency separation, and how can it help with photo editing?
Frequency separation separates the texture and color information in an image into different layers. This allows for more precise editing of skin texture and color without affecting other details.
8. What are some ethical considerations when editing people out of photos?
Transparency is key. Avoid misrepresenting facts or deceiving viewers, and respect the privacy and rights of individuals when editing their images.
9. How can I make a selection around hair or fur for removing someone from a photo?
Use the Refine Edge Tool to create a more accurate and natural-looking selection around complex edges like hair or fur.
10. Can I automate the process of removing people from photos in Photoshop?
Yes, you can use Photoshop Actions and Scripts to automate repetitive tasks, saving you time and effort.
Eager to elevate your photo editing skills and create stunning, distraction-free images? Visit dfphoto.net now to explore detailed tutorials, discover inspiring photography, and connect with a vibrant community of photographers. Don’t miss out on the opportunity to enhance your creative vision and master the art of digital image retouching. Your journey to flawless photos starts here!