Are you looking to seamlessly integrate a person into a photograph, creating stunning visuals? This guide from dfphoto.net will provide you with the knowledge and techniques to master this skill, whether you’re aiming for realistic portraits, creative compositions, or simply fixing a group photo. We’ll explore various methods and tools to create a realistic image using picture manipulation, image editing software, and photo enhancement techniques. Unlock your creative potential and elevate your photo editing skills with our detailed walkthrough, and discover the art of digital artistry, picture manipulation, and photo composition.
1. Understanding the Basics of Photo Editing
Before diving into the specifics of adding a person to a photo, it’s crucial to understand the fundamental concepts of photo editing.
1.1. Why Is Photo Editing Important?
Photo editing isn’t just about making cosmetic changes; it’s about enhancing the overall impact and message of an image. Photo editing is important because of the following:
- Correcting Imperfections: Fixes lighting, color balance, and other technical issues.
- Enhancing Visual Appeal: Improves composition, sharpness, and overall aesthetics.
- Creating Artistic Effects: Adds creative elements and unique styles.
- Telling a Story: Conveys emotions and narratives through visual adjustments.
- Professional Use: Essential for photographers, designers, and marketers.
1.2. Essential Photo Editing Terms
Familiarize yourself with these terms to better understand the editing process:
| Term | Definition |
|---|---|
| Resolution | The level of detail in an image, measured in pixels. |
| Exposure | The amount of light that reaches the camera sensor, affecting the brightness of the image. |
| Contrast | The difference in brightness between the lightest and darkest areas of an image. |
| Saturation | The intensity of colors in an image. |
| Hue | The actual color (e.g., red, green, blue). |
| Layers | Different levels on which you can work on an image independently without affecting other parts. |
| Masking | A non-destructive way to hide or reveal parts of a layer. |
| Cloning | Duplicating parts of an image to cover up imperfections or add elements. |
| Sharpening | Enhancing the edges and details in an image to make it appear clearer. |
| Color Balance | Adjusting the intensity of colors to achieve a natural and pleasing look. |
1.3. Popular Photo Editing Software
Choosing the right software is the first step. While Adobe Photoshop is a leading choice, several other options cater to different skill levels and needs. Here are some of the most popular:
- Adobe Photoshop: Industry-standard software with a wide range of tools and features.
- Adobe Lightroom: Excellent for managing and editing large volumes of photos, with a focus on color correction and global adjustments.
- GIMP (GNU Image Manipulation Program): A free, open-source alternative to Photoshop with many similar features.
- Affinity Photo: A professional-grade editor that offers a balance of power and affordability.
- Capture One: Known for its exceptional color handling and tethered shooting capabilities.
2. Planning Your Photo Composition
Before you even open your photo editing software, strategic planning is essential.
2.1. Selecting the Right Images
The success of your composite image heavily depends on the quality and compatibility of the source images. Here’s what to consider:
- Resolution Consistency: Ensure that all images have similar resolutions to avoid a jarring difference in detail.
- Lighting Match: Select images with similar lighting conditions (e.g., direction, intensity, color temperature) to create a cohesive look.
- Perspective Alignment: Choose images with matching perspectives to ensure that the added person fits naturally into the scene.
- Image Quality: Use high-quality images with good sharpness and minimal noise.
2.2. Understanding Perspective
Perspective refers to the way objects appear to recede into the distance. Matching the perspective of your source images is critical for creating a realistic composite.
- One-Point Perspective: Lines converge at a single vanishing point.
- Two-Point Perspective: Lines converge at two vanishing points.
- Three-Point Perspective: Lines converge at three vanishing points, often used for dramatic, high-angle or low-angle shots.
2.3. Matching Lighting and Shadows
Lighting plays a crucial role in creating a believable composite. Pay attention to the following:
- Light Direction: The angle from which the light is hitting the subject.
- Light Intensity: The brightness of the light.
- Color Temperature: The warmth or coolness of the light (measured in Kelvin).
- Shadow Placement: The position and softness of shadows.
3. Step-by-Step Guide: Adding a Person to a Photo in Photoshop
Here’s a detailed walkthrough using Adobe Photoshop, the industry-standard software for photo manipulation.
3.1. Opening Your Images in Photoshop
- Launch Adobe Photoshop.
- Go to
File > Openand select the background image (the photo where you want to add the person). - Repeat the process to open the image of the person you want to add.
3.2. Selecting the Person
Accurately selecting the person is the most critical step. Photoshop offers several tools for making selections, each with its strengths.
- Quick Selection Tool:
- Select the Quick Selection Tool from the toolbar (it looks like a brush with a selection symbol).
- Adjust the brush size to fit the person you’re selecting.
- Click and drag over the person to automatically select them.
- Use the
Add to SelectionandSubtract from Selectionoptions in the toolbar to refine the selection.
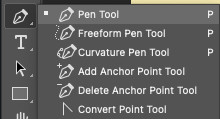
- Pen Tool:
- Select the Pen Tool from the toolbar (it looks like a pen tip).
- Click around the person to create a precise path.
- Close the path by clicking on the starting point.
- Right-click on the path and select
Make Selection. - Adjust the feather radius if needed and click
OK.
 Adobe pen tool
- Select and Mask:
- Make a rough selection using any of the above tools.
- Go to
Select > Select and Mask. - Use the Refine Edge Brush Tool to improve the selection around hair and other fine details.
- Adjust the
Smooth,Feather,Contrast, andShift Edgesliders to fine-tune the selection.
3.3. Refining the Selection
No matter which selection tool you use, refining the selection is crucial for a realistic result.
- Zoom In: Zoom in to 200-300% to see the edges clearly.
- Feathering: Apply a slight feather (0.5-1.0 pixels) to soften the edges of the selection. Go to
Select > Modify > Feather. - Contract/Expand: If the selection is too tight or too loose, use
Select > Modify > ContractorSelect > Modify > Expandto adjust the edges.
3.4. Copying and Pasting the Person
- Once you’re satisfied with the selection, press
Ctrl+C(Windows) orCmd+C(Mac) to copy the selected person. - Go to the background image and press
Ctrl+V(Windows) orCmd+V(Mac) to paste the person. - The person will appear on a new layer in the Layers panel.
3.5. Adjusting Size and Position
- Press
Ctrl+T(Windows) orCmd+T(Mac) to activate the Free Transform tool. - Hold
Shiftto maintain the aspect ratio while resizing the person. - Drag the corners of the bounding box to adjust the size.
- Click and drag inside the bounding box to reposition the person.
- Right-click inside the bounding box to access additional transformation options like
Rotate,Skew,Distort, andPerspective.
3.6. Blending the Person with the Background
Blending is where the magic happens. It involves adjusting the person’s layer to match the lighting, color, and texture of the background.
- Color Correction:
- Select the person’s layer.
- Go to
Image > Adjustments > Color Balance. - Adjust the
Cyan/Red,Magenta/Green, andYellow/Bluesliders to match the color tones of the background.
- Lighting Adjustment:
- Go to
Image > Adjustments > Brightness/Contrast. - Adjust the
BrightnessandContrastsliders to match the lighting of the background. - Alternatively, use
Image > Adjustments > LevelsorImage > Adjustments > Curvesfor more precise control over the tonal range.
- Go to
- Shadows and Highlights:
- Use the Dodge and Burn tools to selectively lighten or darken areas of the person’s layer.
- Set the
RangetoShadowsto darken shadows orHighlightsto lighten highlights. - Adjust the
Exposureto control the intensity of the effect.
- Blending Modes:
- Experiment with different blending modes in the Layers panel (e.g.,
Multiply,Screen,Overlay) to blend the person’s layer with the background. - Adjust the layer opacity to fine-tune the blending effect.
- Experiment with different blending modes in the Layers panel (e.g.,
3.7. Adding Shadows
Adding shadows is crucial for grounding the person in the scene and creating a sense of realism.
- Create a New Layer: Create a new layer below the person’s layer.
- Paint the Shadow:
- Select the Brush Tool.
- Set the color to a dark gray or black.
- Set the brush opacity to 20-30%.
- Paint the shadow on the new layer, following the direction of the light source.
- Blur the Shadow:
- Go to
Filter > Blur > Gaussian Blur. - Adjust the radius to soften the shadow.
- Go to
- Transform the Shadow:
- Press
Ctrl+T(Windows) orCmd+T(Mac) to activate the Free Transform tool. - Right-click inside the bounding box and select
DistortorPerspectiveto shape the shadow according to the surface it’s cast on.
- Press
3.8. Final Touches and Enhancements
- Sharpening: Apply a slight sharpening filter to the final image to enhance the details. Go to
Filter > Sharpen > Unsharp Mask. - Noise Reduction: If necessary, reduce noise in the image by going to
Filter > Noise > Reduce Noise. - Color Grading: Use color grading techniques to give the image a consistent and stylized look. Use
Image > Adjustments > Color Lookupfor preset looks or adjust the colors manually.
4. Advanced Techniques for Seamless Integration
For those looking to take their photo editing skills to the next level, here are some advanced techniques:
4.1. Frequency Separation
Frequency separation is a technique that separates the texture and color information in an image into different layers, allowing for targeted adjustments.
- Duplicate Layer: Duplicate the image layer twice.
- High Frequency Layer:
- Select the top layer.
- Go to
Filter > Other > High Pass. - Adjust the radius until you see fine details (usually around 2-4 pixels).
- Set the blending mode to
Linear Light.
- Low Frequency Layer:
- Select the bottom layer.
- Go to
Filter > Blur > Gaussian Blur. - Adjust the radius to blur the details, leaving only the colors and tones.
- Editing: Edit the texture on the high-frequency layer and the colors on the low-frequency layer.
4.2. Using Adjustment Layers
Adjustment layers are non-destructive layers that allow you to apply color and tonal adjustments without directly modifying the original image.
- Creating Adjustment Layers:
- Click on the
Create New Fill or Adjustment Layericon at the bottom of the Layers panel. - Choose an adjustment layer type (e.g.,
Brightness/Contrast,Levels,Curves,Hue/Saturation,Color Balance).
- Click on the
- Clipping Masks: Use clipping masks to apply adjustment layers to specific layers. Right-click on the adjustment layer and select
Create Clipping Mask.
4.3. Working with Smart Objects
Smart Objects are layers that contain image data from raster or vector images. They preserve an image’s source content with all its original characteristics, enabling you to perform non-destructive editing to the layer.
- Converting to Smart Object: Right-click on a layer and select
Convert to Smart Object. - Benefits:
- Non-destructive transformations.
- Ability to apply filters non-destructively.
- Ability to replace the contents of the Smart Object.
4.4. Mastering Layer Masks
Layer masks are essential for creating complex composites and selectively revealing or hiding parts of a layer.
- Adding Layer Masks: Select a layer and click on the
Add Layer Maskicon at the bottom of the Layers panel. - Painting on Layer Masks:
- Select the Brush Tool.
- Set the color to black to hide parts of the layer or white to reveal parts of the layer.
- Adjust the brush opacity to control the transparency.
5. Common Mistakes to Avoid
Even with the right techniques, it’s easy to make mistakes. Here’s what to watch out for:
- Mismatching Lighting: Inconsistent lighting is a dead giveaway. Always match the direction, intensity, and color temperature of the light.
- Incorrect Perspective: Ensure that the perspective of the added person matches the background.
- Poor Selection Quality: Rough or jagged edges around the person will ruin the realism.
- Over-Editing: Too much sharpening, saturation, or contrast can make the image look unnatural.
- Ignoring Shadows: Shadows are crucial for grounding the person in the scene.
6. Inspiration and Ideas
Looking for creative inspiration? Here are some ideas for using this technique:
- Family Portraits: Add a missing family member to a cherished photo.
- Historical Recreations: Insert yourself into a historical scene.
- Fantasy Art: Create surreal and imaginative compositions.
- Humorous Images: Place people in funny or unexpected situations.
- Conceptual Photography: Convey abstract ideas and emotions through visual storytelling.
7. Case Studies: Before and After Examples
Let’s look at some real-world examples of how these techniques can be applied.
7.1. Adding a Person to a Group Photo
- Challenge: A family photo is missing a member who couldn’t attend the event.
- Solution: Select the missing person from another photo and seamlessly add them to the group shot, matching the lighting and perspective.
- Result: A complete and heartwarming family portrait.
7.2. Creating a Fantasy Scene
- Challenge: Creating a surreal image of a person floating in a dreamlike landscape.
- Solution: Combine multiple images of landscapes and skies, then add the person and blend them seamlessly using layer masks and color adjustments.
- Result: A captivating and ethereal fantasy artwork.
7.3. Recreating a Historical Moment
- Challenge: Inserting a person into a historical photograph.
- Solution: Carefully match the lighting, color tones, and perspective of the historical photo, then add the person and blend them in using advanced masking and blending techniques.
- Result: A compelling and thought-provoking historical recreation.
8. The Role of AI in Photo Editing
Artificial intelligence is revolutionizing photo editing, offering new tools and capabilities that can significantly enhance your workflow.
8.1. AI-Powered Selection Tools
AI-powered selection tools can automatically identify and select objects, people, and areas in an image with remarkable accuracy.
- Adobe Sensei: Adobe’s AI technology powers features like
Select SubjectandObject Selection Tool, making it easier to create complex selections with minimal effort. - Luminar AI: Offers AI-driven selection and masking tools that can intelligently identify and select elements in a photo.
8.2. AI-Driven Enhancements
AI can also automatically enhance various aspects of an image, such as color, lighting, and sharpness.
- Auto Adjustments: Many photo editing software offer AI-powered auto adjustment features that can analyze an image and automatically apply the optimal settings.
- AI Noise Reduction: AI algorithms can intelligently reduce noise in an image while preserving details.
- AI Upscaling: AI can upscale low-resolution images while maintaining or even enhancing the details.
8.3. AI-Assisted Compositing
AI can assist in the compositing process by automatically matching the lighting, color, and perspective of different images.
- Automatic Blending: Some AI tools can automatically blend different images together, creating seamless composites with minimal manual adjustments.
- AI Sky Replacement: AI can automatically detect and replace the sky in a photo, matching the lighting and color tones of the new sky to the rest of the image.
9. Resources and Learning Materials
To further enhance your photo editing skills, here are some valuable resources and learning materials:
- Online Courses:
- Adobe Photoshop Masterclass: Comprehensive courses on platforms like Udemy and Coursera.
- CreativeLive: Offers a wide range of photography and photo editing courses taught by industry professionals.
- YouTube Channels:
- Phlearn: Provides in-depth Photoshop tutorials and tips.
- PiXimperfect: Offers advanced photo editing techniques and tips.
- Tutvid: Features tutorials on a variety of design and photo editing topics.
- Books:
- “Adobe Photoshop Classroom in a Book” by Andrew Faulkner and Conrad Chavez: A comprehensive guide to Photoshop.
- “The Photoshop Book for Digital Photographers” by Scott Kelby: A practical guide for photographers.
- Websites and Blogs:
- Adobe Photoshop Tutorials: Official tutorials from Adobe.
- Digital Photography School: Offers articles, tutorials, and tips on photography and photo editing.
10. Frequently Asked Questions (FAQs)
Here are some common questions related to editing a person into a photo:
10.1. What is the best software for editing a person into a photo?
Adobe Photoshop is widely considered the best software due to its extensive features and capabilities, though other options like GIMP and Affinity Photo are also viable.
10.2. How can I make the added person look realistic?
Matching the lighting, perspective, and color tones of the added person to the background is crucial. Adding realistic shadows and refining the selection edges also help.
10.3. What are the common mistakes to avoid?
Common mistakes include mismatching lighting, incorrect perspective, poor selection quality, over-editing, and ignoring shadows.
10.4. Can I use AI to improve the editing process?
Yes, AI-powered tools can assist with selection, enhancement, and compositing, making the editing process more efficient and accurate.
10.5. How do I handle hair and other fine details during selection?
Use the Select and Mask feature in Photoshop with the Refine Edge Brush Tool to improve the selection around hair and other fine details.
10.6. What is frequency separation and how can it help?
Frequency separation is a technique that separates texture and color information, allowing for targeted adjustments to improve the overall image quality.
10.7. How do I add realistic shadows to the added person?
Create a new layer below the person’s layer, paint the shadow using a soft brush, blur the shadow, and transform it to match the surface it’s cast on.
10.8. What are adjustment layers and how do they work?
Adjustment layers are non-destructive layers that allow you to apply color and tonal adjustments without directly modifying the original image.
10.9. How do I ensure the resolution of the added person matches the background?
Start with images that have similar resolutions. If necessary, use AI upscaling tools to increase the resolution of the added person while preserving details.
10.10. Where can I find inspiration and learning materials for photo editing?
Online courses, YouTube channels, books, and websites offer a wealth of resources and learning materials to enhance your photo editing skills.
Mastering the art of adding a person to a photo is a journey that combines technical skills with creative vision. With the right tools, techniques, and a dash of inspiration, you can create stunning and realistic composites that tell compelling stories. So grab your digital camera, explore the tutorials on dfphoto.net, and start experimenting today.
Ready to take your photography skills to the next level? Visit dfphoto.net for more in-depth guides, stunning photo collections, and a vibrant community of photographers. Share your creations, get feedback, and discover new techniques to elevate your art.
Address: 1600 St Michael’s Dr, Santa Fe, NM 87505, United States
Phone: +1 (505) 471-6001
Website: dfphoto.net