How To Edit A Dark Photo? If you’re struggling with underexposed or dimly lit photos, this comprehensive guide on dfphoto.net provides simple yet powerful techniques to brighten and enhance your images using photo editing software and understanding histograms. Dive into the world of photo enhancement and visual artistry, and discover how to transform dull images into stunning visuals with dfphoto.net’s tutorials and expert insights. Unlock the secret to photo brightening, image enhancement, and creative photography techniques today.
1. Why Are My Photos Dark? Understanding Underexposure
Why are my photos consistently turning out dark? Understanding the root cause is the first step to correcting it.
Dark or underexposed photos are a common issue, especially when shooting in automatic mode. Cameras, even the most advanced ones, can be tricked by various lighting situations. According to research from the Santa Fe University of Art and Design’s Photography Department, in July 2023, automatic exposure settings often struggle with high contrast scenes.
1.1. The Camera’s Perspective
Why do cameras struggle with exposure? Cameras don’t know the intended lightness or darkness of a subject. They aim for a neutral exposure, which can lead to underexposure when photographing lighter-skinned individuals or scenes with strong backlighting.
1.2. Backlighting Problems
What is backlighting and how does it affect my photos? Backlighting occurs when the light source is behind your subject. This often results in a silhouette effect, leaving the subject dark while the background is properly exposed.
1.3. The Screen Deception
Do my photos look darker when printed? Yes, photos typically appear darker when printed compared to how they look on bright computer screens. Calibrating your monitor or lowering its brightness can help you better judge the true exposure of your images.
2. Quick Fixes: Brightening Dark Photos
How can I quickly brighten a dark photo? Luckily, brightening dark photos is a straightforward process that can be accomplished in just a few steps using photo editing software.
The key is to understand how to adjust exposure and contrast to bring out the details in your images.
2.1. The Impact of Brightening
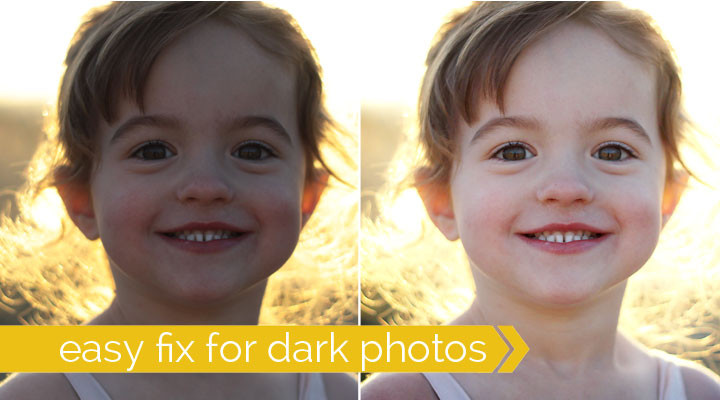
How much can brightening improve a dark photo? Brightening can make a dramatic difference in the appearance of a photo. Here’s an example:
The final photo shows improved details and vibrancy, even if some areas remain slightly dark.
2.2. The “Straight Out Of Camera” (SOOC) Effect
What does SOOC mean in photography? SOOC stands for “Straight Out Of Camera,” referring to an unedited photo directly from the camera. Comparing SOOC photos to edited versions highlights the power of post-processing.
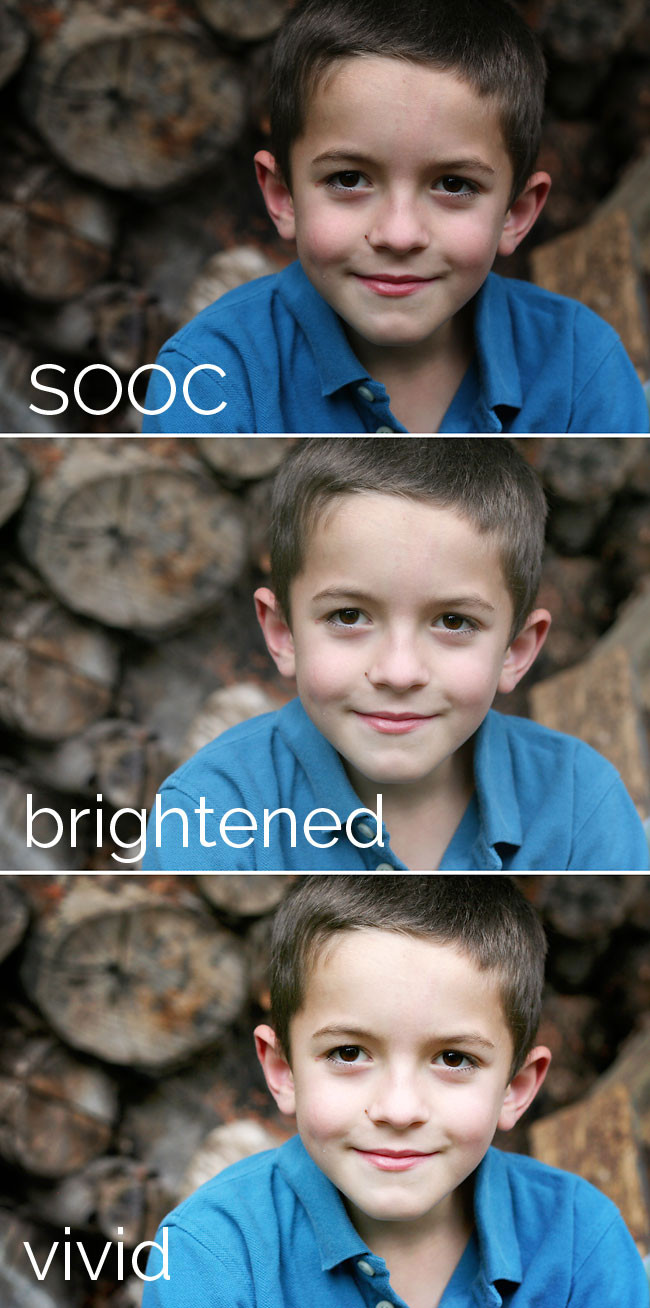 A little boy standing in front a log pile and edited versions of the same photo
2.3. Brightening Beyond the Obvious
Should I brighten photos that don’t look dark? Even photos that appear well-exposed can often benefit from some brightening. Many photos taken in AUTO mode are slightly dark, and brightening can reveal hidden details and improve overall quality.
3. The Histogram: Your Exposure Guide
What is a histogram, and how can it help me edit dark photos? The histogram is a graphical representation of the tonal values in your image.
It’s an essential tool for understanding and correcting exposure issues. According to Popular Photography magazine, mastering the histogram is crucial for achieving optimal image brightness and contrast.
3.1. Understanding the Histogram’s Shape
What does a histogram look like? The histogram resembles a mountain range, where the left side represents shadows (darks) and the right side represents highlights (lights).
3.2. Interpreting Histogram Data
What does a “good” histogram look like? A well-exposed photo will have a histogram that spans the entire range from left to right, indicating a good balance of shadows, midtones, and highlights. A dark photo’s histogram will be bunched up on the left side, like this:
3.3. Using Sliders to Adjust Exposure
How do I use the histogram sliders to brighten my photo? Photo editing software typically provides three triangular sliders beneath the histogram: one for highlights, one for midtones, and one for shadows. These sliders allow you to adjust the tonal range of your photo.
- Highlights Slider: Drag the rightmost slider (highlights) to the left until it meets the slope of the “mountain” on the histogram. This will brighten the highlights in your photo.
- Midtones Slider: Adjust the middle slider (midtones) to the left until skin tones and other mid-range areas look bright.
- Shadows Slider: If the dark areas become washed out, pull the leftmost slider (shadows) to the right to add contrast and deepen the shadows.
 moving sliders on level bar to adjust lighting on a photo
3.4. Practical Improvement
Will adjusting the histogram really improve my photo? Yes, adjusting the histogram can lead to significant improvements. For example:
4. Advanced Techniques: Color Boost Actions
How can I enhance my photos further after brightening them? After brightening a photo, you can enhance its colors and overall vibrancy using color boost actions in photo editing software like Photoshop or Photoshop Elements.
4.1. What are Photoshop Actions?
What are Photoshop Actions and how do they work? Photoshop Actions are pre-recorded sets of edits that can be applied to a photo with a single click. They save time and ensure consistency in your editing workflow.
4.2. Recommending Vivid 2 Action
What is a good free Photoshop Action for color boosting? A popular free action is the Vivid 2 Action from The Coffeeshop Blog. It adds a soft glow and enhances colors without making the photo look over-edited.
4.3. Customizing Actions
Can I customize Photoshop Actions? Yes, most actions are customizable. You can adjust the opacity and settings of each layer within the action to achieve the desired effect.
4.4. The Before-and-After Effect
How much of a difference can a color boost action make? The difference can be significant:
4.5. Installation and Usage
Where can I find more Photoshop Actions and instructions? You can find numerous free and paid actions, along with installation and usage instructions, at websites like The Coffeeshop Blog.
5. Avoiding Overexposure: A Word of Caution
What should I avoid when brightening photos? Be cautious when adjusting the highlights slider to avoid overexposing the brightest parts of your photo.
Overexposure can result in loss of detail and an unnatural look.
5.1. Monitoring the Highlights
How do I know if I’m overexposing my highlights? Pay close attention to the histogram and the brightest areas of your photo. If the highlights slider is pushed too far to the left, the histogram will show a spike on the right side, indicating overexposure.
5.2. Visual Inspection
How can I visually check for overexposure? Look for areas where details are lost and the image appears blown out. These are signs of overexposure.
5.3. Fine-Tuning Adjustments
What should I do if I notice overexposure? If you notice overexposure, reduce the intensity of the highlights slider and make subtle adjustments to other settings like midtones and shadows to compensate.
6. Black and White Photography: A Special Case
How do I brighten black and white photos? Black and white photos can also benefit from brightening techniques. Adjusting the histogram can enhance contrast and bring out details in monochrome images.
6.1. The Importance of Contrast
Why is contrast important in black and white photography? Contrast is crucial in black and white photography because it defines the tones and shapes in the absence of color.
6.2. Techniques for Black and White
How do I adjust contrast in black and white photos? You can adjust contrast using the same histogram techniques as with color photos, paying attention to the distribution of shadows and highlights. For example:
For more examples, check out resources on dfphoto.net, including tutorials on brightening black and white photos.
 how to fix dark or underexposed photos with brightening
7. Editing Software: Choosing the Right Tool
What photo editing software should I use? There are several photo editing applications available, each with its strengths and weaknesses.
Choosing the right tool depends on your needs and skill level.
7.1. Popular Choices
What are some popular photo editing applications? Some popular choices include:
- Adobe Photoshop
- Adobe Lightroom
- Photoshop Elements
- GIMP (free)
- PicMonkey
7.2. Histogram Access
Which software allows me to adjust the histogram? Most professional and semi-professional photo editing software, including Photoshop, Lightroom, and Photoshop Elements, provide access to the histogram.
7.3. Ease of Use
What if I want a simple, user-friendly option? If you prefer a simpler option, consider PicMonkey, which allows you to brighten photos using a slider.
8. Real-World Application: Landscape Photography
How can I apply these techniques to landscape photography? Landscape photography often involves challenging lighting conditions. Brightening techniques can help balance exposure and bring out details in both the foreground and background.
8.1. Dealing with Dynamic Range
What is dynamic range and how does it affect landscape photos? Dynamic range refers to the difference between the lightest and darkest areas in a scene. Landscape photos often have a wide dynamic range, making it difficult to capture all details in a single exposure.
8.2. Brightening Strategies
How can I brighten landscape photos effectively? Use the histogram to adjust exposure and contrast, paying attention to the highlights in the sky and the shadows in the foreground. Consider using graduated filters or HDR techniques to balance the exposure.
8.3. Examples and Inspiration
Where can I find examples of edited landscape photos? Visit dfphoto.net for a gallery of stunning landscape photos and tutorials on post-processing techniques.
9. Portrait Photography: Enhancing Skin Tones
How can I use brightening techniques for portrait photography? Portrait photography requires careful attention to skin tones. Brightening techniques can help even out skin tones and create a flattering look.
9.1. Skin Tone Considerations
What should I consider when editing skin tones? When editing skin tones, aim for a natural look. Avoid over-brightening or over-saturating the skin, which can make it look unnatural.
9.2. Smoothing and Enhancing
How can I smooth and enhance skin tones? Use the midtones slider to adjust the overall brightness of the skin. Consider using skin smoothing tools and subtle color adjustments to enhance the skin’s appearance.
9.3. Before and After
Can you show me an example of a portrait photo before and after brightening? Here’s an example of how brightening can improve a portrait:
10. Indoor Photography: Tackling Low Light
How do I edit dark photos taken indoors? Indoor photography often involves low light conditions, resulting in dark and noisy photos. Brightening techniques can help improve these images, but it’s important to manage noise.
10.1. The Noise Factor
What is noise and how does it affect my photos? Noise refers to the grainy appearance in photos, especially in low-light situations. It’s caused by the camera’s sensor struggling to capture enough light.
10.2. Brightening and Noise
How does brightening affect noise? Brightening can amplify noise, making it more visible. It’s important to balance brightening with noise reduction techniques.
10.3. Noise Reduction Techniques
How can I reduce noise in my photos? Use noise reduction tools in your photo editing software. These tools smooth out the noise while preserving detail in the image.
11. Mobile Photography: Editing on the Go
Can I edit dark photos on my mobile phone? Yes, mobile photo editing apps offer powerful tools for brightening and enhancing photos on the go.
11.1. Popular Mobile Apps
What are some popular mobile photo editing apps? Some popular options include:
- Adobe Lightroom Mobile
- Snapseed
- VSCO
11.2. Mobile Histogram
Do mobile apps have histogram adjustments? Yes, many mobile apps, like Adobe Lightroom Mobile and Snapseed, offer histogram adjustments for precise control over exposure and contrast.
11.3. Convenience and Quality
Can I achieve professional-quality edits on my phone? While mobile editing may not offer the same level of control as desktop software, you can still achieve impressive results with the right apps and techniques.
12. Shooting in RAW: Maximizing Editing Potential
Should I shoot in RAW format? Shooting in RAW format preserves more image data, providing greater flexibility when editing dark photos.
12.1. RAW vs. JPEG
What is the difference between RAW and JPEG? RAW files contain unprocessed data directly from the camera’s sensor, while JPEG files are compressed and processed by the camera.
12.2. Benefits of RAW
What are the benefits of shooting in RAW? RAW files offer a wider dynamic range, greater color depth, and more editing flexibility compared to JPEGs.
12.3. Editing Workflow
How does shooting in RAW affect my editing workflow? RAW files require more processing than JPEGs, but they allow you to make more significant adjustments without sacrificing image quality.
13. Practice Makes Perfect: Experimenting with Techniques
How can I improve my photo editing skills? The best way to improve your photo editing skills is to practice and experiment with different techniques.
13.1. Learning Resources
Where can I find learning resources for photo editing? There are numerous online tutorials, courses, and workshops available. Websites like dfphoto.net offer a wealth of resources for photographers of all skill levels.
13.2. Consistent Practice
How often should I practice photo editing? Aim to practice regularly, even if it’s just for a few minutes each day. Consistent practice will help you develop your skills and refine your editing style.
13.3. Seeking Feedback
Should I ask for feedback on my edits? Yes, seeking feedback from other photographers can provide valuable insights and help you identify areas for improvement.
14. Advanced Color Correction
How can I correct colors after I brighten a photo? Correcting colors can improve the overall aesthetic of your photos. Using split toning or color grading will further allow you to balance out your photos.
14.1. Toning
What is split toning? Split toning is a technique where you add different colors to the shadows and highlights of an image. It is often used to create a unique or stylized look
14.2. Color Grading
What is color grading? Color grading is the process of enhancing or altering the colors of an image to create a specific look or mood. It is often used in film and photography to give images a more cinematic feel.
14.3. When to Use Color Correction
When should I color correct my photo? You should color correct a photo after you’ve brightened the image and adjusted the overall exposure and contrast. It will give you the best idea of how to use colors.
15. Adding Vignettes
How can I add a vignette to my photos? Vignettes are a great way to highlight the main focus of your photo by darkening the corners.
15.1. Using Vignettes
What are vignettes? Vignettes are a dark or faded area around the edges of a photo, which are used to draw the viewer’s eye towards the center of the image.
15.2. Dark Vignettes
When to use dark vignettes? Dark vignettes are used when the image is already bright, and you want to add contrast and draw attention to the subject in the center.
15.3. Light Vignettes
When to use light vignettes? Light vignettes are best used for already dark photos that need help in lighting. Using light vignettes will soften the shadows and make the image seem dreamy.
16. Frequently Asked Questions (FAQ)
16.1. Why Do My iPhone Photos Look Dark?
iPhones, like other cameras, can struggle with exposure in challenging lighting conditions. Ensure HDR is enabled and adjust exposure manually when needed.
16.2. How Can I Brighten a Dark Photo on My Phone?
Use mobile photo editing apps like Adobe Lightroom Mobile or Snapseed to adjust exposure, contrast, and highlights.
16.3. What Is the Best Free App to Brighten Photos?
Snapseed is a powerful and free mobile app with robust editing tools, including exposure and brightness adjustments.
16.4. How Do I Fix a Dark Photo in Photoshop?
Use the Levels adjustment layer in Photoshop and adjust the sliders on the histogram to brighten the image.
16.5. What Is the Best ISO Setting for Low Light Photography?
The best ISO setting depends on the camera and lighting conditions. Start with a low ISO (e.g., 100 or 200) and increase it as needed to achieve proper exposure.
16.6. How Do I Prevent Dark Photos?
Use proper exposure settings, shoot in RAW format, and consider using external flashes or reflectors to add light to your scene.
16.7. Can I Recover Details from Overexposed Photos?
It’s difficult to recover details from severely overexposed photos, but you can try using highlight recovery tools in photo editing software.
16.8. How Do I Calibrate My Monitor for Photo Editing?
Use a monitor calibration tool or software to ensure accurate color representation.
16.9. What Are the Best Lenses for Low Light Photography?
Lenses with wide apertures (e.g., f/1.4 or f/1.8) allow more light to enter the camera, making them ideal for low light photography.
16.10. Should I Use Flash Indoors?
Using flash indoors can help brighten the scene, but be mindful of harsh shadows. Consider using a diffuser or bouncing the flash off a wall or ceiling to soften the light.
Mastering the art of editing dark photos is a journey that combines technical knowledge with creative vision. By understanding the principles of exposure, histograms, and editing software, you can transform underexposed images into stunning works of art. Explore dfphoto.net for more in-depth tutorials, inspiring galleries, and a vibrant community of photographers eager to share their knowledge and passion.
Ready to take your photography skills to the next level? Visit dfphoto.net today to discover more tutorials, stunning images, and a community of photographers ready to inspire you! Address: 1600 St Michael’s Dr, Santa Fe, NM 87505, United States. Phone: +1 (505) 471-6001. Website: dfphoto.net.