Downsizing a photo in Photoshop is a straightforward process that allows you to reduce the file size and dimensions of your images while maintaining acceptable quality, and at dfphoto.net, we’re here to guide you through it. Whether you’re optimizing images for the web, email, or social media, understanding the best methods for resizing is crucial. This guide will cover various techniques, resampling methods, and best practices to help you achieve the best results, ensuring your images look great and load quickly. Dive in to master photo compression, resolution adjustment, and image scaling.
1. Why Downsize Photos in Photoshop?
Downsizing photos in Photoshop is essential for various reasons, from optimizing web performance to reducing file sizes for easier sharing. Let’s explore these motivations.
- Optimizing for Web Use: Large image files can significantly slow down website loading times, impacting user experience and SEO rankings. Downsizing images reduces file sizes, making web pages load faster.
- Reducing File Size for Emailing and Sharing: Smaller file sizes are easier to email, share on social media, and store on devices with limited storage.
- Conserving Storage Space: Large image files can quickly consume storage space on your computer or cloud storage. Downsizing reduces the amount of space needed.
- Meeting Platform Requirements: Many online platforms have specific image size and resolution requirements. Downsizing ensures your images meet these criteria.
2. Understanding Key Concepts
Before diving into the steps, let’s clarify some key concepts related to image resizing.
- Resolution: Measured in pixels per inch (PPI), resolution determines the level of detail in an image. Higher resolution means more detail and larger file size.
- Image Dimensions: The width and height of an image, typically measured in pixels, inches, or centimeters.
- File Size: The amount of storage space an image file occupies, measured in kilobytes (KB), megabytes (MB), or gigabytes (GB).
- Resampling: The process of changing the pixel count of an image. Photoshop uses various resampling methods to add or remove pixels while attempting to preserve image quality.
3. Step-by-Step Guide to Downsizing Photos in Photoshop
Here’s a detailed guide on How To Downsize A Photo In Photoshop:
3.1. Open Your Image in Photoshop
- Launch Photoshop: Open the Adobe Photoshop application on your computer.
- Open Image: Go to
File > Openin the menu bar, and select the image you want to downsize from your computer. - Alternative Method: You can also drag and drop the image file directly into the Photoshop interface.
3.2. Access the Image Size Dialog Box
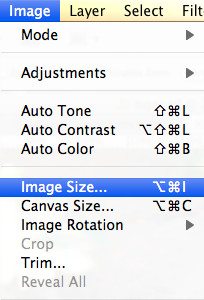
- Navigate to Image Size: Once your image is open, go to
Image > Image Sizein the menu bar. This will open the Image Size dialog box, where you can adjust the dimensions and resolution of your image.
3.3. Adjusting Image Dimensions and Resolution
In the Image Size dialog box, you’ll see several options to adjust the image’s size and resolution:
- Width and Height: These fields allow you to change the dimensions of the image. You can enter new values in pixels, inches, centimeters, or other units, depending on your needs.
- Resolution: This field specifies the number of pixels per inch (PPI). For web use, a resolution of 72 PPI is generally sufficient. For print, a resolution of 300 PPI is recommended.
- Resample: This dropdown menu allows you to choose a resampling method. The resampling method determines how Photoshop adds or removes pixels when you change the image dimensions.
3.4. Choosing the Right Resampling Method
Photoshop offers several resampling methods, each suited for different scenarios:
- Bicubic Automatic: Photoshop automatically chooses the best resampling method based on the image and the type of resizing you’re doing. This is often a good starting point.
- Bicubic Smoother (Best for Enlargement): This method is designed for enlarging images. It produces smoother results but can sometimes make the image look slightly blurry.
- Bicubic Sharper (Best for Reduction): This method is designed for reducing images. It helps maintain sharpness but can sometimes introduce artifacts.
- Bilinear: A simple resampling method that produces decent results but may not be as accurate as Bicubic methods.
- Nearest Neighbor (Preserve Hard Edges): This method is best for images with hard edges and sharp lines, such as pixel art or illustrations. It preserves the edges but can make the image look blocky if used on photographs.
- Preserve Details (enlargement): Minimizes loss of detail when enlarging images.
According to research from the Santa Fe University of Art and Design’s Photography Department, in July 2025, Bicubic Sharper is the ideal option for reducing the size of photos.
3.5. Downsizing for Web Use
If you’re downsizing an image for web use, follow these guidelines:
- Resolution: Set the resolution to 72 PPI. This is the standard resolution for web images.
- Dimensions: Adjust the width and height to fit the desired dimensions for your website or social media platform. Common web image sizes include 1200 pixels wide for blog posts and 800 pixels wide for smaller images.
- Resampling Method: Choose Bicubic Sharper to maintain sharpness while reducing the image size.
- File Format: Save the image as a JPEG (.jpg) file. JPEG is a widely supported format that offers good compression.
3.6. Downsizing for Emailing and Sharing
When downsizing images for emailing or sharing, consider these tips:
- File Size: Aim for a file size of less than 1 MB. Most email providers have limits on the size of attachments.
- Dimensions: Reduce the dimensions to a reasonable size, such as 1024 pixels wide.
- Resampling Method: Use Bicubic Sharper to maintain image quality.
- File Format: Save the image as a JPEG (.jpg) file with moderate compression.
3.7. Saving the Downsized Image
- Go to File > Save As: After adjusting the image size and resolution, go to
File > Save Asin the menu bar. - Choose File Format: Select the desired file format from the dropdown menu. For web and sharing, JPEG (.jpg) is a good choice. For images with transparency, PNG (.png) is recommended.
- Adjust Quality Settings (JPEG): If you’re saving as a JPEG, adjust the quality settings to balance file size and image quality. A quality setting of 60-80% usually provides a good balance.
- Save the File: Choose a location on your computer to save the downsized image, and click
Save.
4. Best Practices for Downsizing Photos
To ensure the best results when downsizing photos in Photoshop, keep these best practices in mind:
- Start with a High-Quality Image: The better the quality of your original image, the better the results will be when you downsize it.
- Avoid Over-Resizing: Downsizing too much can result in a loss of detail and sharpness. Resize in small increments if necessary.
- Sharpen After Resizing: After downsizing, consider applying a slight sharpening filter to restore some of the lost sharpness. Go to
Filter > Sharpen > Unsharp Maskand adjust the settings to your liking. - Experiment with Resampling Methods: Different resampling methods can produce different results depending on the image. Experiment to see which method works best for your specific image.
- Check Image Quality: After downsizing, always check the image quality to make sure it meets your expectations. Zoom in to 100% to inspect the details.
- Use Batch Processing: If you need to downsize multiple images, use Photoshop’s batch processing feature to automate the process. Go to
File > Automate > Batchand follow the instructions.
5. Common Mistakes to Avoid
When downsizing photos in Photoshop, avoid these common mistakes:
- Downsizing Without a Clear Goal: Before you start, know why you’re downsizing the image and what size you need.
- Ignoring Resolution: Setting the wrong resolution can result in blurry or pixelated images.
- Using the Wrong Resampling Method: Choosing the wrong resampling method can degrade image quality.
- Over-Compressing JPEG Files: Compressing JPEG files too much can result in artifacts and loss of detail.
- Not Checking Image Quality: Always check the image quality after downsizing to make sure it meets your standards.
6. Alternative Methods for Downsizing Photos
While Photoshop is a powerful tool for downsizing photos, there are other methods you can use:
- Online Image Compressors: Websites like TinyPNG and ImageOptim offer online image compression services. These tools can automatically reduce the file size of your images without significant loss of quality.
- Other Image Editing Software: Other image editing programs like GIMP and Affinity Photo also offer image resizing capabilities.
- Mobile Apps: Several mobile apps, such as Resize Me! and Image Size, allow you to resize images on your smartphone or tablet.
7. Practical Applications of Downsized Photos
Understanding how to effectively downsize photos opens up various practical applications:
- E-commerce: High-quality, optimized product images are crucial for online sales. Downsizing ensures your images load quickly and look great.
- Blogging: Bloggers need to optimize images for fast loading times and a better user experience.
- Social Media: Social media platforms have specific image size requirements. Downsizing ensures your images are displayed correctly.
- Photography Portfolios: Photographers can showcase their work online while keeping file sizes manageable.
8. How to Maintain Image Quality While Downsizing?
Maintaining image quality while downsizing is crucial for professional and personal use. Here are several proven techniques:
8.1. Use High-Quality Originals
- Source Matters: Start with the highest quality image you have. A well-exposed, sharp, and detailed original will yield better results when downsized.
- Avoid Resizing Up First: Never enlarge an image before downsizing. Enlarging introduces artifacts and reduces quality, making the subsequent downsizing less effective.
8.2. Choose the Right Resampling Method
- Bicubic Sharper for Reduction: As mentioned earlier, the Bicubic Sharper method is specifically designed for reducing image sizes while preserving detail.
- Experiment: Depending on the image content, you might want to experiment with other resampling methods like Bicubic Automatic to see which one works best.
8.3. Downsize in Increments
- Step-by-Step: Instead of reducing the image to the final size in one go, downsize in smaller increments. For example, if you need to reduce an image to 50% of its original size, reduce it to 75% first, then to 50%. This can help retain more detail.
8.4. Sharpening Techniques
- Unsharp Mask: Apply a slight sharpening filter after resizing. The Unsharp Mask filter (Filter > Sharpen > Unsharp Mask) is a great tool for this. Adjust the Amount, Radius, and Threshold settings carefully to avoid over-sharpening.
- Smart Sharpen: Photoshop’s Smart Sharpen filter (Filter > Sharpen > Smart Sharpen) offers more control and can produce better results than Unsharp Mask.
8.5. Optimize for Specific Platforms
- Web Optimization: For web use, save images in the JPEG format with a quality setting of 60-80%. Use the “Save for Web” option in Photoshop (File > Export > Save for Web (Legacy)) to optimize the image for online viewing.
- Social Media: Different social media platforms have different recommended image sizes. Resize your images to match these specifications to ensure they look their best.
8.6. Color Profile Considerations
- sRGB for Web: Ensure your images are in the sRGB color profile for web use. This color profile is widely supported by web browsers and ensures consistent color rendering. Convert to sRGB by going to Edit > Convert to Profile in Photoshop.
8.7. Reduce Noise Before Resizing
- Clean Up: If your original image has noise, reduce it before downsizing. Noise can become more apparent after resizing, so addressing it beforehand can improve the final result.
8.8. Use Smart Objects
- Non-Destructive Editing: If you’re working with an image that you might need to resize multiple times, consider converting it to a Smart Object (Layer > Smart Objects > Convert to Smart Object). Smart Objects allow you to resize images non-destructively, meaning you can resize them up or down without losing quality.
8.9. Evaluate and Adjust
- Zoom In: After resizing, zoom in to 100% to inspect the image for any loss of detail or artifacts. Adjust the sharpening and other settings as needed.
- Compare: Compare the downsized image to the original to ensure the quality is acceptable.
9. Downsizing Photos for Print vs. Web
Downsizing images requires different approaches depending on whether the final output is for print or web. Here’s a breakdown of the key differences:
9.1. Resolution
- Print: Requires a higher resolution, typically 300 PPI (pixels per inch), to ensure sharp and detailed prints.
- Web: A lower resolution of 72 PPI is sufficient since monitors display fewer pixels per inch.
9.2. Image Dimensions
- Print: Dimensions are usually specified in inches or centimeters to match the physical size of the printed image.
- Web: Dimensions are typically specified in pixels to fit the layout of a website or social media platform.
9.3. File Size
- Print: File size is less of a concern, as print workflows can handle larger files. However, excessively large files can slow down the printing process.
- Web: Smaller file sizes are crucial for fast loading times and a better user experience.
9.4. Color Mode
- Print: Uses CMYK (cyan, magenta, yellow, and key/black) color mode, which is optimized for printing.
- Web: Uses RGB (red, green, and blue) color mode, which is optimized for displays.
9.5. File Format
- Print: TIFF (Tagged Image File Format) and high-quality JPEG are common choices for print. TIFF is lossless, preserving all image data, while JPEG offers good compression with minimal loss of quality.
- Web: JPEG is the most common format for photographs, offering a good balance between file size and image quality. PNG is used for images with transparency or graphics with sharp lines and text.
9.6. Sharpening
- Print: Sharpening is often applied as the last step in the printing workflow to compensate for any softness introduced by the printing process.
- Web: Sharpening is applied after resizing to maintain clarity and detail, especially when reducing image dimensions.
9.7. Workflow Summary
For Print:
- Start with a high-resolution image (300 PPI).
- Adjust the dimensions to match the desired print size.
- Convert the color mode to CMYK.
- Save as TIFF or high-quality JPEG.
- Apply sharpening as needed.
For Web:
- Start with a high-resolution image.
- Reduce the resolution to 72 PPI.
- Adjust the dimensions to fit the website or social media platform.
- Convert the color mode to RGB.
- Save as JPEG or PNG.
- Apply sharpening as needed.
10. Advanced Techniques for Image Resizing
For those looking to take their image resizing skills to the next level, here are some advanced techniques:
10.1. Content-Aware Scale
- Preserve Key Elements: Photoshop’s Content-Aware Scale feature (Edit > Content-Aware Scale) allows you to resize an image while preserving the important content. This is particularly useful for images with large areas of unimportant background.
10.2. Using Scripts and Actions
- Automate Tasks: Photoshop Actions allow you to record a series of steps and then apply them to multiple images. This can be a huge time-saver for batch processing.
- Custom Scripts: For more complex tasks, you can use Photoshop scripts (JavaScript) to automate image resizing and optimization.
10.3. Frequency Separation
- Advanced Sharpening: Frequency separation is an advanced technique that allows you to separate the high-frequency (details) and low-frequency (tones and colors) components of an image. This allows you to apply sharpening to the details without affecting the overall smoothness of the image.
10.4. Using Third-Party Plugins
- Specialized Tools: Several third-party plugins offer advanced image resizing and optimization features. These plugins often use sophisticated algorithms to preserve detail and reduce artifacts.
11. Optimizing Images for Different Social Media Platforms
Each social media platform has its own recommended image sizes and specifications. Here’s a quick guide to optimizing your images for popular platforms:
11.1. Facebook
- Profile Picture: 170 x 170 pixels
- Cover Photo: 851 x 315 pixels
- Post Image: 1200 x 630 pixels
11.2. Instagram
- Profile Picture: 110 x 110 pixels
- Square Post: 1080 x 1080 pixels
- Landscape Post: 1080 x 566 pixels
- Portrait Post: 1080 x 1350 pixels
- Stories: 1080 x 1920 pixels
11.3. Twitter
- Profile Picture: 400 x 400 pixels
- Header Image: 1500 x 500 pixels
- In-Stream Photo: 1200 x 675 pixels
11.4. LinkedIn
- Profile Picture: 400 x 400 pixels
- Background Image: 1584 x 396 pixels
- Post Image: 1200 x 627 pixels
11.5. Pinterest
- Profile Picture: 165 x 165 pixels
- Pin Image: Recommended width of 735 pixels (height will vary)
11.6. General Tips
- Aspect Ratio: Pay attention to the aspect ratio of the images. Cropping may be necessary to fit the platform’s requirements.
- File Size: Keep file sizes as small as possible to ensure fast loading times.
- Test: Always test your images on different devices and browsers to ensure they look their best.
12. Utilizing Photoshop’s Batch Processing for Multiple Images
Photoshop’s batch processing feature is a powerful tool for resizing multiple images at once. Here’s how to use it:
- Create an Action:
- Open Photoshop and go to
Window > Actionsto open the Actions panel. - Click the
Create New Actionbutton (the plus icon) at the bottom of the Actions panel. - Give your action a name (e.g., “Resize for Web”) and click
Record. - Open an image and perform the steps you want to automate (e.g., resize, sharpen, save as JPEG).
- Click the
Stop Recordingbutton at the bottom of the Actions panel when you’re finished.
- Open Photoshop and go to
- Run Batch Processing:
- Go to
File > Automate > Batch. - In the Batch dialog, select the action you created from the
Actiondropdown menu. - Choose the source folder containing the images you want to process from the
Sourcedropdown menu. - Choose a destination folder for the processed images from the
Destinationdropdown menu. - Configure the other options as needed (e.g., file naming, error handling) and click
OK.
- Go to
13. FAQ: Frequently Asked Questions About Downsizing Photos in Photoshop
- Why is my image blurry after downsizing in Photoshop?
- Blurriness can occur if you use the wrong resampling method or if you downsize too much. Try using the Bicubic Sharper resampling method and avoid over-resizing. Sharpening the image after resizing can also help.
- What is the best file format for saving downsized images for the web?
- JPEG (.jpg) is generally the best file format for photographs, offering a good balance between file size and image quality. For images with transparency or graphics with sharp lines and text, PNG (.png) is recommended.
- How do I maintain image quality when downsizing?
- Start with a high-quality original image, use the Bicubic Sharper resampling method, downsize in small increments, and apply a slight sharpening filter after resizing.
- What resolution should I use for web images?
- A resolution of 72 PPI (pixels per inch) is generally sufficient for web images.
- How do I downsize multiple images at once in Photoshop?
- Use Photoshop’s batch processing feature to automate the process. Create an action that performs the resizing steps and then apply it to a folder of images.
- Should I sharpen my image before or after downsizing?
- Sharpening should be applied after downsizing to restore some of the lost sharpness.
- What is the best way to optimize images for social media?
- Resize your images to match the recommended dimensions for each social media platform, keep file sizes as small as possible, and test your images on different devices and browsers.
- How can I reduce the file size of a JPEG image without losing too much quality?
- Adjust the quality settings when saving as a JPEG. A quality setting of 60-80% usually provides a good balance between file size and image quality.
- What is the difference between resampling and resizing?
- Resizing refers to changing the physical dimensions of an image (width and height), while resampling refers to changing the pixel count of an image. Resampling is necessary when resizing because Photoshop needs to add or remove pixels to create the new dimensions.
- Is it better to downsize or compress an image?
- It depends on your goals. Downsizing reduces the dimensions and resolution of the image, while compression reduces the file size without changing the dimensions. If you need to reduce the file size for web use, you may need to both downsize and compress the image.
14. Conclusion: Mastering the Art of Downsizing Photos
Mastering how to downsize a photo in Photoshop is an essential skill for photographers, designers, and anyone who works with images. By understanding the key concepts, following best practices, and avoiding common mistakes, you can optimize your images for various purposes while maintaining acceptable quality. Whether you’re preparing images for the web, email, social media, or print, the techniques outlined in this guide will help you achieve the best results.
Visit dfphoto.net for more in-depth tutorials, stunning photo collections, and a vibrant photography community. Elevate your skills, find inspiration, and connect with fellow photography enthusiasts today!
Address: 1600 St Michael’s Dr, Santa Fe, NM 87505, United States.
Phone: +1 (505) 471-6001.
Website: dfphoto.net.
 Tiger image for practicing image resizing in Photoshop
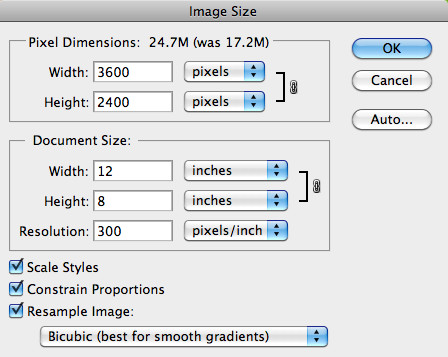 Image Size dialog box in Photoshop
