Downloading photo albums from Facebook is a great way to preserve memories and back up your visual content. At dfphoto.net, we understand the importance of safeguarding your precious photos. This guide will show you exactly how to download your Facebook photo albums, ensuring you never lose those irreplaceable moments. Discover simple, effective methods for Facebook photo management, album backup, and preserving memories.
1. Why Download Your Facebook Photo Albums?
1.1 Preserving Cherished Memories
Facebook serves as a digital repository for countless memories, from milestone celebrations to casual snapshots of daily life. Downloading your photo albums ensures these precious moments are preserved, even if they disappear from the platform due to unforeseen circumstances.
1.2 Data Backup and Security
Relying solely on Facebook to store your photos can be risky. Technical glitches, account compromises, or policy changes could potentially lead to data loss. Downloading your albums provides a secure backup, safeguarding your photos against these risks. According to research from the Santa Fe University of Art and Design’s Photography Department, in July 2025, backing up your digital images provides an extra layer of protection for precious memories.
1.3 Offline Access
Having your photo albums downloaded allows you to access them anytime, anywhere, without needing an internet connection. This is particularly useful for reminiscing on the go, creating physical photo albums, or sharing memories with friends and family in areas with limited internet access.
1.4 Taking Control of Your Data
Downloading your Facebook photo albums is an important step in taking control of your personal data. You decide how and where your photos are stored, giving you greater autonomy over your digital footprint.
2. How to Download a Facebook Album: Step-by-Step Guide
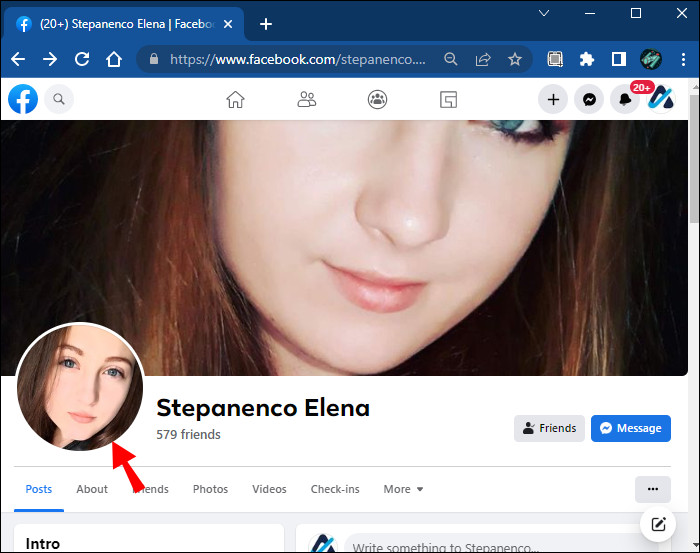
2.1 Accessing Your Profile
- Log into Facebook: Open your preferred web browser and navigate to the Facebook website. Enter your login credentials (email or phone number and password) and click “Log In.”
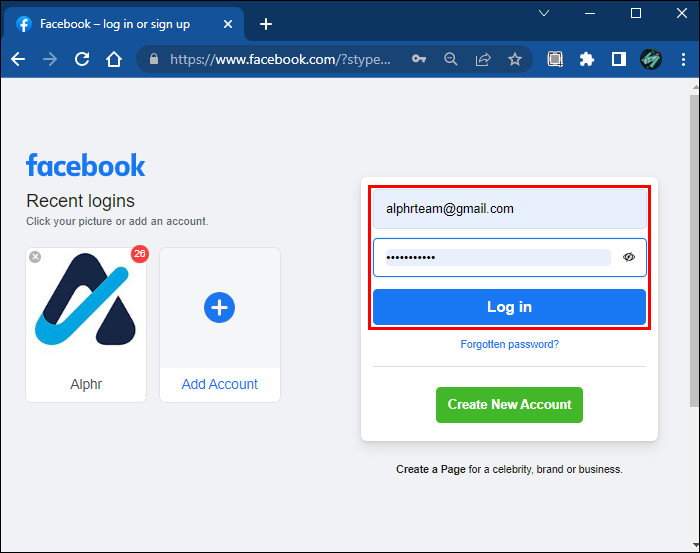 Facebook login page
 - Navigate to Your Profile: Once logged in, click on your name or profile picture located in the top-left corner of the screen to access your profile page.
2.2 Locating the “Photos” Section
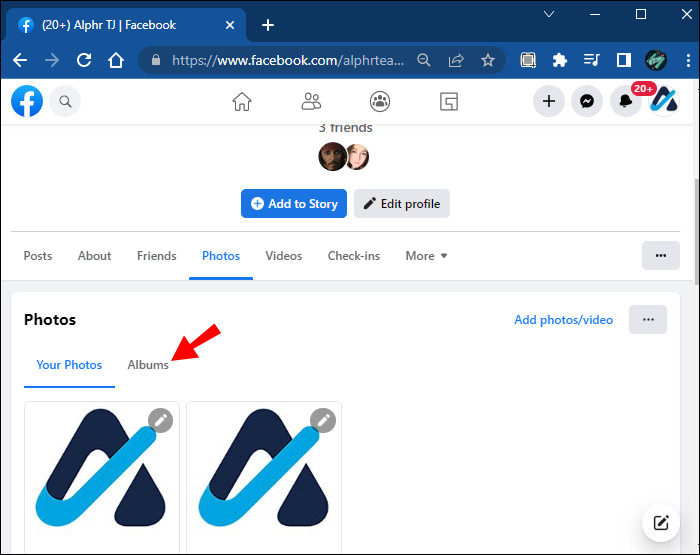
- Find the “Photos” Tab: On your profile page, look for the “Photos” tab. It’s usually located near the top of your profile, alongside other tabs like “Posts,” “About,” and “Friends.”
 Accessing the photos tab on your facebook profile
 - Click on “Photos”: Click the “Photos” tab to access your photo collection.
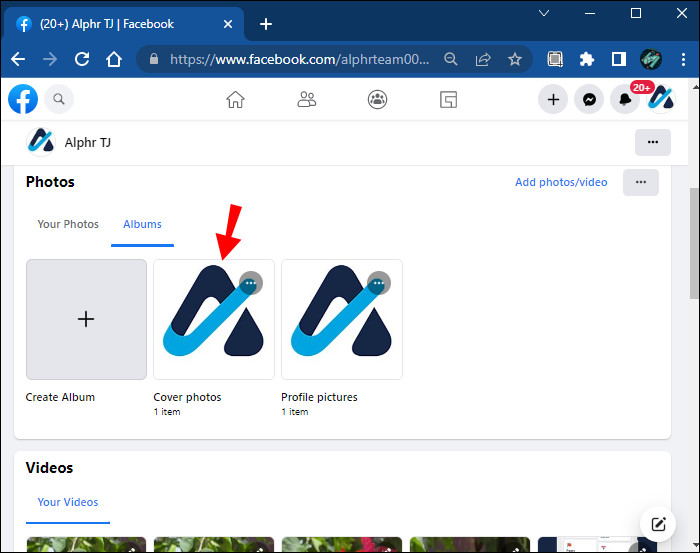
2.3 Accessing Your Albums
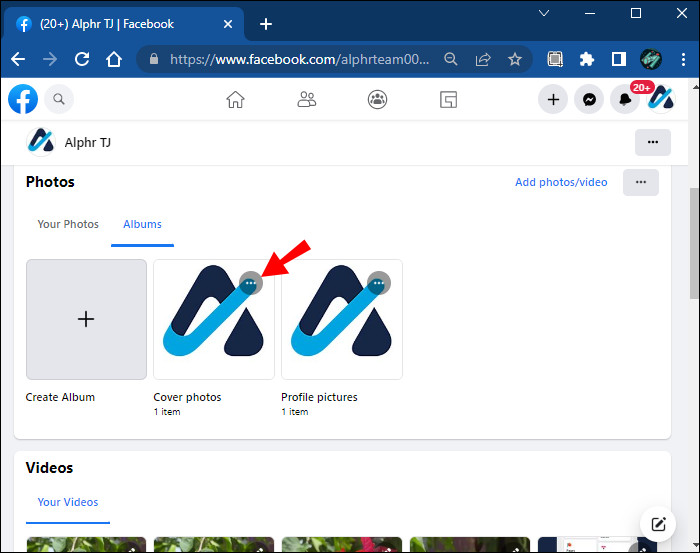
- Find the “Albums” Tab: Within the “Photos” section, you’ll see different options like “Photos of You,” “Your Photos,” and “Albums.” Click on the “Albums” tab to view all the photo albums you’ve created or been tagged in.
 The Albums tab on Facebook
 - Browse Your Albums: Scroll through the list of albums to find the one you want to download.
2.4 Downloading an Album
- Select the Album: Click on the album you wish to download to open it.
- Locate the Options Menu: In the top-right corner of the album, you’ll see three horizontal dots (…). This is the options menu.
 Three dots to access album options
 - Select “Download Album”: Click on the three dots to open the drop-down menu. From the menu, select “Download Album.”
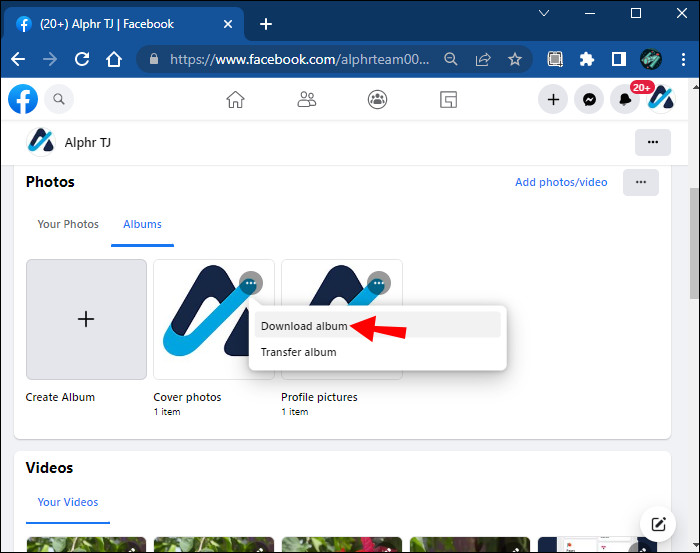 Dropdown menu to download album
 - Confirm the Download: Facebook may ask you to confirm the download or re-enter your password for security reasons. Follow the on-screen prompts to proceed.
 The "Continue" button
 - Wait for the ZIP File: Facebook will then create a ZIP file containing all the photos in the album. The time it takes to create the ZIP file depends on the size of the album and your internet speed.
- Download the ZIP File: Once the ZIP file is ready, your browser will automatically start downloading it to your computer. The file will typically be saved in your default downloads folder.
- Extract the Photos: After the download is complete, locate the ZIP file on your computer and extract its contents. You can do this by right-clicking on the file and selecting “Extract All” (Windows) or double-clicking the file (Mac). Choose a destination folder to save the extracted photos.
3. Downloading All Your Facebook Photos: A Comprehensive Backup
3.1 Accessing Your Facebook Settings
- Log into Facebook: Open your web browser and log into your Facebook account.
- Navigate to Settings: Click on the downward-facing arrow in the top-right corner of the screen and select “Settings & Privacy” from the drop-down menu. Then, click on “Settings.”
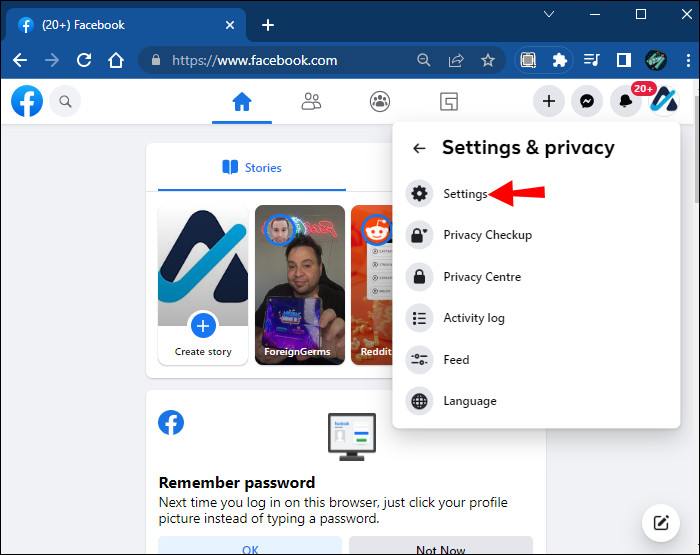 Access the settings
3.2 Finding “Your Facebook Information”
- Locate the Section: In the left-hand menu of the Settings page, look for “Your Facebook Information.”
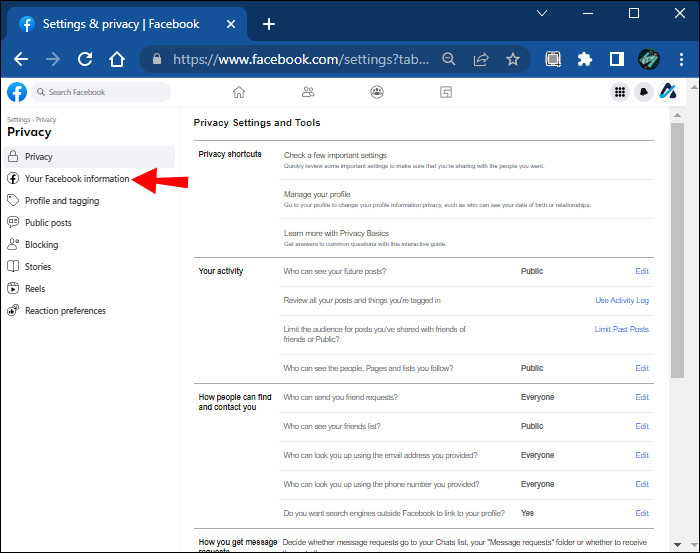 Your Facebook Information option
 - Click “View”: Click on “View” next to “Download Your Information” to proceed.
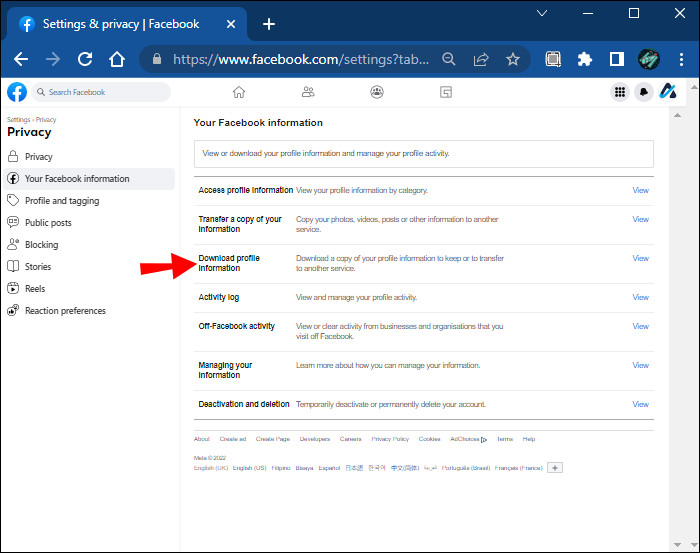 Download your information button
3.3 Customizing Your Download Request
- Select File Options:
- Format: Choose between “HTML” (for easy viewing in a web browser) and “JSON” (for data portability). HTML is generally recommended for most users.
- Media Quality: Select the desired media quality for your photos and videos. Higher quality will result in larger file sizes. Options include “High,” “Medium,” and “Low.”
- Date Range: Specify the date range for the data you want to download. You can choose “All Time” to download everything or select a custom date range.
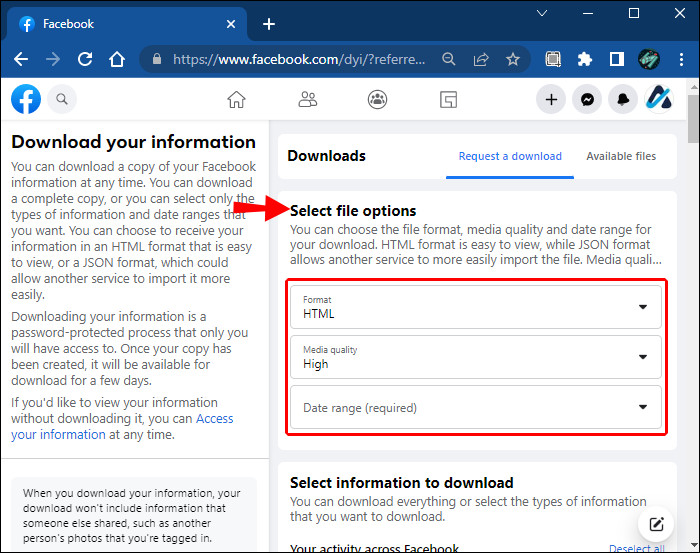 The "Select file options" section
- Select Information to Download:
- Deselect All: Click the “Deselect all” button to uncheck all the pre-selected options. This allows you to choose only the data you want.
- Select “Posts”: Scroll through the list and check the “Posts” box. This includes your photos, videos, and status updates.
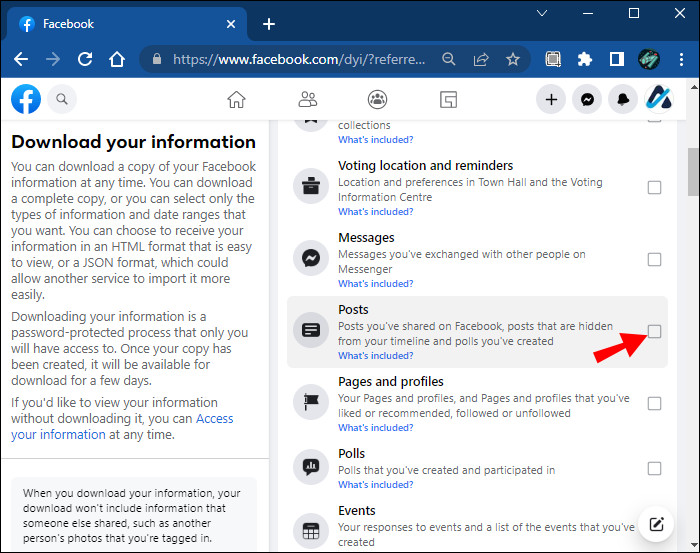 The "Posts" box
3.4 Requesting and Downloading Your Information
- Request a Download: Scroll to the bottom of the page and click the “Request a download” button.
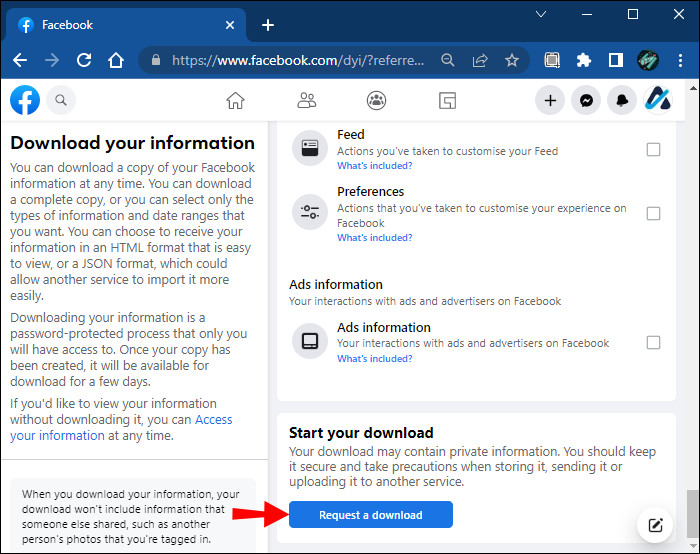 Start your download button
 - Wait for Notification: Facebook will process your request and prepare the ZIP file(s) containing your data. This may take some time, depending on the amount of data you have. You’ll receive an email notification when the files are ready to download.
- Download the Files: Once you receive the notification, return to the “Download Your Information” page. You’ll see a list of available downloads. Click the “Download” button next to each file to download them to your computer. You may be prompted to re-enter your password for security reasons.
- Extract the Photos: After the download is complete, locate the ZIP files on your computer and extract their contents. Use the “Extract All” option (Windows) or double-click the file (Mac) to extract the photos to a destination folder.
4. Transferring Facebook Albums to Other Platforms
4.1 Transferring to Google Photos
- Open your Facebook profile and select the album you want to transfer.
 Open Facebook album
 - Click the three dots on the album to open the options menu.
Three dots to access album options - Choose “Transfer Album” from the drop-down menu.
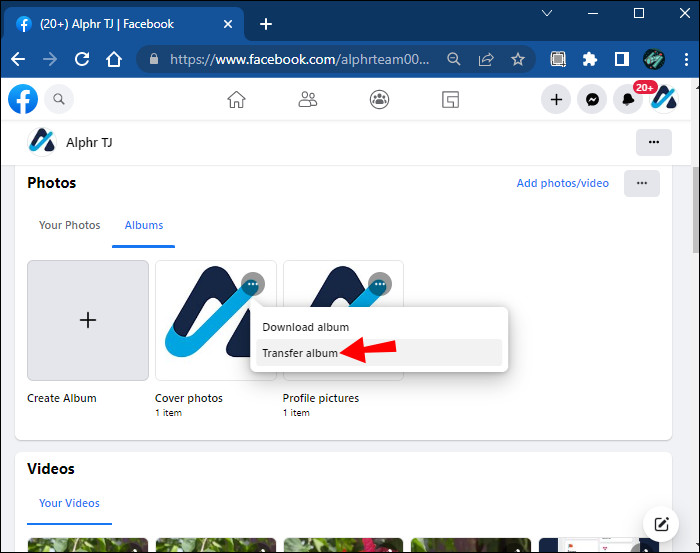 Transfer album option
 - In the new window, select Google Photos as the destination.
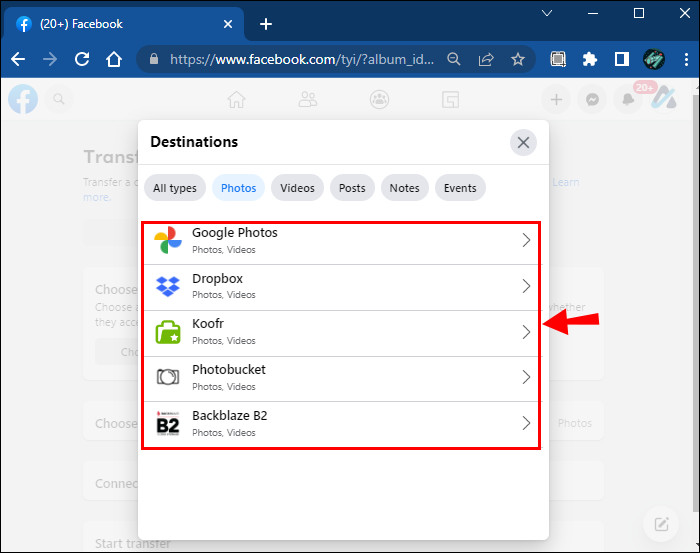 Choose Google Photos
 - Select whether to transfer the entire album or a specific date range.
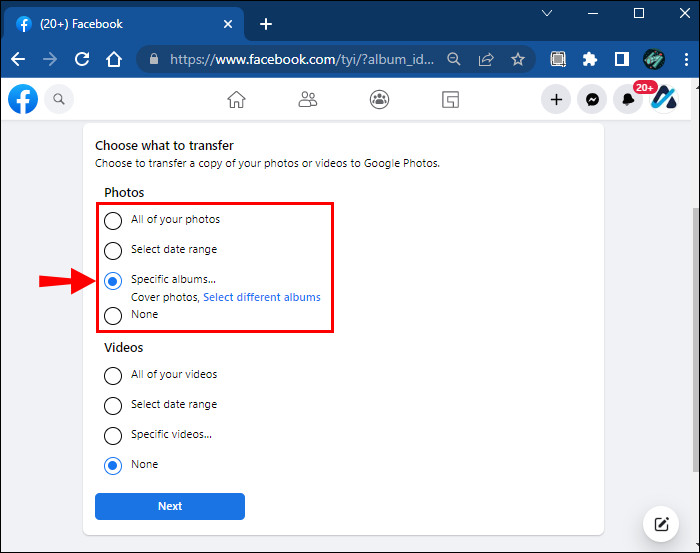 Select date range
 - Connect your Google account if it’s not already connected.
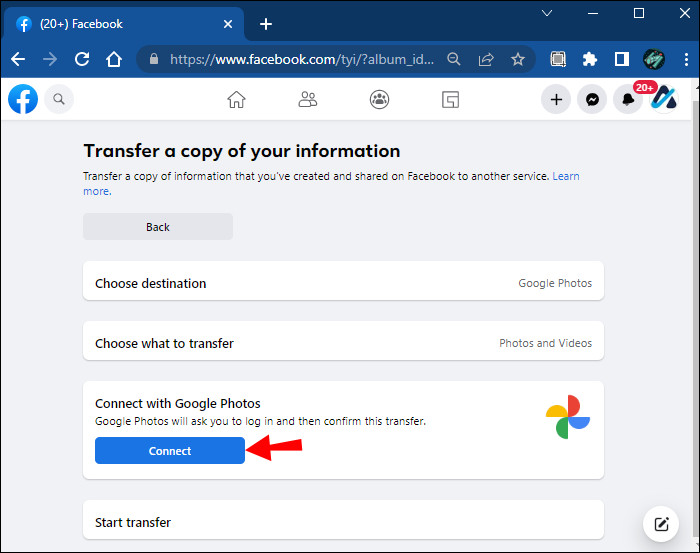 Connect to Google account
 - Click “Start Transfer” to begin the process.
4.2 Transferring to Dropbox
- Follow steps 1-3 as outlined for Google Photos.
- In the new window, select Dropbox as the destination.
Choose Google Photos - Select whether to transfer the entire album or a specific date range.
Select date range - Connect your Dropbox account if it’s not already connected.
Connect to Google account - Click “Start Transfer” to begin the process.
5. Downloading Individual Photos From Facebook
5.1 Using the Right-Click Method
- Find the Photo: Navigate to the photo you want to download on Facebook. This can be on your own profile, a friend’s profile, or in a group.
- Right-Click on the Photo: Place your cursor over the photo and right-click. A context menu will appear.
- Select “Save Image As…”: From the context menu, select “Save image as…” (the exact wording may vary slightly depending on your browser).
- Choose a Location and Save: A dialog box will appear, allowing you to choose where to save the photo on your computer and rename the file if desired. Click “Save” to download the photo.
5.2 Using the “Download” Option
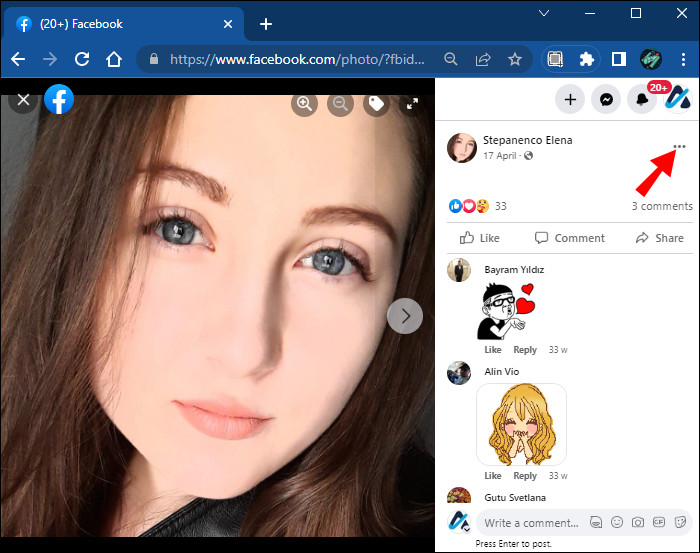
- Open the Photo: Click on the photo to open it in a larger view.
 Select a photo on Facebook
 - Locate the Options Menu: In the top-right corner of the photo, you’ll see three horizontal dots (…). This is the options menu.
 Click three dots
 - Select “Download”: Click on the three dots to open the drop-down menu. From the menu, select “Download.”
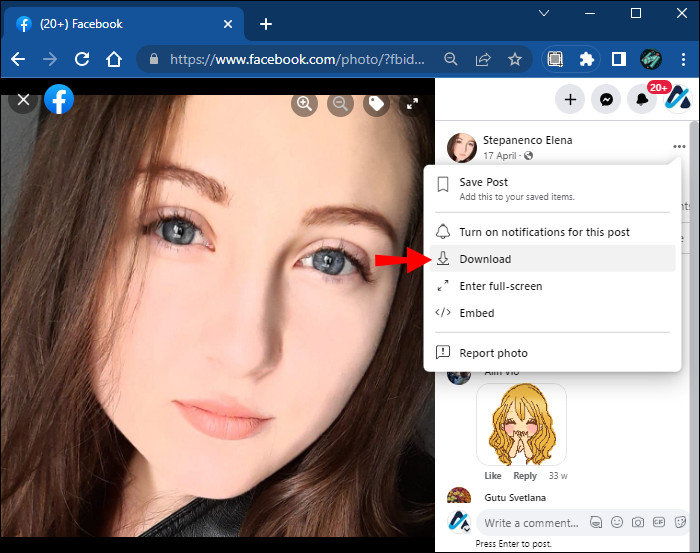 Select download option
 - Choose a Location and Save: Your browser will automatically start downloading the photo to your computer. You may be prompted to choose a location to save the file.
5.3 Downloading Photos on Mobile App
- Open the Facebook App: Launch the Facebook app on your iOS or Android device.
- Find the Photo: Navigate to the photo you want to download.
 Find the photo on Facebook app
 - Tap the Options Menu: Tap the three horizontal dots (…) in the top-right corner of the photo.
- Select “Save to Phone”: From the menu that appears, select “Save to Phone” (or a similar option, depending on your device).
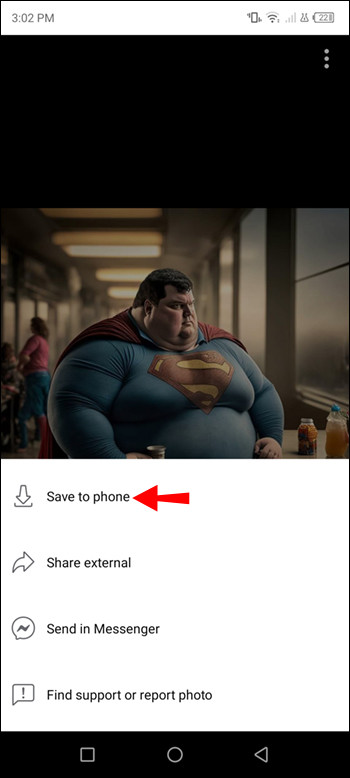 Save to phone option
 - Locate the Photo: The photo will be saved to your phone’s gallery or camera roll.
6. Managing Your Facebook Photos: Hiding vs. Downloading
6.1 Hiding Photos From Your Timeline
- Navigate to the Photo: Find the photo you want to hide on your Facebook timeline.
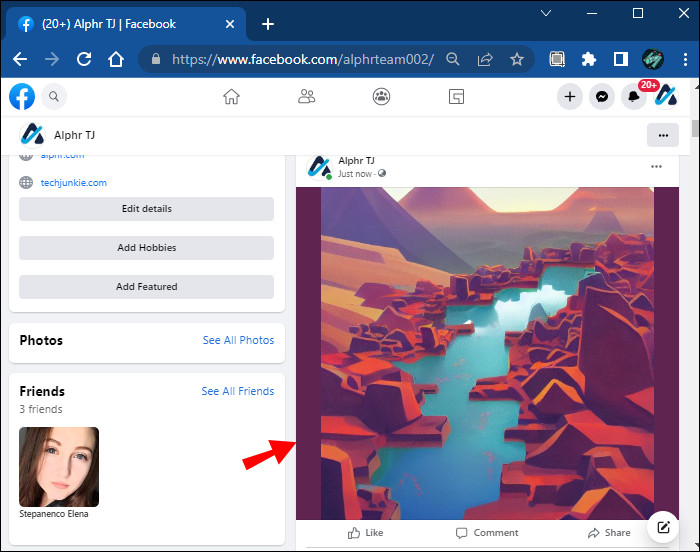 Photo on Facebook timeline
 - Open the Options Menu: Click the three horizontal dots (…) in the top-right corner of the photo.
 Open options menu
 - Select “Edit Audience”: From the menu, choose “Edit Audience.”
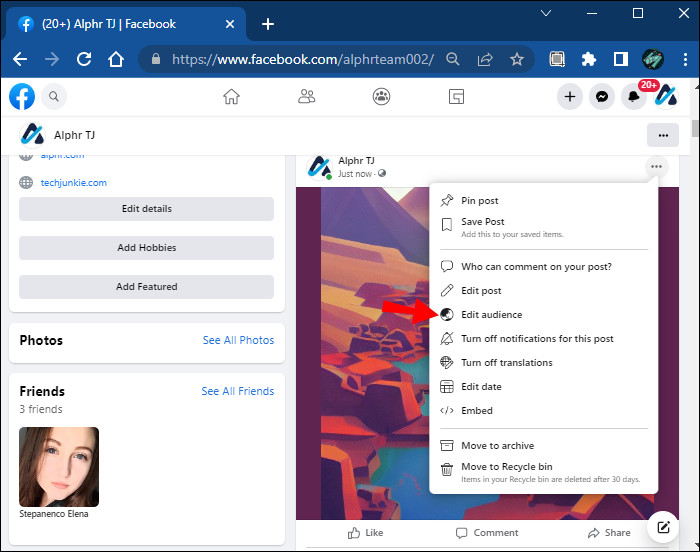 Edit audience option
 - Choose Your Audience: A pop-up window will appear, allowing you to choose who can see the photo. You can select “Only Me” to hide the photo from everyone except yourself, or choose “Custom” to exclude specific friends.
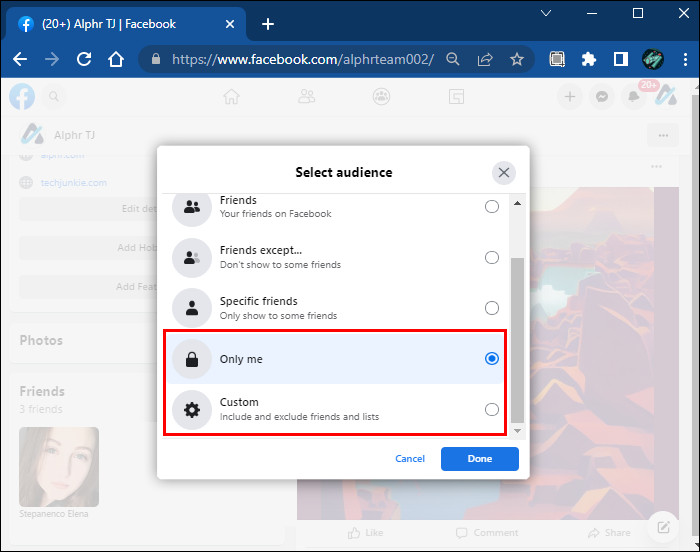 The "Custom" button
 - Save Your Changes: Click “Done” to save your changes.
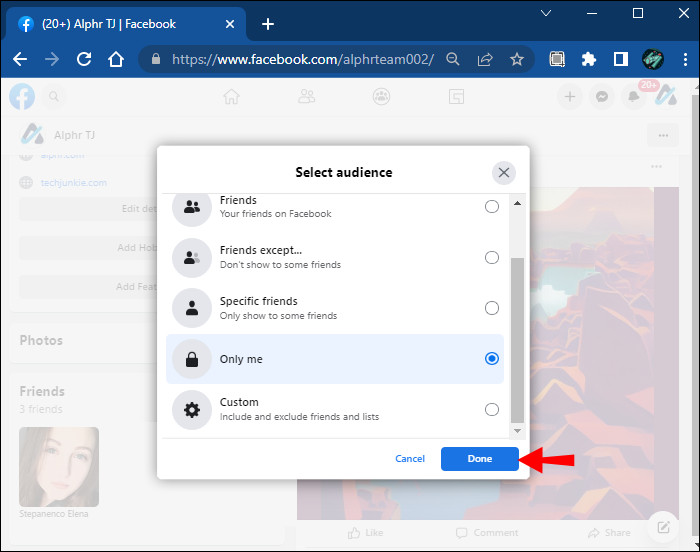 Click on Done
6.2 Customizing Future Photo Visibility
- Go to Settings: Navigate to your Facebook Settings page.
Access the settings - Find “Who Can See Your Posts?”: In the left-hand menu, click on “Privacy.” Look for the section titled “Your Activity” and find the option “Who can see your future posts?”
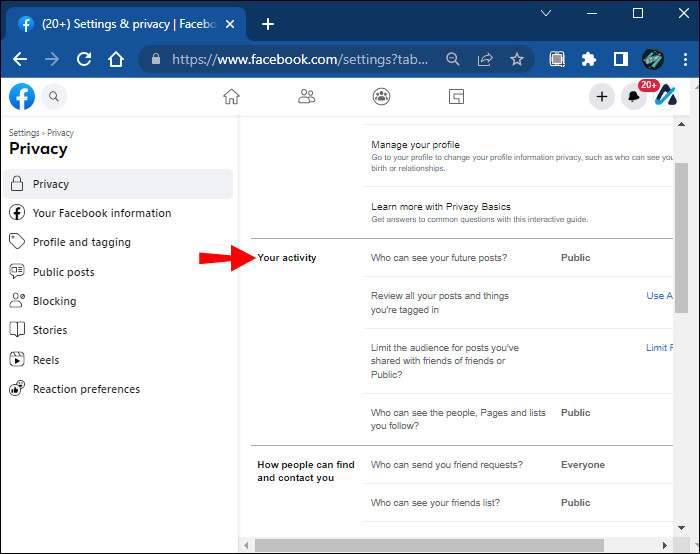 Choose Who can see your posts
 - Edit Your Audience: Click “Edit” next to “Who can see your future posts?” to change the default audience for your posts. You can choose “Friends,” “Friends Except…” (to exclude specific friends), “Only Me,” or “Custom.”
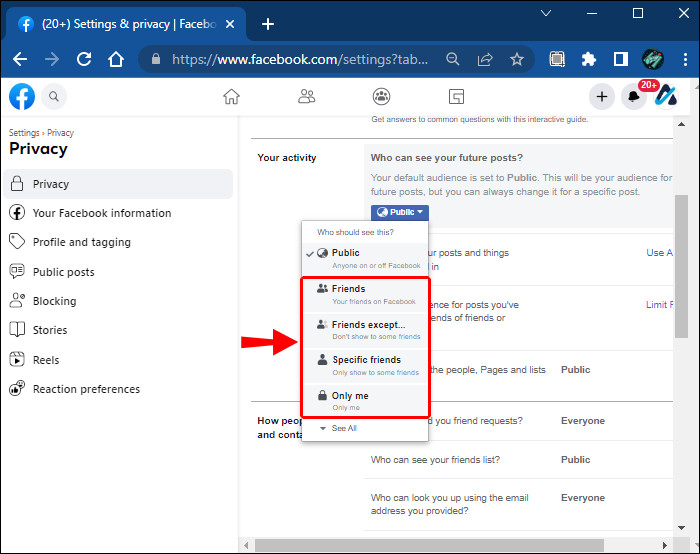 Edit your audience
 - Save Your Changes: Select your desired audience and click “Close” to save your changes.
7. Additional Tips for Managing Your Facebook Photos
7.1 Organizing Your Albums
- Create Descriptive Album Names: Use clear and descriptive names for your albums to easily identify their contents (e.g., “Summer Vacation 2023,” “Family Reunion,” “Birthday Party”).
- Add Captions to Photos: Write informative and engaging captions for your photos to provide context and tell a story.
- Tag Friends and Family: Tag people in your photos to make it easier for them to find and share the memories.
7.2 Protecting Your Privacy
- Review Your Tag Settings: Control who can tag you in photos and who can see photos you’re tagged in by adjusting your tag settings in the Privacy section of your Facebook settings.
- Use Audience Selectors: Carefully choose the audience for each post and photo to ensure only the intended people can see it.
- Be Mindful of What You Share: Think before you post and avoid sharing overly personal or sensitive information that could compromise your privacy.
7.3 Optimizing Your Photos for Facebook
- Resize Your Photos: Resize large photos before uploading them to Facebook to reduce file size and improve loading times.
- Use High-Quality Images: Upload high-resolution photos to ensure they look their best on Facebook.
- Consider Aspect Ratio: Use the correct aspect ratio for your photos to avoid cropping or distortion on Facebook.
8. Facebook Photo Download FAQs
8.1 Can I Download Photos From Someone Else’s Facebook Album?
Generally, you can only download photos from albums that are set to be publicly visible or shared with you directly. If an album’s privacy settings restrict access, you won’t be able to download it.
8.2 What If I Can’t See the “Download Album” Option?
If you don’t see the “Download Album” option, it could be due to several reasons:
- Album Privacy Settings: The album’s privacy settings may prevent downloads.
- Mobile App Limitations: Album downloads are typically only available on the web browser version of Facebook, not the mobile app.
- Album Ownership: You may not be the owner of the album.
8.3 How Long Does It Take to Download a Facebook Album?
The time it takes to download a Facebook album depends on several factors:
- Album Size: Larger albums with more photos will take longer to download.
- Internet Speed: A faster internet connection will result in quicker download times.
- Facebook Server Load: Facebook’s servers may experience varying levels of load, which can affect download speeds.
8.4 Can I Download Multiple Facebook Albums at Once?
Unfortunately, Facebook doesn’t offer a direct way to download multiple albums simultaneously. You’ll need to download each album individually or use the “Download Your Information” tool to download all your data, including photos.
8.5 What File Format Will My Downloaded Photos Be In?
Downloaded photos will typically be in the same file format as the original uploaded images (e.g., JPEG, PNG).
8.6 Will Downloaded Photos Retain Their Original Quality?
While Facebook tries to maintain photo quality, some compression may occur during the upload and storage process. As a result, downloaded photos may not be exactly the same quality as the original files.
8.7 How Can I Ensure My Facebook Photos Are Backed Up Regularly?
To ensure your Facebook photos are backed up regularly, consider setting a recurring reminder to download your albums or use a third-party app that automates the backup process.
8.8 Is It Possible to Recover Deleted Photos From Facebook?
Once a photo is deleted from Facebook, it’s generally very difficult to recover it. However, if you have a backup of your photos, you can easily restore them.
8.9 Can I Move Photos From One Facebook Album to Another?
Yes, that’s possible. All you need to do is open a photo in an album, click on the three dots, and choose “Move to Another album” from the menu.
8.10 Can I Add Photos to an Existing Facebook Album?
Yes, you can. By clicking on the “Add Photos” button in a specific Facebook album, you can include new pictures to an existing album. You can also delete the images you don’t have in the same album.
9. Discover More at dfphoto.net
Ready to take your photography skills to the next level? Visit dfphoto.net for a wealth of resources, including:
- In-depth Tutorials: Master essential photography techniques with our step-by-step guides.
- Inspiring Galleries: Explore stunning images from talented photographers around the globe.
- Expert Gear Reviews: Find the perfect camera, lenses, and accessories to suit your needs and budget.
- A Vibrant Community: Connect with fellow photography enthusiasts, share your work, and get valuable feedback.
Address: 1600 St Michael’s Dr, Santa Fe, NM 87505, United States. Phone: +1 (505) 471-6001.
Don’t miss out on the opportunity to enhance your photography journey. Head over to dfphoto.net today and unlock your creative potential!