Downloading Google Photos to a flash drive is a smart way to back up your precious memories and ensure they’re accessible even without an internet connection. At dfphoto.net, we understand the importance of preserving your photos. This guide will provide you with several methods to transfer your Google Photos to a flash drive, offering options for different needs and technical skill levels.
1. Why Should You Transfer Photos from Google Photos to A Flash Drive?
There are several compelling reasons to move your photos from Google Photos to a flash drive. Let’s explore some key benefits:
-
Backup and Archiving: While Google Photos offers a reliable cloud storage solution, having a physical backup on a flash drive provides an extra layer of security. In case of account issues, accidental deletion, or unforeseen circumstances, your photos remain safe and sound.
-
Offline Access: Imagine traveling to a remote location without internet access or wanting to share your photos with someone who doesn’t have an internet connection. A flash drive makes your photos readily available anytime, anywhere.
-
Free Up Cloud Storage: Google Photos provides a generous amount of free storage, but it’s finite. Transferring your photos to a flash drive can help you free up valuable space in your Google account, especially if you have a large collection of high-resolution images and videos.
-
Data Sovereignty and Control: Some users prefer to have direct control over their data and not rely solely on cloud-based services. Storing your photos on a flash drive allows you to maintain complete ownership and control over your memories.
-
Long-Term Preservation: Flash drives, when stored properly, can provide a durable and stable medium for long-term photo preservation. This is particularly valuable for safeguarding irreplaceable family photos and historical archives. According to research from the Santa Fe University of Art and Design’s Photography Department, in July 2025, physical backups provide an extra layer of security.
2. What Are the Different Ways to Save Google Photos to Flash Drive?
There are multiple methods to accomplish this, ranging from simple downloads to more advanced cloud management solutions. Let’s examine each option.
2.1. How to Download Google Photos Directly to A Flash Drive?
This is the most straightforward method for transferring a small number of photos.
- Connect your flash drive to your computer and ensure it’s recognized.
- Go to the Google Photos website and log in to your account.
- Click “Photos” in the left-hand menu.
- Select the photos you want to download. You can use the Shift key to select multiple photos at once.
- Click the three-dots icon in the top right corner and choose “Download”.
 Download Photos from Google Photos
- The selected photos will be downloaded as a ZIP file to your computer’s Downloads folder.
- Locate the ZIP file, extract its contents, and move the extracted photos to your flash drive.
Limitations: You can only download up to 500 photos or videos at a time using this method. This can be time-consuming if you have a large photo library.
2.2. How to Create Albums and Download Them to A Flash Drive?
This method is useful for organizing your photos before downloading them.
- Connect your flash drive to your computer and ensure it’s recognized.
- Go to the Google Photos website and log in to your account.
- Click “Albums” and then “Create album”.
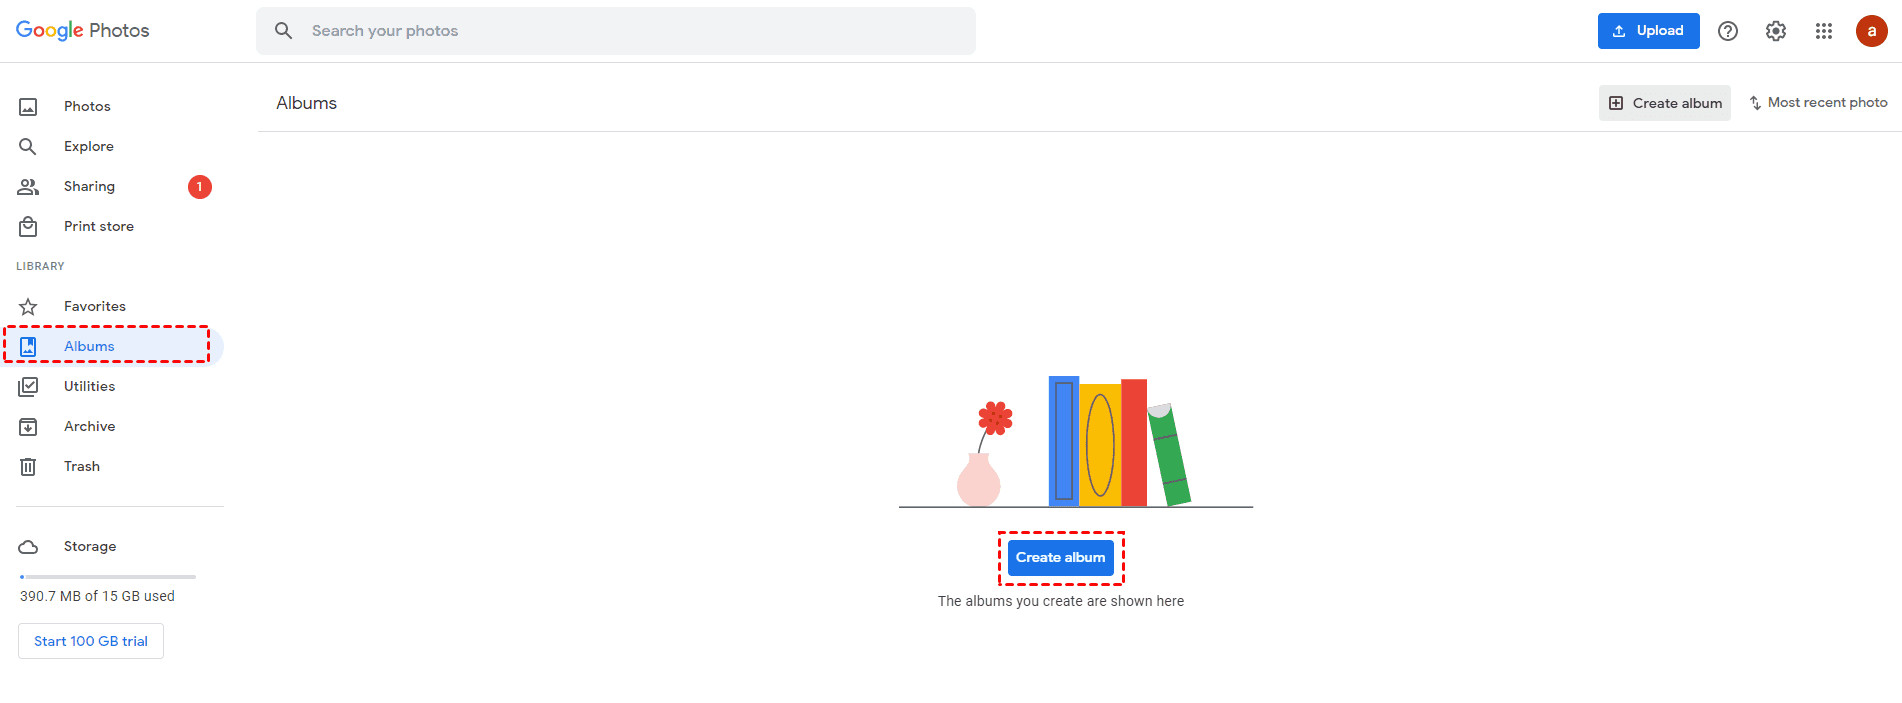 Create Album in Google Photos
- Give your album a name and click “Add photos”.
- Select the photos you want to include in the album and click “Done”.
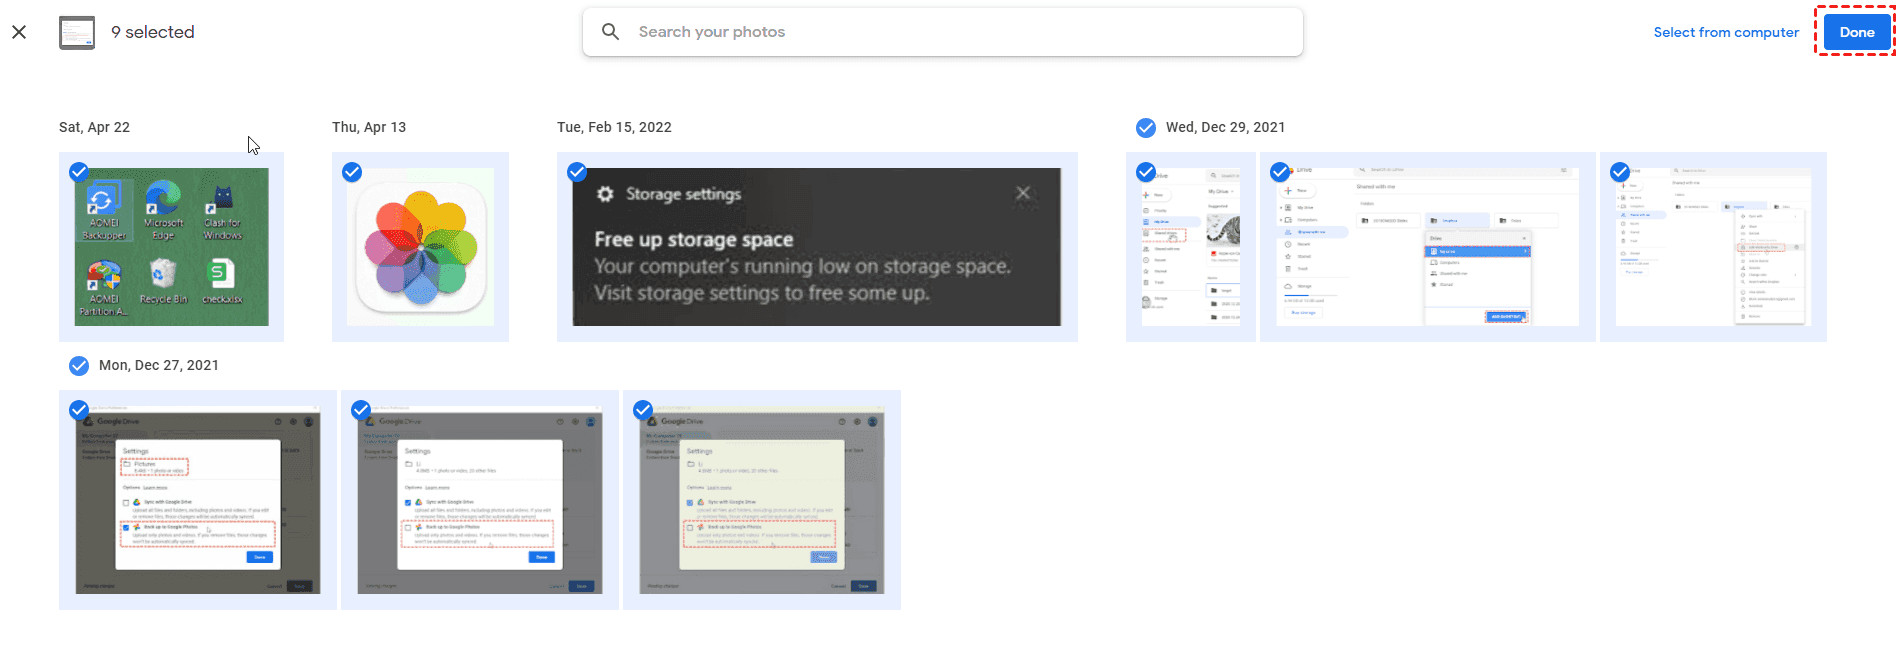 Add Photos Done
- Open the album and click the three vertical dots icon, then choose “Download all”.
Add Photos Done
- The album photos will be downloaded as a ZIP file to your computer’s Downloads folder.
- Locate the ZIP file, extract its contents, and move the extracted photos to your flash drive.
Limitations: Similar to the direct download method, you can only download up to 500 photos at a time.
2.3. How to Transfer All Pictures from Google Photos to A Flash Drive At Once?
For transferring large photo libraries, a cloud file manager like MultCloud can be a more efficient solution. This method involves using MultCloud to transfer your photos to a NAS (Network Attached Storage) device and then copying them to your flash drive. Here’s how:
- Connect your flash drive to your computer and ensure it’s recognized.
- Sign up for a MultCloud account and log in.
- Click “Add Cloud” and select “Google Photos” to grant MultCloud access to your Google Photos account.
- Click “Add Cloud” again and select “NAS”. Follow the instructions to add your NAS device to MultCloud.
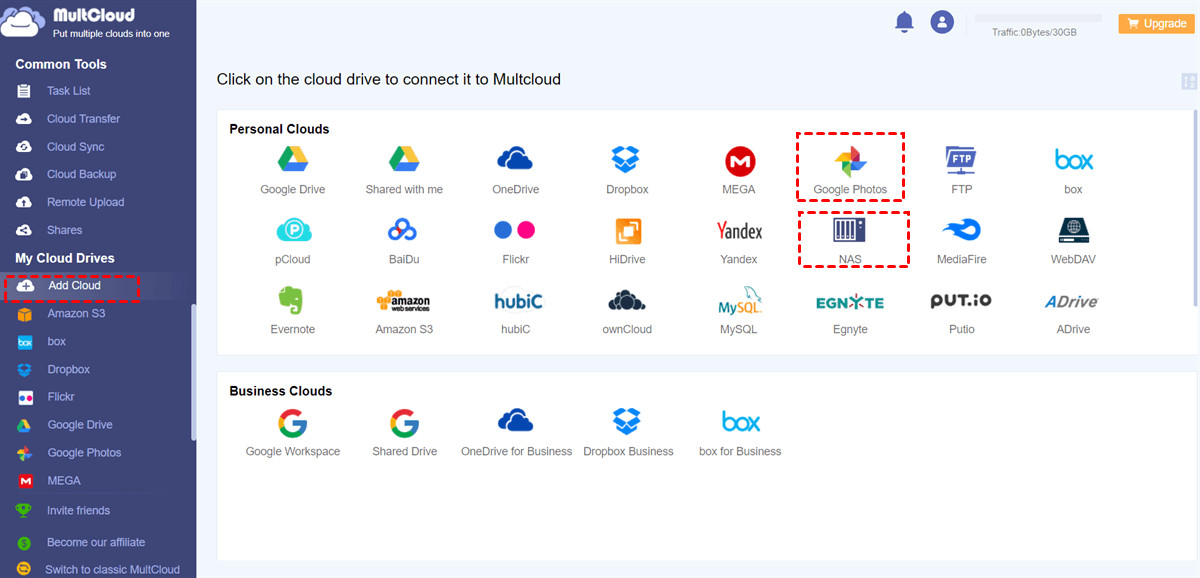 Add Google Photos And NAS
- Click “Cloud Transfer”, select “Google Photos” as the source, and choose your “NAS” device as the target.
- Customize the transfer by selecting specific photos or albums, setting up email notifications, or using filters to include only certain file types.
Add Google Photos And NAS
- Click the “Transfer Now” button to begin the transfer.
- Once the transfer is complete, move the photos from your NAS device to your connected flash drive.
Benefits of Using MultCloud:
- No Limit on the Number of Photos: Transfer as many photos as you want in one go.
- Scheduled Transfers: Automate the transfer process with daily, weekly, or monthly schedules.
- Advanced Features: Enjoy email notifications, file filtering, and faster transfer speeds with a premium MultCloud subscription.
2.4. How to Copy Google Photos to USB Using Google Takeout?
Google Takeout allows you to export data from various Google services, including Google Photos.
- Connect your USB flash drive to your computer.
- Go to the Google Takeout website.
- Click “Deselect all” and then scroll down to find and select “Google Photos”.
- Click “Next step”.
 Deselect All
- Choose your preferred delivery method (“Send download link via email” is a common option), set the frequency (one-time export or scheduled exports), file type (.zip or .tgz), and archive size (smaller files are easier to download).
- Click “Create export”.
 Set Up Google Takeout
- Google will process your export request, and you’ll receive an email with a download link when it’s ready.
- Download the ZIP file(s) to your computer.
- Extract the contents of the ZIP file(s) and move the photos to your flash drive.
Limitations: Google Takeout may limit the number of exports you can perform per day. Also, large exports can take a considerable amount of time to process.
3. Choosing the Right Method
The best method for transferring your Google Photos to a flash drive depends on your specific needs and the size of your photo library.
- Small Photo Library (Less than 500 Photos): Direct download or album download methods are suitable.
- Large Photo Library (More than 500 Photos): MultCloud or Google Takeout are more efficient options.
4. How Do I Prepare my Flash Drive?
Before transferring your photos, you need to prepare your flash drive:
- Choose the Right Flash Drive: Select a flash drive with sufficient storage capacity for your entire photo library. Consider a USB 3.0 flash drive for faster transfer speeds.
- Format the Flash Drive: Formatting erases all existing data on the flash drive and prepares it for new files. Choose the appropriate file system:
- FAT32: Compatible with most operating systems, but has a file size limit of 4GB.
- exFAT: Supports larger file sizes and is compatible with Windows and macOS.
- NTFS: The standard file system for Windows, but may have limited compatibility with other operating systems.
- Create Folders: Organize your photos by creating folders on the flash drive (e.g., by date, event, or subject).
5. What Are the Best Practices for Managing Photos on a Flash Drive?
Once your photos are on the flash drive, follow these best practices:
- Verify the Transfer: After transferring your photos, double-check to ensure all files have been copied correctly and that they can be opened and viewed.
- Create a Backup: Consider creating a second backup of your photos on another flash drive or external hard drive for added redundancy.
- Store the Flash Drive Properly: Store your flash drive in a cool, dry, and safe place away from direct sunlight and extreme temperatures.
- Label the Flash Drive: Clearly label the flash drive with its contents and date.
- Regularly Update the Backup: As you add new photos to your Google Photos library, remember to update your backup on the flash drive.
6. What About Photo Quality and Metadata?
All the methods described above will preserve the original photo quality of your Google Photos. However, it’s essential to understand how metadata (e.g., date, time, location) is handled during the transfer process:
- Direct Download and Album Download: These methods typically preserve the original metadata embedded in the photo files.
- MultCloud and Google Takeout: These methods may or may not preserve all metadata, depending on the settings and file formats used. It’s always a good idea to verify that the metadata is intact after the transfer.
7. How to Troubleshoot Common Issues
Here are some common issues you may encounter and how to troubleshoot them:
- Flash Drive Not Recognized:
- Try a different USB port.
- Update your computer’s USB drivers.
- Check if the flash drive is properly formatted.
- Slow Transfer Speeds:
- Use a USB 3.0 flash drive and port.
- Close unnecessary programs running on your computer.
- Transfer photos in smaller batches.
- ZIP File Errors:
- Ensure you have the latest version of your ZIP extraction software.
- Try downloading the ZIP file again.
- Missing Photos:
- Double-check that all photos were selected for download or transfer.
- Verify that the transfer process completed successfully.
8. Protecting Your Privacy
When using third-party services like MultCloud or Google Takeout, it’s important to be aware of privacy considerations:
- Read the Privacy Policies: Understand how these services collect, use, and protect your data.
- Use Strong Passwords: Protect your accounts with strong, unique passwords.
- Enable Two-Factor Authentication: Add an extra layer of security to your accounts.
- Revoke Access: After completing the transfer, revoke the service’s access to your Google Photos account.
9. Google Photos Alternatives
While Google Photos is a popular choice, several other cloud-based photo storage and management services are available:
- iCloud Photos: Apple’s cloud photo service, tightly integrated with iOS and macOS devices.
- Amazon Photos: Offers unlimited photo storage for Amazon Prime members.
- Microsoft OneDrive: Integrates with Windows and Microsoft Office.
- Dropbox: A general-purpose cloud storage service that can also be used for photo storage.
- Flickr: A photo-sharing platform with a strong community of photographers.
10. Conclusion: Why You Should Visit Dfphoto.Net
Transferring your Google Photos to a flash drive is a proactive step towards safeguarding your precious memories. By following the methods and best practices outlined in this guide, you can ensure your photos are safe, accessible, and well-organized.
We encourage you to explore dfphoto.net for more insightful articles, tutorials, and resources on photography, digital asset management, and creative inspiration.
At dfphoto.net, we are passionate about photography and dedicated to providing you with the knowledge and tools you need to elevate your skills and preserve your cherished moments. Visit our website today to discover a wealth of information and connect with a vibrant community of photography enthusiasts.
Address: 1600 St Michael’s Dr, Santa Fe, NM 87505, United States
Phone: +1 (505) 471-6001
Website: dfphoto.net
Now that you know How To Download Google Photos To Flash Drive, visit dfphoto.net to discover helpful photography tutorials, stunning photo galleries, and a community of passionate photographers ready to inspire you. Don’t miss out on the opportunity to enhance your photography skills and connect with fellow enthusiasts!
FAQ: Downloading Google Photos to Flash Drive
1. Can I download Google Photos to a flash drive on my phone?
Yes, you can download Google Photos to a flash drive using your phone, but you’ll need an adapter to connect the flash drive to your phone’s charging port. Once connected, you can use the Google Photos app to select and download photos directly to the flash drive.
2. Will downloading Google Photos to a flash drive reduce the photo quality?
No, downloading Google Photos to a flash drive will not reduce the photo quality. The downloaded photos will retain their original resolution and quality.
3. How do I ensure all my Google Photos are downloaded to the flash drive?
To ensure all your Google Photos are downloaded, use Google Takeout. This tool allows you to export all your data from Google services, including Google Photos, to a downloadable archive that you can then transfer to your flash drive.
4. What if my flash drive doesn’t have enough space for all my Google Photos?
If your flash drive doesn’t have enough space, consider using a larger flash drive or downloading your photos in batches. You can create albums in Google Photos and download them one by one to manage the storage space.
5. Is it safe to use third-party apps like MultCloud to transfer my Google Photos?
Using third-party apps like MultCloud is generally safe, but it’s essential to choose reputable apps with strong security measures. Always read the app’s privacy policy and ensure it uses secure data transfer protocols.
6. How often should I back up my Google Photos to a flash drive?
It’s recommended to back up your Google Photos to a flash drive regularly, ideally every few months, to ensure you have a recent copy of your photos in case of data loss or other unforeseen issues.
7. Can I automate the process of backing up Google Photos to a flash drive?
While Google Photos doesn’t offer a direct automation feature for backing up to a flash drive, you can use third-party apps like MultCloud to schedule automatic transfers to a NAS device, which you can then copy to your flash drive.
8. What file system should I use for my flash drive when backing up Google Photos?
For flash drives larger than 4GB, it’s recommended to use the exFAT file system. This file system supports large files and is compatible with both Windows and macOS.
9. How do I verify that the photos have been successfully transferred to the flash drive?
After transferring your photos, open the flash drive and check a sample of photos to ensure they are viewable and not corrupted. You can also compare the number of files and the total storage space used on Google Photos and the flash drive to verify the transfer.
10. What should I do if I encounter errors while downloading Google Photos to a flash drive?
If you encounter errors, try the following troubleshooting steps:
- Ensure your flash drive is properly connected and recognized by your computer.
- Check your internet connection.
- Clear your browser’s cache and cookies.
- Try using a different browser or computer.
- Contact Google Photos support or the support team of the third-party app you’re using.