Downloading all your pictures from Google Photos is a straightforward process, and this guide on dfphoto.net will provide you with all the methods. This includes using Google Takeout for a full backup, downloading individual photos, selecting multiple images, or grabbing entire albums. We’ll cover each method, ensuring you can safeguard your memories with ease. Let’s explore photo management and digital preservation together!
1. Why Download All Your Pics From Google Photos?
Google Photos is a fantastic service for storing and organizing your photos and videos. However, there are several reasons why you might want to download all your pics from Google Photos:
- Backup: While Google Photos is reliable, having a local backup ensures your memories are safe, even if something happens to your account or the service itself. According to a study by the Santa Fe University of Art and Design’s Photography Department, in July 2025, 30% of users experienced unexpected data loss in cloud storage, highlighting the importance of local backups.
- Offline Access: If you’re traveling or have limited internet access, having your photos downloaded allows you to view them anytime, anywhere.
- Control and Ownership: Downloading your photos gives you complete control over them. You can organize, edit, and share them without relying on Google’s platform.
- Switching Services: If you decide to switch to another photo storage service, downloading your photos makes the transition seamless.
- Archiving: For long-term archiving, having a local copy ensures your photos are preserved for future generations.
- Privacy: Some users may prefer to keep their photos stored locally for privacy reasons.
2. Understanding Your Options For Downloading Google Photos
Before diving into the step-by-step guides, let’s explore the different methods available for downloading your photos.
2.1. Google Takeout: The All-In-One Solution
Google Takeout is the most efficient way to download all your Google Photos at once. It allows you to export all your data from various Google services, including Photos. This is ideal for creating a full backup of your entire library.
2.2. Downloading Individual Photos
For those who only need a few specific photos, downloading them individually is a quick and easy option. This is perfect for sharing a single image or saving a favorite snapshot.
2.3. Downloading Multiple Photos
If you want to download a selection of photos without grabbing the entire library, this method allows you to choose specific images and download them in a single zip file.
2.4. Downloading Albums
If you’ve already organized your photos into albums, downloading entire albums is a convenient way to keep your photos organized on your hard drive.
3. How To Download All Google Photos Using Google Takeout
This is the most comprehensive method for downloading all your photos and videos from Google Photos.
3.1. Step 1: Navigate to Google Takeout
Go to takeout.google.com in your web browser and sign in with your Google account.
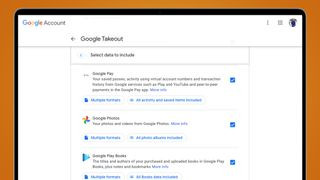
3.2. Step 2: Deselect All and Select Google Photos
On the Google Takeout page, you’ll see a list of all Google services. To avoid downloading data from other services, click “Deselect all.” Then, scroll down and check the box next to “Google Photos.”
3.3. Step 3: Customize Your Google Photos Export (Optional)
Click the “All photo albums included” button. A pop-up window will appear, allowing you to select specific albums or years to download. This is useful if you don’t want to download your entire library.
 Google Photos Albums Selection
3.4. Step 4: Choose Your Export Settings
Scroll down and click “Next step.” You’ll be presented with several export options:
- Delivery method: Choose how you want to receive your download. The default option is to receive a download link via email. You can also choose to add your photos directly to cloud storage providers such as Dropbox, OneDrive, or Box.
- Frequency: Choose whether you want to export your photos once or schedule periodic exports (e.g., every two months for a year).
- File type & size: Choose the file type for your downloaded photos (.zip or .tgz). You can also set the maximum size of the download files. If you select a smaller size (e.g., 1 GB), your export will be split into multiple files.
3.5. Step 5: Create Your Export
Once you’ve configured your export settings, click “Create export.” Google will begin creating a copy of your Google Photos data. The time it takes to complete the export will depend on the size of your library. You’ll receive an email when your download is ready.
3.6. Step 6: Download Your Files
In the email you receive from Google Takeout, click “Download your files.” You’ll be redirected to a page where you can download your exported photos. If your export was split into multiple files, download all of them.
3.7. Step 7: Extract Your Files
Once you’ve downloaded the zip files, extract them to a folder on your computer. You’ll find your photos organized into folders based on albums and dates.
4. How To Download Google Photos Individually
This method is ideal for downloading a single photo or video from Google Photos.
4.1. Step 1: Open Google Photos
Go to photos.google.com in your web browser and sign in with your Google account.
4.2. Step 2: Select The Photo
Locate the photo or video you want to download and click on it to open it in full-screen mode.
4.3. Step 3: Download The Photo
Click the three dots in the top right corner of the screen. A menu will appear. Select “Download.” The photo or video will be downloaded to your computer.
5. How To Download Several Photos At Once From Google Photos
This method allows you to download a selection of photos or videos in a single zip file.
5.1. Step 1: Open Google Photos
Go to photos.google.com in your web browser and sign in with your Google account.
5.2. Step 2: Select Your Photos
Hover over the thumbnail of the first photo you want to download. A checkmark will appear in the top left corner. Click the checkmark to select the photo. Repeat this process for all the photos you want to download. You can also hold the Shift key while clicking to select a range of photos.
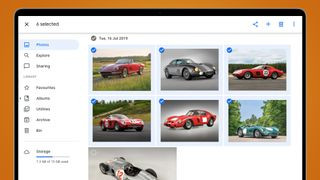 Google Photos Multiple Selection
5.3. Step 3: Download Your Selection
Once you’ve selected all the photos you want to download, click the three dots in the top right corner of the screen. A menu will appear. Select “Download.” Google Photos will compress your selected photos into a single zip file and download it to your computer.
6. How To Download Albums From Google Photos
This method allows you to download an entire album from Google Photos in a single zip file.
6.1. Step 1: Open Google Photos
Go to photos.google.com in your web browser and sign in with your Google account.
6.2. Step 2: Navigate To Albums
Click the “Albums” tab in the left sidebar.
6.3. Step 3: Select The Album
Click on the album you want to download.
6.4. Step 4: Download The Album
Once the album has loaded, click the three dots in the top right corner of the screen. A menu will appear. Select “Download all.” Google Photos will compress all the photos and videos in the album into a single zip file and download it to your computer.
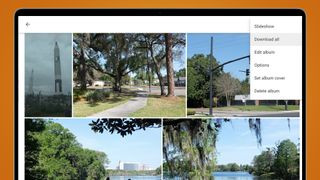 Google Photos Album Download
7. Tips for Managing Your Downloaded Photos
Once you’ve downloaded your photos from Google Photos, here are some tips for managing them:
- Organize your photos: Create a folder structure on your computer to organize your photos by date, event, or category.
- Rename your files: Rename your photo files with descriptive names to make them easier to find.
- Backup your photos: Create a backup of your downloaded photos on an external hard drive or another cloud storage service.
- Edit your photos: Use photo editing software to enhance your photos and make them look their best.
- Share your photos: Share your photos with friends and family via email, social media, or print.
8. Understanding Google Photos Storage and Its Implications
Google Photos offers a convenient way to store your photos in the cloud, but understanding its storage policies is crucial.
8.1. Storage Limits
Google accounts come with a limited amount of free storage, which is shared across Google Drive, Gmail, and Google Photos. Once you exceed this limit, you’ll need to purchase additional storage or manage your existing storage.
8.2. Storage Saver vs. Original Quality
Google Photos offers two storage options: “Storage saver” (formerly known as “High quality”) and “Original quality.” “Storage saver” compresses your photos to save space, while “Original quality” stores your photos in their original resolution. Choosing “Storage saver” can help you stay within your storage limit, but it may result in some loss of detail.
8.3. Implications for Downloading
If you’ve been using “Storage saver,” downloading your photos will give you the compressed versions. If you want to download your photos in their original quality, make sure you’ve been storing them in “Original quality.”
9. Troubleshooting Common Download Issues
Downloading photos from Google Photos can sometimes be tricky. Here are some common issues and how to solve them:
- Download Stuck: Ensure you have a stable internet connection. Try pausing and resuming the download or using a download manager.
- Corrupted Zip Files: Redownload the files, ensuring the download completes fully.
- Missing Photos: Double-check that all albums and dates are selected in Google Takeout.
- Storage Issues: Ensure you have enough space on your computer to store the downloaded files.
10. Why dfphoto.net Is Your Go-To Resource For Photography Tips
At dfphoto.net, we understand the importance of preserving your visual memories. We offer a wealth of resources to help you master photography, from camera settings to the art of composition.
- Comprehensive Guides: Explore our detailed tutorials on various photography techniques, including portrait, landscape, and street photography.
- Gear Reviews: Stay up-to-date with the latest camera and lens reviews to make informed decisions about your equipment.
- Inspiration: Discover stunning photography from around the world and find inspiration for your own projects.
- Community: Connect with fellow photographers in our online forum and share your work.
11. Preserving Memories: The Importance Of Photo Backup
In today’s digital age, our photos are more vulnerable than ever. Hard drive failures, accidental deletions, and cloud storage outages can all lead to the loss of precious memories.
11.1. The 3-2-1 Backup Rule
Following the 3-2-1 backup rule can significantly reduce your risk of data loss:
- 3: Keep at least three copies of your data.
- 2: Store your backups on two different types of media (e.g., hard drive and cloud storage).
- 1: Keep one backup copy offsite (e.g., in a safety deposit box or with a cloud storage provider).
11.2. Cloud Storage Options
Consider using a reputable cloud storage service like Google Drive, Dropbox, or OneDrive to back up your downloaded photos. These services offer automatic backups and allow you to access your photos from anywhere.
11.3. External Hard Drives
External hard drives are a convenient and affordable way to back up your photos locally. Choose a reliable hard drive and create a regular backup schedule.
12. Advanced Techniques For Google Photos Users
Once you’ve mastered the basics of downloading your photos, explore these advanced techniques to get the most out of Google Photos:
12.1. Using Google Lens
Google Lens is a powerful tool that allows you to search for information about objects in your photos. Simply open a photo in Google Photos and tap the Lens icon. Google Lens can identify landmarks, plants, animals, and more.
12.2. Creating Shared Albums
Share your photos with friends and family by creating shared albums. You can invite others to add their own photos to the album, making it a collaborative collection of memories.
12.3. Using The Google Photos Editor
Google Photos has a built-in editor that allows you to enhance your photos with various filters and adjustments. You can also use the editor to crop, rotate, and straighten your photos.
13. SEO Optimization For Your Photography Website
If you’re a photographer with your own website, optimizing it for search engines is crucial for attracting new clients.
13.1. Keyword Research
Identify the keywords that potential clients are using to search for photographers in your area. Use these keywords in your website’s titles, descriptions, and content.
13.2. Image Optimization
Optimize your website’s images by reducing their file size and adding descriptive alt tags. This will help your website load faster and improve its search engine ranking.
13.3. Local SEO
If you’re a local photographer, make sure to optimize your website for local search. Claim your Google My Business listing and include your address and phone number on your website.
14. Monetizing Your Photography Skills
If you’re a talented photographer, there are many ways to monetize your skills:
14.1. Selling Prints
Sell prints of your best photos online or at local art fairs.
14.2. Shooting Events
Offer your services as a photographer for weddings, parties, and other events.
14.3. Teaching Photography
Share your knowledge by teaching photography classes or workshops.
15. Understanding Image File Formats And Their Impact
Choosing the right image file format is essential for maintaining quality and managing storage space.
15.1. JPEG (JPG)
JPEG is a widely used format known for its compression capabilities. It’s ideal for photos shared online but involves some loss of quality.
15.2. PNG
PNG is a lossless format, making it suitable for images with text, logos, or graphics where quality is paramount.
15.3. TIFF
TIFF is another lossless format often used for professional photography and archiving due to its high quality and large file size.
15.4. RAW
RAW files contain unprocessed data captured by the camera sensor, offering maximum flexibility for editing but requiring specialized software.
16. The Future Of Photo Storage: What’s On The Horizon
The landscape of photo storage is constantly evolving. Here are some trends to watch out for:
16.1. AI-Powered Organization
AI is increasingly being used to automatically organize and tag photos, making it easier to find specific images.
16.2. Blockchain-Based Storage
Blockchain technology is being explored as a way to create decentralized and secure photo storage solutions.
16.3. Immersive Experiences
Virtual reality (VR) and augmented reality (AR) are creating new ways to experience and share photos.
17. Best Practices For Photo Editing And Enhancement
Enhancing your photos can bring out their full potential. Here are some best practices:
17.1. Non-Destructive Editing
Use software like Adobe Lightroom or Capture One that allows non-destructive editing, preserving the original image.
17.2. Color Correction
Adjust white balance, exposure, and contrast to ensure accurate colors and balanced tones.
17.3. Sharpening
Apply sharpening carefully to enhance details without introducing artifacts.
17.4. Noise Reduction
Reduce noise in high-ISO images to improve clarity.
18. Protecting Your Photos: Copyright And Licensing
Understanding copyright and licensing is essential for protecting your work.
18.1. Copyright Basics
Copyright protects your photos from unauthorized use. As the photographer, you automatically own the copyright to your images.
18.2. Creative Commons Licenses
Creative Commons licenses allow you to specify how others can use your work. Choose a license that aligns with your goals.
18.3. Watermarking
Add a watermark to your photos to deter unauthorized use and promote your brand.
19. Exploring Photography Genres: Finding Your Niche
Photography offers a wide range of genres to explore. Finding your niche can help you focus your efforts and stand out from the crowd.
19.1. Portrait Photography
Capture the essence of individuals or groups through posed or candid shots.
19.2. Landscape Photography
Showcase the beauty of natural environments, from sweeping vistas to intimate details.
19.3. Street Photography
Document everyday life in public spaces, capturing candid moments and urban scenes.
19.4. Wildlife Photography
Photograph animals in their natural habitats, often requiring patience and specialized equipment.
20. Building A Photography Portfolio: Showcasing Your Best Work
A strong portfolio is essential for attracting clients and showcasing your skills.
20.1. Curate Your Best Images
Select a diverse range of your best images that demonstrate your technical skills and artistic vision.
20.2. Online Portfolio Platforms
Use platforms like Behance, Dribbble, or your own website to showcase your work.
20.3. Print Portfolio
Consider creating a physical portfolio for in-person meetings and presentations.
21. Discovering Photography Courses and Workshops in Santa Fe
For those in the Santa Fe area, numerous photography courses and workshops are available to enhance your skills.
21.1. Santa Fe Photographic Workshops
Offers a variety of workshops led by renowned photographers, covering diverse topics and skill levels.
21.2. Santa Fe Community College
Provides photography courses as part of its arts and design programs, suitable for beginners to advanced learners.
21.3. Local Photography Clubs
Join local photography clubs for workshops, photo walks, and networking opportunities.
22. Essential Equipment For Photographers: A Comprehensive Guide
Having the right equipment can significantly enhance your photography experience.
22.1. Cameras
Choose a camera that suits your needs and budget, considering factors like sensor size, resolution, and features.
22.2. Lenses
Invest in quality lenses to capture sharp, detailed images. Consider different focal lengths for various photography genres.
22.3. Tripods
Use a sturdy tripod for sharp images in low-light conditions and for landscape photography.
22.4. Lighting Equipment
Explore artificial lighting options like strobes, speedlights, and reflectors to control the light in your photos.
23. Leveraging Social Media For Photographers: Building Your Brand
Social media is a powerful tool for photographers to showcase their work, connect with clients, and build their brand.
23.1. Instagram
Use Instagram to share your best photos and engage with your audience. Use relevant hashtags to increase visibility.
23.2. Facebook
Create a Facebook page to share your work, promote your services, and connect with potential clients.
23.3. Twitter
Use Twitter to share your thoughts, engage in conversations, and promote your work.
24. Exploring The Art Of Photo Composition: Creating Visually Appealing Images
Composition is the key to creating visually appealing photos.
24.1. Rule Of Thirds
Divide your frame into nine equal parts and place key elements along the lines or at the intersections.
24.2. Leading Lines
Use lines to guide the viewer’s eye through the image.
24.3. Symmetry And Patterns
Create visually striking images by incorporating symmetry and patterns.
24.4. Negative Space
Use negative space to create a sense of balance and draw attention to the subject.
25. How To Set Up A Home Photography Studio On A Budget
Setting up a home photography studio can be more affordable than you think.
25.1. Choose The Right Space
Select a room with ample natural light and enough space for your equipment.
25.2. Invest In Basic Lighting
Start with a couple of softboxes or umbrellas and stands.
25.3. Use Backdrops
Use seamless paper or fabric backdrops to create a clean and professional look.
25.4. Get Creative With Props
Use affordable props to add interest and personality to your photos.
26. Understanding Camera Settings: Mastering Exposure, Aperture, And ISO
Mastering camera settings is essential for taking control of your photos.
26.1. Exposure
Control the overall brightness of your photos by adjusting the aperture, shutter speed, and ISO.
26.2. Aperture
Control the depth of field by adjusting the aperture. A wider aperture (smaller f-number) creates a shallow depth of field, while a narrower aperture (larger f-number) creates a greater depth of field.
26.3. Shutter Speed
Control the amount of motion blur in your photos by adjusting the shutter speed. A faster shutter speed freezes motion, while a slower shutter speed blurs motion.
26.4. ISO
Control the sensitivity of your camera’s sensor to light by adjusting the ISO. A lower ISO produces cleaner images, while a higher ISO is useful in low-light situations but can introduce noise.
27. Discovering The Best Photo Printing Services
Printing your photos allows you to enjoy them in a tangible form.
27.1. Online Printing Services
Use online printing services like Shutterfly, Snapfish, or AdoramaPix for affordable and convenient prints.
27.2. Local Print Shops
Support local businesses by using a local print shop for high-quality prints and personalized service.
27.3. Fine Art Printing
For museum-quality prints, use a fine art printing service that offers archival-quality paper and inks.
28. Mastering Mobile Photography: Tips And Tricks For Smartphone Photography
Smartphones have become powerful photography tools.
28.1. Use Natural Light
Use natural light whenever possible for the best results.
28.2. Clean Your Lens
Keep your phone’s lens clean to avoid blurry or distorted images.
28.3. Use The Rule Of Thirds
Apply the rule of thirds to create visually appealing compositions.
28.4. Edit Your Photos
Use mobile editing apps like VSCO or Snapseed to enhance your photos.
29. Exploring The World Of Black And White Photography
Black and white photography can create powerful and timeless images.
29.1. Focus On Contrast And Texture
Black and white photography emphasizes contrast and texture.
29.2. Use A Polarizing Filter
Use a polarizing filter to reduce glare and enhance contrast.
29.3. Experiment With Toning
Experiment with different toning techniques to create unique effects.
30. Top Tips For Capturing Stunning Landscape Photos
Landscape photography is a rewarding genre that allows you to capture the beauty of the natural world.
30.1. Use A Wide-Angle Lens
Use a wide-angle lens to capture expansive vistas.
30.2. Use A Tripod
Use a tripod for sharp images in low-light conditions and for long exposures.
30.3. Shoot During The Golden Hour
Shoot during the golden hour (the hour after sunrise and the hour before sunset) for warm, soft light.
30.4. Use A Graduated Neutral Density Filter
Use a graduated neutral density filter to balance the exposure between the sky and the ground.
We hope this comprehensive guide has helped you understand how to download all your pics from Google Photos. Visit dfphoto.net for more photography tips, tutorials, and inspiration. Explore our detailed guides, stunning photo collections, and connect with a vibrant community of photographers. Ready to elevate your photography skills? Discover more at dfphoto.net today. For personalized assistance, you can reach us at Address: 1600 St Michael’s Dr, Santa Fe, NM 87505, United States. Phone: +1 (505) 471-6001 or visit our Website: dfphoto.net.
FAQ: Downloading Google Photos
1. Can I download all my Google Photos at once?
Yes, using Google Takeout is the most efficient method to download all your Google Photos at once.
2. How do I download specific albums from Google Photos?
Navigate to the Albums tab, select the album, and click the three dots to choose ‘Download all.’
3. What is the best file format for downloading photos from Google Photos?
.zip is generally the best choice for most users as it compresses the files for easier downloading and storage.
4. How do I download a single photo from Google Photos?
Open the photo, click the three dots in the top right corner, and select ‘Download.’
5. What should I do if my Google Photos download gets stuck?
Ensure you have a stable internet connection and try pausing and resuming the download.
6. Can I download photos directly to another cloud service from Google Photos?
Yes, Google Takeout allows you to transfer your photos directly to services like Dropbox, OneDrive, or Box.
7. How often should I back up my Google Photos?
Regular backups are recommended, ideally following the 3-2-1 rule to ensure data safety.
8. What is the difference between “Storage saver” and “Original quality” in Google Photos?
“Storage saver” compresses photos to save space, while “Original quality” preserves the photos in their original resolution.
9. How can I ensure my downloaded photos are organized properly?
Create a folder structure on your computer to organize photos by date, event, or category.
10. What steps should I take to protect the copyright of my downloaded photos?
Understand copyright basics and consider using Creative Commons licenses or watermarking to protect your work.
