Google Photos is a fantastic service for storing and organizing your precious memories. Its seamless cloud integration, AI-powered features, and cross-platform accessibility make it a favorite for millions. However, there are numerous reasons why you might want to download all your photos from Google Photos to your computer, whether it’s a PC or Mac. Perhaps you’re looking to create a local backup, switch to a different photo storage service, or simply want offline access to your entire photo library.
While Google Photos excels at cloud storage, the process of downloading all your photos isn’t immediately obvious within the app itself. Many users find themselves searching for a straightforward “download all” button, only to realize it requires a slightly different approach. Fortunately, downloading all your Google Photos is indeed possible, and this guide will walk you through the most effective methods step-by-step.
Before we delve into the ‘how-to’, let’s quickly consider why downloading your photos from Google Photos is a smart move. Even with Google’s robust infrastructure, relying solely on cloud storage has potential drawbacks. Account lockouts, internet access limitations, or simply wanting complete control over your data are all valid reasons to have a local backup. Having a copy of your Google Photos library on a hard drive ensures you can access your memories anytime, anywhere, regardless of internet connectivity or the status of your Google account.
Let’s explore the various methods to download all your Google Photos, ensuring you have a secure and accessible backup of your visual memories.
Method 1: Downloading All Google Photos at Once Using Google Takeout
For downloading your entire Google Photos library in one go, Google Takeout is your most efficient tool. Google Takeout is designed to export your data from various Google services, including Google Photos, Gmail, Drive, and more. It’s the quickest way to initiate a full backup of your photos and videos.
Step 1: Go to Google Takeout
The first step is to navigate to the Google Takeout website. Open your web browser and go to takeout.google.com. You will need to sign in with the Google account associated with your Google Photos library.
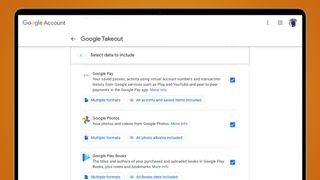 Google Takeout page for downloading Google Photos
Step 2: Deselect All and Select Google Photos
Once you are logged in, you’ll see a list of Google services from which you can export data. By default, all services are selected. To download only your Google Photos, click the “Deselect all” option at the top of the list.
Then, scroll down until you find “Google Photos” and check the box next to it. This ensures that only your Google Photos data will be included in the export.
Step 3: Customize Your Google Photos Export Settings
After selecting Google Photos, you can customize your export further. Click on the “All photo albums included” button. This will open a pop-up window allowing you to choose specific albums or date ranges to download. You can deselect “All photo albums included” and then select specific albums or even entire years if you don’t want to download everything. If you intend to download absolutely everything, leave “All photo albums included” checked. Click “OK” to confirm your album selection.
After configuring albums, scroll down and click the “Next step” button at the bottom of the page to proceed to export options.
Step 4: Choose Your Export Preferences
On the next page, you will configure your export preferences.
- Delivery method: The “Delivery method” dropdown allows you to choose how you want to receive your files. The default option is to receive a download link via email. You can also choose to add the exported files directly to cloud storage services like Dropbox, Google Drive (different account), OneDrive, or Box. If you’re planning to move your photos to another cloud service, direct transfer can save time and bandwidth.
- Frequency: You can choose between a one-time export (“Export once”) or scheduled exports (“Export every 2 months for 1 year”). Scheduled exports are useful for creating regular backups.
- File type & size: Choose your archive file type.
.zipis the most common and widely compatible option. You can also select.tgz. Finally, you can set the archive size. If your export is larger than the chosen size (e.g., 1GB), it will be split into multiple smaller files, making them easier to download and manage.
 Google Takeout export customization options for Google Photos
Configure these options according to your needs and click “Create export”.
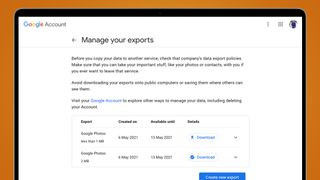
Step 5: Wait for Export and Download Your Files
After clicking “Create export”, Google will begin compiling your Google Photos data. The process time depends on the size of your photo library; it can take anywhere from minutes to several hours, or even days for very large libraries. You’ll see a “Export in progress” message while Google prepares your files.
Once the export is complete, you will receive an email notification with a download link.
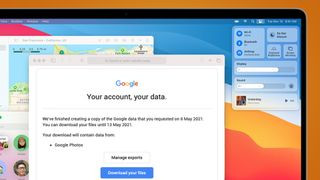 Email notification from Google Takeout with download link for Google Photos
Click the “Download your files” button in the email to start downloading your Google Photos archive to your computer. Remember that the download links are typically active for about a week, so download your files promptly.
Method 2: Downloading Google Photos Individually
If you only need to download a few specific photos, downloading them individually directly from Google Photos is the simplest method.
Step 1: Open Google Photos
Go to the Google Photos website (photos.google.com) and open the photo you wish to download.
Step 2: Download the Photo
Once the photo is open, click the three vertical dots (More options) in the top right corner of the screen. From the dropdown menu, select “Download”. The photo will then be downloaded to your computer’s default download location.
Method 3: Downloading Multiple Google Photos at Once
For downloading a selection of photos, Google Photos allows you to download multiple images at once in a ZIP file.
Step 1: Select Multiple Photos
Open Google Photos on the web (photos.google.com). Hover your cursor over the thumbnail of the first photo you want to download. A checkmark will appear in the top-left corner. Click the checkmark to select the photo.
Continue clicking the checkmarks on other photos you want to download to add them to your selection. You can also select a range of photos by clicking the checkmark on the first photo, holding down the Shift key, and then clicking the checkmark on the last photo in the range.
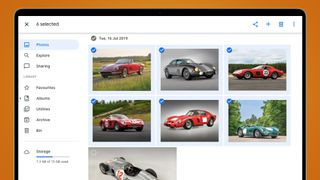 Selecting multiple photos in Google Photos for download
Step 2: Download Selected Photos
Once you have selected all the photos you want to download, click the three vertical dots (More options) in the top right corner. Select “Download” from the menu. Google Photos will then compress your selected photos into a single ZIP archive, which will be downloaded to your computer.
Method 4: Downloading Google Photos Albums
If you have organized your photos into albums in Google Photos, you can download entire albums directly.
Step 1: Go to the Albums Section
In Google Photos, click on the “Albums” tab in the left-hand menu. If you don’t see it directly, it might be under “Explore” or the main menu icon (three horizontal lines). Then, click on “View all albums” to see your complete album collection.
Step 2: Download an Album
Click on the album you want to download. Once the album is open, click the three vertical dots (More options) in the top right corner. Select “Download all” from the dropdown menu.
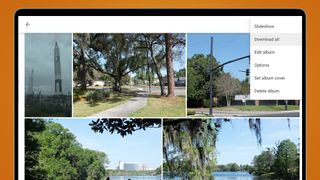 Download album option in Google Photos album view
Google Photos will then compress all the photos and videos within that album into a ZIP file and start the download process. You will need to repeat this process for each album you want to download. Unfortunately, there isn’t a way to download multiple albums simultaneously through the Google Photos interface.
Choosing the Right Method to Download All Photos from Google Photos
- Download All at Once (Google Takeout): Best for creating a full backup of your entire Google Photos library. Most efficient for large libraries.
- Download Individually: Suitable for downloading only one or a few specific photos.
- Download Multiple Photos: Useful for downloading a selection of photos, like those from a particular event or date range.
- Download Albums: Ideal for downloading photos organized in albums, preserving your existing organization.
Conclusion
Downloading all your photos from Google Photos is a crucial step for data security and accessibility. Whether you choose to download everything at once using Google Takeout, download individual photos, select multiple images, or download entire albums, Google provides you with the tools you need. Regularly backing up your Google Photos library ensures that your precious memories are safe and accessible, regardless of your internet connection or cloud service status. By following these methods, you can confidently manage and safeguard your valuable photo collection.