Have you ever considered backing up your precious memories and moments shared on Facebook? Since 2008, like many users, you’ve likely accumulated a vast collection of photos, videos, posts, and other data. Losing access to this digital archive, whether due to account hacking or a decision to deactivate or delete your profile, would be disheartening.
Fortunately, Facebook provides a straightforward way to download all of your personal data. The platform also offers the flexibility to select specific categories of information for export, ensuring you only download what you truly need.
Understanding Your Facebook Data Download Options
Before you start the download process, it’s crucial to understand the types of data Facebook allows you to retrieve. This comprehensive download can include:
- Profile Information: This covers your basic profile details, all posts you’ve created, and photos you’ve uploaded directly to your profile.
- Activity Log: A detailed record of your interactions on Facebook, including comments you’ve made, posts you’ve liked, reactions you’ve given, and more.
- Messages and Chat History: A complete archive of your private conversations and messages exchanged on the platform.
- Uploaded Media (Photos and Videos): Copies of all the photos and videos you have personally uploaded to Facebook. It’s important to note that this download will not include photos and videos you are tagged in but haven’t uploaded yourself. For those, you’ll need to save them manually.
- Advertiser Information: Details about the ads you’ve interacted with and advertisers who may have obtained your contact information through Facebook’s advertising platform.
To get a preview of the extensive data Facebook collects, you can visit the Facebook Your Information page. This page gives you insights into the categories of data Facebook holds about you.
Step-by-Step Guide to Downloading Your Facebook Photos and Data
Ready to download your Facebook data and create a backup of your photos and more? Follow these simple steps on your computer or mobile device.
Step 1: Accessing the ‘Download Your Information’ Tool
The first step is to locate Facebook’s data download tool. The process is slightly different depending on whether you are using a computer or your phone.
On Your Computer:
- Navigate to Facebook.com and click on your profile picture, usually located in the top right-hand corner of the page.
- From the dropdown menu, select ‘Settings & Privacy’, then click on ‘Settings’.
- In the left-hand navigation menu, scroll down until you find the section labeled ‘Your Facebook Information’. Click on this section, and then select ‘Download your information’. Finally, click the ‘Continue’ button.
- A pop-up window will appear. Click on the ‘Request a download’ button to proceed.
- Choose the specific accounts or profiles you wish to download data from (if applicable) and click ‘Next’.
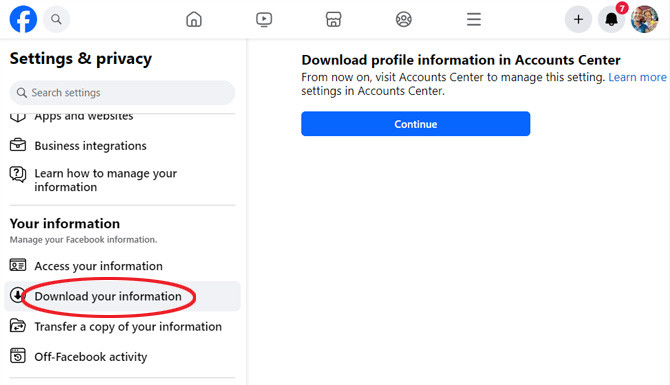 Facebook Settings page screenshot showing the Your Facebook Information option and Download your information highlighted
On Your Phone:
- Open the Facebook mobile app on your smartphone.
- Tap on your profile icon, situated in the lower right corner of the app’s interface.
- Tap the ‘Settings’ icon (it looks like a cog or gear), typically found in the upper right corner of your profile page.
- Scroll down the settings menu until you reach the ‘Your Information’ section. Select ‘Download your information’, and then tap ‘Continue’.
- In the pop-up window, tap on the ‘Request a download’ button.
- Select the accounts and profiles you want to include in your download and tap ‘Next’.
Step 2: Customizing Your Facebook Data Download
Facebook allows you to customize your data download, giving you control over what information you want to save.
Selecting Specific Information to Download
You have the option to download all of your Facebook data or to select specific categories. For users primarily interested in backing up photos, selecting specific categories can save time and storage space.
Choosing Download Categories
If you choose to customize, you’ll see a range of categories to select from:
- ‘Your activity across Facebook’: This section lets you choose specific activities and content you’ve shared, including posts, photos and videos, likes, comments, and more. Crucially, ensure you select ‘Posts‘ here if your primary goal is to download your photos and videos.
- ‘Personal information’: This category includes the information you’ve provided in your profile, such as your name, contact details, and other personal details.
- ‘Connections’: Here, you can choose to download lists of your Facebook friends and followers.
- ‘Logged information’: This section contains data like your search history on Facebook, music recommendations, and location history (if enabled).
Defining the Date Range
You can specify a date range for your download. Choose from predefined ranges or select ‘All of my data‘ to download everything from the beginning of your Facebook history.
Choosing the Download Format
Facebook offers two download formats:
- ‘HTML’: This format is user-friendly and allows you to easily navigate your downloaded data using a web browser. It’s ideal for viewing and personal archiving.
- ‘JSON’: This format is intended for importing your data into other services or for more technical uses. It’s not designed for easy browsing. For most users wanting to view and backup their photos, ‘HTML’ is the recommended choice.
Media Quality Options
Finally, you can choose the media quality for your downloaded photos and videos. Opting for ‘High’ quality will preserve the original resolution of your media but will result in a larger download file size. Select a lower quality if file size is a primary concern.
Step 3: Requesting Your Facebook Data Download
After you’ve customized your download preferences, click the ‘Create File’ button. Facebook will then begin the process of compiling your data into a downloadable file.
The time it takes to compile your data will vary depending on the amount of information in your account. Facebook will send you a notification when your file is ready for download. This could range from minutes to hours, or in rare cases, even days for very large accounts.
Step 4: Downloading Your Facebook Information
Once you receive the notification that your Facebook data archive is ready, navigate back to the ‘Download Your Information’ tool. Refer to Step 1 for instructions on how to access this tool.
In the ‘Available Files’ section, you will see your prepared download file. Click the ‘Download’ button next to it. For security purposes, Facebook will likely prompt you to re-enter your password before the download begins.
Step 5: Exploring Your Downloaded Facebook Data
After the download is complete, you’ll have a ZIP file containing your Facebook data. You’ll need to extract the contents of this file to access your information.
Extracting the ZIP File
- For Windows users: Right-click on the downloaded ZIP file in File Explorer and select ‘Extract All…’. In the pop-up window, choose a location to save the extracted files, optionally check the box labeled ‘Show extracted files when complete’, and then click ‘Extract’. A new File Explorer window will open, displaying the extracted folder and its contents.
- For Mac users: Simply double-click the .zip file. The operating system will automatically extract the files, and they will appear in a new folder in the same location as the original ZIP file.
Browsing Your Data with the HTML File
Facebook provides an easy-to-use HTML interface for browsing your downloaded data. To access it, locate the extracted folder and double-click the file named ‘start_here.html’. This will open your web browser and display a local webpage that serves as a navigation hub for your downloaded Facebook information.
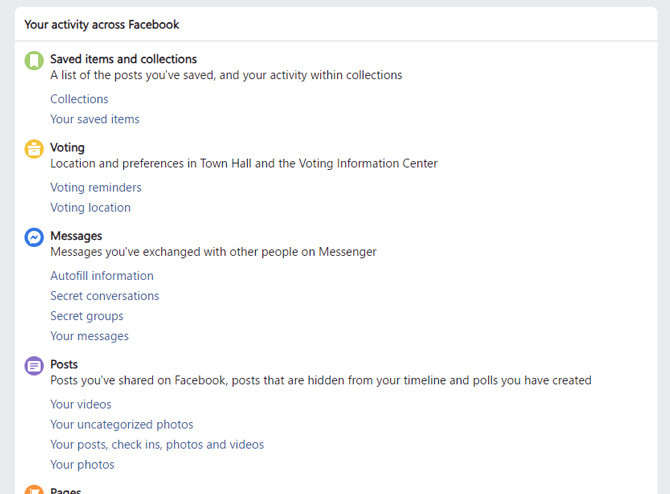 Your activity across Facebook downloaded HTML page example
From this central page, you can explore various categories of your downloaded data, including messages, timeline information, and, of course, photos. You can navigate through your data as if you were browsing an offline website.
However, when viewing photo albums through the HTML interface, you might only see the first image of each album. To access all your photos and videos directly, you’ll need to navigate the file structure within the extracted folder using File Explorer (Windows) or Finder (Mac).
You’ll find your media files organized within the folder path: your_activity_across_facebook > posts > media. Within the ‘media’ folder, your photos and videos are typically organized into subfolders corresponding to your Facebook albums, such as ‘Timeline Photos’ or albums you’ve created. Individual photos not part of albums may be found in folders like ‘your_posts’ or ‘Timelinephotos’.
For users primarily interested in backing up their photos and videos, an alternative and potentially more convenient method is to use Facebook’s photo transfer tool. This tool allows you to directly transfer your Facebook media to cloud storage services like Google Photos or Dropbox. For detailed instructions, see our guide: How to Export Your Facebook Photos and Videos to Cloud Storage.
Final Thoughts on Downloading Facebook Photos
Downloading your Facebook data, including all your photos, is a proactive step towards managing your digital footprint and safeguarding your online memories. Whether you intend to create a personal backup, ensure data portability, or simply have a copy of your digital life, this guide provides you with the knowledge to navigate the process smoothly.
Once you have successfully downloaded your Facebook archive, you might also consider options like taking a break from the platform or permanently deleting your account. Explore our guides on How to Deactivate Your Facebook Account and How to Delete Your Facebook Account for further information.
[Image credit: screenshots via Techlicious, phone mockup via Canva]
Josh Kirschner is the co-founder of Techlicious and has extensive experience covering consumer technology. With over a decade in the tech journalism field, Josh brings expertise and a user-focused perspective to help readers understand and utilize technology effectively.
Topics: Tips & How-Tos, Computers and Software, Facebook, Privacy, Tech 101, Social Networking
