Are you looking for a reliable way to download all of your Google Photos? You’re definitely not alone. Many users, whether they use PCs or Macs, find themselves wanting to backup their precious memories stored within Google Photos. While Google Photos is fantastic for cloud storage and easy access, having a local copy of your photos and videos is always a smart move for peace of mind and offline access.
Google Photos has become a go-to platform for countless individuals to store and organize their visual memories. Its seamless integration across devices, smart organization features, and free storage (for some) have made it incredibly popular. It’s arguably one of the best cloud storage solutions for photos available today. However, relying solely on cloud storage can be risky. What if you lose access to your account, or face internet connectivity issues when you want to reminisce? Downloading your Google Photos ensures you have a personal backup, giving you control and access anytime, anywhere, regardless of internet availability.
This guide will walk you through several effective methods to download all of your Google Photos to your PC or Mac. Whether you want to download everything at once, grab specific photos, or download entire albums, we’ve got you covered. Let’s dive in and secure your digital memories!
Downloading All Google Photos at Once Using Google Takeout
The most efficient way to download all of your Google Photos in bulk is by using a handy tool called Google Takeout. Google Takeout is designed to export your data from various Google services, including Google Photos. It’s your one-stop solution for creating a complete backup of your photo library.
Here’s a step-by-step guide on how to use Google Takeout to download all your Google Photos:
-
Navigate to Google Takeout: Open your web browser and go to takeout.google.com. Make sure you are logged in to the Google account associated with your Google Photos library.
-
Initiate Your Export and Deselect All: You’ll be presented with a list of Google services. To streamline the process and only download your photos, click “Deselect all” located at the top of the list, under “Select data to include”.
-
Select Google Photos: Scroll down the list until you find “Google Photos” and check the box next to it. This action, by default, selects your entire Google Photos library for download.
-
Customize Google Photos Export (Optional): If you wish to download specific albums or date ranges instead of your entire library, click the “All photo albums included” button.
(Alt text: Screenshot showing the “All photo albums included” button in Google Takeout, allowing users to select specific Google Photos albums or years for download.)
A pop-up window will appear, allowing you to deselect “All photo albums included” and then choose specific albums or even years to download. You can select or deselect individual albums or choose to include photos from specific years. Once you’ve made your selections, click “OK”.
-
Proceed to the Next Step: After selecting Google Photos (and customizing album selection if needed), scroll down to the bottom of the page and click the “Next step” button.
-
Configure Export Settings: You will now be presented with “Delivery method”, “Frequency”, “File type & size” options.
 Choosing export settings in Google Takeout for Google Photos download
(Alt text: Screenshot of Google Takeout’s export settings, highlighting options for delivery method, frequency, file type, and archive size for Google Photos download.)
- Delivery method: Choose how you want to receive your download. The default is to receive a download link via email. You can also opt to add your export directly to cloud storage services like Dropbox, OneDrive, or Box, which can be convenient if you plan to migrate your photos to another cloud platform.
- Frequency: Decide whether you want to perform a one-time export or schedule periodic exports (e.g., every 2 months for a year). For a full backup, a one-time export is usually sufficient.
- File type & size: .ZIP is the most common and recommended file type. You can also choose .TGZ. For “File size”, you can choose the maximum size of the archive files. If your export is large, it will be split into multiple files of the size you specify (e.g., 2GB, 10GB, 50GB). Smaller file sizes are easier to download, especially on slower internet connections.
-
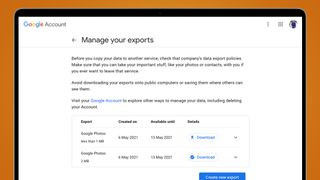
Create Export: After configuring your export settings, click the “Create export” button. Google will then begin preparing your export. The message “Google is creating a copy of files from Google Photos” will be displayed.
-
Wait for Completion and Download: The time it takes for Google to prepare your export depends on the size of your Google Photos library. It can range from minutes to several hours, or even days for very large libraries. You will receive an email notification at your Google account email address when your export is ready.
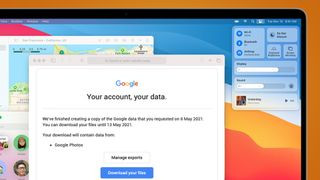 Email notification for Google Takeout download
(Alt text: Screenshot of an email notification from Google Takeout, informing the user that their Google Photos download is ready and providing a “Download your files” button.)
Open the email and click the “Download your files” button. This will take you back to Google Takeout where you can download your exported Google Photos as a ZIP file (or multiple ZIP files, depending on the size). Remember that the download links are typically active for about a week for security reasons.
Downloading Google Photos Individually
Sometimes, you might only need to download a few specific photos rather than your entire library. Google Photos makes it easy to download individual images directly from the platform.
Here’s how to download Google Photos one by one:
-
Open Google Photos: Go to photos.google.com and open the specific photo you want to download.
-
Access Download Option: Once the photo is open, look for the three vertical dots (More options menu) in the top right corner of the screen and click on them.
-
Select Download: From the dropdown menu, select “Download”. The photo will then be downloaded to your computer’s default download location.
Downloading Multiple Google Photos Simultaneously
If you need to download a selection of photos, but not everything, Google Photos allows you to select and download multiple images at once.
Follow these steps to download several Google Photos at once:
-
Select Photos: Go to photos.google.com. Hover your cursor over the thumbnail of the first photo you want to download. A checkmark icon will appear in the top-left corner of the thumbnail. Click on the checkmark to select the photo.
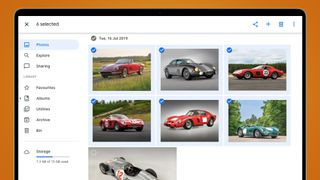 Selecting multiple photos for download in Google Photos
(Alt text: Screenshot of Google Photos interface showing multiple photos selected for download, indicated by checkmarks on the thumbnails.)
-
Continue Selecting: Select additional photos by clicking on the checkmark icon on their thumbnails. To select a range of photos, you can select the first photo, hold down the Shift key, and then select the last photo in the range – this will select all photos in between as well.
-
Download Selected Photos: Once you have selected all the photos you want to download, click the three vertical dots (More options menu) in the top right corner of the screen.
-
Click Download: From the dropdown menu, select “Download”. Google Photos will then compress your selected photos into a single ZIP file, which will be downloaded to your computer.
Downloading Google Photos Albums
If you have organized your photos into albums in Google Photos, downloading entire albums is a convenient way to backup photos by category or event.
Here’s how to download albums from Google Photos:
-
Go to Albums: In Google Photos, click on the “Albums” tab in the left-hand menu. If you don’t see it, you might need to click on “Explore” or the main menu icon first. Then, click on “View all albums” to see your complete album collection.
-
Select Album: Click on the album you want to download.
-
Access Album Options: Once the album is open, click the three vertical dots (More options menu) in the top right corner.
-
Download Album: From the dropdown menu, select “Download all”.
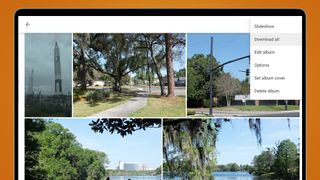 Downloading an album from Google Photos using the "Download all" option
(Alt text: Screenshot showing the “Download all” option in the Google Photos album menu, enabling users to download the entire album as a ZIP file.)
Google Photos will compress all the photos and videos within that album into a ZIP file, and the download will begin. You will need to repeat this process for each album you wish to download.
Conclusion
Downloading your Google Photos is a proactive step towards safeguarding your digital memories. Whether you choose to download everything at once using Google Takeout, download individual photos, multiple selections, or entire albums, Google Photos offers flexible options to suit your needs. Regularly backing up your photos ensures you always have access to your precious moments, regardless of your internet connection or cloud service status. So, take the time to download your Google Photos today and enjoy the peace of mind that comes with having a secure, local backup of your visual history.
