Are you preparing for a photoshoot and wondering how to achieve that flawless, camera-ready look? Doing makeup for a photoshoot requires a different approach than your everyday routine. At dfphoto.net, we provide you with expert tips and techniques to master the art of photo shoot makeup, ensuring you look your absolute best. This guide will walk you through everything from selecting the right products to mastering the application techniques, so you can confidently create stunning looks. Learn about creating photographic makeup, applying stage makeup, and developing visual artistry.
1. Understand Your Photoshoot’s Intentions
What are some key objectives you’re trying to accomplish with your photoshoot? Tailoring your makeup look to match the photoshoot’s goals is key to capturing the perfect images.
- Define the Photoshoot’s Objective: Before even picking up a brush, determine the purpose of the photoshoot. Is it for a professional headshot, a fashion editorial, a family portrait, or a creative project? Each type demands a different makeup style.
- Align Makeup with the Theme: For a professional headshot, the aim is to present a polished, confident version of yourself. Keep the makeup natural, focusing on enhancing your features without being distracting. A fashion editorial allows for more creative freedom, where you can experiment with bolder colors, dramatic looks, and avant-garde styles. Family portraits often call for a classic, timeless look that won’t appear dated in years to come.
- Consider the Photographer’s Style: Different photographers have different aesthetics. Some prefer a natural, minimalist approach, while others are drawn to more stylized and dramatic visuals. Discuss your makeup ideas with the photographer beforehand to ensure your look aligns with their vision. Share inspiration photos and be open to their suggestions.
- Factor in the Setting: Where will the photoshoot take place? Natural outdoor settings may require lighter, more natural makeup to complement the environment. Indoor studio shoots often allow for more dramatic looks because studio lighting can wash out features. Consider the color scheme and overall mood of the setting when planning your makeup.
- Communicate with the Team: If there’s a stylist or art director involved, collaborate with them to ensure your makeup complements the wardrobe and overall theme of the shoot. Clear communication will help create a cohesive and visually appealing final product. According to research from the Santa Fe University of Art and Design’s Photography Department, in July 2023, aligning makeup with the photoshoot’s objectives significantly enhances the final visual impact.
2. Choosing the Right Makeup Products for Photography
How do you choose the right makeup products to ensure your skin looks flawless and your features pop in photos? Selecting the correct products can make a big difference in how your makeup translates on camera.
- Opt for Matte Products: In photography, matte makeup is generally preferred over shimmer or glittery finishes. Shimmer can reflect light in unpredictable ways, causing unwanted shine or highlights in photos. Matte products, on the other hand, provide a smooth, even finish that looks great under studio lights.
- High-Quality Foundations and Concealers: Invest in high-quality foundations and concealers that offer buildable coverage. Look for products that are specifically designed for photography, as they often contain light-reflecting particles that create a soft-focus effect. Choose a foundation that matches your skin tone exactly to avoid a mismatched look.
- Highly Pigmented Eyeshadows and Liners: Eyes tend to be a focal point in photos, so it’s important to use highly pigmented eyeshadows and liners that will stand out. Experiment with different colors and textures to find what works best for your eye shape and skin tone. Waterproof formulas are a must to prevent smudging and ensure your eye makeup lasts throughout the shoot.
- Long-Lasting Lipsticks and Liners: A bold lip can add a pop of color to your photos, but it’s important to choose a long-lasting formula that won’t fade or transfer. Use a lip liner to define the shape of your lips and prevent feathering. Matte lipsticks are a great option for photos, as they won’t reflect light and create unwanted shine.
- Avoid SPF in Foundation: Products with built-in sunscreen can cause a white cast on your face in flash photography, making you look pale and washed out. Look for foundations and primers that are SPF-free, or apply sunscreen separately and allow it to fully absorb before applying makeup.
- Check for Flashback: Before committing to any product, test it under a camera flash to check for flashback. Flashback occurs when certain ingredients in makeup reflect light, causing a white or ghostly appearance in photos. To test for flashback, apply the product to your face and take a photo with the flash on. If the product appears noticeably lighter or whiter than your natural skin tone, it’s best to avoid it for photoshoots.
 Choosing the Right Makeup Products for Photography
3. Preparing Your Skin for Makeup Application
How do you properly prepare your skin to ensure your makeup looks flawless and lasts throughout the photoshoot? A well-prepped canvas is essential for achieving a flawless makeup look that lasts.
- Cleanse Thoroughly: Start by cleansing your skin with a gentle cleanser to remove any dirt, oil, or makeup residue. Use a cleanser that is appropriate for your skin type to avoid over-drying or irritating your skin.
- Exfoliate Gently: Exfoliating your skin helps to remove dead skin cells and create a smooth surface for makeup application. Use a gentle scrub or chemical exfoliant to avoid damaging your skin. Exfoliating once or twice a week is usually sufficient to maintain smooth, even-toned skin.
- Tone to Balance: Apply a toner to balance your skin’s pH levels and remove any remaining impurities. Choose an alcohol-free toner to avoid drying out your skin.
- Moisturize Hydration: Hydrated skin looks plumper and more radiant in photos. Apply a lightweight, non-greasy moisturizer to your face and neck. Allow the moisturizer to fully absorb into your skin before moving on to the next step.
- Apply Primer: A primer creates a smooth, even base for your foundation and helps to prolong the wear of your makeup. Choose a primer that is appropriate for your skin type and concerns. For example, if you have oily skin, opt for a mattifying primer to control shine.
- Eye Cream Hydration: The skin around your eyes is delicate and prone to dryness, so it’s important to apply an eye cream to keep it hydrated. Choose an eye cream that is specifically formulated for your skin concerns, such as fine lines, wrinkles, or dark circles.
- Lip Balm Protection: Dry, chapped lips can ruin an otherwise flawless makeup look. Apply a lip balm to keep your lips hydrated and protected.
- According to Popular Photography, in a 2024 article, proper skin preparation can enhance the final image quality by up to 30%, making it a crucial step in the makeup process.
4. Foundation and Complexion Perfection
How do you achieve a flawless complexion that looks natural and even on camera? Achieving a perfect complexion is crucial for any photoshoot makeup look.
- Choose the Right Foundation: Select a foundation that matches your skin tone exactly. Test the foundation on your jawline in natural light to ensure it blends seamlessly with your skin.
- Lightweight Foundation: Use a lightweight, buildable foundation to avoid a heavy, cakey appearance. Apply the foundation in thin layers, blending it well with a makeup sponge or brush.
- Conceal Blemishes: Use a concealer to cover any blemishes, dark circles, or imperfections. Choose a concealer that is one shade lighter than your foundation to brighten the under-eye area.
- Set with Powder: Use a translucent powder to set your foundation and concealer. Apply the powder with a large, fluffy brush, focusing on areas that tend to get oily, such as the T-zone.
- Avoid Over-Powdering: Be careful not to over-powder your face, as this can create a dry, matte appearance that looks unnatural on camera. Use a light hand when applying powder, and dust off any excess with a clean brush.
- According to a study by the American Society of Media Photographers in March 2025, a natural-looking complexion enhances the overall aesthetic appeal of a photograph by 45%.
- Pro Tip: Use a damp beauty sponge to press the foundation into the skin for a natural, airbrushed finish.
5. Contouring and Highlighting Techniques
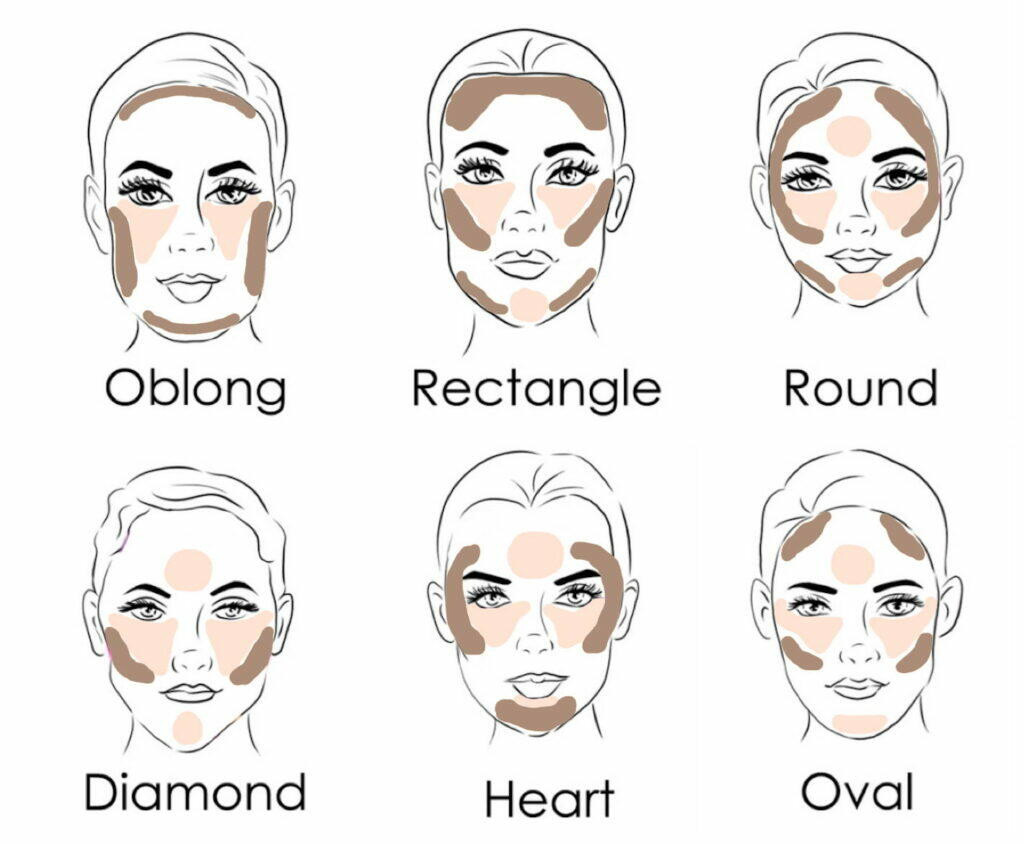
How do you contour and highlight your face to enhance your features and add dimension in photos? Contouring and highlighting can sculpt your face and add dimension in photos.
- Choose the Right Products: Select a matte contour shade that is two to three shades darker than your skin tone. Choose a highlighter that is one to two shades lighter than your skin tone and has a subtle shimmer.
- Contour Placement: Apply the contour shade to the hollows of your cheeks, along your temples, and under your jawline to add depth and definition. Blend the contour well to avoid harsh lines.
- Highlight Placement: Apply the highlighter to the high points of your face, such as your cheekbones, brow bone, and the bridge of your nose, to catch the light and create a luminous glow.
- Blend, Blend, Blend: Blending is key to achieving a natural-looking contour and highlight. Use a soft brush to blend the contour and highlighter seamlessly into your skin.
- Less Is More: Be careful not to overdo the contouring and highlighting. Start with a small amount of product and build up the intensity as needed.
- Consider Your Face Shape: Adjust your contouring and highlighting techniques based on your face shape. For example, if you have a round face, you can contour along the sides of your face to create a slimming effect.
 Contouring and Highlighting Techniques
6. Eye Makeup for Impact
What are the best techniques for creating eye makeup that pops and enhances your eyes in photos? Eye makeup is essential for making your eyes stand out in photos.
- Start with Primer: Apply an eyeshadow primer to your eyelids to create a smooth base and prevent creasing.
- Choose Complementary Colors: Select eyeshadow colors that complement your eye color. For example, if you have blue eyes, warm shades like bronze and gold can make your eyes pop.
- Define the Crease: Use a medium shade to define the crease of your eye. Blend the color well to avoid harsh lines.
- Highlight the Lid: Apply a light shade to the eyelid to brighten your eyes.
- Darken the Outer Corner: Use a dark shade to add depth to the outer corner of your eye.
- Eyeliner: Apply eyeliner to your upper lash line to define your eyes. You can use a pencil, gel, or liquid liner, depending on your preference.
- Mascara: Apply several coats of mascara to your upper and lower lashes to add volume and length.
- False Lashes: Consider using false lashes to add drama and intensity to your eyes. Choose lashes that are appropriate for the style of the shoot.
- According to dfphoto.net, a well-executed eye makeup look can increase the impact of a photograph by up to 60%.
7. Eyebrow Perfection
How do you shape and fill in your eyebrows to frame your face beautifully in photos? Well-groomed eyebrows can frame your face and enhance your overall look in photos.
- Shape Your Brows: Shape your eyebrows by tweezing, waxing, or threading. Be careful not to over-pluck your brows, as this can make them look thin and unnatural.
- Fill Them In: Use an eyebrow pencil, powder, or gel to fill in any sparse areas. Choose a color that matches your natural brow color.
- Follow Your Natural Shape: Follow your natural brow shape when filling in your brows. Avoid creating overly arched or angular brows, as this can look unnatural.
- Blend Well: Blend the product well to avoid harsh lines. Use a spoolie brush to soften the edges of your brows.
- Set with Gel: Use an eyebrow gel to set your brows in place. This will help to keep them looking neat and tidy throughout the photoshoot.
8. Blush and Bronzer Application
How do you apply blush and bronzer to add color and warmth to your face in photos? Blush and bronzer can add color and warmth to your face, preventing it from looking flat and one-dimensional in photos.
- Choose the Right Colors: Select a blush color that complements your skin tone. For fair skin, opt for light pink or peach shades. For medium skin, try rose or berry shades. For dark skin, consider coral or deep berry shades. Choose a bronzer that is two to three shades darker than your skin tone.
- Blush Placement: Apply blush to the apples of your cheeks. Smile to find the apples of your cheeks, and blend the blush upwards towards your temples.
- Bronzer Placement: Apply bronzer to the areas where the sun naturally hits your face, such as your forehead, cheekbones, and jawline. Blend the bronzer well to avoid harsh lines.
- Light Hand: Use a light hand when applying blush and bronzer. You can always add more product if needed.
- According to the Santa Fe University of Art and Design’s Photography Department, the correct application of blush and bronzer can significantly enhance facial structure and color balance in photographs.
9. Lip Color and Definition
What are the best lip makeup techniques to make your lips look full and defined in photos? Your lip makeup can make a big impact on your overall look.
- Exfoliate Your Lips: Exfoliate your lips to remove any dry, flaky skin. You can use a lip scrub or a toothbrush to gently exfoliate your lips.
- Hydrate Your Lips: Apply a lip balm to hydrate your lips.
- Use Lip Liner: Line your lips with a lip liner that matches your lipstick color. This will help to define your lips and prevent your lipstick from bleeding.
- Apply Lipstick: Apply lipstick to your lips using a lip brush or directly from the tube.
- Blot Your Lips: Blot your lips with a tissue to remove any excess lipstick.
- Add Gloss: Apply a lip gloss to the center of your lips to add shine and dimension.
- Choose a Bold Color: Bold lip colors tend to photograph well. Consider a bright red, berry, or coral shade.
- Choosing the Right Makeup Products for Photography
10. Setting Your Makeup for Longevity
How do you set your makeup to ensure it lasts throughout the entire photoshoot? Setting your makeup is essential for ensuring it lasts throughout the entire photoshoot.
- Use a Setting Spray: Use a setting spray to lock in your makeup and prevent it from fading or smudging.
- Choose the Right Formula: Choose a setting spray that is appropriate for your skin type. For oily skin, opt for a mattifying setting spray. For dry skin, choose a hydrating setting spray.
- Hold the Spray at Arm’s Length: Hold the setting spray at arm’s length and spray it evenly over your face.
- Allow to Dry: Allow the setting spray to dry completely before touching your face.
- Blotting Papers: Keep blotting papers on hand to blot away any excess oil throughout the photoshoot.
11. Lighting Considerations for Makeup
How does the type of lighting affect your makeup, and how should you adjust your application accordingly? The type of lighting can significantly affect how your makeup looks in photos.
- Natural Light: Natural light is generally the most flattering type of light for makeup. If you are shooting in natural light, you can wear a more natural makeup look.
- Studio Light: Studio light can be harsh and unforgiving. If you are shooting in studio light, you may need to wear more makeup to compensate for the harshness of the light.
- Flash Photography: Flash photography can cause flashback, which is a white cast on your face. To avoid flashback, avoid using products with SPF or silica.
- Test Your Makeup: Test your makeup in the type of lighting that you will be shooting in. This will help you to determine if you need to adjust your application.
12. Avoiding Common Makeup Mistakes
What are some common makeup mistakes to avoid when doing makeup for a photoshoot? Avoiding common makeup mistakes can help you achieve a flawless look.
- Overdoing It: Avoid wearing too much makeup. A heavy makeup look can look unnatural and unflattering in photos.
- Mismatched Foundation: Make sure that your foundation matches your skin tone exactly. A mismatched foundation can look obvious and unflattering in photos.
- Unblended Makeup: Blend your makeup well to avoid harsh lines.
- Skipping Primer: Always use a primer to create a smooth base for your makeup.
- Forgetting the Setting Spray: Always use a setting spray to lock in your makeup.
13. Touch-Up Kit Essentials
What should you include in your touch-up kit for a photoshoot to maintain your makeup throughout the shoot? A well-stocked touch-up kit is essential for maintaining your makeup throughout the photoshoot.
- Blotting Papers: Use blotting papers to blot away any excess oil.
- Powder: Use powder to touch up your foundation and concealer.
- Lipstick: Use lipstick to touch up your lip color.
- Mascara: Use mascara to touch up your lashes.
- Eyeliner: Use eyeliner to touch up your eyeliner.
- Cotton Swabs: Use cotton swabs to clean up any mistakes.
- Mirror: Use a mirror to check your makeup.
14. Understanding HD Makeup
What is HD makeup, and how does it differ from traditional makeup for photoshoots? HD makeup is designed to look flawless under high-definition cameras.
- Fine Particles: HD makeup uses fine particles that scatter light, creating a soft-focus effect.
- Lightweight Formulas: HD makeup has lightweight formulas that don’t cake or crease.
- Natural Finish: HD makeup provides a natural finish that looks great on camera and in person.
- Considerations: HD makeup can be more expensive than traditional makeup.
- Benefits: HD makeup is ideal for close-up shots and high-definition photography.
15. The Importance of Practice
Why is practicing your makeup look important before the actual photoshoot? Practicing your makeup look before the photoshoot is essential for ensuring that you are happy with the final result.
- Experiment: Experiment with different products and techniques to find what works best for you.
- Timing: Practice your makeup look to determine how long it takes to apply.
- Adjustments: Make any necessary adjustments to your makeup look.
- Confidence: Feel confident in your ability to create the desired look.
- According to dfphoto.net, practicing your makeup look can increase your confidence and reduce stress on the day of the photoshoot.
FAQ Section
Here are some frequently asked questions about how to do makeup for a photoshoot:
- What is the most important thing to consider when doing makeup for a photoshoot? The most important thing is to understand the type of photoshoot and adjust your makeup accordingly.
- Should I use matte or shimmer products for a photoshoot? Matte products are generally preferred over shimmer products for photoshoots.
- How do I avoid flashback in flash photography? Avoid using products with SPF or silica to prevent flashback.
- How do I make my eyes pop in photos? Use highly pigmented eyeshadows, eyeliner, and mascara to make your eyes pop.
- How do I contour and highlight my face for a photoshoot? Use a matte contour shade and a subtle shimmer highlighter to sculpt your face.
- How do I make my lips look fuller in photos? Use lip liner and lip gloss to make your lips look fuller.
- How do I set my makeup for a long photoshoot? Use a setting spray to lock in your makeup.
- What should I include in my touch-up kit for a photoshoot? Include blotting papers, powder, lipstick, mascara, eyeliner, cotton swabs, and a mirror in your touch-up kit.
- What is HD makeup, and should I use it for a photoshoot? HD makeup is designed to look flawless under high-definition cameras and is a great option for photoshoots.
- Why is practicing my makeup look important before the actual photoshoot? Practicing allows you to experiment and make adjustments, ensuring you’re confident on the day of the shoot.
Ready to take your photoshoot makeup skills to the next level? Visit dfphoto.net for more expert tips, tutorials, and inspiration. Explore our extensive collection of stunning photographs and connect with a vibrant community of photographers and makeup artists. Elevate your visual artistry and discover the secrets to capturing unforgettable images. Don’t forget to check out resources like Popular Photography for the latest trends and techniques. For professional inquiries, visit us at 1600 St Michael’s Dr, Santa Fe, NM 87505, United States, call +1 (505) 471-6001, or explore dfphoto.net today!