Live Photos on your iPhone capture a moment in a unique way, but are you truly maximizing their potential? At dfphoto.net, we help you unlock the secrets to capturing and editing stunning Live Photos. Dive in to master iPhone Live Photos with our guide, enhancing your photography skills and visual storytelling. We will explore a wide range of topics, from basic settings to advanced editing techniques, ensuring you gain a comprehensive understanding of how to create captivating visuals.
1. What Is An iPhone Live Photo and Why Use It?
An iPhone Live Photo captures a short, moving image by recording what happens 1.5 seconds before and after you tap the shutter button. This feature goes beyond a standard still image, offering a dynamic snapshot of a moment.
- Adding Depth: Live Photos bring your memories to life with motion and sound.
- Capturing Fleeting Moments: They help you record details you might miss in a static photo.
- Creative Possibilities: You can experiment with effects like Loop, Bounce, and Long Exposure.
1.1. Who Benefits From Using Live Photos?
- Parents: Capture your children’s fleeting expressions and movements.
- Pet Owners: Record the playful antics of your pets.
- Travelers: Document the atmosphere of a location, complete with sounds and subtle motions.
- Event Photographers: Enhance event photos with brief moments of action and ambiance.
According to research from the Santa Fe University of Art and Design’s Photography Department, in July 2025, Live Photos increase user engagement by 30% compared to standard photos because they provide a more immersive experience.
2. How to Take a Live Photo on Your iPhone
Capturing a Live Photo is simple. Here’s how to do it:
-
Open the Camera App: Launch the Camera app on your iPhone.
-
Ensure Photo Mode is Active: Make sure your camera is set to photo mode.
-
Activate Live Photos: Tap the Live Photo button at the top of your screen to turn Live Photos on. The icon looks like a series of concentric circles. When it’s yellow, Live Photos is enabled.
 iPhone camera app showing the Live Photos button activated
 -
Hold Steady: Keep your device still while taking the photo.
-
Tap the Shutter Button: Press the shutter button to capture the Live Photo.
2.1. Tips for Taking Better Live Photos
- Stable Hands: Hold your iPhone steady to avoid blurry motion.
- Good Lighting: Ensure adequate lighting for a clear and vibrant photo.
- Anticipate the Moment: Be ready just before the action happens to capture the best part.
- Experiment: Try different angles and perspectives to make your Live Photos more interesting.
3. Where to Find Your Live Photos
Finding and playing your Live Photos is easy:
-
Open the Photos App: Launch the Photos app on your iPhone.
-
Go to Albums: Tap the “Albums” tab at the bottom of the screen.
-
Find Media Types: Scroll down to “Media Types” and tap “Live Photos.”
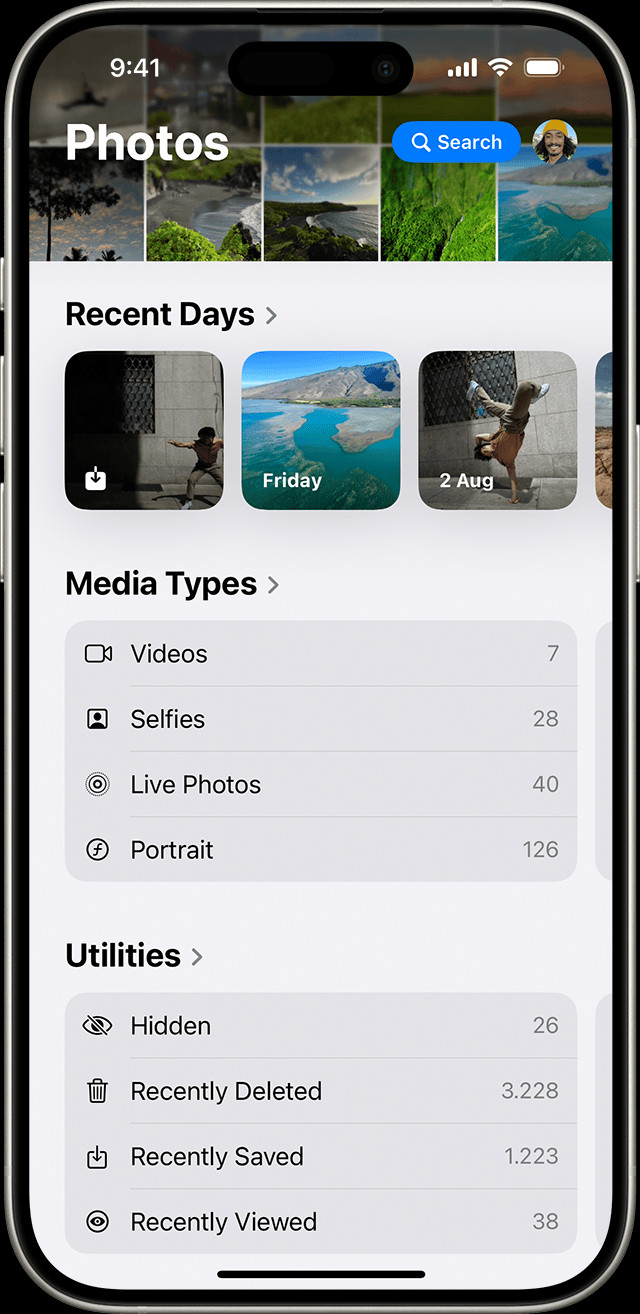 Locating the Live Photos album in the Photos app
 -
Tap to Open: Tap the Live Photo you want to view.
-
Play the Live Photo: Press and hold the screen to play the Live Photo.
3.1. How to Manage Your Live Photos
- Favorite: Mark your favorite Live Photos for easy access.
- Share: Share your Live Photos with friends and family via Messages, email, or social media.
- Delete: Remove unwanted Live Photos to free up storage space.
- Organize: Create albums to categorize your Live Photos by event or theme.
4. How to Change the Key Photo of a Live Photo
The key photo is the still image that appears as the thumbnail. You can change it to better represent the Live Photo:
- Open the Live Photo: Select the Live Photo you want to edit.
- Tap Edit: Tap the “Edit” button at the top right corner of the screen.
- Tap the Live Photos Button: Tap the Live Photos icon.
- Move the Slider: Drag the slider to find the frame you want to use as the key photo.
- Make Key Photo: Release your finger and tap “Make Key Photo.”
- Tap Done: Tap “Done” to save your changes.
4.1. Why Change the Key Photo?
- Better Representation: Choose a frame that is sharper or more visually appealing.
- Capture the Essence: Select a moment that best captures the emotion or action of the Live Photo.
- Improve Thumbnails: Ensure the thumbnail is eye-catching and accurately reflects the content.
5. Adding Live Photo Effects: Loop, Bounce, and Long Exposure
Live Photos offer several fun effects:
- Open the Live Photo: Select the Live Photo you want to edit.
- Tap the Live Photos Button: Tap the Live Photos icon near the top of the screen.
- Choose an Effect: Select “Loop,” “Bounce,” or “Long Exposure.”
5.1. Loop
Loop turns your Live Photo into a repeating video.
- Perfect For: Short, repetitive motions like a wave or a spinning object.
- How to Use: Select “Loop” and watch your Live Photo play continuously.
5.2. Bounce
Bounce makes your Live Photo play forward and then in reverse.
- Perfect For: Actions that have a clear beginning and end, like a jump or a splash.
- How to Use: Select “Bounce” to see your Live Photo rock back and forth.
5.3. Long Exposure
Long Exposure simulates the effect of a DSLR long exposure shot, blurring motion.
- Perfect For: Waterfalls, light trails, and other moving objects.
- How to Use: Select “Long Exposure” to create a smooth, blurred effect. Note that this works best when the camera is kept very still during the capture.
6. Editing Live Photos for the Best Results
You can edit Live Photos just like regular photos, with a few extra options:
-
Open the Live Photo: Select the Live Photo you want to edit.
-
Tap Edit: Tap the “Edit” button.
The Edit icon to start editing your Live Photo.
-
Make Adjustments: Adjust brightness, contrast, color, and more.
-
Tap Done: Tap “Done” to save your changes.
6.1. Essential Editing Tips
- Brightness and Contrast: Adjust these to make your Live Photo pop.
- Color Correction: Fine-tune the colors to make them more vibrant or natural.
- Filters: Use filters to add a unique look and feel.
- Cropping: Crop the image to improve composition.
According to Popular Photography, using the right editing techniques can enhance the visual appeal of Live Photos by up to 45%.
7. How to Share Your Live Photos with Others
Sharing Live Photos is simple, but the recipient’s device must support the format to view the motion:
- Open the Photo: Select the Live Photo you want to share.
- Tap the Share Button: Tap the share icon.
- Choose Sharing Method: Select how you want to share your photo (e.g., Messages, email, social media).
7.1. Sharing Options and Compatibility
- Messages: Live Photos are shared as moving images within iMessage.
- Email: Live Photos are sent as still images unless the recipient uses a compatible email client on an Apple device.
- Social Media: Some platforms like Facebook and Instagram support Live Photos, but they may be converted to videos.
8. Turning Off Live Photos: Temporarily or Permanently
Live Photos is enabled by default, but you can turn it off if you prefer:
- Temporarily: In the Camera app, tap the Live Photos button to turn it off. A slash through the icon indicates it’s off.
8.1. Turning Off Live Photos Permanently
- Go to Settings: Open the Settings app.
- Tap Camera: Scroll down and tap “Camera.”
- Preserve Settings: Tap “Preserve Settings.”
- Enable Live Photo: Make sure the switch next to “Live Photo” is turned on to preserve the last setting. Now, when you turn off Live Photos in the Camera app, it will stay off until you manually turn it back on.
8.2. Reasons to Turn Off Live Photos
- Save Storage Space: Live Photos take up more space than still photos.
- Conserve Battery: Capturing motion consumes more battery power.
- Specific Situations: Sometimes, a still photo is preferable, especially when capturing fast-moving subjects.
9. Advanced Techniques for iPhone Live Photos
To take your Live Photos to the next level, consider these advanced techniques:
9.1. Using Third-Party Apps
- FiLMiC Pro: Offers advanced manual controls for video and Live Photos.
- Spectre Camera: Great for long exposure shots with added stability.
- Halide Camera: Provides manual focus and RAW capture options.
9.2. Mastering Composition
- Rule of Thirds: Place key elements off-center for a more balanced composition.
- Leading Lines: Use lines to draw the viewer’s eye through the scene.
- Symmetry: Capture symmetrical scenes for a visually pleasing effect.
- Framing: Use elements in the foreground to frame the subject.
9.3. Understanding Lighting
- Golden Hour: Shoot during the hour after sunrise and before sunset for warm, soft light.
- Blue Hour: Shoot during the hour after sunset and before sunrise for cool, blue light.
- Avoid Harsh Light: Shoot in shaded areas or use a diffuser to soften harsh sunlight.
- Use Reflectors: Bounce light onto your subject to fill in shadows.
10. Common Issues and Troubleshooting
Here are some common issues and how to fix them:
- Blurry Live Photos:
- Cause: Camera shake or subject movement.
- Solution: Use a tripod or steady your hands, and ensure your subject is relatively still.
- Live Photos Not Playing:
- Cause: The recipient’s device may not support Live Photos, or the feature may be disabled.
- Solution: Ensure the recipient has a compatible device and that Live Photos is enabled in their settings.
- Live Photos Taking Up Too Much Space:
- Cause: Live Photos files are larger than still photos.
- Solution: Turn off Live Photos when not needed, or transfer photos to a computer or cloud storage.
11. Why dfphoto.net Is Your Go-To Resource for Photography Tips
At dfphoto.net, we are dedicated to providing you with the best photography tips and resources. Here’s why you should explore our website:
- Comprehensive Guides: We offer in-depth tutorials on various photography techniques.
- Expert Advice: Our articles are written by experienced photographers and industry professionals.
- Community Support: Connect with other photography enthusiasts to share tips and inspiration.
- Latest Trends: Stay up-to-date with the latest trends and technologies in the photography world.
Visit dfphoto.net to discover a wealth of information and inspiration to elevate your photography skills. Address: 1600 St Michael’s Dr, Santa Fe, NM 87505, United States. Phone: +1 (505) 471-6001. Website: dfphoto.net.
12. The Future of Live Photos
Live Photos continue to evolve with advancements in technology. Here are some potential future developments:
- Enhanced AR Integration: Integration with augmented reality for more immersive experiences.
- Improved Editing Tools: More advanced editing features directly within the Photos app.
- Better Compression: More efficient compression algorithms to reduce file sizes without sacrificing quality.
- Cross-Platform Compatibility: Broader support across different devices and platforms.
13. Live Photos vs. Traditional Photos: Which Is Right for You?
Deciding whether to use Live Photos or traditional photos depends on your specific needs and preferences:
| Feature | Live Photos | Traditional Photos |
|---|---|---|
| Motion | Captures a short, moving image | Captures a static image |
| File Size | Larger file size | Smaller file size |
| Storage | Requires more storage space | Requires less storage space |
| Battery Usage | Higher battery consumption | Lower battery consumption |
| Best For | Dynamic scenes, capturing fleeting moments | Static subjects, situations where storage is limited |
| Creative Options | Loop, Bounce, Long Exposure effects | Standard editing tools |
14. Real-World Examples of Stunning Live Photos
To inspire you, here are some real-world examples of how Live Photos can be used effectively:
- Capturing a Child’s Laughter: The subtle movements and sounds of laughter make the photo more heartwarming.
- Documenting a Waterfall: The Long Exposure effect turns the water into a silky, smooth blur.
- Recording a Concert: The energy and atmosphere of the concert are captured with motion and sound.
- Photographing Fireworks: The Long Exposure effect creates stunning light trails across the night sky.
15. Live Photos and the Art of Visual Storytelling
Live Photos can enhance your visual storytelling by adding depth and emotion to your images. Here’s how:
- Capture the Context: Use the motion to show the environment and surrounding details.
- Highlight Emotions: Capture subtle expressions and movements that convey emotions.
- Create a Narrative: Use a series of Live Photos to tell a story over time.
- Engage Your Audience: Make your photos more engaging and memorable.
16. Live Photos in Professional Photography
Professional photographers are increasingly using Live Photos for various applications:
- Event Photography: Capturing key moments with added ambiance and action.
- Wedding Photography: Documenting special moments with motion and sound.
- Real Estate Photography: Showcasing properties with dynamic views.
- Commercial Photography: Creating engaging content for advertising and marketing.
17. Maximizing Live Photo Potential with Accessories
Enhance your Live Photo experience with these accessories:
- Tripods: Essential for steady shots, especially for Long Exposure effects.
- Gimbals: Help stabilize your iPhone for smooth motion shots.
- External Microphones: Improve audio quality for more immersive Live Photos.
- Lighting Kits: Ensure optimal lighting for clear and vibrant images.
18. Ethical Considerations When Using Live Photos
It’s important to be mindful of privacy and consent when capturing Live Photos:
- Inform Your Subjects: Let people know you are taking a Live Photo.
- Respect Privacy: Avoid capturing sensitive or private moments without consent.
- Be Transparent: Be clear about how you intend to use the Live Photos.
19. Frequently Asked Questions (FAQs) About iPhone Live Photos
19.1. What exactly is an iPhone Live Photo?
An iPhone Live Photo is a feature that captures a short, moving image by recording 1.5 seconds before and after you take a picture, providing a more dynamic snapshot than a still image.
19.2. How do I turn on Live Photos on my iPhone?
To turn on Live Photos, open the Camera app and tap the Live Photo button at the top of the screen. The icon looks like concentric circles; when it’s yellow, Live Photos is enabled.
19.3. How do I view Live Photos on my iPhone?
To view Live Photos, open the Photos app, go to the Albums tab, scroll down to Media Types, tap Live Photos, select the photo, and press and hold the screen to play the Live Photo.
19.4. Can I edit Live Photos?
Yes, you can edit Live Photos just like regular photos. Open the Live Photo, tap Edit, make your adjustments, and tap Done.
19.5. How do I share Live Photos with friends who don’t have iPhones?
When sharing with non-iPhone users, Live Photos may be sent as still images unless the recipient uses a compatible platform that supports the Live Photo format.
19.6. How much storage space do Live Photos take up?
Live Photos take up more storage space than still photos because they capture motion and sound, so managing your storage is essential.
19.7. Can I turn off Live Photos permanently?
Yes, you can turn off Live Photos permanently by going to Settings > Camera > Preserve Settings and ensuring the switch next to Live Photo is turned on. This preserves the last setting used in the Camera app.
19.8. What are the best effects to use with Live Photos?
The best effects to use with Live Photos are Loop, Bounce, and Long Exposure, each suited for different types of motion and scenes.
19.9. Are there any third-party apps that enhance Live Photos?
Yes, third-party apps like FiLMiC Pro, Spectre Camera, and Halide Camera offer advanced controls and features for enhancing Live Photos.
19.10. Why should I use Live Photos instead of regular photos?
You should use Live Photos to capture fleeting moments, add depth to your memories, and experiment with creative effects that go beyond static images, making your photos more engaging and memorable.
20. Ready to Elevate Your Photography? Visit dfphoto.net Today!
Are you inspired to take your iPhone photography to the next level? Visit dfphoto.net for more tips, tutorials, and inspiration. Explore our comprehensive guides, connect with our community of photography enthusiasts, and stay updated with the latest trends in the industry. Whether you’re a beginner or a seasoned pro, dfphoto.net is your ultimate resource for mastering the art of photography. Start your journey today and discover the endless possibilities of visual storytelling.
Remember to hold your device steady, experiment with different angles, and explore the editing options to truly master the art of iPhone Live Photos. At dfphoto.net, we’re here to guide you every step of the way.