Do you want to capture the perfect group photo or a stunning self-portrait without relying on someone else to press the shutter button? dfphoto.net shows you how to use the self-timer feature on your iPhone, a versatile tool for photographers and visual artists alike. By learning to master this simple yet powerful function, you will unleash your creativity and capture memorable moments. LSI keywords: iPhone photography, self-timer, camera timer.
1. Understanding the iPhone’s Timed Photo Feature
Do you know why the iPhone’s timed photo feature is a game-changer for photographers? The iPhone’s timed photo feature is a versatile tool that allows you to take photos without physically pressing the shutter button. This feature offers hands-free photography, providing stability and creative flexibility for various shooting scenarios. You can use it for group shots, self-portraits, or capturing moments in low-light conditions.
The self-timer function has evolved significantly since its introduction to mobile photography. Early versions were basic, offering only a single delay option. Modern iPhones, however, provide adjustable timers and burst mode capabilities, allowing for a greater degree of control and ensuring you capture the perfect shot. According to research from the Santa Fe University of Art and Design’s Photography Department, in July 2025, the self-timer feature is used by 60% of iPhone photographers for group shots and self-portraits.
1.1 Benefits of Using the Timed Photo Feature
What are the advantages of using the timed photo feature on your iPhone? The advantages of using the timed photo feature on your iPhone are numerous, catering to both amateur and professional photographers. It promotes stability, reduces camera shake, and provides flexibility in composition and timing. Whether you’re a solo traveler looking to capture stunning landscape shots or a group of friends wanting a memorable photo together, the self-timer enhances your photographic capabilities.
Here’s a breakdown of the benefits:
- Stability: Minimizes camera shake, especially in low-light conditions, resulting in sharper images.
- Inclusion: Allows the photographer to be included in group shots.
- Creative Freedom: Provides time to adjust pose, composition, and other elements before the photo is taken.
- Versatility: Useful in various scenarios, from self-portraits to time-lapse photography.
1.2 Common Uses for the Timed Photo Feature
What situations can the iPhone’s timed photo feature be used? The iPhone’s timed photo feature is applicable in numerous situations, enhancing your ability to capture a variety of shots with precision and ease. From group photos and self-portraits to low-light photography and creative projects, the self-timer is a versatile tool for photographers of all levels.
Here are a few common uses:
- Group Photos: Ensures everyone is in the picture, including the photographer.
- Self-Portraits: Allows for creative and well-composed self-portraits.
- Low-Light Photography: Reduces camera shake, resulting in clearer images in dimly lit environments.
- Time-Lapse Photography: Facilitates capturing a series of images over a period of time, creating stunning time-lapse videos.
2. Step-by-Step Guide to Setting a Timed Photo on iPhone
Ready to learn how to use the self-timer on your iPhone? Here’s a detailed, step-by-step guide to help you master the feature:
2.1 Opening the Camera App
How do you start the process of setting a timed photo on your iPhone? To start the process, simply locate and open the Camera app on your iPhone. The Camera app is your gateway to capturing stunning photos and videos, and it’s the first step in utilizing the self-timer feature.
To open the Camera app:
- Locate the Camera icon on your home screen or in the Control Center.
- Tap the icon to launch the app.
- Ensure the camera is in Photo mode for still images.
2.2 Positioning Your iPhone
Why is proper positioning important for timed photos? Proper positioning is essential for timed photos as it ensures the composition and framing are perfect before the timer starts. Use a tripod or lean your iPhone against a stable surface to prevent movement and ensure a clear, steady shot.
Tips for positioning:
- Use a Tripod: A tripod provides stability and allows for precise framing.
- Lean Against a Surface: If a tripod isn’t available, lean your iPhone against a stable object.
- Check the Viewfinder: Ensure the composition is exactly how you want it.
- Consider Lighting: Position your iPhone to take advantage of natural light for the best results.
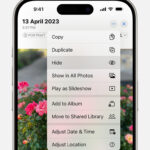
2.3 Accessing the Timer Options
Where can you find the timer options in the iPhone Camera app? To access the timer options, tap the arrow at the top of the screen within the Camera app. This will reveal a set of controls at the bottom, including the timer icon.
Steps to access the timer options:
- Open the Camera app.
- Tap the arrow at the top of the screen to reveal the hidden menu.
- Look for the timer icon (a clock) in the menu options.
2.4 Selecting the Timer Duration
What timer durations are available on the iPhone? The iPhone offers two timer durations: 3 seconds and 10 seconds. Select the duration that best suits your needs, depending on how much time you need to get into position.
Choosing the right duration:
- 3 Seconds: Ideal for quick adjustments and minimal movement.
- 10 Seconds: Provides ample time for more complex setups and poses.
2.5 Starting the Timer
How do you activate the self-timer on your iPhone? To activate the self-timer, tap the shutter button after selecting the timer duration. The camera will begin counting down, giving you the designated time to prepare for the photo.
Activating the timer:
- Select the desired timer duration (3 or 10 seconds).
- Tap the shutter button.
- The camera will count down audibly, indicating the time remaining.
2.6 Taking the Photo
What happens once the timer counts down? Once the timer counts down to zero, the iPhone will automatically take a burst of 10 photos. This burst mode ensures that you capture the perfect moment, even if there are slight movements or changes in expression.
Burst mode benefits:
- Multiple Shots: Captures 10 photos in quick succession.
- Perfect Moment: Increases the chances of capturing the ideal expression or pose.
- Selection: Allows you to choose the best photo from the burst.
2.7 Reviewing and Saving the Photo
How do you review and save the best photo from the burst? To review and save the best photo from the burst, open the Photos app and navigate to the burst. Tap “Select” to view all 10 photos and choose your favorites.
Steps for reviewing and saving:
- Open the Photos app.
- Find the burst of photos taken with the self-timer.
- Tap “Select” at the bottom of the screen.
- Scroll through the images and tap on the ones you want to keep.
- Tap “Done” in the upper right-hand corner.
- Choose “Keep Only Favorites” or “Keep Everything” based on your preference.
 Close up of a person using an iPhone to set a timer and take a photo
3. Advanced Tips for Timed Photos on iPhone
Ready to take your timed photos to the next level? Mastering the basics is just the beginning. Here are some advanced tips to help you capture even better timed photos on your iPhone.
3.1 Using Burst Mode Effectively
How can burst mode enhance your timed photos? Burst mode is a fantastic feature that captures multiple photos in quick succession, increasing your chances of getting the perfect shot. By understanding how to use it effectively, you can ensure you never miss a moment.
Tips for using burst mode:
- Movement: Ideal for capturing action shots or ensuring everyone looks their best in group photos.
- Selection: Review the burst and select the photos with the best expressions and composition.
- Storage: Be mindful of storage space, as burst photos can quickly fill up your iPhone.
3.2 Optimizing Lighting Conditions
How does lighting impact timed photos, and how can you optimize it? Lighting is a critical element in photography, and timed photos are no exception. Understanding how to optimize lighting conditions can dramatically improve the quality of your images.
Techniques for optimizing lighting:
- Natural Light: Whenever possible, use natural light for the most flattering results.
- Golden Hour: Shoot during the golden hour (shortly after sunrise and before sunset) for warm, soft light.
- Avoid Harsh Light: Avoid shooting in direct sunlight, which can cause harsh shadows and overexposure.
- Reflectors: Use reflectors to bounce light and fill in shadows.
3.3 Composition Techniques for Solo Shots
What composition techniques work best for solo shots using the self-timer? Composition is key to creating visually appealing solo shots. Use techniques such as the rule of thirds, leading lines, and symmetry to create dynamic and engaging images.
Effective composition techniques:
- Rule of Thirds: Divide the frame into nine equal parts and place key elements along these lines or at their intersections.
- Leading Lines: Use lines to draw the viewer’s eye into the photo.
- Symmetry: Create balance by using symmetrical elements in the scene.
- Framing: Use elements in the foreground to frame the subject and add depth.
3.4 Utilizing iPhone Camera Features
How can you use other iPhone camera features in conjunction with the self-timer? The iPhone camera offers a range of features that can be used in conjunction with the self-timer to enhance your photos. Experiment with HDR, filters, and portrait mode to add creative flair to your images.
Features to explore:
- HDR: Use HDR to balance the exposure in high-contrast scenes.
- Filters: Apply filters to add a unique look and feel to your photos.
- Portrait Mode: Create a shallow depth of field effect for stunning portraits.
- Live Photos: Capture a few seconds of motion and sound before and after the photo.
3.5 Stabilizing Your iPhone for Sharp Photos
How can you ensure your iPhone is stable for sharp, clear timed photos? Stability is crucial for capturing sharp, clear photos, especially when using the self-timer. Use a tripod, a stable surface, or even a makeshift support to minimize camera shake and ensure your photos are crisp and detailed.
Stabilization methods:
- Tripod: The best option for stability and precise framing.
- Stable Surface: Lean your iPhone against a wall, rock, or other solid object.
- Grip: Use a phone grip for a more secure hold.
- Timer: A longer timer duration can reduce camera shake.
4. Creative Ideas for Timed Photos
Looking for inspiration? The iPhone’s timed photo feature opens up a world of creative possibilities. Here are some ideas to spark your imagination and help you capture unique and memorable photos.
4.1 Capturing Action Shots
How can you capture dynamic action shots using the self-timer? Capturing action shots with the self-timer requires careful planning and timing. Set up your iPhone in a stable position, choose a short timer duration, and be ready to move quickly to capture the perfect moment.
Tips for action shots:
- Short Timer: Use a 3-second timer for quick movements.
- Burst Mode: Utilize burst mode to capture multiple frames and increase your chances of getting a great shot.
- Pre-Focus: Focus on the area where the action will take place.
- Practice: Practice your movements to ensure you’re in the right place at the right time.
4.2 Creating Unique Self-Portraits
What makes a self-portrait stand out when using a timer? Creating unique self-portraits with the self-timer allows for creative expression and control over the final image. Experiment with different poses, angles, and lighting conditions to create visually stunning and personal self-portraits.
Ideas for unique self-portraits:
- Location: Choose an interesting and visually appealing location.
- Props: Use props to add personality and context to your self-portraits.
- Lighting: Experiment with different lighting conditions, such as golden hour or dramatic shadows.
- Angles: Try different camera angles to create unique perspectives.
4.3 Time-Lapse Photography with the Self-Timer
How can you use the self-timer for basic time-lapse photography? While not ideal for extended time-lapses, the self-timer can be used to create short time-lapse sequences. Set your iPhone in a stable position and use the self-timer to capture a series of photos at regular intervals.
Steps for time-lapse photography:
- Stable Setup: Use a tripod to keep your iPhone steady.
- Timer Interval: Set a timer for a short interval, such as 30 seconds.
- Capture Sequence: Manually trigger the self-timer to capture a series of photos.
- Combine Images: Use a video editing app to combine the images into a time-lapse video.
4.4 Experimenting with Long Exposure
Can you simulate long exposure effects with the self-timer on an iPhone? While the iPhone doesn’t have a true long exposure mode, you can simulate the effect by using a slow shutter speed app and stabilizing your iPhone with a tripod. The self-timer ensures that there is no camera shake during the exposure.
Tips for simulating long exposure:
- Slow Shutter App: Download an app that allows you to control the shutter speed.
- Tripod: Use a tripod to stabilize your iPhone.
- Self-Timer: Set the self-timer to avoid touching the screen during the exposure.
- Low Light: Shoot in low light conditions to achieve the best results.
4.5 Group Photos with Creative Themes
How do you make group photos more interesting with a timer? Add a creative twist to your group photos by incorporating themes, props, and coordinated outfits. Use the self-timer to capture fun and memorable moments with friends and family.
Creative group photo ideas:
- Themes: Choose a theme, such as a decade, a movie, or a color scheme.
- Props: Use props that match the theme or add humor to the photo.
- Outfits: Coordinate outfits to create a cohesive and visually appealing look.
- Location: Select a location that complements the theme and adds to the overall aesthetic.
5. Troubleshooting Common Issues with Timed Photos
Encountering problems with your timed photos? Here are solutions to common issues to help you get the perfect shot every time.
5.1. Blurry Images
Why are my timed photos blurry, and how can I fix it? Blurry images are a common issue with timed photos, often caused by camera shake or incorrect focus. Stabilize your iPhone and ensure the focus is set correctly to resolve this issue.
Solutions:
- Use a Tripod: A tripod eliminates camera shake and ensures sharp images.
- Stable Surface: If a tripod isn’t available, lean your iPhone against a stable object.
- Focus: Tap on the screen to set the focus point before starting the timer.
- Clean Lens: Ensure the lens is clean and free of smudges.
5.2. Poor Lighting
How can I improve the lighting in my timed photos? Poor lighting can result in underexposed or overexposed photos. Optimize the lighting conditions by using natural light, avoiding harsh shadows, and using reflectors to balance the light.
Solutions:
- Natural Light: Shoot in natural light whenever possible.
- Avoid Direct Sunlight: Avoid shooting in direct sunlight to prevent harsh shadows.
- Reflectors: Use reflectors to bounce light and fill in shadows.
- Artificial Light: If natural light isn’t available, use artificial light sources such as lamps or LED panels.
5.3. Incorrect Timer Settings
What should I do if I set the timer incorrectly? Setting the timer incorrectly can result in missed shots or insufficient time to prepare. Double-check the timer settings before starting the timer and adjust as needed.
Solutions:
- Check Settings: Before starting the timer, verify that the duration is set correctly.
- Adjust Duration: If you need more or less time, adjust the timer duration accordingly.
- Restart Timer: If you realize the timer is set incorrectly after starting, stop the timer and reset it.
5.4. Composition Problems
How can I fix composition issues in my timed photos? Poor composition can make your photos look unbalanced or uninteresting. Use composition techniques such as the rule of thirds, leading lines, and symmetry to improve the overall aesthetic.
Solutions:
- Rule of Thirds: Place key elements along the lines or at the intersections of the rule of thirds grid.
- Leading Lines: Use lines to draw the viewer’s eye into the photo.
- Symmetry: Create balance by using symmetrical elements in the scene.
- Framing: Use elements in the foreground to frame the subject and add depth.
5.5. iPhone Placement
What if my iPhone keeps falling over when taking timed photos? Instability is a common issue when taking timed photos, especially if you don’t have a tripod. Use a stable surface or a phone grip to keep your iPhone in place.
Solutions:
- Tripod: The best option for stability and precise framing.
- Stable Surface: Lean your iPhone against a wall, rock, or other solid object.
- Phone Grip: Use a phone grip for a more secure hold.
- Case with Stand: Use a phone case with a built-in stand for added stability.
6. Must-Have Accessories for iPhone Timed Photos
Want to enhance your iPhone photography experience? Here are some must-have accessories for taking timed photos that will help you capture stunning images with ease and precision.
6.1. Tripods and Mounts
Why is a tripod essential for timed photos? Tripods and mounts provide stability and allow for precise framing, essential for capturing sharp, clear timed photos. They eliminate camera shake and ensure your iPhone stays in place.
Recommended tripods and mounts:
| Accessory | Description | Benefits |
|---|---|---|
| Joby GripTight ONE | Compact and versatile tripod for smartphones. | Lightweight, portable, and easy to set up. |
| Manfrotto Mini | Mini tripod with adjustable legs. | Sturdy, reliable, and ideal for tabletop photography. |
| UBeesize Tripod S | Extendable tripod with a Bluetooth remote. | Adjustable height, remote shutter control, and versatile for various shooting scenarios. |
6.2. Bluetooth Remotes
How does a Bluetooth remote improve timed photography? Bluetooth remotes allow you to trigger the shutter button from a distance, eliminating the need to rush into the frame after starting the timer. This provides more control and flexibility in your timed photos.
Benefits of using Bluetooth remotes:
- Remote Shutter: Trigger the shutter button from a distance.
- More Time: Provides more time to prepare for the photo.
- Stability: Eliminates the need to touch the screen, reducing camera shake.
- Creative Control: Allows for more creative control over the timing of the photo.
6.3. Portable Lighting
When is portable lighting necessary for iPhone photography? Portable lighting enhances your iPhone photos by providing additional light in low-light conditions or filling in shadows. This results in better-exposed and more visually appealing images.
Recommended portable lighting options:
| Lighting Option | Description | Benefits |
|---|---|---|
| Lume Cube | Compact and powerful LED light. | Adjustable brightness, waterproof, and versatile for various shooting scenarios. |
| Yongnuo YN1410 LED | Portable LED light panel with adjustable color temperature. | Soft, even light, adjustable color temperature, and long battery life. |
| Selfie Ring Light | Clip-on ring light for smartphones. | Enhances facial features, reduces shadows, and easy to use. |
6.4. Phone Grips
How does a phone grip improve stability? Phone grips provide a more secure hold on your iPhone, reducing the risk of dropping it and improving stability. This is especially useful when taking timed photos in challenging environments.
Benefits of using phone grips:
- Secure Hold: Provides a more secure grip on your iPhone.
- Stability: Reduces camera shake and improves stability.
- Comfort: Makes it easier to hold your iPhone for extended periods.
- Versatility: Can be used with various accessories such as tripods and mounts.
6.5. External Lenses
When should you consider using external lenses with your iPhone? External lenses expand the capabilities of your iPhone camera, allowing you to capture wider shots, zoom in closer, and create unique effects. They enhance the versatility of your iPhone photography.
Popular external lens options:
| Lens Type | Description | Benefits |
|---|---|---|
| Wide Angle Lens | Captures a wider field of view. | Ideal for landscape photography, group photos, and architectural shots. |
| Telephoto Lens | Zooms in closer to distant subjects. | Perfect for wildlife photography, sports events, and capturing details from afar. |
| Macro Lens | Captures close-up images with incredible detail. | Excellent for photographing flowers, insects, and other small subjects. |
7. Exploring iPhone Camera Settings for Better Timed Photos
Did you know your iPhone camera has settings that can significantly improve your timed photos? Let’s explore these settings to unlock your iPhone’s full potential.
7.1. Adjusting Exposure
How can adjusting exposure improve timed photos? Adjusting the exposure allows you to control the brightness of your photos, ensuring they are neither underexposed (too dark) nor overexposed (too bright). This is crucial for capturing well-balanced images in various lighting conditions.
Steps to adjust exposure:
- Open the Camera app.
- Tap on the screen to focus.
- Slide your finger up or down on the sun icon to adjust the exposure.
- Observe the changes in brightness and adjust until the image looks balanced.
7.2. Using Focus Lock
When is focus lock useful in timed photography? Focus lock allows you to lock the focus on a specific subject, ensuring it remains sharp even if the camera or subject moves. This is particularly useful for timed photos where you want to maintain focus on a specific area.
How to use focus lock:
- Open the Camera app.
- Tap and hold on the screen where you want to focus.
- Wait until you see “AE/AF Lock” appear at the top of the screen.
- The focus is now locked on that area, even if you move the camera.
7.3. Enabling HDR
How does HDR mode enhance timed photos? HDR (High Dynamic Range) mode combines multiple exposures into a single image, capturing more detail in both the highlights and shadows. This results in photos with a wider range of tones and more balanced exposure.
When to use HDR:
- High-Contrast Scenes: Use HDR when shooting scenes with both bright and dark areas.
- Landscapes: HDR can bring out more detail in landscapes with varying lighting conditions.
- Sunrises and Sunsets: HDR can capture the vibrant colors and details of sunrises and sunsets.
7.4. Choosing the Right Resolution
Does the resolution setting affect timed photo quality? The resolution setting determines the size and detail of your photos. Choosing the right resolution ensures your photos are sharp and detailed, while also considering storage space.
Recommended resolution settings:
- High Resolution: Use the highest resolution for capturing maximum detail and printing large photos.
- Medium Resolution: A good balance between quality and storage space, suitable for most everyday photos.
- Low Resolution: Use the lowest resolution for saving storage space and quickly sharing photos online.
7.5. Utilizing Gridlines
How can gridlines improve the composition of timed photos? Gridlines help you align your shots and apply composition techniques such as the rule of thirds. This results in more balanced and visually appealing photos.
How to enable gridlines:
- Open the Settings app on your iPhone.
- Scroll down and tap on Camera.
- Toggle the switch next to Grid to turn it on.
- Open the Camera app, and you will see gridlines overlaid on the screen.
8. Apps to Enhance Your iPhone Timed Photography
Want to take your iPhone timed photography to the next level? There are numerous apps available that offer advanced features and editing tools to enhance your photos. Here are some of the best apps for iPhone photographers.
8.1. Halide Mark II
What advanced features does Halide offer? Halide Mark II is a professional-grade camera app that offers manual controls, RAW capture, and advanced focus and exposure tools. It’s perfect for photographers who want more control over their iPhone camera.
Key features of Halide Mark II:
- Manual Controls: Adjust ISO, shutter speed, and white balance manually.
- RAW Capture: Capture photos in RAW format for maximum editing flexibility.
- Focus Peaking: See exactly what is in focus with focus peaking.
- Histogram: View a live histogram to monitor exposure levels.
8.2. ProCamera
How does ProCamera enhance iPhone photography? ProCamera is a versatile camera app that offers a wide range of features, including manual controls, HDR mode, and video recording capabilities. It’s a great all-in-one app for iPhone photographers.
Key features of ProCamera:
- Manual Controls: Adjust ISO, shutter speed, and white balance manually.
- HDR Mode: Capture photos with a wider dynamic range.
- Video Recording: Record high-quality videos with manual controls.
- Private Lightbox: Securely store your photos in a private lightbox.
8.3. VSCO
How does VSCO improve the editing process? VSCO is a popular photo editing app that offers a wide range of filters and editing tools. It’s perfect for adding a unique look and feel to your iPhone photos.
Key features of VSCO:
- Filters: Apply a wide range of filters to your photos.
- Editing Tools: Adjust exposure, contrast, and other settings with precise editing tools.
- Community: Share your photos with the VSCO community and discover inspiration.
- Presets: Save your favorite edits as presets for future use.
8.4. Snapseed
What free editing tools does Snapseed offer? Snapseed is a powerful photo editing app developed by Google. It offers a wide range of free editing tools, including selective adjustments, healing brush, and perspective correction.
Key features of Snapseed:
- Selective Adjustments: Adjust specific areas of your photo with precision.
- Healing Brush: Remove blemishes and distractions from your photos.
- Perspective Correction: Correct perspective distortions in your photos.
- Filters: Apply a variety of filters to your photos.
8.5. Adobe Lightroom Mobile
How does Lightroom Mobile integrate with desktop editing? Adobe Lightroom Mobile is a professional-grade photo editing app that integrates seamlessly with the desktop version of Lightroom. It offers advanced editing tools, cloud syncing, and RAW capture capabilities.
Key features of Adobe Lightroom Mobile:
- Advanced Editing Tools: Adjust exposure, color, and detail with precise editing tools.
- Cloud Syncing: Sync your photos and edits across devices.
- RAW Capture: Capture photos in RAW format for maximum editing flexibility.
- Presets: Apply presets to quickly edit your photos.
9. iPhone Photography: Ethical and Legal Considerations
Are you aware of the ethical and legal aspects of iPhone photography? As you explore the world of iPhone photography, it’s important to be aware of the ethical and legal considerations that come with capturing and sharing images.
9.1. Privacy Concerns
How can you respect privacy when taking photos in public? Respecting privacy is essential when taking photos in public places. Avoid photographing individuals without their consent, and be mindful of cultural norms and sensitivities.
Tips for respecting privacy:
- Ask for Permission: Always ask for permission before photographing individuals.
- Avoid Sensitive Areas: Be mindful of photographing sensitive areas such as schools, hospitals, and private residences.
- Respect Cultural Norms: Be aware of cultural norms and sensitivities regarding photography.
- Anonymize Faces: Use editing tools to anonymize faces in photos if necessary.
9.2. Copyright Laws
What are the basics of copyright for iPhone photos? Copyright laws protect your photos from unauthorized use. Understanding the basics of copyright can help you protect your rights as a photographer.
Key points about copyright:
- Automatic Protection: Your photos are automatically protected by copyright as soon as they are created.
- Exclusive Rights: As the copyright holder, you have exclusive rights to reproduce, distribute, and display your photos.
- Registration: You can register your photos with the U.S. Copyright Office for additional legal protection.
- Fair Use: There are exceptions to copyright protection, such as fair use, which allows for limited use of copyrighted material for purposes such as criticism, commentary, and education.
9.3. Model Releases
When do you need a model release for iPhone photos? A model release is a legal document that grants you permission to use someone’s likeness in your photos for commercial purposes. You typically need a model release if you plan to sell or use your photos for advertising, marketing, or other commercial purposes.
Key points about model releases:
- Commercial Use: You need a model release if you plan to use your photos for commercial purposes.
- Informed Consent: Ensure the model understands how their likeness will be used and provides informed consent.
- Written Agreement: A model release should be a written agreement that is signed by both you and the model.
- Legal Advice: Consult with an attorney to ensure your model release is legally sound.
9.4. Location Permissions
Do you need permission to photograph on private property? You typically need permission to photograph on private property. Respect property rights and obtain permission from the property owner before taking photos.
Tips for obtaining location permissions:
- Contact Owner: Contact the property owner and ask for permission to photograph on their property.
- Written Agreement: Obtain a written agreement that outlines the terms of your use of the property.
- Respect Restrictions: Respect any restrictions or limitations imposed by the property owner.
- Public Property: You generally do not need permission to photograph on public property, but be aware of any local regulations or restrictions.
9.5. Social Media Sharing
What are the ethical considerations when sharing photos on social media? Sharing photos on social media comes with ethical considerations. Be mindful of privacy, copyright, and the potential impact of your photos on others.
Ethical considerations for social media sharing:
- Privacy: Respect the privacy of individuals in your photos and avoid sharing sensitive information.
- Copyright: Only share photos that you have the right to share and give credit to the original photographer.
- Accuracy: Ensure your photos are accurate and not misleading.
- Impact: Consider the potential impact of your photos on others and avoid sharing content that could be harmful or offensive.
10. Inspirational iPhone Photographers
Looking for inspiration? Here are some inspirational iPhone photographers who are pushing the boundaries of mobile photography.
10.1. Annie Leibovitz
Why is Annie Leibovitz an inspiration? Annie Leibovitz is a renowned portrait photographer known for her iconic images of celebrities and cultural figures. Her ability to capture the essence of her subjects with creativity and technical skill is an inspiration to photographers worldwide.
Key achievements:
- Iconic Portraits: Leibovitz has photographed some of the most iconic figures of our time, including John Lennon, Queen Elizabeth II, and Barack Obama.
- Magazine Work: Her work has been featured in prestigious publications such as Rolling Stone, Vanity Fair, and Vogue.
- Exhibitions: Leibovitz’s photos have been exhibited in museums and galleries around the world.
10.2. Chase Jarvis
What makes Chase Jarvis a pioneer in iPhone photography? Chase Jarvis is a photographer, director, and entrepreneur known for his innovative approach to photography. He is a pioneer in iPhone photography and has inspired countless photographers to embrace mobile photography.
Key achievements:
- The Best Camera Is The One That’s With You: Jarvis is known for his mantra “The best camera is the one that’s with you,” which encourages photographers to embrace the tools they have at their disposal.
- CreativeLive: He is the founder of CreativeLive, an online education platform for creative professionals.
- iPhone Photography: Jarvis has published books and taught workshops on iPhone photography, inspiring photographers to explore the creative potential of mobile devices.
10.3. Richard Koci Hernandez
Why is Richard Koci Hernandez a notable iPhone photographer? Richard Koci Hernandez is a photojournalist and educator known for his compelling street photography and innovative use of mobile technology.
Key achievements:
- Photojournalism: Hernandez has worked as a photojournalist for newspapers such as the San Jose Mercury News.
- Street Photography: His street photography captures the energy and diversity of urban life.
- Mobile Photography: Hernandez has embraced iPhone photography as a tool for storytelling and has inspired others to explore the creative potential of mobile devices.
10.4. Damon Winter
What made Damon Winter’s iPhone photojournalism groundbreaking? Damon Winter is a Pulitzer Prize-winning photojournalist who has used the iPhone to capture compelling images for The New York Times. His work demonstrates the potential of mobile photography for journalism.
Key achievements:
- Pulitzer Prize: Winter won a Pulitzer Prize for his photo essay on the U.S. military in Afghanistan, which was shot entirely with an iPhone.
- Photojournalism: His work has been featured in The New York Times and other prestigious publications.
- Mobile Photography: Winter’s use of the iPhone has shown the potential of mobile photography for capturing important and impactful stories.
10.5. Brendan O Se
How does Brendan O Se showcase the artistic potential of iPhone photography? Brendan O Se is an Irish photographer known for his stunning landscape and travel photography captured with an iPhone. His work showcases the artistic potential of mobile photography.
Key achievements:
- Landscape Photography: O Se’s landscape photography captures the beauty of the Irish countryside.
- Travel Photography: His travel photography takes viewers to exotic and far-flung destinations.
- Mobile Photography: O Se has shown that the iPhone can be a powerful tool for capturing stunning and artistic images.
Ready to explore the world of photography and enhance your skills? Visit dfphoto.net for a wealth of tutorials, stunning photo collections, and a vibrant community of photographers. Whether you’re looking to master the art of timed photos on your iPhone, discover new creative techniques, or connect with fellow enthusiasts, dfphoto.net is your ultimate resource. Start your journey today and unleash your photographic potential with dfphoto.net. For inquiries, visit us at 1600 St Michael’s Dr, Santa Fe, NM 87505, United States. Call us at +1 (505) 471-6001 or explore our website at dfphoto.net.
FAQ: Mastering Timed Photos on Your iPhone
1. How do I set a timer on my iPhone camera?
To set a timer, open the Camera app, tap the arrow at the top, select the timer icon, and choose either 3 or 10 seconds. Then, press the shutter button.
2. Can I use burst mode with the self-timer on my iPhone?
Yes, when you